Tag Archive for: basement waterproofing

Finding Waterproofing Contractors Near Me in the Puget Sound

When you start searching for "waterproofing contractors near me," you're not just looking for a service—you're looking for peace of mind. Here in the Puget Sound, the best defense against water damage for both homes and commercial properties is a good offense. Tackling potential issues before they turn into costly structural failures is always the smartest move for any property owner.

Why Waterproofing is Non-Negotiable in the Puget Sound

A person in a raincoat inspects a newly constructed house with muddy ground and surrounding trees on a rainy day.

Living in the Pacific Northwest means embracing the rain. But for our homes and commercial buildings, that constant moisture is less a charming feature and more of a relentless threat. Our damp climate creates a unique set of challenges that demand a specialized defense system for your property, whether you're a homeowner or a facilities manager.

It all starts with the soil. The persistent rain keeps the ground around your property saturated, creating immense hydrostatic pressure. This force is constantly pushing water against your foundation walls, looking for any way in. It’s the number one reason basements, crawl spaces, and ground-floor commercial units end up wet.

Our Unique Climate Challenges

It’s not just the rain, either. The freeze-thaw cycles we get in the colder months are especially destructive. Water seeps into tiny, invisible cracks in your concrete or masonry, and when it freezes, it expands. Over time, that expansion can turn a minor flaw into a significant structural problem.

This is a serious concern for business owners and property managers, too. A leaky foundation in a commercial space can ruin thousands of dollars in inventory, shut down operations, and create an unsafe environment for employees and customers. Whether you’re managing a new retail build-out or an established office space, water intrusion will steadily chip away at your building's integrity and value.

A proactive waterproofing plan is the most powerful tool you have to prevent foundation damage, toxic mold growth, and expensive structural repairs for any residential or commercial property in our climate.

Why a Local Pro Makes All the Difference

This is exactly why hiring a residential or commercial contractor with deep roots in the Puget Sound is so important. A true local expert brings an irreplaceable understanding of our specific soil compositions, regional building codes, and unique weather patterns. Frankly, that regional knowledge is your best defense against having to do the same repair twice. They know which materials and methods hold up against the constant dampness we face year after year.

A great waterproofing partner won’t just sell you a quick fix. They’ll work with you to create a comprehensive plan that's actually right for your building. This could mean:

  • Applying a high-performance exterior membrane during new commercial construction.
  • Installing an interior drainage system to manage water in an older home's basement.
  • Using specialty sealants on a retail space's porous concrete walls.

Ultimately, investing in professional waterproofing is an investment in your property's future. Of course, if you’re already dealing with the aftermath of a leak, you can learn more about professional water damage cleanup in our detailed guide.

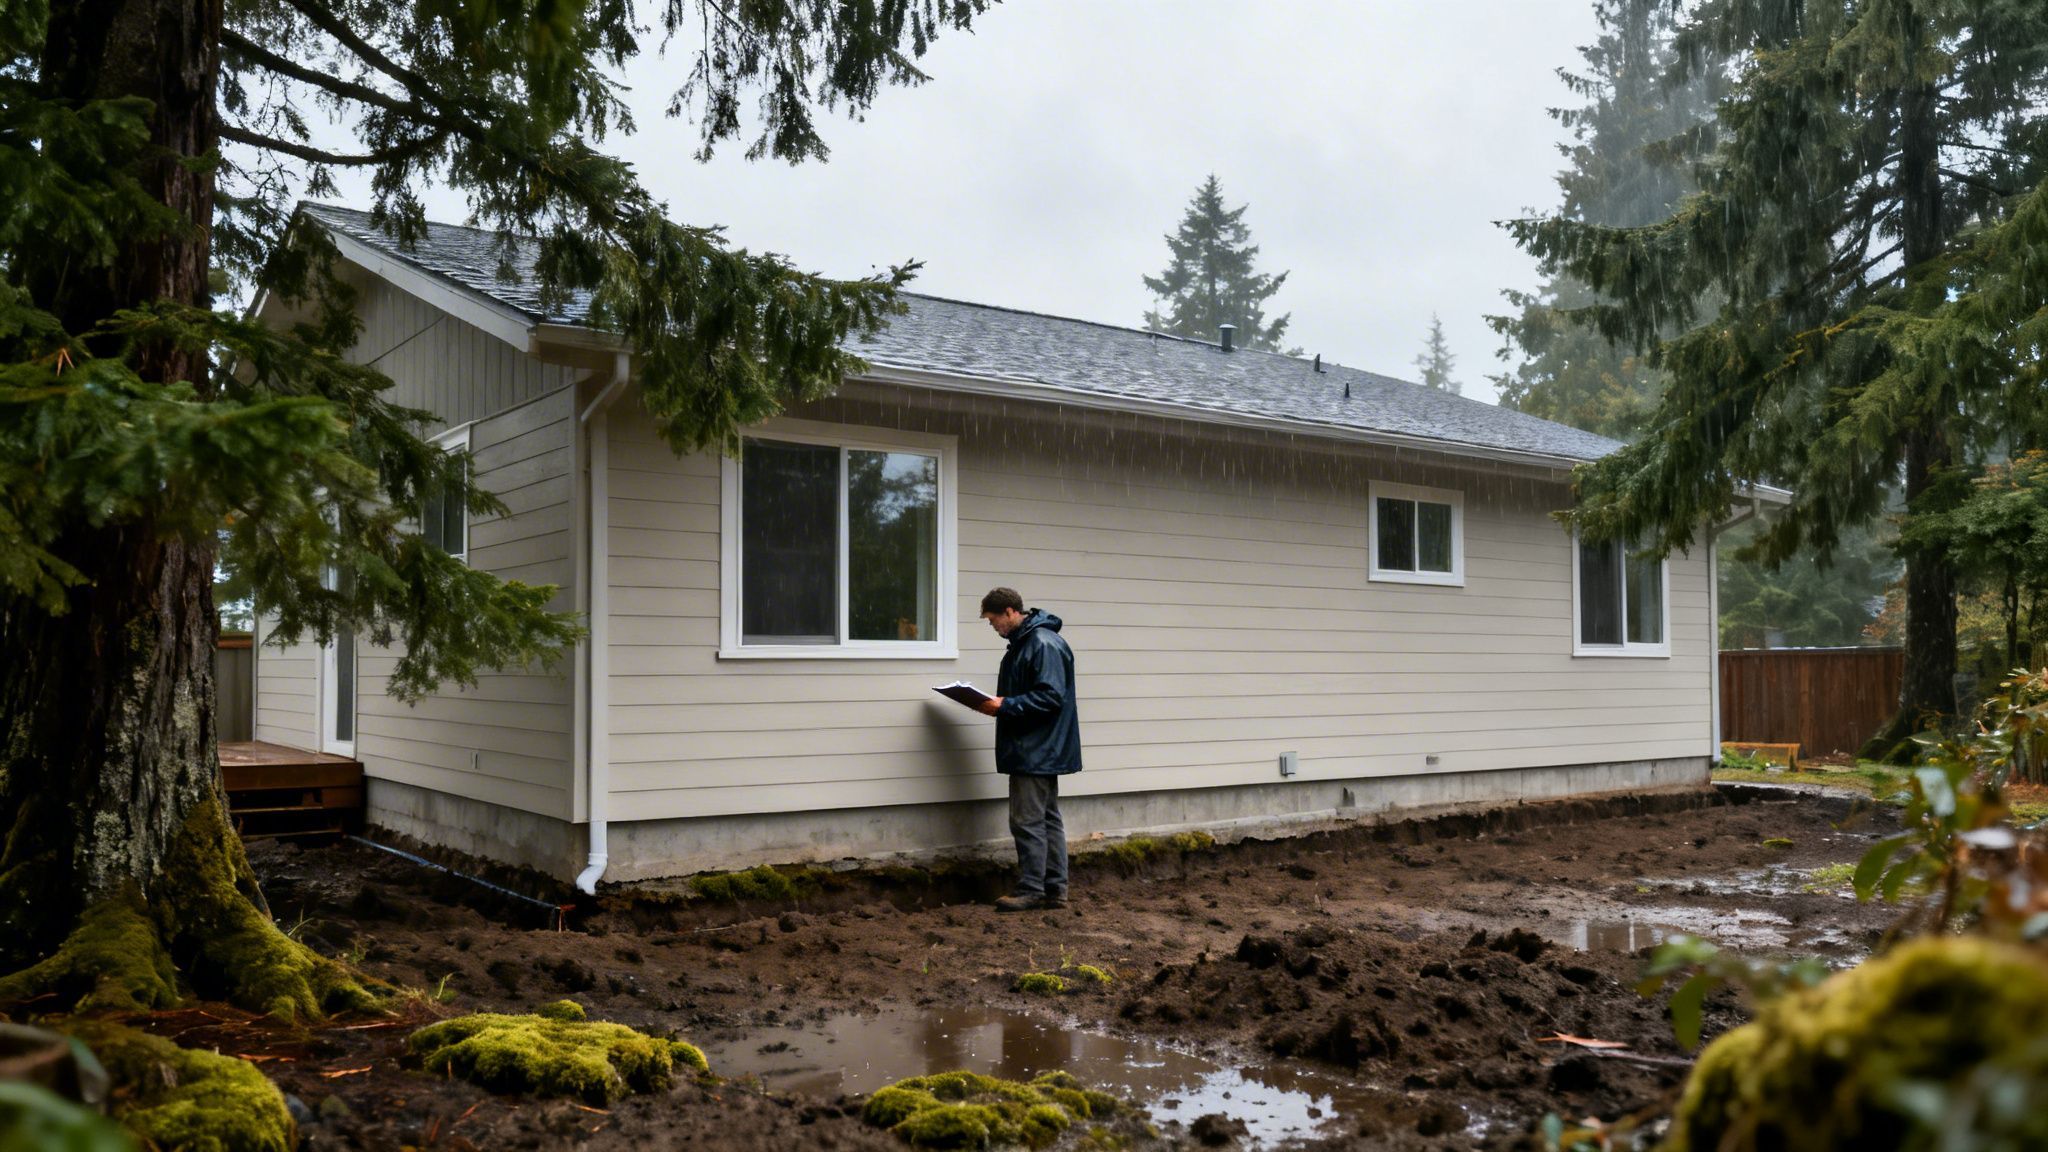
How to Spot the Early Warning Signs of Water Intrusion

A hand points at a concrete basement wall showing efflorescence and a water puddle, indicating water damage.

Water problems rarely start with a flood. Long before you're dealing with a standing puddle in your basement or crawl space, your property will give you subtle hints that something is wrong. The real trick is learning to recognize these clues for what they are—an early warning system that can save you from major headaches down the road.

Don't just rely on your eyes. One of the most telling signs of a moisture problem is a persistent, musty smell. If your basement, ground-floor storage room, or crawl space has that unmistakable damp, earthy odor, it’s a red flag for hidden moisture and potential mold, even if the area looks completely dry.

What to Look For on Walls and Floors

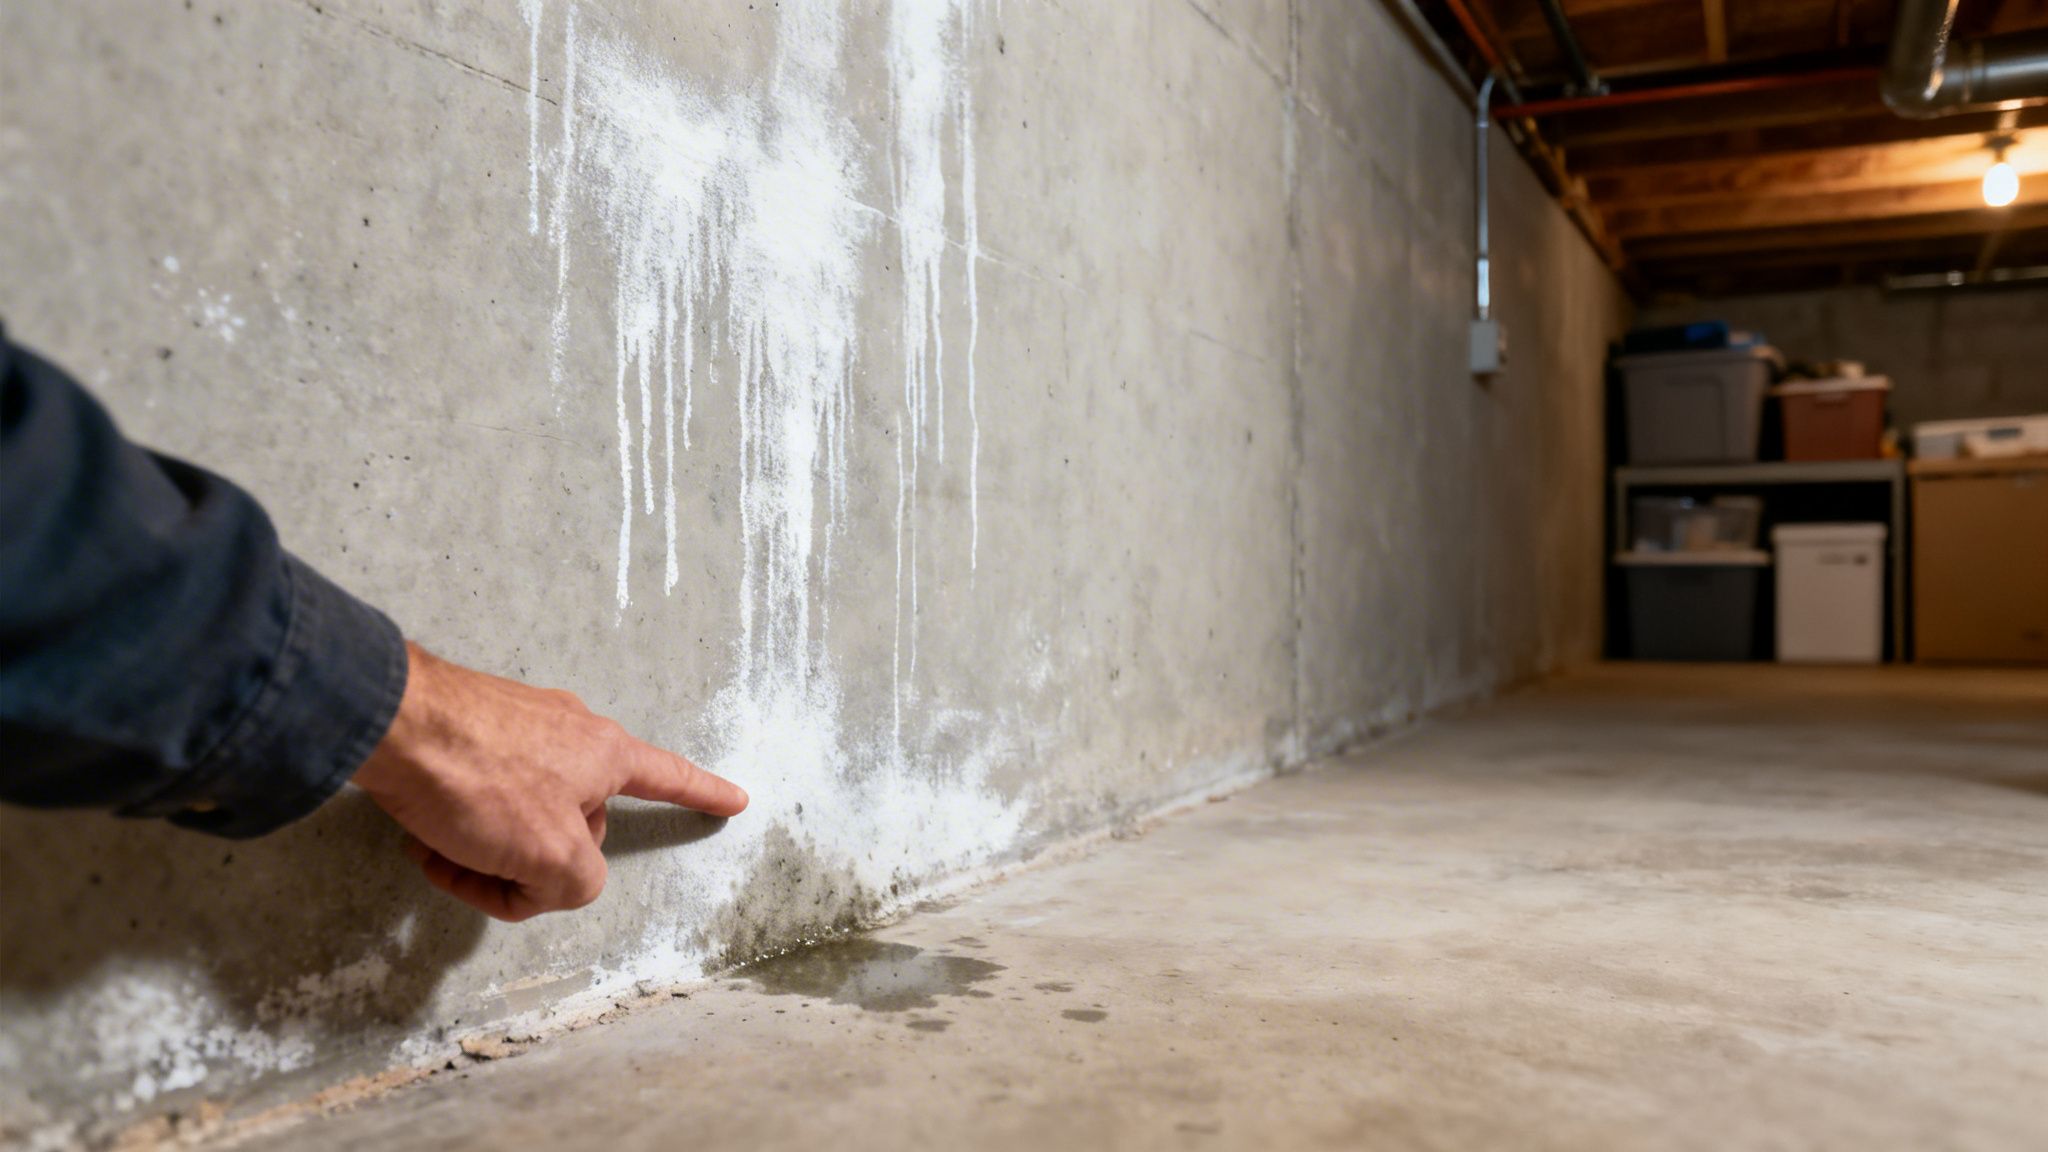
On concrete or masonry surfaces, a common giveaway is efflorescence. This is a powdery, white crystal-like substance that appears on the surface. It’s not harmful on its own, but it’s a clear sign that water is wicking through your foundation and evaporating, leaving these mineral deposits behind.

Also, keep a close eye on your finishes. Is the paint on your walls bubbling, flaking, or peeling? That’s a classic sign that moisture is trapped underneath. Dark, stained patches on drywall or ceiling tiles are another telltale sign of a leak that needs immediate attention, whether you’re managing your own home or a large commercial property.

By the time you notice visible water damage like stains or peeling paint, moisture has already been moving through your building’s structure for a while. Catching these early signs means you can get a professional involved before the underlying issue gets worse and more expensive to fix.

Common Symptoms and What They Mean

Water intrusion can show up in different ways. To help you connect the dots, here's a quick-reference table for a few of the most common symptoms we see on both residential and commercial projects.

Symptom What It Looks Like Potential Problem Area
Efflorescence A chalky, white powder on concrete, brick, or stone walls. Foundation, basement walls, retaining walls.
Peeling/Bubbling Paint Paint that is blistering or flaking off the wall, often near the floor. Interior/exterior walls, basement walls.
Musty Odor A persistent damp, earthy smell in a specific area. Basements, crawl spaces, poorly ventilated rooms.
Wall/Ceiling Stains Discolored, brownish, or dark patches on drywall or ceiling tiles. Leaky pipes, roof leaks, or condensation from HVAC systems.
Warped Wood Wood floors, paneling, or trim that is buckling, cupping, or swelling. Areas with high humidity or near foundation leaks.
Cracks in Foundation Hairline or larger cracks in the concrete foundation, inside or out. Foundation walls, concrete slab floors.

This isn't an exhaustive list, but it covers the main culprits. If you spot any of these, it's a good idea to start investigating.

Real-World Examples

These symptoms often appear in common scenarios that property owners in the Puget Sound area face all the time. Here are a few examples:

  • The Damp Crawl Space: You peek into your crawl space and notice the ground is always damp, even during a dry spell. The wooden support beams feel moist, and there’s a general feeling of humidity. This is a perfect breeding ground for wood rot that can threaten your home's structural integrity.

  • The Cracked Commercial Foundation: While doing a routine walk-around of your retail building, you discover a network of small, hairline cracks along the exterior foundation. Even tiny cracks are an open door for hydrostatic pressure, which can force our relentless Pacific Northwest rain right into your building during facility construction or years later.

  • The Warped Basement Paneling: The old-school wood paneling in your finished basement suddenly looks wavy or buckled near the floor. This is a strong clue that water is seeping in at the cove joint—the critical point where the basement floor meets the foundation wall.

Finding any of these signs doesn't mean you need to panic. It just means it's time to bring in an expert. When you search for "waterproofing contractors near me," having a clear list of what you've observed will help them diagnose the problem accurately and recommend the right solution.

How to Vet and Choose the Right Local Contractor

So, you’ve searched for "waterproofing contractors near me" and now you're staring at a wall of search results. It can feel overwhelming, but figuring out who to trust is easier than you think if you know what to look for.

Your goal isn't just to hire someone to do a job; you're looking for a partner who will protect your property for the long haul. The best ones have a solid local reputation, all the right credentials, and a deep understanding of what our Puget Sound weather throws at us.

First Things First: Check Their Credentials

Before you even think about calling for an estimate, your first move should be a quick background check. Here in Washington State, any residential or commercial contractor worth their salt must be registered, licensed, bonded, and insured. This is non-negotiable.

You can easily verify any contractor’s status on the Washington State Department of Labor & Industries website. It only takes a minute. A valid license shows they meet the state’s standards, and proper insurance protects you from any liability if an accident happens on your property. Skipping this step is a gamble you just don't want to take.

Go Beyond Star Ratings and Read the Reviews

Once you’ve confirmed a few contractors are properly licensed, it's time to see what their actual customers have to say. Head over to review sites like Google and Angi but don’t just glance at the star rating. The real story is always in the comments.

Look for reviews that talk about the actual experience:

  • Did they explain the problem and the solution clearly?
  • Was the crew respectful of the property and did they show up on time?
  • If a problem came up unexpectedly, how did they handle it?

These details give you a real sense of what it's like to work with a company. As you're looking, it can also be helpful to understand the different roles that various types of restoration companies near me can play in projects involving water damage.

A strong portfolio of local work is a direct indicator of a contractor's experience with Puget Sound-specific challenges. Ask to see examples of projects similar to yours, whether it's a residential basement or a large commercial facility.

Why Local Experience Matters So Much

Hiring a contractor who is truly local to the Puget Sound area gives you a massive advantage. They've seen it all—our unique clay soil, the local building codes, and of course, our notoriously wet weather. They understand the physics of hydrostatic pressure in our region and know which waterproofing methods will last and which will fail in a few years.

This kind of specialized expertise is becoming more valuable. In fact, the global waterproofing market was valued at USD 35.83 billion in 2024 and is projected to keep climbing. You can read more about these growing waterproofing market trends to see why property owners everywhere are investing more in protecting their assets.

By focusing on these key areas—credentials, real-world reviews, and proven local experience—you can cut through the noise. This simple vetting process ensures you’re only inviting qualified, trustworthy professionals to bid on your project.

Making Sense of Contractor Bids and Waterproofing Methods

The bids are starting to roll in. Now comes the hard part—figuring out what they actually mean. Getting a few different quotes is always a good idea, but the real skill lies in comparing them effectively.

Be wary of any contractor who hands you a vague, one-line estimate. A true professional will give you a detailed, itemized proposal that breaks everything down. This isn't just a bill; it's their plan of attack. You should be able to see the full scope of work, the exact materials they intend to use, a realistic timeline, and a clear payment schedule. Anything less makes an apples-to-apples comparison impossible and leaves you vulnerable to surprise costs.

A flowchart detailing a contractor vetting decision tree with steps from start to offer or rejection.

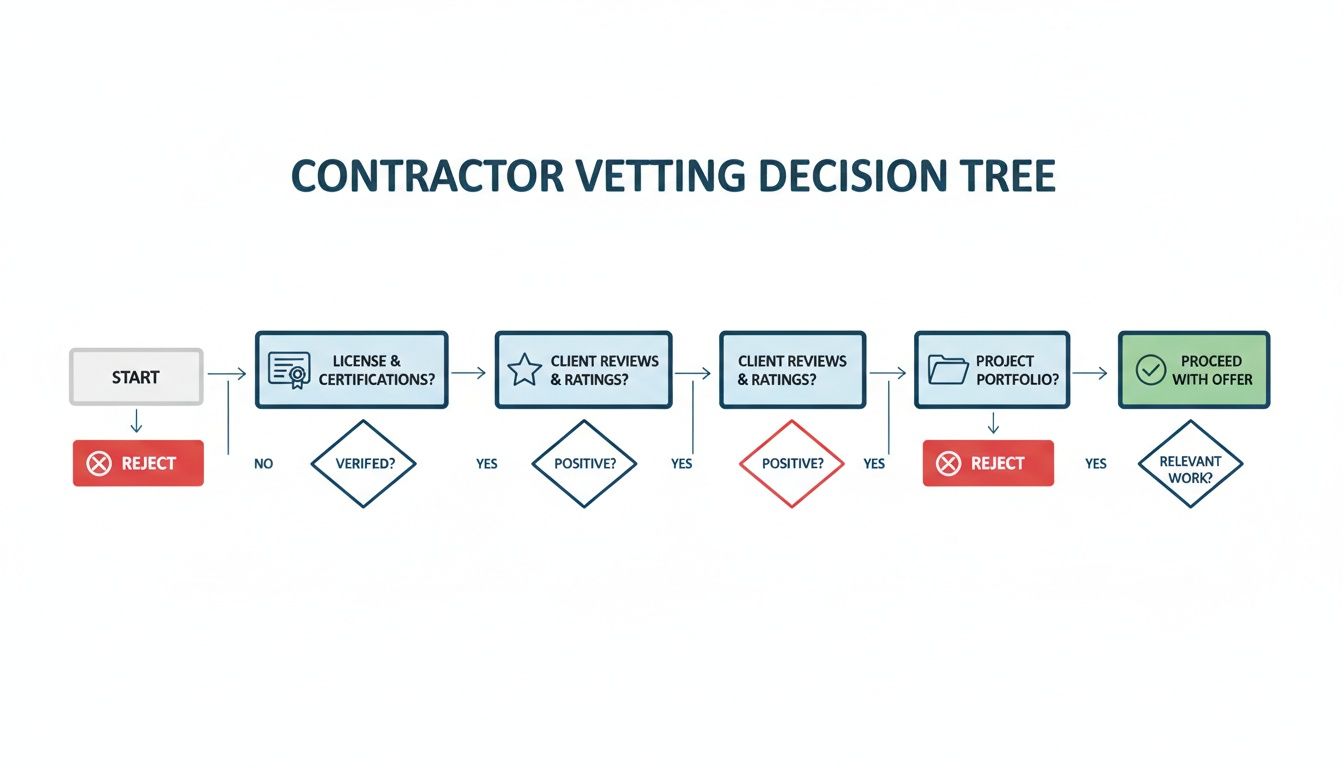
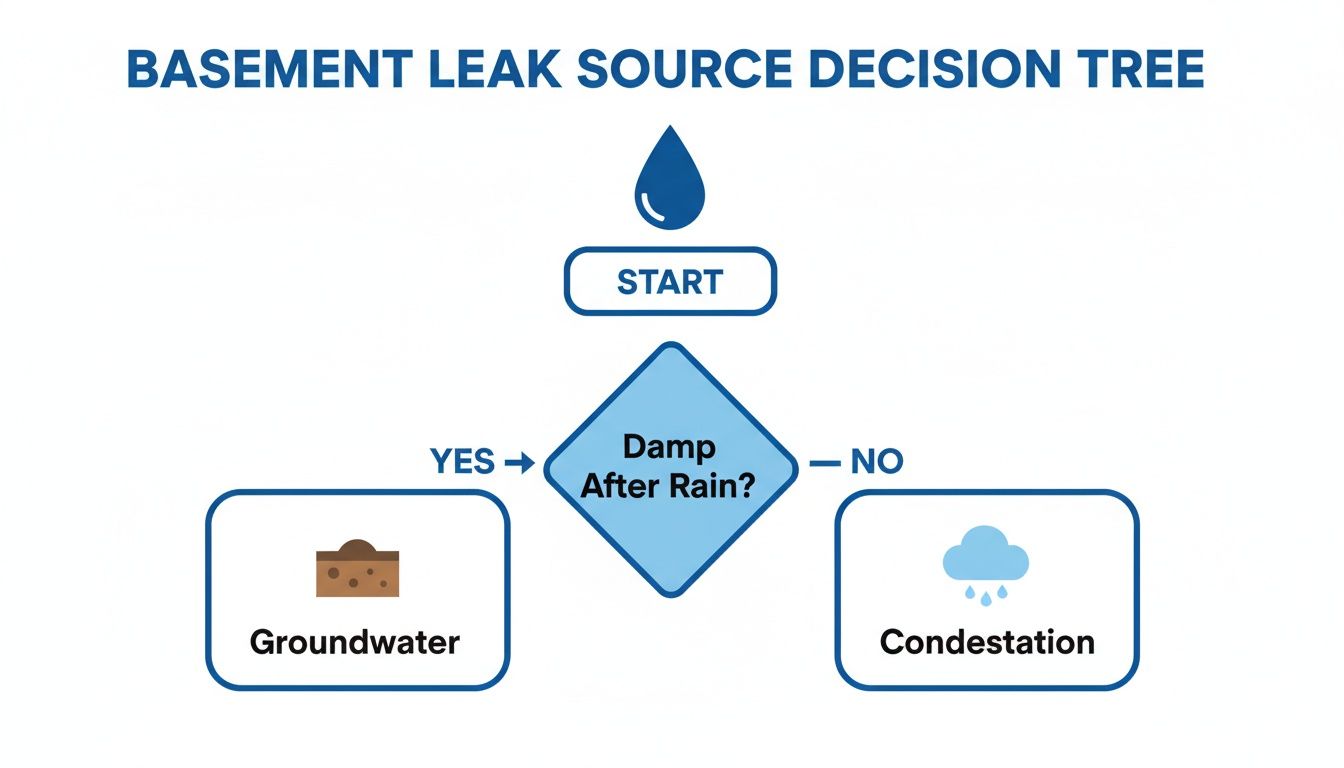
This flowchart visualizes the vetting process we’ve been talking about—checking licenses, reading reviews, and looking at past work. By following these steps before asking for bids, you ensure that every proposal you receive comes from a credible, well-qualified professional ready to do the job right.

Interior vs. Exterior: Understanding the Approach

One of the first things you'll notice in different bids is the proposed method. Will they work from the inside or the outside? This is probably the biggest decision you'll face, as interior and exterior waterproofing are two fundamentally different strategies.

Here’s the breakdown:

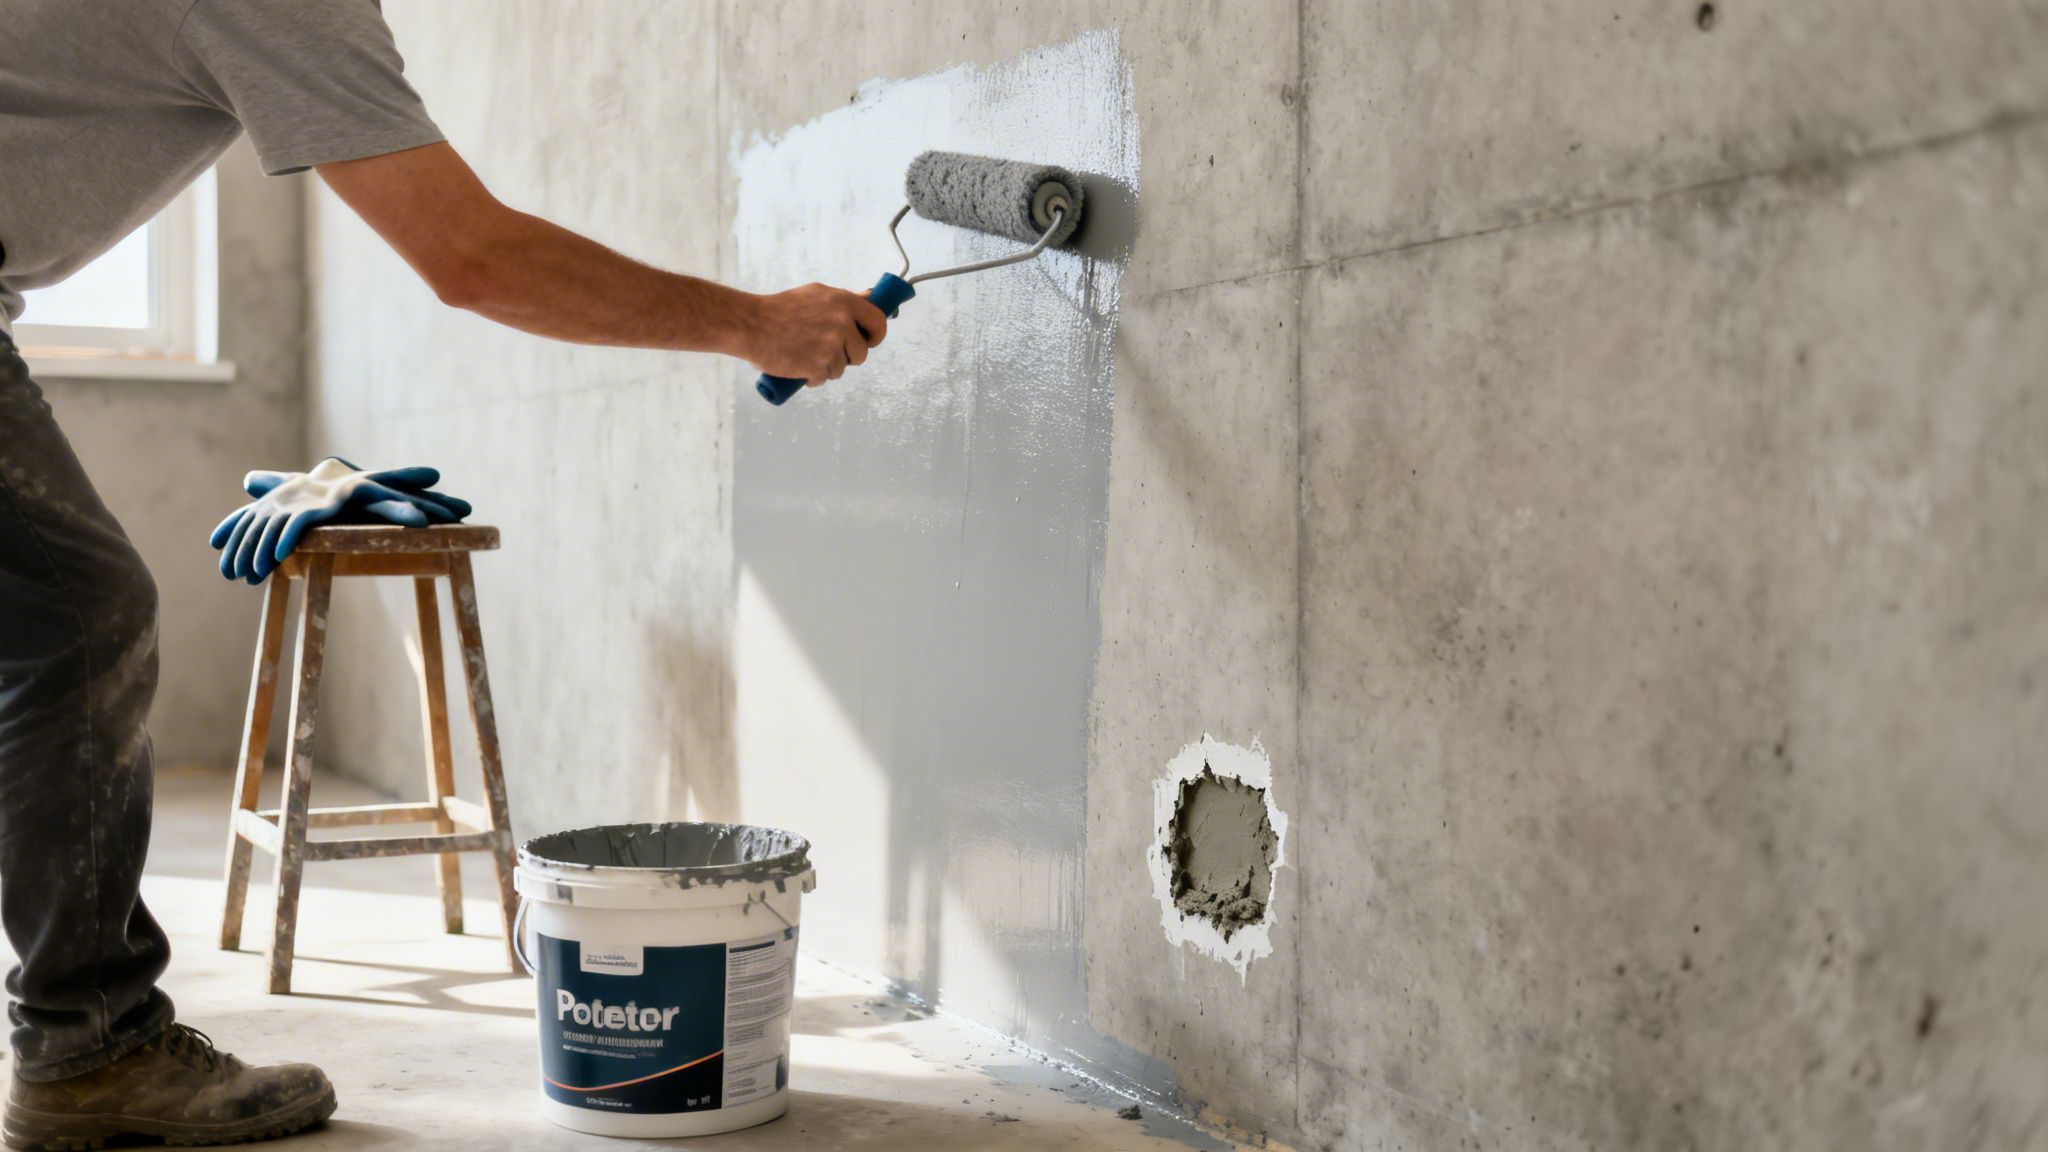
  • Exterior Waterproofing: Think of this as creating a fortress for your foundation. The crew excavates down to the footing, cleans the foundation walls, and applies a waterproof membrane directly to the exterior surface. This stops water in its tracks before it can even touch your foundation, which is the only way to truly relieve hydrostatic pressure. It's a bigger, more disruptive job, but it's the definitive solution for severe, persistent water problems.

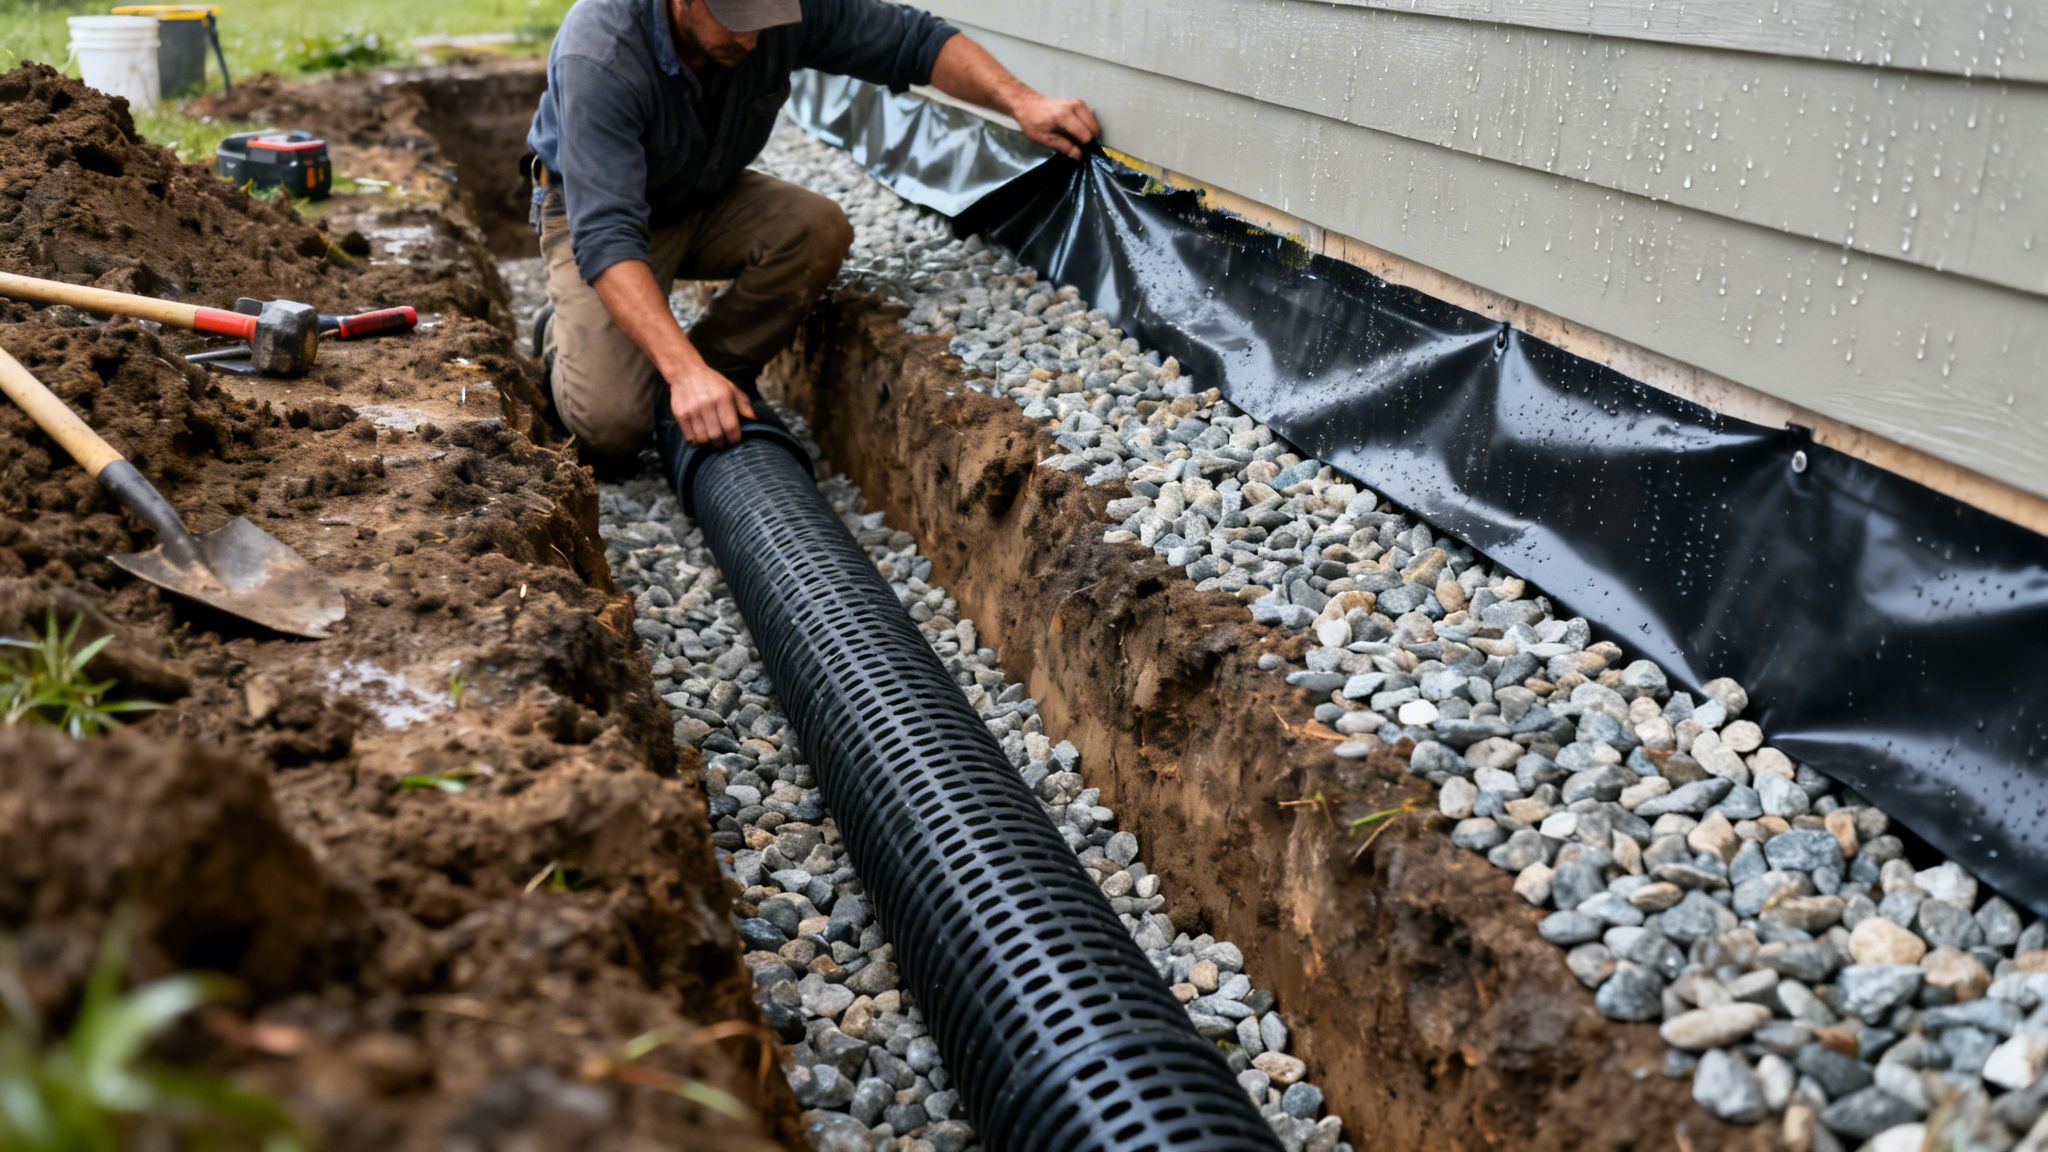
  • Interior Waterproofing: This approach is more about water management than water-stopping. Instead of blocking water outside, it deals with it once it has already seeped through the foundation. A typical interior system involves installing a drainage channel around the inside edge of your basement floor. This channel catches any intruding water and funnels it to a sump pump, which then ejects it away from your property. It's often less invasive and can be a very practical choice for dealing with issues like a high water table.

It's not about which method is better, but which one is right for your specific issue. A good contractor will diagnose the root cause of the leak and explain why they're recommending one approach over the other, not just push the easiest or most expensive option.

What's in the Mix? Looking at Materials

Your proposal should also get specific about the products being used. The technology here has come a long way. In fact, the global market for waterproofing membranes is projected to hit USD 59.32 billion by 2032, driven by powerful new materials. You can read up on these waterproofing material innovations to see how much things have advanced.

For example, a common high-performance material you might see listed is a liquid-applied membrane (LAM). This is a special coating that's painted or sprayed on, creating a flexible, seamless barrier that's perfect for fitting around the unique angles and pipes of a foundation.

Ultimately, a detailed bid is a sign of professionalism. It tells you the contractor has done their homework on your property and is committed to transparency. That level of detail is your best protection, ensuring you're investing in a lasting fix, not just a quick patch. For insights on how these principles apply to specific indoor projects, our guide on waterproofing a wet room has some great targeted advice.

You’ve done the hard part—you've vetted contractors and signed on the dotted line. Now, what can you do to make sure the actual project goes off without a hitch? A little bit of prep work on your end can make a world of difference for the crew, helping them work safely, efficiently, and with minimal disruption.

If you're a homeowner getting your basement waterproofed, the biggest help you can provide is clearing the space. We typically ask clients to move furniture, boxes, and anything else stored along the walls at least three to four feet back. This gives the team a clear, safe perimeter to work in. It's also a good idea to secure your pets in another part of the house or even off-site, just to keep them safe and out from underfoot.

For commercial properties, the prep work is more about communication. If the waterproofing impacts common areas, like in an office building or institutional facility, notifying tenants well in advance is absolutely essential. Give them a clear heads-up about the timeline, what areas will be off-limits, and who they can reach out to with any questions.

The All-Important Pre-Project Walkthrough

Before a single tool comes out of the truck, a final walkthrough with your contractor is a must. This isn't just a formality; it's your last chance to iron out every detail and make sure everyone is on the same page before the work starts.

This is the perfect time to point out that one corner you're especially worried about or ask any lingering questions. You'll want to confirm the crew's access points, figure out where materials will be staged, and just do a final sanity check on the entire plan. I’ve found that this simple meeting prevents countless headaches down the road.

A pre-project walkthrough is more than a formality; it's the foundation of a great working relationship. It confirms all expectations and demonstrates a shared commitment to a smooth, organized project.

Setting the Stage for Success

Getting these details right matters because a professional waterproofing job is a serious investment in your property's health. More and more owners are realizing this, which is why the global waterproofing chemicals market is expected to jump from USD 8.29 billion in 2026 to USD 14.92 billion by 2035. You can dig into the numbers and see the insights on waterproofing chemical trends for yourself—it’s clear that this is a critical piece of property maintenance.

So, what are the concrete steps you should take? Here's a quick checklist that applies to both residential and commercial projects:

  • Create a Clear Path: Make sure the crew has an unobstructed path from their truck to the work area. This is for safety and to prevent accidental dings on walls or doorframes.
  • Protect Your Stuff: Even the most meticulous crews create dust. Cover nearby furniture, electronics, or inventory with plastic sheeting to keep everything clean.
  • Handle Access Logistics: On a commercial site, this might mean arranging for security access, providing key cards, or having a point person available to let the crew into restricted areas.
  • Talk About Utilities: Ask the contractor if they'll need access to water or specific electrical outlets. Making sure they're available and working from day one prevents delays.

By taking care of these simple logistics, you’re not just being helpful—you’re empowering the team you hired to get started immediately and focus on delivering the quality work you paid for. It’s a small effort that helps ensure your project is a success from start to finish.

Got Questions About Hiring a Waterproofing Contractor? We've Got Answers.

Making the call to hire a professional is a big decision, and you’re bound to have questions. We hear a lot of the same concerns from homeowners and property managers all over the Puget Sound. Let's tackle the most common ones head-on so you can move forward with confidence.

How Much Does Professional Waterproofing Cost?

This is always the first question, and the honest answer is that it truly depends on what’s causing the problem. There's no one-size-fits-all price.

A simple crack injection on an interior wall might just be a few hundred dollars. But for a full-scale exterior excavation to install a waterproof membrane around your home's foundation, you could be looking at a range of $10,000 to $30,000 or even more. Commercial jobs, such as for a retail build-out or office space renovation, are a different beast entirely, quoted based on the sheer square footage and unique needs of the space.

The only way to get a real number is with an on-site inspection and a detailed estimate. If a contractor throws out a price over the phone without ever setting foot on your property, be wary. They can't possibly know what they're up against.

Is This a Permanent Fix?

When done right, a professional waterproofing system is absolutely a long-term solution. The goal is to address the root cause of the water intrusion—like hydrostatic pressure pushing against your foundation—not just patch a symptom.

While nothing lasts forever without some care, a quality installation using the right materials should protect your property for many, many years. This is where the warranty becomes crucial.

A strong, clearly written warranty is a hallmark of a reputable contractor. It demonstrates their confidence in the materials they use and the quality of their installation, giving you peace of mind.

Should We Waterproof from the Inside or the Outside?

This is a great question, and it's not about which method is "better," but which one is right for your specific situation. Both are effective, but they solve different problems.

  • Exterior Waterproofing: This is the most comprehensive approach. We dig down to the foundation and apply a seamless waterproof barrier. It stops water before it can even touch your foundation walls. It's a bigger job, but it’s the definitive way to stop water from getting in.
  • Interior Waterproofing: This method is designed to manage water that has already found its way through the foundation. It typically involves installing a drainage system that collects the water and channels it to a sump pump. It’s an excellent and far less disruptive solution for dealing with a high water table.

A contractor who knows their stuff will inspect your property thoroughly and explain exactly why one approach makes more sense than the other for you.

What Kind of Warranty Should I Expect?

Don't even consider a contractor who doesn't offer a solid, written warranty. It should cover both the materials they use and the labor to install them. The terms and length will naturally vary depending on the type of system installed.

For example:

  • An exterior membrane might carry a 10 to 25-year warranty.
  • An interior drainage system could even come with a lifetime warranty.

Make sure you read the fine print. Understand exactly what's covered, what isn’t, and if there are any maintenance tasks you need to perform to keep it valid. A good warranty isn't just a piece of paper; it's a promise that the contractor stands behind their work.


From the first phone call to the final inspection, we know that tackling a water problem can feel overwhelming. At Wheeler Painting, our job is to make it simple and stress-free. With decades of hands-on experience in both residential and commercial construction here in the Puget Sound, we pride ourselves on clear communication, top-notch craftsmanship, and solutions that last.

If you’re ready for a trusted partner to protect your property, let's talk.

Schedule Your On-Site Estimate Today

How to Waterproof Basement Walls in Your Puget Sound Home

Walking into your basement after a solid week of rain and finding damp, weeping walls is a feeling every property owner dreads. It’s a common problem, but thankfully, one with a clear solution. Fixing it really boils down to three things: finding where the water is getting in, shoring up your foundation, and then applying the right kind of waterproofing barrier. The process can feel overwhelming, but a dry, usable basement is absolutely achievable with a clear plan.

Why Puget Sound Basements Are So Prone to Leaks

If you live anywhere in Western Washington, you know our climate is defined by one thing: relentless, soaking rain. That constant saturation creates a unique headache for property owners, turning what should be valuable square footage into a major source of stress. For homeowners, business owners, and facilities managers alike, the first step to a real, long-term fix is understanding why our local conditions are working against us.

The main issue is the ground itself. Much of the Puget Sound region is built on dense, clay-heavy soil. Unlike sandy soil that lets water drain right through, clay holds onto water like a sponge, keeping it pressed directly against your foundation walls. This creates what we call hydrostatic pressure—the constant, powerful force of water trying to push its way inside.

The Real Impact of Our Wet Climate

Over time, that constant pressure finds every little weakness. Water will force its way through tiny pores in the concrete, hairline cracks you can barely see, and the cold joints where the walls meet the floor. That musty smell you can’t get rid of or that chalky white powder (called efflorescence) on your walls? Those are the classic early warnings of this slow-motion water invasion.

Making matters worse is our region’s high water table, especially from fall through spring. When the ground becomes completely saturated, the groundwater level can rise dramatically, essentially putting the lower part of your foundation underwater. For many properties around here, it's not a question of if this will happen, but when.

This isn't just a local problem, either. It’s a surprisingly widespread issue. A staggering 98% of basements in the US will experience some form of water damage in their lifetime. For property owners here in the Pacific Northwest, that statistic feels particularly real. You can read more about the prevalence of basement water damage and see why getting ahead of the problem is so important.

Playing Detective: Identifying Your Basement's Symptoms

Not all basement moisture is created equal. The clues your basement gives you—a damp patch here, a trickle there—can help you and a trusted contractor zero in on the root cause. Knowing what to look for is the key to choosing the right fix.

To get you started, here’s a straightforward table we put together to help property owners connect what they're seeing with what's likely causing it.

Common Basement Moisture Issues and First-Step Solutions

Symptom Likely Cause First Action Step
Water trickling down from top of wall Poor exterior grading, clogged gutters, or faulty downspouts Check and clean gutters; ensure downspouts direct water at least 6-10 feet away from the foundation.
Damp patches low on walls or near floor Hydrostatic pressure pushing groundwater through the concrete Investigate interior sealing options and consider exterior drainage solutions for a long-term fix.
Musty smells and high humidity with no visible water Condensation from humid air meeting cool basement walls Improve ventilation with a dehumidifier and check for air leaks around pipes or windows.
Water seeping up from the floor High water table creating pressure from below the slab Evaluate the need for an interior drainage system and a sump pump installation.

Think of these as your first leads. Understanding these specific challenges is crucial before you commit to any one solution. At Wheeler Painting, we help homeowners and commercial property managers across the Puget Sound area diagnose and solve these exact problems every day. By getting to the root cause, we can finally turn that damp, unusable basement into a dry, secure, and valuable part of your property.

Where Is That Water Really Coming From?

Before you buy a single tube of sealant or call a "residential contractor near me," you need to play detective. The biggest and most expensive mistake property owners make is jumping to a solution before they've found the real problem.

Slapping a coat of waterproof paint on the walls is a waste of time and money if your gutters are dumping gallons of water right against the foundation. Getting the diagnosis right from the start is the single most important step. The good news is, you can often figure it out yourself just by paying attention. Water always leaves clues.

Is It a Leak or Just Humid Air?

First, let's figure out if the water is coming from inside or outside. The moisture you're seeing usually falls into one of three buckets: interior condensation, surface water runoff from outside, or groundwater being pushed through your foundation.

Think about the conditions when you notice the dampness. A basement that feels consistently clammy and damp, especially in the warmer months, is often just dealing with condensation. This is when warm, moist air hits your cool foundation walls and forms water droplets—just like on a cold can of soda on a summer day. It's a humidity problem, not a structural leak.

But if the damp spots, water stains, or trickles appear or get worse right after a heavy rain, you're almost certainly looking at water getting in from the outside.

This flowchart can help you visualize the process and narrow down the cause.

A decision tree flowchart identifying basement leak sources based on dampness after rain, leading to groundwater or condensation.

As you can see, moisture that shows up with rain points toward groundwater or runoff. If it’s a constant issue regardless of the weather, condensation is the likely culprit.

The Easiest Way to Get a Definitive Answer

There's a classic, incredibly simple method we use to know for sure: the plastic sheet test.

Find a damp spot on your basement wall and firmly tape a one-foot square of plastic sheeting over it. Use heavy-duty duct tape or painter's tape to seal all four sides completely, making sure it's airtight.

Now, just leave it alone for a day or two.

When you come back, check the plastic. Is the moisture on the outside of the plastic, facing the room? That’s condensation. Your basement air is too humid. If the moisture is trapped behind the plastic, against the wall, you’ve confirmed it: water is coming through the foundation from the outside.

Our Two Cents: Don't skip this test. It takes five minutes to set up and tells you everything. Knowing if water is coming from the air or through the wall dictates your entire waterproofing strategy. The fixes are completely different.

Follow the Water Trail Outside

If your plastic sheet test proves water is penetrating the foundation, your next job is to head outside. The source is often simpler than you think. If you can do it safely, take a walk around your property during a steady rain and look for obvious flaws.

Pay close attention to these problem areas:

  • Gutters & Downspouts: Are your gutters overflowing? This is a huge red flag. Downspouts should be clear and discharge water at least six to ten feet away from your foundation. If they're dumping water right at the base of your building, you’ve found a major part of your problem.
  • Grading & Landscaping: Look at the soil around your foundation. It needs to slope away from the building to carry water away. If it's flat or, even worse, slopes toward it, you're basically funneling every raindrop straight to your basement.
  • Window Wells: These are classic weak points. If a window well doesn't have a good drain or a solid cover, it will fill up like a bathtub, creating intense hydrostatic pressure against that one section of your wall.

Here in the Puget Sound, with our notoriously wet seasons, these exterior drainage issues are the cause of most "leaky basements." Correcting them is always the first, most effective line of defense before you even think about more complex solutions.

Effective Interior Waterproofing Methods and Materials

Person applies grey waterproofing coating to a concrete basement wall with a roller.

If you've traced your moisture problems to water seeping directly through the foundation walls, your first and most direct line of defense is creating a barrier from the inside. For minor dampness or general humidity, this approach can completely transform a basement from a damp storage area into a usable living or operational space.

This can sometimes be a manageable project for a determined property owner. But we can't stress this enough: the success of any interior coating comes down to how well you prepare the walls. Slapping a coat of "waterproof paint" over a dirty, cracked surface is a recipe for failure. It won't be long before it blisters and peels, and you're right back where you started.

It All Starts with Meticulous Wall Prep

You have to get this part right. Before you even think about popping the lid on a can of sealant, your basement walls need to be clean, dry, and structurally sound. This prep work is absolutely non-negotiable.

First, deal with any existing problems. If you see a chalky, white powder on the walls, that’s efflorescence. You need to get it all off using a stiff wire brush and a masonry cleaning solution. Efflorescence is a salt deposit left behind as water evaporates, and trying to paint over it is like painting over dust—the new coating simply won't stick.

Next, get up close and personal with your walls. Inspect every square inch for cracks, holes, or gaps. Even a tiny, hairline fracture is a potential path for water to sneak past your new waterproof barrier.

A Pro's Tip for a Permanent Fix: For any active leaks or visible cracks, your standard patch or filler just won't cut it. You need to use hydraulic cement. This product is incredible—it actually expands as it cures, forcing its way into the crack to form a powerful, watertight plug. It can even stop flowing water in its tracks, which is why it's a go-to for professionals and a must-have for any serious repair.

Choosing Your Interior Waterproofing Product

With your walls finally clean, patched, and dry, you’re ready to pick your sealant. The waterproof coatings aisle at the hardware store can be overwhelming, but most products fall into three main categories, each designed for different levels of moisture.

  • Waterproof Paint (Acrylic Formulas): This is the most common DIY-friendly product you'll find. It's basically an extra-thick acrylic paint that creates a water-resistant film on the surface. It works well for handling minor dampness and cutting down on that musty basement smell, but it is not designed to hold back any real water pressure.

  • Silicate-Based Concrete Sealers: These are a significant step up. Instead of just forming a film on top, these sealers penetrate deep into the concrete. They trigger a chemical reaction with the lime and minerals already there, forming a hard, crystalline barrier inside the concrete's pores. This makes the wall itself the barrier, and it's fantastic for stopping moisture from wicking through the foundation.

  • Epoxy Coatings: When you need the most robust interior barrier possible, epoxy is the answer. These are two-part systems that, when mixed, cure into an incredibly thick, hard, and durable waterproof shell. Epoxies are far more resilient than any paint and can withstand moderate hydrostatic pressure. This makes them a perfect choice for workshops, commercial basements, or any area that demands a high-performance, long-lasting finish.

The application itself is a skill, especially for high-solids epoxies. Mixing ratios, application thickness, and cure times have to be spot on. A professional crew ensures these systems are applied perfectly to deliver the full, warrantied protection you're paying for. These concepts are key to many residential and commercial construction services, from institutional painting to office space renovations.

Proper Application for a Lasting Barrier

Applying these coatings is a lot more involved than a simple paint job. For any of these products to work as advertised, you'll need to apply at least two generous coats. Keep in mind that a single gallon might only cover 75-100 square feet—far less than standard interior paint—so measure your walls and buy accordingly.

Work the first coat into the wall's texture with a thick-nap roller or a high-quality brush. You want to force the material into every little pore and crevice. Let it dry completely, which can take several hours depending on the product and basement humidity. Then, apply your second coat, ideally in the opposite direction (e.g., vertical strokes first, horizontal strokes second) to ensure a seamless, pinhole-free finish.

While interior coatings are an excellent solution for many basements, it's important to remember what they do: they stop water that has already made it through the concrete. They are a defensive measure. For homes and businesses with serious, ongoing water intrusion, the real solution often lies on the other side of the wall.

When to Use Exterior Waterproofing and Drainage

A person installs a black perforated French drain pipe in a gravel trench next to a house foundation.

Interior sealants and coatings are great for handling minor dampness, but they're ultimately playing defense. They only stop water after it has already pushed its way through your foundation. When you're dealing with serious, persistent water intrusion—especially from the kind of heavy hydrostatic pressure we get here in Western Washington—you have to get to the root of the problem.

The only truly permanent solution is on the other side of the wall.

Exterior waterproofing is the offensive strategy. It stops water from ever touching your foundation in the first place. This is the definitive answer for protecting the structural integrity of your home or commercial building for the long haul.

The Professional Exterior Waterproofing Process

Let's be clear: this isn't a weekend DIY job. True exterior waterproofing is a major project that requires heavy equipment and a deep understanding of excavation, foundations, and drainage. It’s a job for a qualified "commercial construction near me" contractor who has done this before.

The process is intensive, but it creates a completely sealed building envelope. It starts with digging. A crew will carefully excavate all the soil around your foundation's perimeter, going all the way down to the footing. This gives them full access to the walls.

Once the foundation is exposed, it gets power-washed to strip away all the dirt, clay, and any old, failing sealant. The crew then inspects the bare concrete, looking for cracks, holes, or crumbling mortar joints. Any weak spots are patched with hydraulic cement or other high-strength compounds to create a solid, uniform surface.

Next comes the barrier itself. A thick, rubberized waterproof membrane is applied directly to the foundation. This could be a liquid-applied coating that cures into a seamless barrier or a self-adhering sheet membrane. Either way, it creates a flexible, impermeable shield that water simply can't get through.

Why Proper Drainage Is Half the Battle

Just sealing the walls isn't enough. You have to give all that groundwater a new place to go. This is where a modern drainage system becomes non-negotiable, as it’s the key to relieving the intense pressure pushing against your new waterproof barrier. To effectively manage water around your property and prevent basement leaks, exploring various drainage solutions for homes is essential.

Nearly every exterior waterproofing job includes a new French drain system. Here’s how it works:

  • A perforated pipe is laid in a trench filled with gravel right at the base of the foundation.
  • The pipe collects groundwater as it flows toward your building.
  • Gravity then carries the water away from your foundation to a lower point on the property or into a sump basin to be pumped out.

Key Insight: A proper exterior system is a one-two punch: the waterproof membrane is the shield, and the French drain is the moat. The membrane stops the water, and the drain relieves the pressure. One without the other is an incomplete job that's bound to fail.

The Investment in Long-Term Protection

Exterior waterproofing is a significant investment in your property—there's no way around it. It involves excavation, specialized materials, and a lot of skilled labor. But for homes and commercial buildings with chronic water problems, it is the only permanent fix.

Think of it as an investment in your primary asset. You're preventing the slow-motion destruction of your foundation, stopping structural damage before it starts, and eliminating the source of musty smells and dangerous mold. A well-installed exterior system can last for decades, giving you a level of peace of mind that interior methods just can't match.

The principles of managing water on this scale often overlap with other large landscaping projects. In fact, many of the same concepts are critical to our local guide on retaining wall design.

Whether you're a homeowner or a facilities manager, hiring a contractor experienced in large-scale residential and commercial construction is crucial. You need a team that can handle the complexities of excavation safety and drainage to deliver a dry, secure basement that will last.

Knowing When to Call a Waterproofing Professional

We get it. You see a little dampness on the basement wall and your first thought is, "I can fix that." A trip to the hardware store for some high-quality sealant seems like an easy weekend project, and sometimes, for minor condensation, it's the right move.

But you have to know when you're in over your head. Some water problems are simply beyond a DIY fix, and trying to patch a major issue can do more harm than good. You might just be hiding a serious problem behind a fresh coat of paint, letting structural damage get worse just out of sight. Here in the Puget Sound, knowing when to call in a professional is one of the most important things you can do to protect your property.

When Your Basement Is Crying for Help

Some symptoms are your foundation's way of telling you that the forces at play are way bigger than a little seepage. These aren't the kind of things you can solve with a bucket of hydraulic cement. If you spot any of these, it's time to pick up the phone.

Here are the warning signs we tell every property owner to watch for:

  • Large, Horizontal Cracks: Small, vertical hairline cracks are often just the concrete settling. But large, horizontal cracks are a different beast entirely. They signal that immense pressure from water-logged soil is pushing against your foundation, threatening its integrity.
  • Bowing or Bulging Walls: If you look down the length of your basement wall and it appears to be curving or bulging inward, that’s a serious red flag. You're witnessing severe hydrostatic pressure in real-time, and this is a structural emergency that needs an expert, fast.
  • Water Coming Up from the Floor: Is water seeping in where the floor meets the wall, or even right up through cracks in the concrete slab? That's a classic sign the water table is high and pushing up from below. No amount of wall sealant will fix this. You're likely looking at a job that requires an interior drainage system and sump pump.
  • Efflorescence That Won't Quit: You scrub off that chalky white residue, and a week later, it’s back with a vengeance. This means a significant amount of moisture is constantly being forced through the concrete.

These aren’t just cosmetic blemishes. They're symptoms of a serious battle between your foundation and the ground it sits in. A professional has the tools and experience to figure out exactly what’s happening and design the right solution.

The Real Cost of a Failed DIY Fix

Trying to tackle a major water issue yourself can quickly become a very expensive mistake. The numbers don't lie. Data shows that a staggering 60% of basements in the US leak, and the average cost to repair water damage hovers around $4,250. Those figures are even more pointed in a rainy climate like ours. You can learn more about basement leak statistics to see just how common this is. A failed DIY project only adds to that final bill.

Hiring a professional isn't admitting defeat; it's a strategic move to safeguard your property. An expert contractor brings an arsenal of tools, materials, and experience that simply aren't available to the average property owner. They provide an accurate diagnosis, implement a solution with industrial-grade materials, and offer a warranty for their work.

This is doubly true for commercial buildings, where a leak can shut down operations, ruin inventory, and create serious liability. Whether it's your home or your business, a professional waterproofing job protects your property's value and buys you priceless peace of mind. And if the water has already done its damage, your first call should be to one of the best local restoration companies near me to manage the cleanup.

Ultimately, calling a team like Wheeler Painting means bringing in a local partner who knows the unique challenges of building in Western Washington. From single-family homes to large-scale commercial renovations, we make sure the job is done right the first time, protecting your biggest investment from the ground up.

Common Questions About Basement Waterproofing

Alright, we've covered a lot of ground on how to diagnose and fix a wet basement. But we know from experience that this is usually where the real questions start popping up for homeowners and property managers. Let's tackle some of the most common ones we hear from clients all over the Puget Sound area.

Our goal here is simple: to give you the straight answers you need to protect your property with confidence.

How Long Does Waterproofing Last?

This is the big one, and the honest answer is: it completely depends on the method you choose. The lifespan can vary dramatically.

  • DIY Interior Coatings: If you're using a good acrylic waterproof paint for minor dampness, you can probably expect it to last 3-5 years before needing a touch-up.
  • Professional Interior Sealants: When a pro applies a high-quality silicate or epoxy system, you're looking at a much more durable solution. These can easily last 10 years or more because they bond with the concrete itself.
  • Exterior Waterproofing Systems: This is the gold standard for a reason. A full exterior excavation with a modern membrane and drainage system is considered a permanent fix. When done right, it can last the life of your home—often 50 years or longer.

Is Waterproofing Paint Really Effective?

Waterproofing paint definitely has its place, but it's critical to know its limits. Think of it as a good raincoat. It's great for keeping you dry in a light drizzle (like minor humidity or damp spots) but it’s not going to do much if someone is pointing a firehose at you.

That "firehose" is hydrostatic pressure—the force of groundwater pushing against your foundation. The paint creates a surface barrier, but it can't stop the pressure from building up behind the wall. Eventually, that pressure will cause the paint to bubble, peel, and fail.

The Takeaway: Waterproof paint is a decent tool for managing slight dampness and musty smells. It is not a real solution for active leaks or significant water pressure.

What's the Difference Between Damp Proofing and Waterproofing?

People mix these terms up all the time, but they refer to two very different things.

Damp proofing is a basic moisture control measure, usually done during new construction. It's typically a thin, black, asphalt-based coating sprayed onto the outside of a foundation to block moisture from the soil. It's designed to stop water vapor, not liquid water under pressure.

Waterproofing, on the other hand, is a complete system designed to keep both moisture and liquid water out. A true waterproofing barrier is robust enough to withstand hydrostatic pressure, creating a seal that stops water from getting through even when the ground is completely saturated. For more insights on various approaches, you can review some general resources on Basement Waterproofing.

Can Waterproofing Increase My Property Value?

Absolutely. In fact, a wet basement can seriously tank your property's value. Studies from the National Association of Realtors have shown that a basement with water issues can slash a home's market value by 10% to 25%.

Fixing the problem not only restores that lost value but also becomes a major selling point. For a homeowner, it means gaining dry, usable living or storage space. For a commercial property owner, it means having a safe, leasable area without the constant threat of water damage to inventory or equipment. A dry basement is also a key feature in retail build-outs and facility construction services.

A professionally waterproofed basement with a warranty tells potential buyers that the building is solid from the ground up. That kind of peace of mind is priceless.


Figuring out the right way to waterproof your basement walls can feel like a huge task, but you don't have to tackle it alone. For over three decades, Wheeler Painting has been providing expert residential and commercial construction services to the Puget Sound community. If you have questions about your property, we have answers.

Contact us today for a professional consultation and let’s create a plan to protect your investment.