Tag Archive for: bathroom remodel seattle

Shower to Tub Conversions A Puget Sound Guide

A lot of Puget Sound homeowners end up in the same spot. The shower-only bathroom looked like the right move a few years ago. It felt cleaner, easier, and more modern. Then life changed.

Now there’s a toddler to bathe, a dog that won’t fit under a handheld sprayer, or a simple wish for a real soak after a long week. In older homes between Seattle, Kent, and Tacoma, that regret shows up often because bathroom layouts are already tight, and every fixture choice matters more.

That’s why shower to tub conversions deserve more attention than they get. Most remodeling advice focuses on taking tubs out. Far less helps homeowners put one back in the right way, especially in Western Washington homes where framing, moisture exposure, and older plumbing can change the whole job.

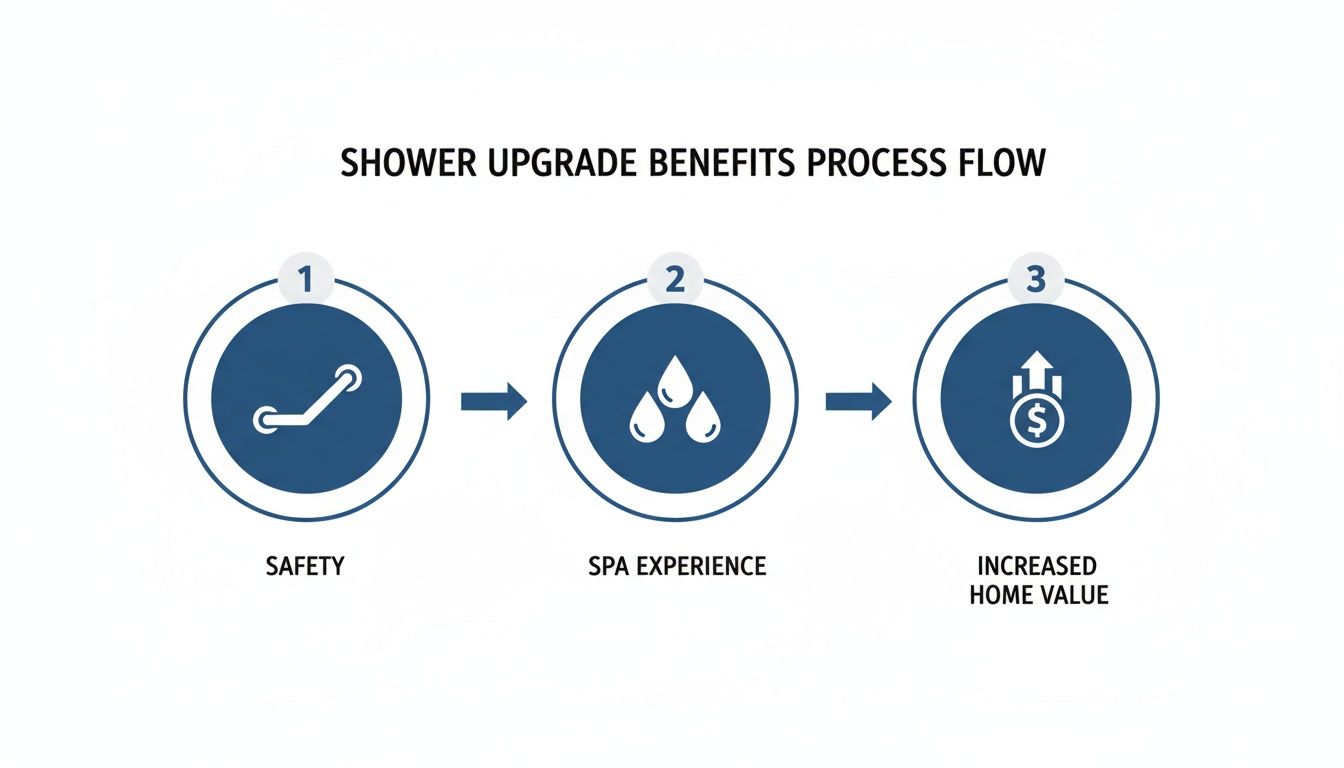
Why Convert a Shower Back to a Bathtub

A common story goes like this. A family buys a house with a stylish walk-in shower in the hall bath. It works fine for adults. Then kids arrive, guests stay over, or resale starts to matter. Suddenly the bathroom feels less practical than it did on move-in day.

That’s not a small concern. Guidance for reverse conversions is notably limited, even though anecdotal remodel trends suggest up to 20 to 30% of homeowners who converted to a shower later express regret, especially when they need a tub for children or everyday flexibility, according to Clear Water Shower Bath.

Everyday use changes faster than bathroom layouts

A shower-only setup can work beautifully for a while. Then the household changes.

Common reasons homeowners revisit the decision include:

  • Kids and grandkids: Bathing small children in a shower stall is awkward and tiring.
  • Comfort: Some people want the option to soak, especially in colder months.
  • Guest flexibility: A tub gives visitors more choice, particularly in a shared hall bath.
  • Buyer expectations: In many homes, buyers still want at least one bathtub.

A reverse conversion isn’t a step backward. It’s usually a correction. The original shower may have matched a specific season of life, but a bathtub often supports more uses over a longer stretch.

It can make a bathroom feel complete again

In many Seattle, Tacoma, and Kent homes, the bathroom footprint already suits a standard tub layout. The room may have originally been designed around that shape, then reworked later for a shower. When a tub goes back in, the room often feels more balanced.

Practical rule: If the bathroom serves children, guests, or the only full bath in the house, a tub is often the more versatile fixture.

That doesn’t mean every shower should become a tub. It means the decision should match how the room gets used. For a primary bath built around speed and accessibility, a shower may still be the better fit. For a family bath, the trade-off often looks different once daily routines settle in.

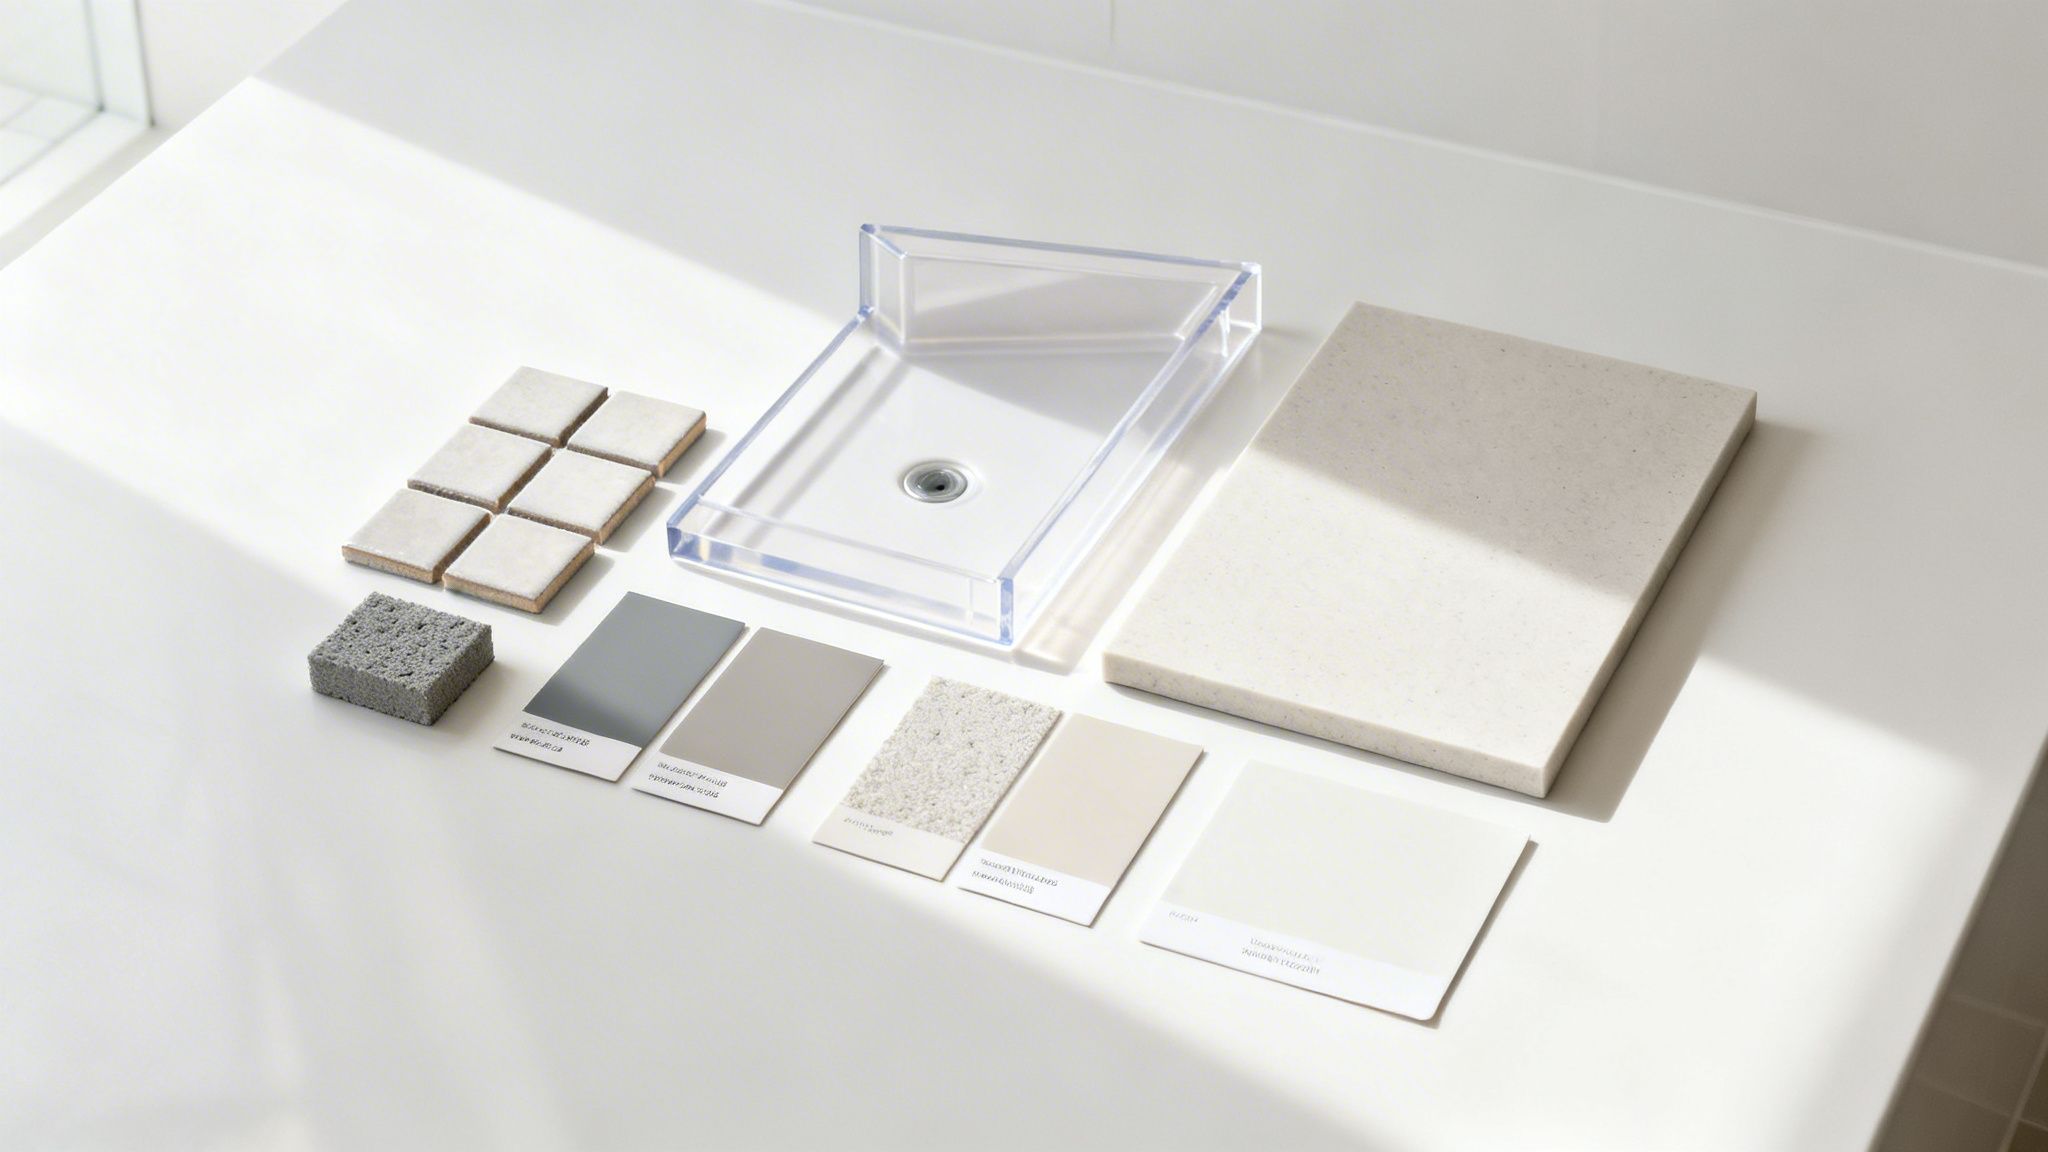
Choosing Your New Bathtub for Your Puget Sound Home

The best tub for a reverse conversion usually isn’t the fanciest one. It’s the one that fits the room, matches the framing below, and gives you the use you want.

In many Puget Sound remodels, the practical choice is an alcove tub because it fits the footprint left by a standard shower area. That said, there are other options if the room allows.

Start with tub type

Some tubs are easier to install in an existing bathroom shell. Others need more framing, more finish work, or more floor support.

Type/Material Best For Typical Cost Pros Cons
Alcove tub Standard family bathrooms and many shower to tub conversions Qualitatively, often the most straightforward option for existing bath footprints Efficient use of space, easy to pair with wall surrounds or tile, familiar layout Less of a design statement, fewer placement options
Drop-in tub Larger bathrooms with a custom deck or surround Qualitatively, often higher due to added carpentry and finish work Flexible look, can feel more custom, works well with built surrounds Needs more framing and finish work, takes more floor area
Freestanding tub Open layouts or design-led remodels Qualitatively, often higher because layout and plumbing matter more Strong visual impact, many style options Usually not ideal for tight bathroom footprints, cleaning around it can be harder
Acrylic Homeowners seeking a lighter, practical tub Qualitatively, common choice for remodels Lighter weight, good value, easier on older framing Can feel less solid than heavier materials
Fiberglass Budget-conscious projects Qualitatively, often one of the lower-cost material choices Lightweight, accessible entry point for simple remodels Can wear faster than sturdier materials
Cast iron Homeowners prioritizing durability and a substantial feel Qualitatively, often heavier and more demanding to install Durable, strong heat retention, classic look Very heavy, may require floor reinforcement
Steel Homeowners who want a hard surface and simple look Qualitatively, varies by model and finish Durable surface, clean appearance Can feel louder and cooler than other materials

Alcove tubs fit many reverse conversions best

Most shower to tub conversions work best when the new tub stays within the existing bathing zone. Alcove tubs are strong candidates because they’re made to sit between three walls and pair well with tile, solid-surface panels, or prefabricated surrounds.

That matters in older homes from Seattle to Tacoma where moving walls creates a bigger project fast. Keeping the same footprint often means less disruption, fewer finish transitions, and a more predictable build.

Material matters more than many expect

Homeowners usually focus first on style. Contractors tend to look at weight, maintenance, and how forgiving the material will be after years of use.

A few practical notes:

  • Acrylic is a common sweet spot. It’s lighter than cast iron and usually easier to work into an upper-floor bathroom.
  • Fiberglass can fit a tighter budget, though it may not wear as well over time.
  • Cast iron feels solid and holds heat well, but it places more demands on the floor system.
  • Steel can work nicely in the right setting, though some homeowners find it less comfortable for soaking.

The best tub isn’t the one that looks best in a showroom. It’s the one your house can support, your family will use, and your finish materials can protect properly.

Match the tub to the room’s job

A hall bath and a primary bath shouldn’t always get the same answer.

For a family-focused bathroom, look for a tub that’s easy to clean, practical to step into, and sized to the existing room. For a more design-driven remodel, a custom look may justify the extra carpentry and finish work. In smaller bathrooms, staying simple often produces the best result.

If you’re unsure where to start, list the bathroom’s top use cases first. Bathing children, quick cleaning, soaking, guest use, and resale all point toward slightly different tub choices. That exercise usually narrows the field fast.

Key Structural and Plumbing Considerations

The part homeowners don’t see is the part that decides whether the project lasts. A shower to tub conversion isn’t just swapping one fixture for another. The plumbing is different, the weight is different, and the waterproofing details have to be right from the start.

A professional plumber installing bathroom pipes during a shower to tub conversion project in a residential home.

Drain location is usually the first big hurdle

A shower drain is typically centered or set toward the rear. A bathtub drain sits at one end. That’s why the old shower drain location usually can’t stay as-is.

According to Clarion Bathware, moving the drain can add $800 to $2,500 and requires rerouting piping through the subfloor while maintaining a code-compliant slope of 1/4 inch per foot so wastewater flows properly. If that slope is off, water can back up, and moisture problems can follow.

In plain terms, the drain line needs enough downhill pitch to move water without turning the pipe run into a trap for standing waste. Too flat and the line doesn’t drain well. Too steep and solids can separate from the flow in some systems. Getting that balance right is basic plumbing work, but it has to be planned before the tub is set.

Older floors need a hard look before demo gets too far

A shower doesn’t place the same load on the floor as a filled bathtub. That’s especially important in older homes around Seattle, Kent, and Tacoma where floor framing may have been altered during earlier remodels.

Areas that deserve close inspection include:

  • Joist condition: Water exposure around an old shower pan can weaken framing.
  • Subfloor strength: Soft spots often hide beneath vinyl, tile, or patchwork repairs.
  • Previous cutouts: Past plumbing work sometimes left joists over-notched or drilled too aggressively.
  • Level and deflection: A tub wants stable support. Bounce in the floor can lead to finish cracks and movement.

When there’s any doubt, opening the floor enough to see the framing saves trouble later.

Waterproofing has to be rebuilt, not patched

One of the most common mistakes in reverse conversions is treating waterproofing like a finish detail. It isn’t. It’s part of the structure of the bathroom.

A proper tub installation needs a coordinated system. That may include a tub flange, a continuous wall waterproofing membrane, sealed penetrations, and careful transitions at corners and horizontal ledges. Products and methods vary, but the principle stays the same. Water will find the weak spot.

That’s where fixture planning matters too. During a remodel, many homeowners take the chance to rethink trim, controls, and pressure balance. If you’re comparing options, this overview of shower valves is useful because valve choice affects wall depth, trim compatibility, and service access once the tub surround is finished.

After the rough plumbing is set, it helps to see how a real conversion comes together in the field.

What works and what usually doesn’t

The jobs that hold up well usually share the same habits. The contractor confirms the drain path, verifies framing, dry-fits the tub, and builds waterproofing as a full system.

The jobs that struggle often involve shortcuts like these:

  • Keeping the wrong drain location: It may look close enough on paper, but tubs aren’t forgiving.
  • Setting the tub before the floor is corrected: A tub on a weak or uneven base can move.
  • Mixing waterproofing methods carelessly: Layering products without a clear system often creates failure points.
  • Treating access as an afterthought: Future service matters, especially around valves and waste connections.

If the behind-the-wall work isn’t right, the finished tile and trim only hide the problem for a while.

For Puget Sound homes, that matters even more because bathrooms don’t get much mercy from damp conditions. A careful structural and plumbing approach isn’t overbuilding. It’s what keeps a straightforward remodel from becoming a repair job later.

Understanding Shower to Tub Conversion Costs in Puget Sound

Homeowners typically want the same thing from an estimate. They want to know what drives the price, what counts as a smart upgrade, and what can surprise them once the walls are open.

That matters because national pricing for the opposite remodel gives only part of the picture. Angi reports that a tub-to-shower conversion averages about $3,000 nationally and can range from $1,500 to over $15,000, with labor accounting for 40 to 60% of the total. The same source notes that bathroom remodels adding functionality can see an average ROI of 60%, especially if the home still has at least one bathtub, according to Angi’s tub-to-shower conversion cost guide. For a shower-to-tub project in Puget Sound, those figures are useful as context, but the actual budget depends more heavily on plumbing changes, floor reinforcement, finish selection, and local labor conditions.

An infographic detailing the various costs and considerations for shower to tub conversions in the Puget Sound region.

The biggest cost drivers

A simple reverse conversion can stay fairly controlled if the bathroom keeps the same footprint and the structure is sound. The budget climbs when the project adds complexity behind the walls or below the floor.

The biggest pricing variables are usually:

  • Plumbing relocation: End-drain tubs often require more rerouting than homeowners expect.
  • Tub selection: A standard acrylic alcove tub and a heavier premium tub don’t install the same way.
  • Wall finish choice: Basic surrounds and fully tiled walls create very different labor loads.
  • Hidden repairs: Rot, mold, or patchwork framing from past remodels can change the scope.
  • Trim and fixture updates: New controls, spouts, and supply components add up quickly.

Labor is a major part of the investment

Bathroom work is detail-heavy. Even when the room is small, the trades are layered tightly together.

A typical shower to tub conversion may involve demolition, plumbing, framing repair, tub setting, waterproofing, finish carpentry, wall installation, paint, and fixture trim-out. That’s why labor often becomes one of the most significant parts of the total job cost in the broader bathroom remodeling category.

What raises a quote and what keeps it under control

If you want to keep a project predictable, the best moves are usually practical, not flashy.

Choices that often help control cost include:

  • Stay within the existing bathing footprint: Fewer layout changes usually mean fewer surprises.
  • Pick readily available fixtures: Special-order items can slow the schedule and complicate coordination.
  • Use a tub suited to the floor structure: Avoiding unnecessary reinforcement can simplify the build.
  • Make finish decisions early: Last-minute tile or trim changes usually ripple through labor.

On the other hand, costs rise when homeowners combine a reverse conversion with broad redesign moves. Moving walls, changing the vanity location, or adding custom glass can turn a targeted project into a full bathroom remodel.

A good estimate doesn’t just list materials. It shows where the house itself may influence the scope.

If you’re planning the budget, this guide on how to estimate home renovation costs is a helpful starting point because it breaks down how to think about construction pricing before you request proposals.

Puget Sound budgeting needs a little extra caution

Older homes between Seattle and Tacoma often hide previous repairs, nonstandard framing, or moisture-related damage. Newer homes can be more straightforward, but access still matters. Upper-floor bathrooms, tight crawlspaces, and limited parking or material staging can all shape labor.

That’s why a site visit matters more than an online calculator. In shower to tub conversions, the true budget usually becomes clear only after the contractor studies the drain path, framing condition, and finish expectations together.

The Conversion Process Timeline Disruption and Permits

The schedule for a shower to tub conversion depends less on square footage than on coordination. The bathroom may be small, but the work stacks tightly. Plumbing, framing, waterproofing, finish work, and inspections all need to happen in the right order.

A professional contractor pointing at a digital project plan for a shower to tub bathroom renovation.

What the project usually looks like

Most projects begin with an on-site review. The contractor checks the existing shower footprint, access to plumbing, the condition of surrounding finishes, and whether the floor looks ready for the added load of a tub.

Then the work generally moves through these phases:

  1. Demo and exposure
    The old shower, wall surfaces, and enough subfloor or wall area get opened to inspect what is there.

  2. Rough plumbing and framing
    The drain is relocated as needed, supply lines are adjusted, and framing repairs or reinforcement are completed.

  3. Tub setting
    The tub is dry-fit, leveled, secured, and connected after the support conditions are confirmed.

  4. Waterproofing and wall finish
    Surround materials go in after the wet-area prep is complete.

  5. Trim, paint, and cleanup
    Final fixtures, caulking, touch-up work, and punch-list items wrap the job.

Reinforcement can affect the timeline

Structural work is one reason these projects vary from house to house. In older Puget Sound homes, that step can’t be skipped when the floor system isn’t ready for a bathtub.

According to Safe Step Tub, a filled tub and bather can create a total load up to 1,000 pounds, and proper reinforcement can add $200 to $600 to the project. The same source notes that failing to reinforce the subfloor or sister joists can lead to cracked tile and failed waterproofing. That work adds time, but it protects the entire installation.

Expect disruption, but it should be organized

The bathroom will be out of service during the main phases of work. Dust control, debris removal, material staging, and daily cleanup all matter more than homeowners expect.

A well-run project usually includes:

  • Clear access planning: Who enters where, and when
  • Protection for adjacent finishes: Especially flooring and nearby walls
  • Trade sequencing: So one crew isn’t undoing another crew’s work
  • A punch-list at the end: Small details should be corrected before sign-off

For homeowners comparing remodel speeds, this page about a one-day bath remodel helps explain why some bathroom updates move quickly and why others, especially reverse conversions with plumbing and framing changes, need a longer and more careful schedule.

Fast is only useful when the sequence still protects the plumbing, the structure, and the waterproofing.

Permits matter more than many homeowners think

When plumbing moves, permits are often part of the job. Local requirements vary by jurisdiction, so a project in Seattle may not follow the exact same path as one in Kent or Tacoma.

A professional contractor should be able to tell you:

  • whether the plumbing scope triggers permit review
  • who is pulling the permit
  • which inspections are expected
  • how corrections are handled if an inspector flags something

For homeowners, the main thing is simple. If the project changes plumbing or structural conditions, permit questions should come up early, not after demo starts.

Making the Right Choice A Homeowner Decision Guide

A shower to tub conversion can be a smart fix, a resale play, or a lifestyle upgrade. It can also be the wrong move if the room serves accessibility needs better as a shower. The right answer usually comes from how the bathroom functions day to day, not from what’s trending.

When a tub makes strong sense

A reverse conversion usually fits well when the bathroom is a shared family bath, when small children use the space regularly, or when the house lacks any practical bathtub. In those cases, adding a tub often solves a real problem instead of just changing the look.

It can also make sense when the current shower feels like a compromise. Some shower-only remodels were done quickly, with a layout that never quite suited the room. Returning the bath area to a tub can improve the room’s function more than a cosmetic refresh would.

When staying with a shower may be better

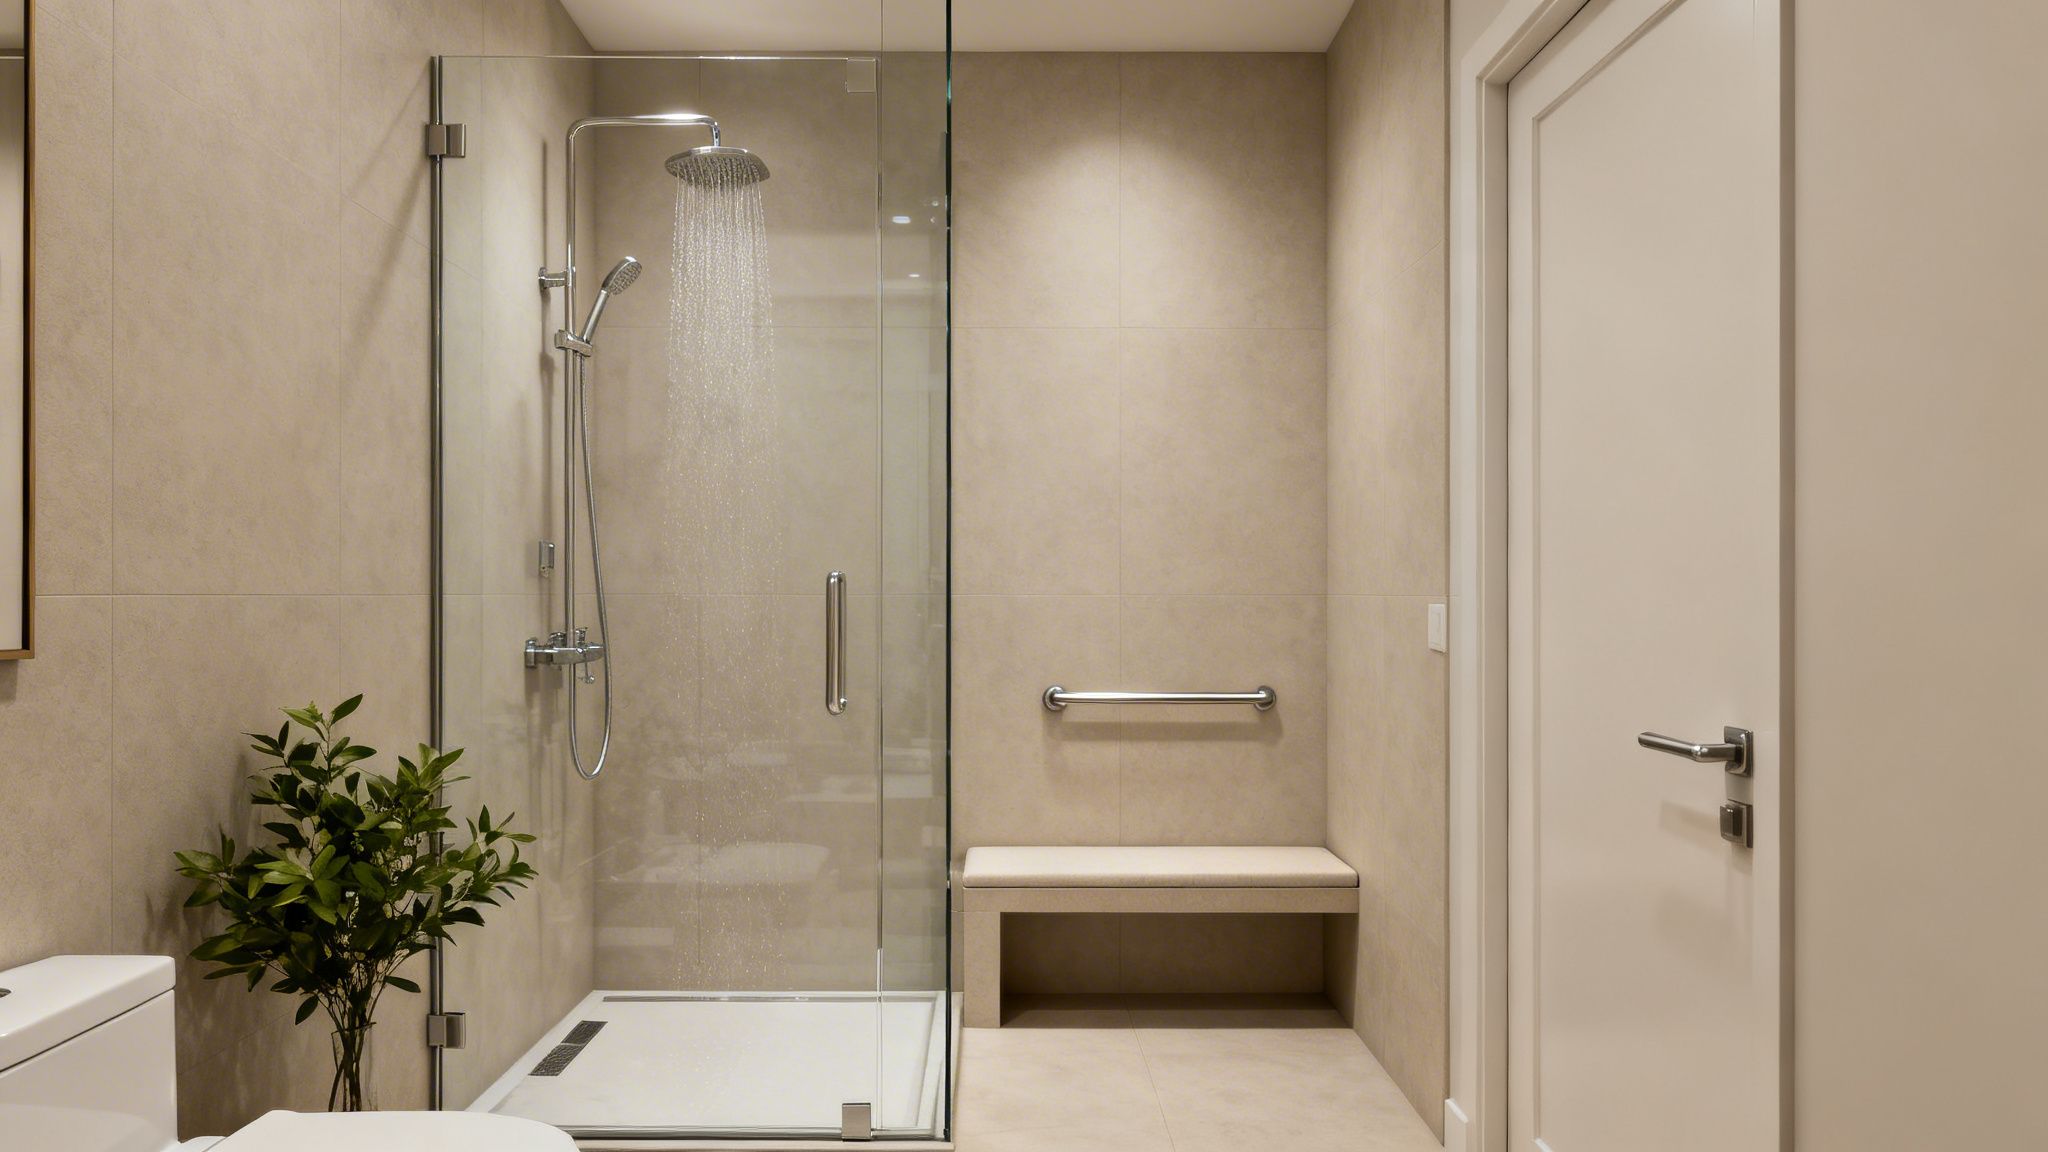
Not every household benefits from changing back. If mobility and easy entry are top priorities, a curbless or low-threshold shower may still be the better long-term fit.

That’s where a reversible approach enters the conversation. For homeowners who worry about making a permanent decision, TubcuT highlights reversible tub-to-shower conversions that preserve the cut-out section so the tub can be restored later. The idea matters because it shows how some families are planning more flexibly for aging-in-place and changing needs over time.

If you’re comparing broader design ideas, this local guide to bathroom renovations is useful for thinking through layout, finishes, and decision priorities from a homeowner perspective.

Pros and cons in plain terms

Pros

  • Family-friendly use: Easier for bathing children and more versatile for guests.
  • Comfort: A tub gives you a soaking option a shower can’t.
  • Market appeal: In many homes, at least one tub still helps the property feel more complete.
  • Balanced layout: Many older bathrooms were originally proportioned around a tub.

Cons

  • More water and cleaning: Tubs generally ask more of both.
  • Structural and plumbing complexity: Reverse conversions often involve behind-the-wall work.
  • Accessibility trade-offs: A tub wall is harder to step over than a low-entry shower.
  • Not ideal for every bathroom: Some primary baths function better as showers.

A quick homeowner checklist

Before moving forward, ask yourself these questions:

  • Who uses this bathroom most often? Kids, guests, adults aging in place, or all of the above?
  • Is this the only full bath in the home? If yes, a tub may carry more weight in the decision.
  • Does the current shower layout work? Function matters more than style photos.
  • Is the floor structure likely to support the tub you want? Heavy tubs create different demands.
  • Do you want a forever solution or a flexible one? Some families value reversibility.
  • Are you comparing this against a modernized shower instead? It helps to weigh both options.

If you’re also considering the opposite path, this overview of a bath to shower remodel can help clarify which direction fits your home better.

The best bathroom decision is the one that still makes sense five years from now, not just the one that photographs well today.

Start Your Project with a Trusted Local Partner

Shower to tub conversions look simple from the outside. In practice, they depend on solid plumbing planning, careful structural review, and waterproofing that’s built as a system. That’s why these projects go best when one experienced contractor manages the sequence from demolition through finish work.

For homeowners in Seattle, Kent, Tacoma, and the communities in between, local experience matters. Older framing, previous remodel layers, and wet-area durability all shape how the job should be built. A contractor who works in Western Washington regularly is more likely to spot the issues that national how-to articles skip.

When you speak with any contractor, ask direct questions:

  • How will you verify the drain relocation plan?
  • What will you inspect once the shower is opened up?
  • How do you handle subfloor or joist repairs if you find damage?
  • What waterproofing system will you use around the tub surround?
  • Will you handle permits and inspections if the project requires them?
  • How will you protect the rest of the home during demolition and installation?
  • What parts of the estimate are allowances, and what parts are fixed?

Good answers should sound clear, specific, and calm. Bathroom remodeling doesn’t have to feel chaotic when the scope is well understood and the process is organized from day one.


If you’re planning a shower to tub conversion and want practical guidance from a contractor that’s served Puget Sound since 1991, contact Wheeler Painting & Restoration Services. Wheeler handles residential remodeling, restoration, waterproofing, and finish work with a clear proposal process and dependable local project management.

Your Seattle Guide To A Bath To Shower Conversion

Thinking about swapping out that old bathtub for a shower? You're not alone. This is one of the most popular home improvement projects we see across Kent, Seattle, and Tacoma, and for good reason. It’s more than a simple style update; it’s a practical upgrade that can completely change how you feel about your bathroom.

As a residential contractor, we at Wheeler Painting help property owners with these decisions every day. By getting rid of an underused tub, you can create a modern, spacious shower that’s safer, more functional, and a whole lot better suited to your daily life.

Why a Shower Conversion Is a Smart Upgrade for Your Home

All across the Puget Sound, from Seattle to Tacoma and Kent, we’re seeing more and more homeowners and property managers decide to ditch their old bathtubs for sleek, modern showers. It’s a shift that makes perfect sense for today’s lifestyles, where convenience, safety, and a touch of everyday luxury are top priorities. At Wheeler Painting, this is a conversation we have with our clients all the time. This isn’t just about making things look prettier—it's a smart investment in your property.

One of the biggest drivers behind this trend is the desire for a safer, more accessible bathroom. Let's be honest, stepping over a high tub wall every day can be a genuine challenge and a serious slip hazard, especially for those with limited mobility. A low-curb or walk-in shower eliminates that barrier, making it a crucial upgrade for anyone who wants to age in place safely and comfortably. For facility managers, this type of residential remodeling can make a property far more attractive to a wider range of tenants.

The Growing Demand for Larger Showers

The desire for big, spa-like showers has absolutely exploded. It's not just a feeling; the numbers confirm it. Recent industry studies show a huge shift in what homeowners want from a bathroom remodel. A solid 27% of homeowners are tearing out their master bathtubs with the specific goal of building a larger shower.

And what do they do with that new space? An overwhelming 91% of them make the shower footprint bigger, transforming a utilitarian spot into a personal retreat. We see this most often with homeowners over 54, who are wisely investing in features like non-slip floors and grab bars for long-term comfort and peace of mind. You can see all the data for yourself in the Houzz U.S. Bathroom Trends Study.

This all points to a bigger change in how we think about our homes. A beautifully designed shower is no longer an afterthought—it's a main feature.

We hear it from our clients constantly: their shower is more than just a place to get clean. They want to create a daily spa experience with rain heads, built-in benches, and gorgeous tile. It’s why a staggering 81% of people upgrading their master shower choose to make it bigger.

Boosting Your Home’s Appeal and Value

In the competitive Puget Sound real estate market, a well-executed bath to shower conversion can be a major selling point. Buyers today are looking for clean lines, practical design, and homes that are move-in ready. A modern, accessible shower checks all those boxes, appealing to everyone from young professionals to retirees.

  • Enhanced Functionality: Walk-in showers are simply easier to clean and maintain than tub-shower combos, which are notorious for grimy corners and stubborn grout lines. For facility and property managers, this means easier upkeep and maintenance.
  • Improved Aesthetics: A glass-enclosed shower opens up the entire room, making even a small bathroom feel brighter, larger, and more inviting.
  • Future-Proofing: When you add accessibility features, you’re not just planning for your own needs down the road. You’re also making your home far more attractive to a wider pool of future buyers or tenants.

At the end of the day, converting your bath to a shower is a strategic move. It improves your daily routine right now while adding real, lasting value to your home. It’s an investment in your comfort, your safety, and the long-term appeal of your property here in the Seattle area.

Getting Your Bath-to-Shower Project Off the Ground

Thinking about a bathroom remodel can feel overwhelming. We get it. But the secret to a smooth, headache-free project isn't some magic formula—it's just a solid, transparent plan. At Wheeler Painting, we've refined our process over countless residential construction projects in Kent, Seattle, and across the Puget Sound, breaking down every bath to shower conversion into clear, predictable phases. You'll know exactly what's happening from day one.

A bathroom renovation is so much more than picking out pretty tile. It’s a construction project that demands skilled demolition, precise plumbing, and, most importantly, bulletproof waterproofing. Our job as your local residential contractor is to manage all those moving parts, turning what could be a mess into an exciting upgrade for your home.

As you can see, swapping that old tub for a modern shower isn't just about looks. It's an investment in your safety, daily comfort, and your home's overall value.

A process flow diagram illustrating three benefits of a shower upgrade: safety, spa experience, and increased home value.

This is why a well-executed shower conversion is one of the smartest updates you can make—it improves your life now and pays off later.

The Initial On-Site Consultation

Every great remodel starts with a simple conversation. We'll come to your property, whether you're in Seattle, Tacoma, or anywhere in between, to see the space for ourselves. This is our chance to listen to what you want, measure everything up, and get a feel for what’s possible.

This in-person meeting is non-negotiable for us. It’s where we figure out the important stuff:

  • Your Vision: Are you aiming for a spa-like retreat with all the bells and whistles, or is the main goal a safe, accessible walk-in shower for a tenant or family member?
  • The Reality: We’ll take a hard look at your current tub, the walls, and where the plumbing is located to spot any potential curveballs early on.
  • First Ideas: We can start brainstorming materials, fixtures, and finishes that match your style and make sense for your budget.

This first step is all about getting on the same page so our proposal is spot-on. It lays the groundwork for a project that runs smoothly from demolition to final polish. If you're looking for more tips on how to prepare, check out our comprehensive guide to bathroom remodel planning.

Demolition and Plumbing Adjustments

With a solid plan in hand, it's time to get to work. First things first: demolition. Our crew is meticulous about protecting your home. We seal off the bathroom to keep dust contained, then carefully remove the old tub, tile, and fixtures.

This is also where the real technical work begins. It’s almost a guarantee that the plumbing will need to be adjusted. The drain for a bathtub almost never lines up with where a new shower drain needs to go. As a licensed and insured contractor, we handle all the necessary plumbing work to ensure your new shower drains perfectly and is built to last.

A common DIY mistake we're often called in to fix is underestimating the plumbing. It’s not just about connecting a new drain. It's about getting the slope just right and tying it into the shower pan flawlessly. Get this wrong, and you’re setting yourself up for a leak that requires expensive floor repairs and replacements.

Waterproofing: The Most Important Step

If there's one stage you absolutely cannot cut corners on, it's this one. Proper waterproofing is the only thing standing between your new shower and a slow, hidden leak that can cause thousands in structural damage and mold. We are obsessive about getting this right.

Our multi-layered approach ensures your shower is completely watertight:

  1. Solid Foundation: We start by inspecting the studs and subfloor. If we find any old water damage, we'll make any necessary floor repairs or replacements to ensure we're building on a solid, clean surface. This may involve wood and tile floor work.
  2. Waterproof Barrier: Next, we install a top-of-the-line waterproof membrane over the shower walls and floor. This creates a continuous, sealed envelope.
  3. Meticulous Sealing: Every single corner, seam, and hole for plumbing fixtures is carefully sealed. There can be no weak points.

This fanatical focus on building a leak-proof shower is what sets a professional job apart. It's the only way to guarantee your investment will look great and function perfectly for decades. As the global bathroom remodeling market continues to grow—projected to hit USD 615.6 billion by 2036—it’s clear that property owners are prioritizing functional, durable upgrades like this.

Navigating Seattle Area Permits And Building Codes

Let's talk about the part of a renovation that makes most property owners groan: permits. For a bath-to-shower conversion, the question we hear all the time is, "Do I really need one?" In the Seattle, Tacoma, and Kent areas, the straightforward, safe answer is yes, you almost certainly do.

It might feel like a simple swap, but this residential remodeling project dives deep into your home's critical systems—plumbing, electrical, and sometimes structural elements. A permit isn't just red tape; it's your assurance that the work is being done correctly and inspected by a third party. It’s the best defense you have against future disasters like hidden leaks, mold growth, or faulty wiring.

So, When Exactly Is a Permit Required?

In the Puget Sound region, the rules are pretty clear. Any time you alter your plumbing or electrical systems, the city wants to know about it. A tub-to-shower conversion hits these triggers every time.

You'll need a permit if your project involves:

  • Moving the drain. A tub drain is in a completely different spot than a shower drain. Relocating it is a non-negotiable part of the job and requires a permit.
  • Altering water supply lines. We’ll need to adjust the pipes to accommodate the new shower valve and head at the correct height, which is considered a system alteration.
  • Adding new electrical work. Planning on adding beautiful recessed lighting, a quiet exhaust fan, or maybe even luxurious heated floors? That requires an electrical permit.
  • Changing the bathroom's footprint. If you’re moving a wall to make that shower a bit bigger, a building permit is standard procedure.

Honestly, this is where a trusted local provider earns their keep. As a residential contractor near you, Wheeler Painting takes all the permit paperwork and coordination off your plate. We deal directly with the building departments in Seattle, Tacoma, and Kent so you don't have to. It's just part of doing the job right from the start.

Key Codes an Inspector Will Scrutinize

Building codes are not just suggestions—they are the minimum legal standard for safety and durability. While our team manages all the technical details, it helps to know what inspectors are looking for when they show up.

From our experience, here are the things they zero in on:

  • Waterproofing: This is the big one. An inspector will look for a continuous, unbroken waterproof membrane behind your tile and across the shower floor. One small mistake here can lead to a catastrophic failure down the road.
  • Shower Floor Slope: The floor can't be flat. It needs a precise slope, typically between 1/4 and 1/2 inch per foot, to guide every drop of water toward the drain. No pooling allowed.
  • Plumbing Vents: Your new shower drain needs to be properly vented. This is what allows it to drain quickly and prevents unpleasant sewer gases from entering your home.
  • Accessibility (ADA) Standards: If your design includes features like grab bars or a curbless, zero-threshold entry, they have to be done right. This means installing proper wood blocking inside the walls for support before the tile goes up, ensuring everything is secure and meets strict code requirements.

Navigating these rules is a core part of our expertise. When you work with Wheeler Painting, you can rest easy knowing your beautiful new shower is not only up to code but built to last for decades.

Choosing The Right Shower Materials For Your Home

Okay, this is where the fun really begins. After all the planning and measuring, you finally get to decide what your new shower will actually look like and feel like. This is the step where your vision starts becoming a reality.

The sheer number of choices can feel overwhelming, we get it. From the shower floor to the walls and fixtures, every decision matters. As a contractor who helps homeowners and property managers in the Seattle and Tacoma areas with these projects every day, our job is to cut through the noise. Let's break down the most common options so you can find that perfect sweet spot between style, budget, and long-term upkeep.

Various bathroom design samples, including tiles, color swatches, and a clear shower pan model.

Shower Floor Showdown: Custom Tile vs. Prefabricated Base

The very foundation of your shower is its base, or what we call the pan. It's the first thing you step onto, and it's a huge factor in both aesthetics and performance. You really have two main roads you can go down: a custom-tiled floor or a single-piece prefabricated base.

A custom-tiled shower floor gives you total creative control. Want a specific mosaic pattern or a color that perfectly matches your vanity? Tile makes it possible. This is the go-to for unique shower footprints or for anyone wanting a high-end, spa-like finish.

The trade-off, of course, is grout. Lots of it. Even with modern grouts, those lines are a magnet for grime and mildew, especially here in our damp Puget Sound climate. They simply require more consistent cleaning and facility maintenance.

If you’d rather skip the scrubbing, a prefabricated shower base is a fantastic option. Usually made of durable acrylic or fiberglass, these pans are a single, seamless piece. No grout lines means less cleaning and a significantly lower chance of leaks down the road. They’re also quicker and more cost-effective to install, which is a big win for many projects. The only real downside is that you’re limited to standard sizes and a handful of colors.

The decision you make on the shower floor sets the stage for the rest of the build. A custom tile pan involves a complex, multi-layered waterproofing process that takes time and skill. A prefab base streamlines everything. We always make sure our clients understand the maintenance side of things so they love their shower just as much five years from now.

Shower Walls: Classic Tile vs. Modern Solid Surface Panels

With the floor decided, let’s look up at the walls. Just like the base, your main options are traditional tile or the more contemporary solid surface panels.

Tiled walls are timeless for a reason. They offer the same limitless design freedom as a tiled floor, letting you create custom accent niches, borders, and patterns that are uniquely yours. For a lot of people, nothing beats the authentic, handcrafted look of real tile. But again, you have to be prepared for the reality of maintaining all those grout lines.

Lately, we've seen a huge surge in the popularity of solid surface panels. These are large, grout-free sheets made from materials like engineered stone or advanced composites. They create a sleek, modern aesthetic that is ridiculously easy to clean—a quick wipe-down is all it takes. Because they're 100% non-porous, they're also bulletproof when it comes to water protection.

While some worry they won't have the character of tile, today's high-quality panels do an amazing job of mimicking natural stone and other textures. To get a better feel for it, you can play around with AI bathroom design tools to see how different materials would look in your actual space before committing.

Use this table to weigh the key differences between common shower materials and find the perfect match for your bathroom remodel.

Comparing Shower Base And Wall Materials

Feature Custom Tiled Shower Prefabricated Base Solid Surface Panel System
Aesthetics Unlimited design freedom; classic, high-end look. Limited to standard sizes and colors; functional look. Sleek and modern; can mimic stone but less variety than tile.
Maintenance High. Requires regular grout cleaning to prevent mildew/stains. Low. Seamless, non-porous surface is easy to wipe clean. Low. No grout lines; a simple wipe-down is sufficient.
Cost Higher. Labor-intensive installation drives up the price. Lower. Cost-effective materials and faster installation. Mid-to-High. Varies by brand but typically between tile and prefab.
Durability Very durable if installed correctly, but grout is a weak point. Extremely durable and leak-resistant due to one-piece design. Highly durable and 100% waterproof; resistant to chips/stains.

Ultimately, choosing the right material comes down to a personal balance of what you want your shower to look like versus how much time you want to spend cleaning it.

Key Material Considerations

Thinking about the big picture, here’s what you should be weighing:

  • Aesthetics: Are you dreaming of a one-of-a-kind design that only tile can provide, or do you prefer the clean, minimalist look of solid panels?
  • Maintenance: How do you feel about cleaning grout? Be honest with yourself! A low-maintenance surface might be a better fit for a busy household or a rental property.
  • Budget: Custom tile work is a significant investment in skilled labor. Prefabricated and panel systems can often stretch your budget further.
  • Durability: Both tile and panels are built to last, but only if installed correctly. The real key to longevity is what’s behind the walls. A bulletproof waterproofing system is non-negotiable. You can read up on our approach and learn more about what waterproofing in construction involves.

At the end of the day, the best materials for your bath to shower conversion are the ones that fit your lifestyle and your vision for your Kent-area home. Our role is to present the options clearly and provide the expert installation to make it happen.

Finishing Your Shower With Fixtures And Doors

Now for the fun part. The demolition is done, the plumbing is set, and the waterproofing is solid. It's time to choose the finishing touches that really bring your new shower to life: the doors and fixtures.

This is where your personal style gets to shine. Think of these elements as the jewelry of your bathroom—they define the look, feel, and daily function of the space. A bath to shower conversion isn't just about swapping a tub for a pan; it's about creating a space you love to use every day.

A clean, modern bathroom with a walk-in shower, a built-in bench, a grab bar, and a plant.

These final decisions are anything but minor. They determine how you start your morning, how easy the shower is to clean, and how the entire bathroom feels. A frameless glass door can make a tight space feel huge, while the right showerhead can feel like a daily trip to the spa. Let's walk through the options we see most often in Puget Sound homes.

Choosing the Perfect Shower Door

Your shower door is a major design element that also needs to be incredibly practical. The right choice depends on your bathroom's layout, your budget, and the look you're going for.

  • Frameless Glass Doors: This is the top choice for a reason. By eliminating the metal frame, you get a clean, minimalist look that makes the whole bathroom feel bigger and brighter. It’s the perfect way to show off that beautiful new tile you just installed.
  • Semi-Frameless Doors: A fantastic compromise. These doors give you a very clean look that’s similar to a frameless model but at a more accessible price point. They typically have minimal framing around the perimeter, but the door panel itself is clean glass.
  • Sliding Doors: If your bathroom layout is tight and a swinging door would hit the toilet or vanity, sliders are the solution. We've seen a huge rise in modern "barn door" style sliders, which look much more high-end than the old-school tracked doors you might be picturing.
  • No Door (Open Concept): A true walk-in shower is the peak of luxury and accessibility. Just be aware that it can make for a chillier shower experience since there's nothing to trap the steam. This works best in larger bathrooms where you have plenty of room to contain splashes.

After years of doing this, one of the biggest regrets we see from DIYers is an open-concept shower that's just too cold, especially during our chilly Washington winters. A frameless glass door often hits the sweet spot—it feels open but keeps you warm.

Selecting Your Shower Fixtures

Your fixtures are the hardworking parts of the shower, so you want to choose them for performance just as much as for looks. Here’s what you’ll need to decide on.

  • Showerheads: The sky's the limit here. A water-saving head is a smart choice for any home, while a big "rain" showerhead can provide a truly luxurious downpour. For ultimate flexibility, many of our Tacoma-area clients choose a dual system with a fixed overhead head and a separate handheld wand.
  • Valves and Controls: This is a decision you don't want to overlook. We highly recommend upgrading to a thermostatic valve. It lets you set an exact temperature and holds it steady, even if someone flushes a toilet or starts the dishwasher. It’s a game-changer for comfort and a crucial safety feature to prevent scalding.

Integrating Accessibility And Safety Features

One of the greatest advantages of a bath to shower conversion is the chance to create a safer, more accessible bathroom for today and for the future. Modern design means these features can be beautiful, not institutional.

  • Grab Bars: Forget the clunky, clinical bars of the past. Today's grab bars come in stunning finishes like matte black, brushed brass, and polished nickel to perfectly match your other fixtures. The key is that we install them with proper blocking inside the wall for rock-solid support.
  • Built-in Bench: A tiled bench is a must-have for anyone who prefers to sit while showering. It provides stability and comfort, turning the shower into a more relaxing and secure space.
  • Zero-Threshold Entry: By eliminating the curb, you create a seamless, "curbless" entry that's easy to walk into and fully accessible for a wheelchair or walker. It’s the ultimate in universal design.

Planning for these features from the very beginning is the key to a successful project. For a deeper dive, check out our guide on creating a handicap-accessible shower. As your local Kent contractor, we at Wheeler Painting specialize in building beautiful showers designed to support you safely for years to come.

How To Budget For Your Shower Conversion Project in 2026

Let's get right to it. The first question every homeowner in the Seattle area asks is, "So, what's this actually going to cost?" The honest answer is: it depends. But that's not a cop-out. The final price for a residential remodeling project like this really comes down to a few key decisions you'll make, and our goal here is to walk you through them so there are no surprises.

When we put together an estimate at Wheeler Painting, it's completely itemized. We want you to see exactly where your money is going, from the demolition down to the last tube of caulk, before we ever start work.

What Drives the Cost of a Shower Conversion?

The final number on your proposal is a mix of labor, the materials you choose, and sometimes, dealing with what we find behind the walls. It’s more than just the new tile and fixtures you see at the end.

For any project here in the Kent area, the budget really boils down to these four things:

  • The Teardown: Ripping out a lightweight, one-piece acrylic tub and surround is a relatively quick job. But if we're dealing with an old cast-iron tub that was mud-set into place with layers of heavy tile? That’s a completely different level of labor and disposal.

  • The Plumbing Puzzle: Your tub drain is in one spot, but a shower drain needs to be centered. The valve and showerhead also need to be raised from tub height to standing height. Simple moves are one thing, but if we have to reroute pipes through tricky framing, the plumbing costs will naturally go up.

  • Your Material Style: This is where you have the most direct control over the budget. A clean, high-quality prefabricated shower base and wall panel system is a very cost-effective and durable option. On the other end of the spectrum, you could have a fully custom-tiled shower pan with floor-to-ceiling natural stone, intricate mosaics, and built-in niches. This could even involve custom cabinets to reconfigure the space.

  • Fixtures and Glass: The hardware is the jewelry of your new shower. A beautiful, reliable showerhead and valve set in chrome might cost a few hundred dollars. A thermostatic system with multiple body sprays in a specialty finish like matte black or brushed gold can run into the thousands. The same goes for shower doors—a standard framed door versus a custom heavy-glass frameless enclosure is a significant price difference.

Here’s a piece of advice we give every single homeowner: plan for a 10-15% contingency fund. It’s not because we expect to find problems. It’s for your peace of mind. If we open the walls and discover old, hidden water damage or funky plumbing from a previous DIY job, that buffer means we can fix it the right way without derailing your budget.

How Long Will My Bathroom Be Out of Action?

The other big question is about time. It's a common myth that a bath-to-shower conversion is a quick weekend project. To do it properly and meet all building codes, especially with critical steps like waterproofing, it just takes more time.

Here's a realistic look at how a typical project unfolds:

  1. Planning & Ordering: We'll meet, finalize the plan, and get your materials ordered. This can take anywhere from 1 to 4 weeks, depending on how custom your tile and fixtures are.
  2. Demo & Rough-In: Once materials are on-site, our crew gets to work. Demolition, plumbing adjustments, and any framing changes usually take 2-4 days. A skilled drywall contractor may also be needed at this stage.
  3. Waterproofing & Walls: This is the most critical phase. We install the shower base, apply multiple layers of waterproofing, and get it inspected. Then, we install the tile or wall panels. This can take 3-7 days because drying and curing times are non-negotiable.
  4. Finishing Touches: Finally, we grout, install the glass door, and mount the fixtures. This last part takes about 1-2 days.

All in, you should realistically plan for your bathroom to be a construction zone for about two to three weeks. We know it's an inconvenience, but that timeline ensures every detail is handled correctly for a shower that will last for decades.

Your Top Shower Conversion Questions, Answered

If you’re thinking about a bath-to-shower conversion, you've probably got a few questions. It's a big decision! We've been doing this for homeowners, business owners, and property managers all over the Seattle and Tacoma area for years, and we've heard just about everything. Here are the honest answers to the questions that come up the most.

Will I Hurt My Home's Resale Value by Removing the Only Tub?

This is easily the number one concern we hear, and it’s a smart question to ask. The short answer? Probably not, especially here in the Puget Sound. While real estate agents used to say a home needed a tub, today’s buyers are often looking for a spacious, modern, and accessible walk-in shower.

A well-designed, professionally installed shower can actually be a major selling point. If you trade an old, cramped tub/shower combo for a beautiful walk-in, you're adding practical, daily value that most new buyers will appreciate far more.

How Long Will I Be Without a Bathroom?

No one wants their bathroom to be a construction zone forever. For a standard conversion, you can expect the project to take about one to three weeks from the start of construction.

This timeline can change based on the complexity of the job. For example, intricate custom tile work takes longer than installing a pre-fabricated shower surround. Major plumbing rerouting or waiting on city inspections can also add to the schedule. We always map out a detailed project calendar for you before we ever pick up a hammer, so you'll know exactly what to expect.

The most important part of this entire project is the waterproofing. I can't stress this enough. A tiny mistake here can go unnoticed for years, leading to hidden leaks that cause thousands in structural rot and mold damage. This is the biggest reason to go with a professional residential contractor near you—we guarantee a completely watertight system that protects your home.

Can I Just DIY This Project to Save Money?

Tackling a project yourself can be rewarding, but a shower conversion is one of those jobs where the risks are incredibly high. It’s not just about tiling a wall; it involves complex plumbing and waterproofing that have to meet very strict local building codes.

One small error—an improperly sealed drain or a punctured waterproof membrane—can lead to catastrophic failure down the line. We’ve been called in to fix DIY jobs that ended up costing the homeowner double. Hiring a licensed, insured professional protects your investment and gives you the peace of mind that the job is done right and will pass inspection.

How Can I Make the New Shower Safe for Aging in Place?

This is a fantastic question and something more and more homeowners are planning for. A walk-in shower is already a huge step up in safety from a high-sided tub. You can enhance it even further with a few key additions:

  • Zero-threshold entry to eliminate any tripping hazard.
  • A comfortable, built-in shower bench.
  • Strategically placed grab bars that are anchored into the wall studs.
  • Non-slip tile for the shower floor.

There’s a lot of great equipment out there designed specifically for this. For a more detailed look at your options, this guide to bathroom safety equipment for the elderly is a really helpful resource.


Ready to see what it would take to transform your bathroom into a space you’ll love? Wheeler Painting has been the go-to residential contractor for home improvements and remodels in Kent, WA, and the surrounding communities since 1991. We bring our expertise in residential and commercial construction to every project, no matter the size. Contact us today for a clear, no-pressure, on-site estimate and let’s start planning your new shower.