How to Paint Over Wood Stain: A Guide for Home & Business Owners
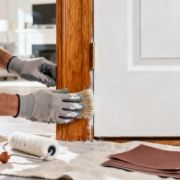
Giving stained wood a clean, painted finish is one of the most satisfying upgrades you can make, whether it’s for your home or a commercial space. A fresh coat of paint can completely transform a room, making it feel brighter and more modern.
The whole job really comes down to four key stages: figuring out what you’re working with, prepping the surface, picking the right primer, and finally, applying the paint. Nailing these steps is the secret to getting a finish that looks like a pro did it, ensuring your property looks its best.
Transforming Wood From Stained to Painted
Painting over old stained wood is a fantastic way to modernize a space. We've seen it countless times—homeowners ready to say goodbye to dated honey oak trim, or facilities managers tasked with updating an office filled with dark, imposing molding. The visual payoff is huge. Rooms instantly feel brighter, cleaner, and more current.
But here’s the catch: you can't just grab a brush and start painting. Success depends on creating a new surface that will properly bond to the old one. This guide is built on our experience as a trusted local painting and construction contractor, and we’ll walk you through exactly how to get it right.
Why Proper Technique Matters
Simply painting directly over an old stain, especially one with a glossy topcoat, is a recipe for disaster. The new paint has nothing to grip, which leads to all the classic DIY frustrations property owners want to avoid.
- Peeling and Chipping: Without proper cleaning and sanding, the paint will lift right off that slick surface. It's a common sight in high-traffic areas of both homes and businesses.
- Stain Bleed-Through: Tannins and old pigments from the wood and stain can leach through your fresh paint, leaving ugly yellow or brown blotches that ruin the entire look.
- Uneven Sheen: If the surface isn't prepped uniformly, you’ll end up with a blotchy, unprofessional finish where some spots are shiny and others are flat.
Projects like painting hardwood floors white are a perfect example of just how critical this prep work is for achieving a finish that can actually withstand daily life.
At Wheeler Painting, we always say that preparation is about 80% of the job. It doesn't matter if we're working on a residential home improvement project or a large-scale commercial renovation—taking the time to assess, clean, and prime the wood is what makes a paint job last.
By following a proven method, you avoid these headaches and get a beautiful, durable finish that actually boosts your property's value. We're going to show you the same foundational process our crews use on projects throughout our service area, so you can get it right the first time.
Identifying Your Wood Stain and Finish
Before you even think about picking up a paintbrush, you need to know what you’re up against. Painting over stained wood isn't just a matter of slapping on a new color; the success of your project hinges on understanding the existing finish. Is it an oil-based or water-based product? Is there a tough topcoat like polyurethane sealing everything in?
Getting this wrong is a primary reason paint jobs fail. If you use a primer that can't stick to the old finish, you're guaranteed to see peeling and chipping down the road. It's a little bit of detective work upfront that saves you a world of frustration later.
The Simple Alcohol Test
Here’s a trick we’ve used on countless jobs. Grab a cotton ball, some denatured alcohol, and find an inconspicuous spot on the wood—the inside of a cabinet door is perfect. Rub the alcohol-soaked cotton ball firmly on the finish for about 30 seconds.
Now, check your cotton ball:
- Did the finish get sticky and rub off? You're looking at a shellac finish. Shellac dissolves in alcohol, which is actually good news—it’s one of the easier surfaces to prep for paint.
- Did nothing happen? You most likely have a modern polyurethane or varnish, either oil or water-based. These finishes are built for durability. You'll need to rough up the surface to give your primer something to grab onto.
This simple test tells you exactly what you need to know. For example, if you're tackling classic oak cabinets from the 90s, chances are you've run into a tough, oil-based polyurethane that will demand some serious prep work.
This flowchart can help you map out your project, whether you're doing it yourself or deciding when it’s time to call in a professional painting service.
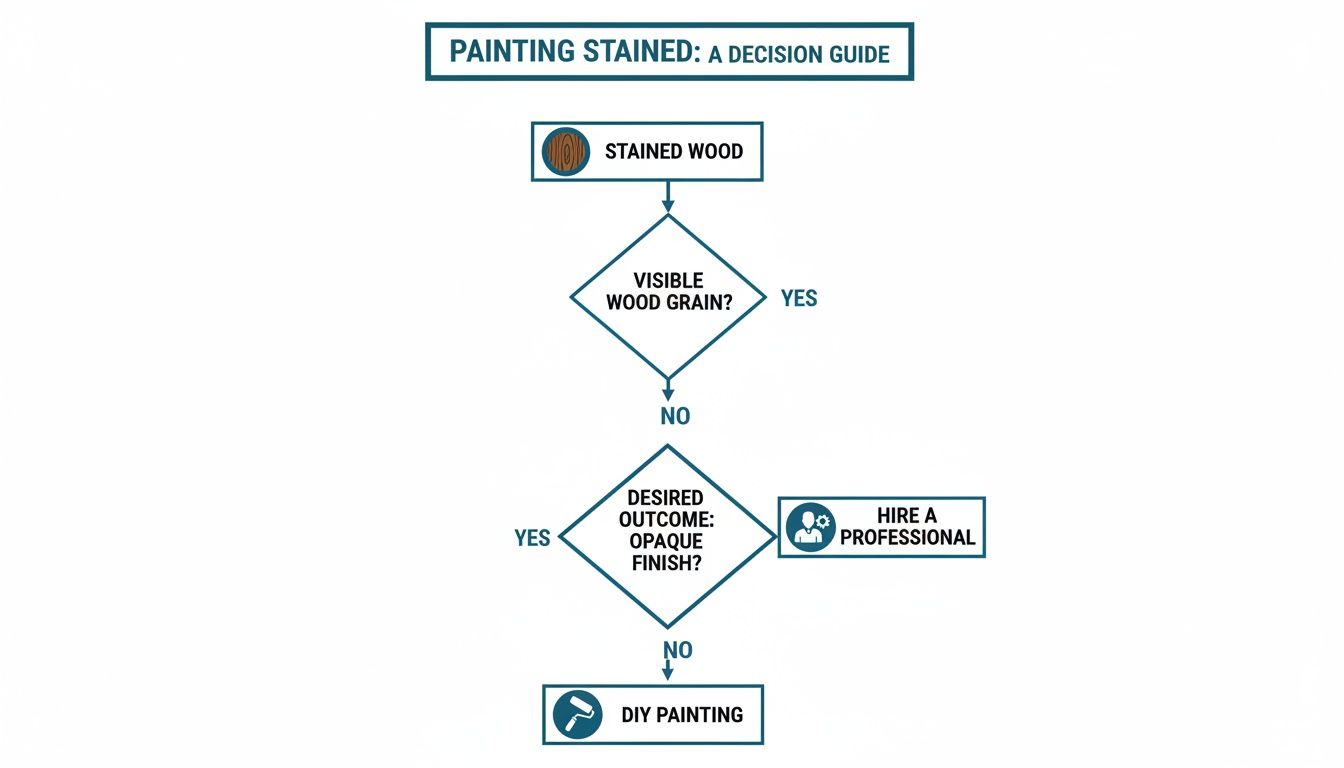
If you're aiming for a solid, opaque color, the path forward really depends on how big the job is and how comfortable you are with the prep work involved. Sometimes, hiring a professional painting contractor is the surest way to get a flawless, lasting finish.
Oil vs. Water-Based Stains
While the topcoat is your biggest hurdle, the stain underneath still matters. A lot of older woodwork features deep, oil-based stains that have a nasty habit of "bleeding" through new layers of paint, especially lighter colors. This is where a good stain-blocking primer becomes non-negotiable.
Remember, you’re not just covering a color—you're sealing in a chemical compound. The right primer acts as a barrier, locking in old pigments so they can’t ruin your beautiful new paint job.
Think about this: up to 70% of stained surfaces in homes and older commercial properties have deep-set pigments that will cause issues if they aren't properly sealed. With oil-based products making up around 45% of the wood stain market, it's a common problem. For these, a thorough sanding with 120-150 grit sandpaper is essential to create enough "tooth" for the primer to bond, a step that can slash the risk of paint failure by 60%.
Getting Stained Wood Ready for Paint: Prep and Sanding
Now that you know what kind of finish you're dealing with, we’ve arrived at the most important part of the entire job: the prep work. A great paint job is built on a great foundation, and skipping these steps is the fastest way to a finish that peels, chips, or just looks amateur.
Proper prep is more than just a quick once-over with sandpaper. It all starts with getting the surface squeaky clean. Just think about it—kitchen cabinets get coated in years of cooking grease, and baseboards in a busy office collect dust and grime. Your new paint needs something clean to grab onto, not a film of dirt.
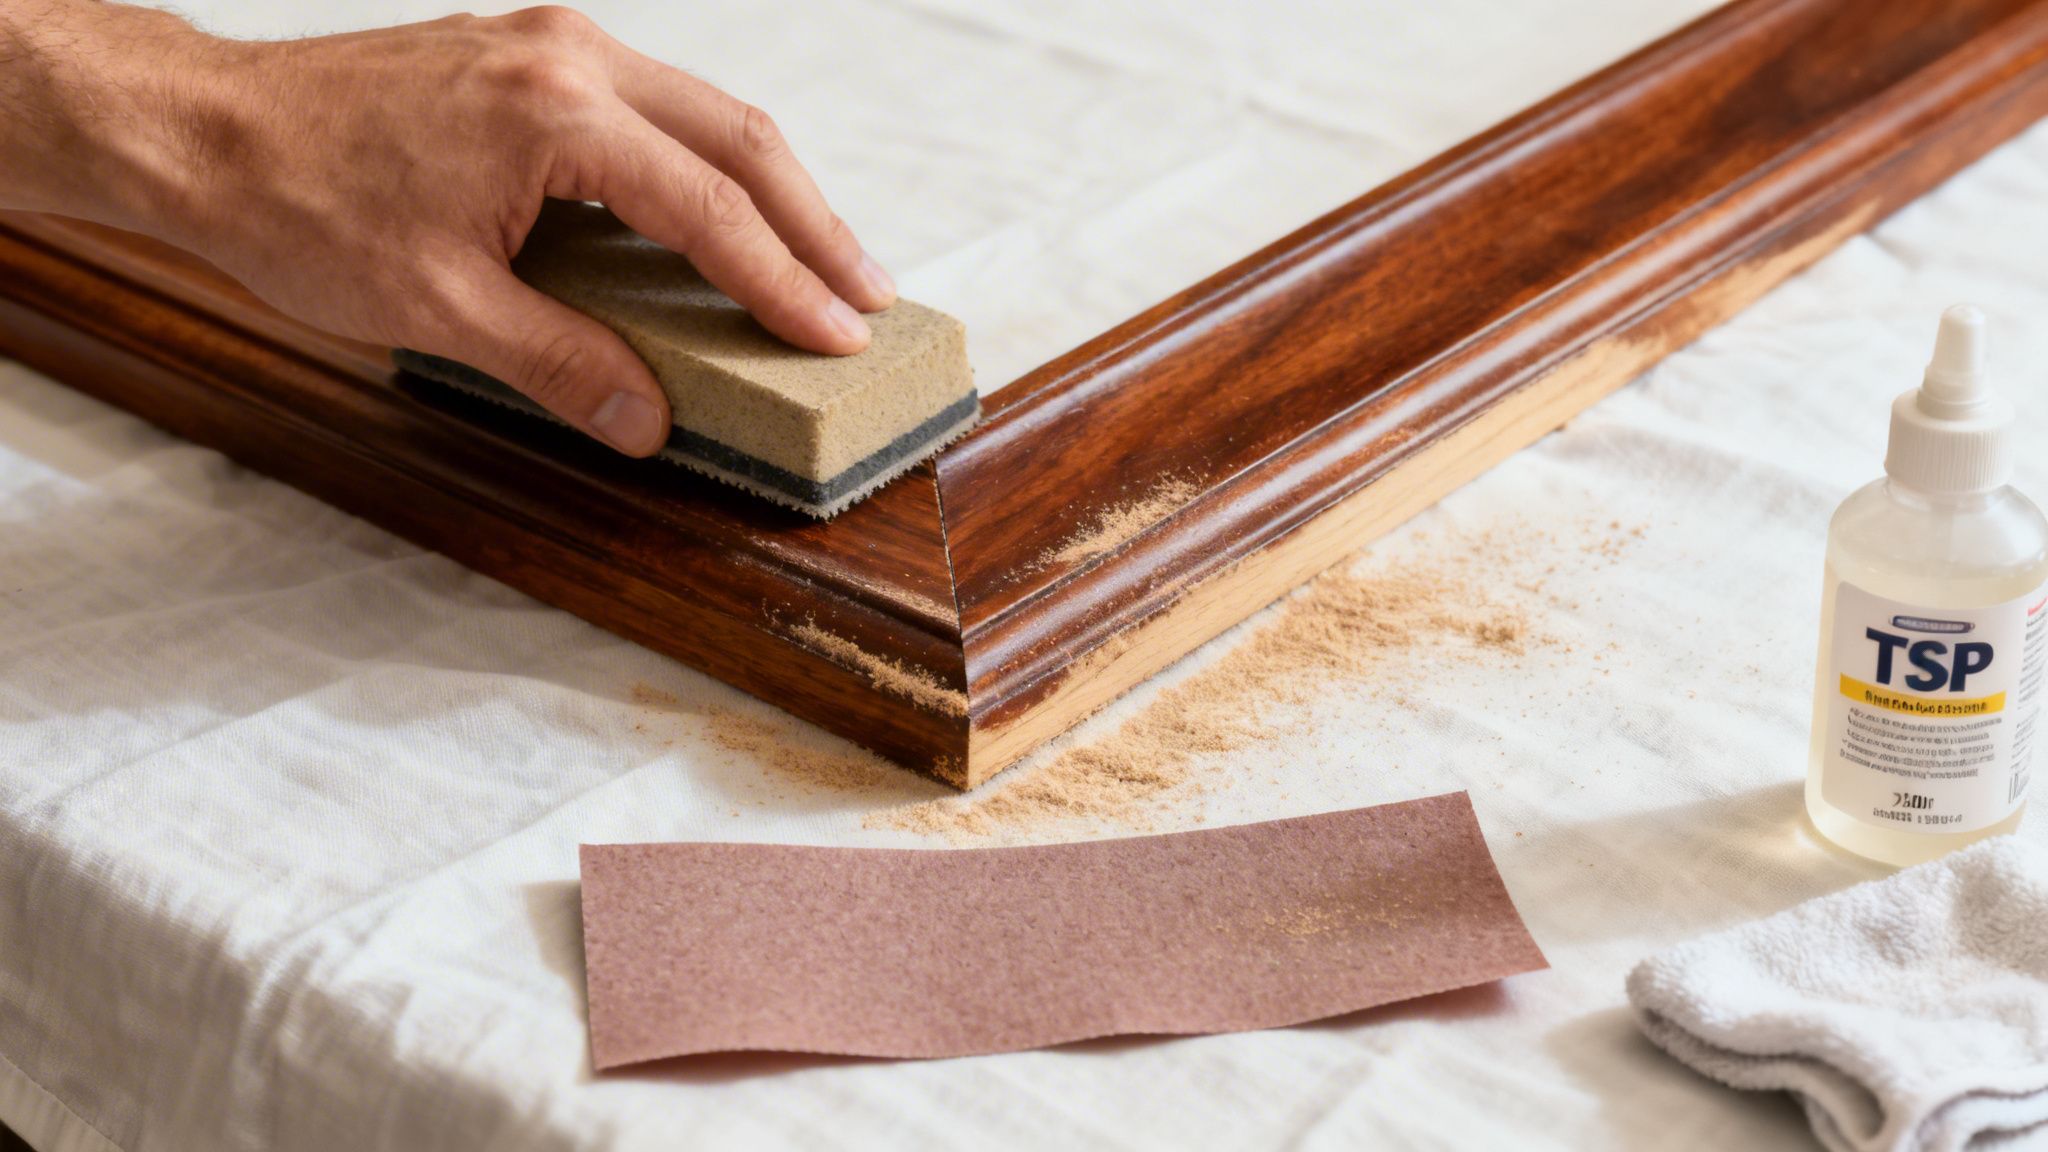
First Things First: A Deep Clean
Before you even touch a piece of sandpaper, you have to clean the wood thoroughly. For most jobs we tackle, both residential and commercial, a trisodium phosphate (TSP) substitute is our go-to. These cleaners are fantastic at cutting through years of built-up grease, wax, and dirt without the harsh chemicals of old-school TSP.
Just mix the cleaner based on the instructions and get to scrubbing with a sponge or cloth. Really focus on the areas that get touched the most, like the wood around doorknobs and handles. Those spots are notorious for collecting oil from hands. Once you're done, rinse the surface with a clean, damp cloth and let it dry completely.
Over the course of thousands of jobs here in our community, we've seen that a simple 50/50 mix of white vinegar and water can be surprisingly effective. It often removes up to 90% of the residue from standard polyurethane finishes. Whatever you use, this initial cleaning is absolutely non-negotiable.
The Art of Sanding for a Great Grip
With the surface clean and bone-dry, it's time to knock down that glossy sheen. This step is called deglossing, and it's all about creating a surface that your primer can bite into. Paint simply can’t stick to a slick, glassy finish.
You have two solid options here: old-fashioned sanding or a chemical deglosser.
Traditional Scuff-Sanding
This is the tried-and-true method for a reason—it works. Your goal isn't to strip off all the old stain and finish down to bare wood. You just need to scuff up the surface enough to give the primer some "tooth." For this, a medium-grit sandpaper (120 to 150-grit) on a sanding block or a random orbital sander is perfect.
Always sand with the grain of the wood, using light and even pressure. You'll know you're done when the shine is gone and the whole piece has a uniform, dull look. Don't leave any shiny spots behind; those are future peeling points.
Choosing the right sandpaper grit is crucial for getting the right surface profile without damaging the wood. Here’s a quick guide to help you pick the right one for your project.
Sanding Grit Guide for Painting Over Stain
| Sandpaper Grit | Primary Use Case | Pro Tip |
|---|---|---|
| 80-100 Grit (Medium) | For very glossy, thick finishes or minor imperfections. Use with caution. | This can leave visible scratches. Only use it for the initial rough-up, then follow with a finer grit. |
| 120-150 Grit (Medium) | The ideal "sweet spot" for general scuff-sanding on most stained surfaces. | This is your workhorse. It dulls the sheen effectively without being too aggressive. Perfect for cabinets and trim. |
| 180-220 Grit (Fine) | For very light scuffing or sanding between primer and topcoats for an ultra-smooth finish. | We use this grit after priming to knock down any raised grain before applying the first coat of paint. |
After you've done your main sanding, a quick pass with a finer grit can give you an even smoother base, but for most projects, 120-150 grit is all you need to get the job done right.
Liquid Deglosser (Sandpaper in a Can)
If you're working with something really ornate, like intricate crown molding or carved cabinet doors, sanding can be a nightmare. This is where a liquid deglosser, or "sandpaper in a can," becomes your best friend. It’s a chemical that softens the top layer of the finish, making it tacky and ready for primer.
You just wipe it on with a lint-free cloth, wait for the time specified on the can, and you're ready to prime. It's a huge time-saver on those tricky, detailed surfaces.
No matter which method you choose, don't rush this part. It's been shown that a shocking 80% of paint failures on stained wood come from improper or skipped deglossing. A little extra time here can prevent a massive headache down the road. If you want to dig deeper, this guide on how to prep wood for painting is a great resource.
Final Dust Removal with a Tack Cloth
Sanding creates a lot of fine dust, and that dust is the enemy of a smooth paint job. If you paint over it, you'll get a gritty, bumpy texture. First, vacuum everything with a brush attachment to get the majority of it.
Then, for the final, critical cleanup, grab a tack cloth. This is basically a sticky cheesecloth made specifically to pick up every last speck of dust. Gently wipe down every surface, refolding the cloth as it fills with dust. You’ll be surprised how much it picks up even after vacuuming.
This final wipe-down is the secret to a perfectly clean, dull surface—the ideal canvas for your primer. It might seem like a small thing, but it’s a non-negotiable step for getting that flawless finish you see on professionally painted kitchen cabinets.
Choosing the Right Primer and Paint for Durability
Alright, your surfaces are clean, dry, and scuffed up perfectly. You’ve built a great foundation, but now comes the part where your project’s long-term success is truly decided: choosing the right products. Slapping a standard wall primer on stained wood is a recipe for disaster.
You need a specialized primer—one designed to lock down that old finish and stop stains from bleeding right through your new paint. Think of it as the crucial mediator between the stubborn old stain and your fresh topcoat. Its job is to create a barrier and give your paint a uniform surface to grab onto.
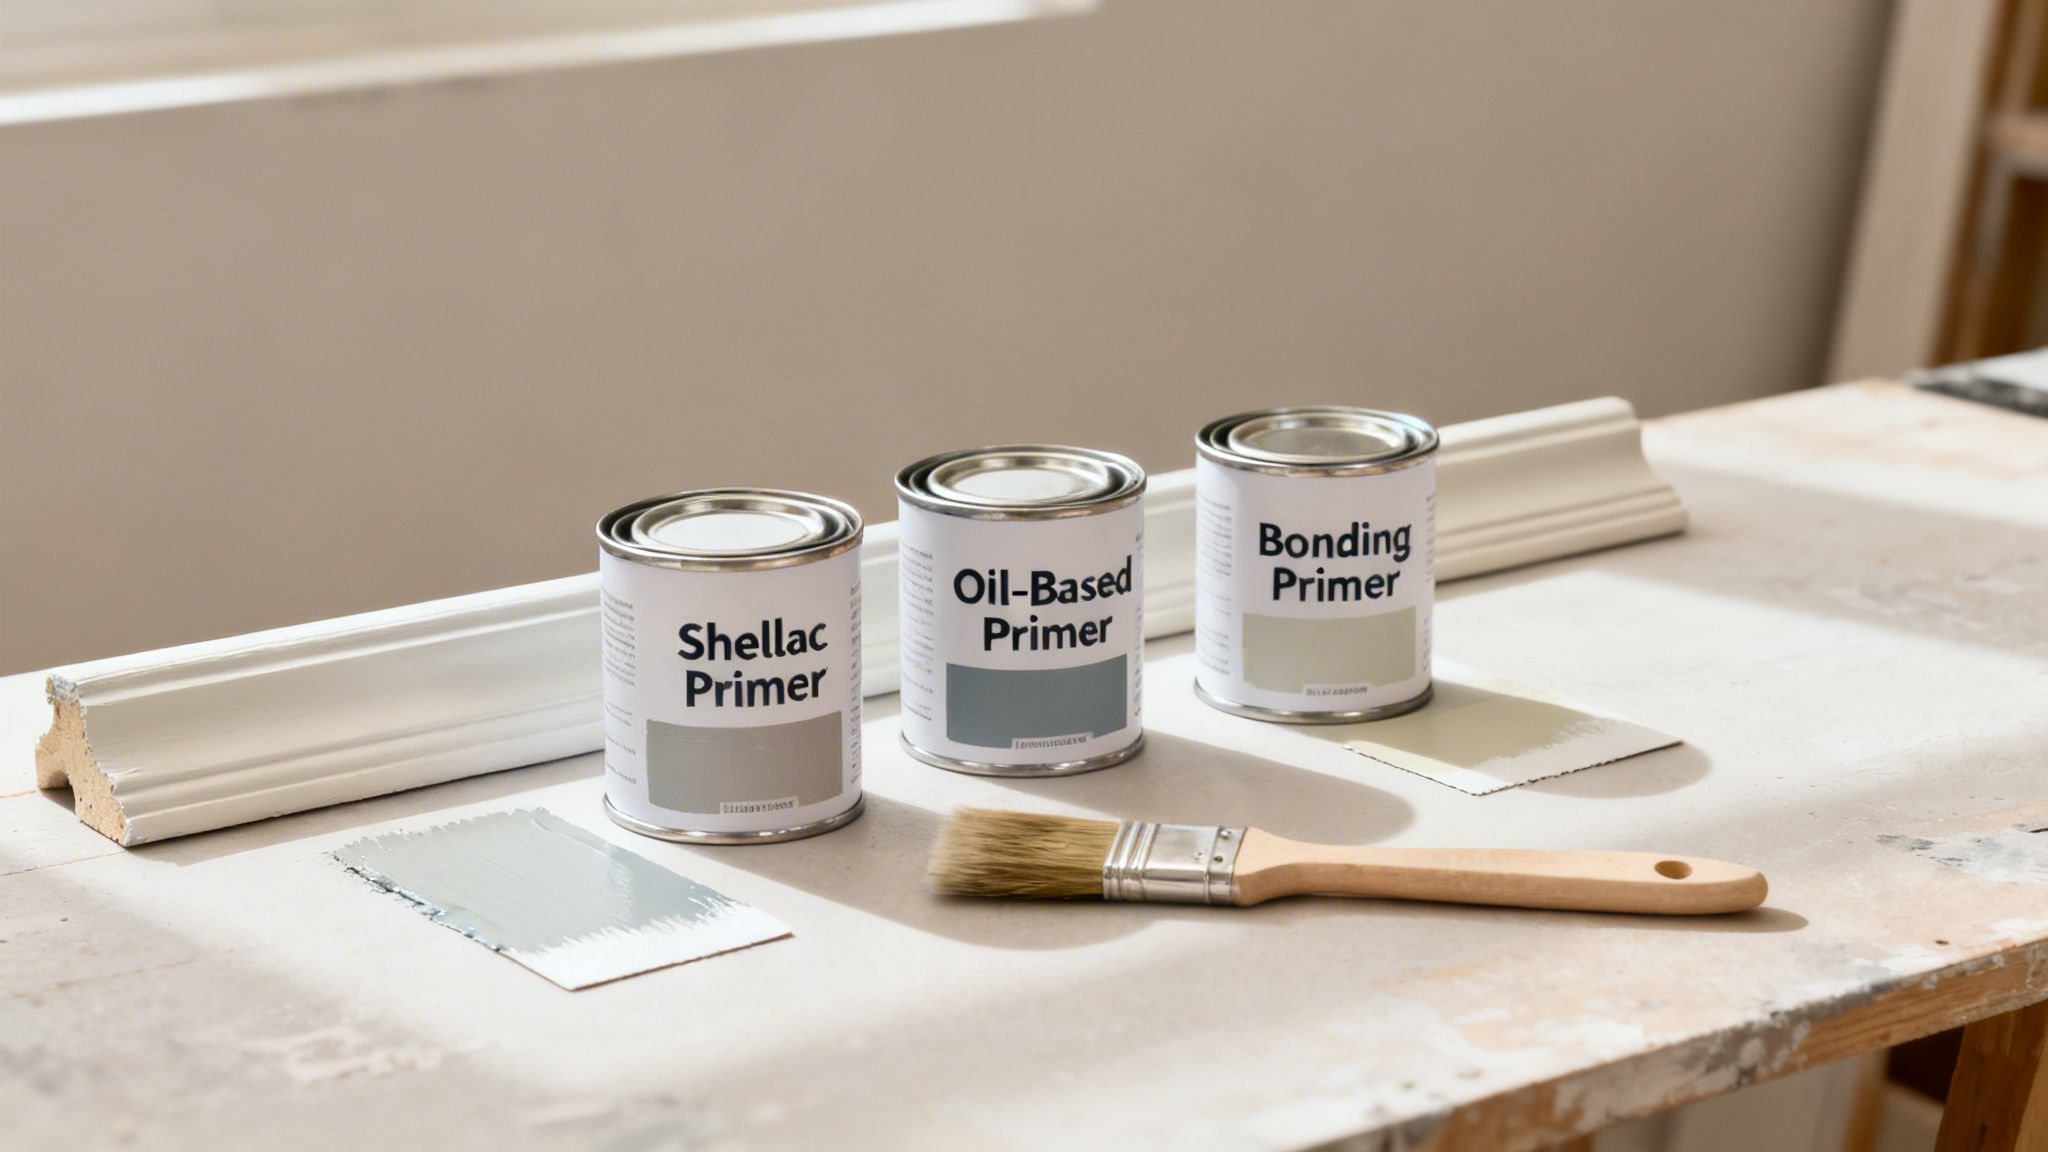
Selecting the Ideal Stain-Blocking Primer
Not all primers are created equal, and this distinction is absolutely critical when you’re painting over stain. You’re looking for a high-adhesion, stain-blocking primer. These are formulated to grip slick surfaces and—most importantly—prevent tannins from the wood and pigments from the old stain from creeping into your new paint color.
Without the right primer, you could apply three coats of the most expensive paint, and still see ugly yellow or brown blotches emerge weeks or even months later. Here’s a breakdown of the main types you'll be choosing from.
Shellac-Based Primers: This is the original champion of stain-blocking and still our go-to for the absolute toughest jobs. It’s a powerhouse for sealing in everything from stubborn wood tannins to smoke, water stains, and knotty pine that loves to bleed. If you have any doubt, a shellac-based primer is your safest bet for a residential or commercial painting project.
Oil-Based Primers: For decades, oil-based primers were the industry standard for adhesion and durability. They grip like nothing else, sand down to a glass-smooth finish, and do a fantastic job blocking most common stains. While water-based tech has caught up, a good oil primer is still a rock-solid choice, especially for older wood with an unknown finish.
Water-Based Bonding Primers: Paint technology has come a long way. The best modern water-based bonding primers offer incredible adhesion and very good stain-blocking power, all with the benefits of low odor and easy soap-and-water cleanup. For most residential projects like painting oak cabinets or trim, these are more than enough to get the job done right. If you want to dig deeper into when primer is necessary, our guide on priming sheetrock before painting offers some good context.
Selecting the right product isn't just a professional recommendation; it's backed by data. Industry findings show that painting over stain can fail 35% of the time without proper product selection. Using a shellac-based sealer on VOC-heavy stains, for instance, provides a 98% effective seal, while certain blocking primers can reduce moisture ingress on exterior wood like decking by 65%—a vital consideration for exterior painting in our region.
Choosing Your Topcoat for a Lasting Finish
Once your primer has fully cured, it’s time for the rewarding part—the color. But don't let the excitement cause you to grab just any can of paint. Your topcoat choice is just as important as the primer for long-term durability. You need a finish that can handle the wear and tear of its environment, whether it's a high-traffic kitchen or a bustling commercial hallway.
For most interior work on cabinets, doors, and trim, a top-quality acrylic-latex enamel is your best bet. These modern paints are engineered for durability, curing to a hard, scrubbable finish that stands up to daily abuse. They also have low VOCs and clean up easily, making them perfect for homes and most commercial spaces.
In some extremely demanding commercial environments, like a restaurant kitchen or retail space, the exceptional hardness and chemical resistance of an oil-based enamel can offer an edge. But their strong odor and much longer dry times make them impractical for most occupied projects.
In the end, pairing the right specialty primer with a tough, durable enamel is how you guarantee all your prep work pays off. That combination is the secret to a professional-grade finish that won’t just look good on day one—it will stay beautiful for years to come.
Applying Paint for a Smooth, Professional Finish
All that careful prep work brings you to this moment. This is where your patience and technique will pay off, turning a prepped surface into a beautiful, durable finish. Getting it right is about more than just slapping on some paint; it's about building a smooth, flawless surface, one coat at a time.
The goal is to eliminate any sign that there was ever a stained finish underneath. This means creating perfectly crisp lines and avoiding common pitfalls like brush marks or drips. These are the same standards our crews at Wheeler Painting follow every day, whether we're transforming residential interiors or updating commercial properties.
The Right Tools and Techniques
Your best friends for this job are a quality angled brush and a mini roller. The brush is for "cutting in"—tackling all the corners, edges, and detailed profiles where a roller just can't get a clean line. For the flat areas, like cabinet doors or wide trim, a mini-roller with a foam or low-nap cover is your secret to a factory-smooth finish, free of brush strokes.
The key to avoiding those dreaded lap marks is to always maintain a "wet edge." Simply put, you should always be rolling or brushing from the unpainted section back into the wet paint you just applied. This lets the strokes melt into each other seamlessly, creating a single, uniform surface before anything starts to dry.
One of the biggest mistakes we see is someone trying to get full coverage in one thick coat. It’s a recipe for drips, sags, and an uneven surface. The professional method is to apply two or three thin coats, letting each one dry completely. This builds up both color and strength for a much smoother, more resilient finish.
Build Your Finish in Layers
Don't panic if the first coat of paint looks a little thin or streaky. That's completely normal. Its job is to bond with the primer and lay down the initial base of color.
Once that first coat is dry (check the can for timing), give it a quick, gentle once-over with 220-grit sandpaper. This will knock down any tiny dust particles or imperfections that have settled in the paint. After a wipe-down with a tack cloth, you’re ready for the next layer.
This is where you'll really see the magic happen. The second coat will go on more smoothly and deliver much better coverage. For most jobs, two coats over your primer is the sweet spot. But if you're making a dramatic change—like going from a dark cherry stain to a crisp white—a third thin coat is often necessary for that perfect, solid color.
Painting trim, in particular, requires a steady hand. For more in-depth advice, you can check out our other tips for painting trim.
Dry vs. Cured: Why Patience is Key
This is a detail that trips up a lot of people, but understanding it is critical for a long-lasting finish on high-traffic surfaces like doors, cabinets, and railings.
Drying Time: This is when the solvents evaporate, making the surface feel dry to the touch, which often happens in just a few hours. At this stage, the paint is still very delicate.
Curing Time: This is the real-world timeline for the paint to fully harden and reach its maximum durability. The paint molecules are cross-linking to form a tough, protective shell. This can take anywhere from a few days to 30 days, depending on the paint and the environment.
Resist the urge to put things back on shelves or close cabinet doors too soon. While the paint may feel dry, it hasn't cured. Rushing this final step can cause dents, scratches, or peeling, undoing all your hard work. A little patience at the very end ensures your new finish will look great for years to come.
When to Hire a Professional Painting Contractor
There's nothing quite like the pride of a finished DIY project. But many property owners find that painting over old wood stain can be overwhelming. It’s a job that looks simple on the surface, but one wrong step can lead to a peeling, tacky mess that’s a nightmare to fix.
So, how do you know when to trade your paintbrush for the phone? The answer often comes down to the project's scale, complexity, and your available time.
Signs You Should Call a Pro
Let's be honest—the time and effort required for a flawless finish can be massive. If your project looks anything like the scenarios below, bringing in an expert is probably your best move.
Large-Scale Cabinet Projects: Your kitchen is a high-value area, and cabinet finishes need to be perfect and durable. A professional crew uses specialized spray equipment to apply a rock-hard, factory-smooth coating you simply can't get by hand.
Commercial Renovations: For any business owner or facilities manager, downtime is money. A professional team like Wheeler Painting can tackle a large office space renovation or retail build-out with a tight, predictable schedule, getting your doors back open with minimal disruption. We also provide facility construction services for larger projects.
Intricate or Extensive Trim Work: Think about tackling every door, window casing, and baseboard in your entire home or office. We're talking hundreds of hours of painstaking sanding, priming, and painting. A pro team has the manpower and the systems to knock this out efficiently, delivering a consistent, beautiful finish from one room to the next.
Hiring a professional isn't just about saving yourself time. It's an investment in a high-quality, long-lasting result. A reputable local contractor has the experience to navigate the tricky chemistry of old stains and new paints, and they’ll stand behind their work with a warranty.
Ultimately, you have to weigh your own time, patience, and skill against the finish you're hoping for. For a single bookshelf, by all means, have at it! But for those big, high-stakes jobs where the results have to be perfect, calling in a pro is the surest path to getting it done right the first time.
If you're looking for "commercial painting services near me" or a "residential contractor near me," finding a trusted local company guarantees a stress-free process and a truly professional-grade transformation.
Your Top Questions About Painting Stained Wood
Over the years, we've heard just about every question there is when it comes to painting over stained wood. Here are the answers to a few of the most common ones we get from both residential and commercial clients before we start a project.
Can I Just Paint Over Stain Without Sanding?
We get this one all the time, and we know it’s tempting to look for a shortcut. The short answer is no, you really shouldn't. At the very least, the surface needs a thorough cleaning and a good scuff-sand to knock down the existing gloss.
If you skip this step, the primer simply has nothing to bite into. You’ll end up with a finish that chips and peels easily, and all your hard work will be wasted in a matter of months.
How Many Coats of Primer Will I Need?
This really depends on the original stain color. If you're tackling a very dark stain, like a deep mahogany or espresso finish, plan on using two coats of a high-quality stain-blocking primer.
The first coat is your sealer—it locks in the old stain and any wood tannins that might try to bleed through. The second coat is what gives you a perfectly clean, neutral canvas for your new color. Always let each coat dry completely based on what the can says.
We’ve seen it happen on countless projects: someone tries to get by with a single coat of primer over a dark stain, only to see faint discoloration show through the topcoat. Doing it right with two coats from the start actually saves you time and paint in the end.
What's the Best Paint Finish for Kitchen Cabinets?
For kitchen cabinets or any other surface that gets a lot of daily use, a satin or semi-gloss finish is the way to go. These sheens have excellent durability and are so much easier to wipe clean compared to a flat or eggshell finish—a must-have in a busy kitchen or commercial space.
For the absolute best results, look for a modern acrylic-alkyd hybrid paint. These give you the hard-as-nails durability of traditional oil-based paint but with the easy, low-odor cleanup of a water-based product.
Whether you’re updating your home or managing a large-scale commercial renovation, a perfect paint job comes from experience. If your project feels like more than you want to handle, the team at Wheeler Painting is here to deliver a professional finish that lasts. Schedule your free estimate today and let our local experts take care of the details.