

What Is Water Damage Restoration? a Puget Sound Guide
You come downstairs on a gray Tacoma morning, and the house feels off. The floor near the dishwasher is a little soft. The baseboard by the exterior wall looks darker than it did yesterday. In a lot of Puget Sound homes, especially older ones in Tacoma's North End or Seattle's Queen Anne, that small clue is often the start of a larger moisture problem hidden behind trim, plaster, subflooring, or insulation.
Water damage restoration is the professional process of removing water, drying the structure, cleaning affected materials, documenting the loss, and repairing the property so it can return to its pre-loss condition safely. It works like medical triage for a building. First, stop the source and assess the spread. Then dry what can be saved, remove what cannot, and record the condition carefully so repairs and insurance decisions are based on evidence instead of guesswork.
Speed matters.
In our part of Washington, moisture does not leave on its own as easily as homeowners hope. Cool air, frequent rain, and long damp stretches can keep framing, crawlspaces, and wall cavities wet longer than they would in a drier climate. Older houses and mixed-use buildings often make the problem harder to spot because they may have layered remodels, original wood components, or outdated assemblies around windows and plumbing that let water travel farther than expected.
That is why professional restoration is not just about drying equipment. It is also about finding hidden moisture, protecting indoor air quality, and creating clear photo, moisture, and scope documentation from day one. That paperwork can make a real difference during an insurance claim, because carriers usually want a clear record of what was affected, what was saved, and why each step was necessary. Property owners comparing help in different regions may even see firms like Good Boy Plumbing for restoration emphasize fast response for the same reason. The first records often shape the whole claim.
Understanding the process early helps you make calmer decisions, avoid preventable damage, and keep a manageable leak from turning into a much larger repair.
A Homeowners Guide to Water Damage
A Tacoma homeowner wakes up, steps into the kitchen, and feels the floor give slightly underfoot. The dishwasher line leaked through the night. There's a puddle under the cabinets, the base trim is darkening, and the drywall near the toe-kick looks swollen. At that moment, the same question often comes to mind. Is this just cleanup, or is this something more serious?
It's usually more than cleanup. Water damage restoration means removing the water, drying the structure, treating affected areas, checking for hidden moisture, and repairing damaged materials so the property can safely return to its pre-loss condition. That applies to homes, offices, tenant spaces, and mixed-use buildings alike.

Why this problem is so common
Water damage isn't a rare event. It's a major part of a much larger recovery industry. Water damage is a major segment of the global disaster recovery sector, which is valued at approximately $41.2 billion in 2024. The dedicated water damage restoration market was estimated at $5.60 billion in 2025 and is expected to reach $5.97 billion in 2026, reflecting how often properties are affected by water intrusion (Benchmark International).
That matters for one practical reason. If this is happening in your house or building, you're not dealing with a strange one-off situation. Contractors, insurers, and property owners handle these losses every day. The key is responding in the right order.
Practical rule: If materials feel wet, swollen, soft, or musty, assume there may be hidden moisture beyond what you can see.
In other markets, property owners often look for fast-response guidance such as Good Boy Plumbing for restoration. The same principle applies here in Puget Sound. Early action protects the structure, your contents, and your claim.
What people often misunderstand
Most stressed property owners focus on the visible water. Professionals focus on the water you can't see. Moisture can move under flooring, wick into drywall, collect behind cabinets, and remain trapped in insulation long after the floor looks dry.
That's why restoration isn't just mopping, running a fan, and hoping for the best. It's a controlled process built around inspection, moisture measurement, drying equipment, sanitation, and repair.
Signs Causes and Health Risks of Water Intrusion
Water intrusion doesn't always announce itself with a burst pipe and a flooded room. In Tacoma and Seattle, it often shows up subtly first. Paint bubbles near a window. A baseboard starts separating from the wall. Wood flooring cups slightly. Someone notices a stale, earthy odor in a lower level office or basement.
Signs you can see and signs you can smell
Start with the obvious clues:
- Standing water or damp flooring: Puddles, soaked carpet, or water-stained vinyl usually mean the problem is active or recent.
- Warping and swelling: Cabinet toe-kicks, trim boards, laminate edges, and drywall that looks puffy often indicate water has been sitting long enough to absorb into porous material.
- Peeling paint or staining: Brown rings on ceilings and bubbling wall paint are common signs of slow leaks above or behind the surface.
- Musty odor: A persistent damp smell often points to moisture that hasn't dried properly.
- Texture changes: Walls that feel soft, crumbly, or cold in one isolated area can signal hidden saturation.
If you want a room-by-room checklist, Wheeler's guide to signs of water damage in walls can help you spot problems before they spread.
Common causes around Puget Sound
Some causes are sudden. Others build up over time.
| Common cause | What it often looks like |
|---|---|
| Plumbing failures | Wet cabinets, soaked drywall, ceiling leaks below bathrooms |
| Roof or window intrusion | Staining near corners, damp insulation, peeling paint |
| Appliance leaks | Water around dishwashers, refrigerators, washing machines |
| Drain backups or flooding | Contaminated water, strong odor, damaged flooring and trim |
| Older building assemblies | Hidden moisture in walls, recurring stains, slow deterioration |
Water damage is the second leading annual cause of property damage claims in the United States, with approximately 1 in 60 insured homes filing a claim each year. Globally, floods are the costliest severe weather event, and over 5,000 water-related disasters occurred between 2001 and 2018 (Rainbow Restoration statistics overview).
Why health risks change the urgency
Wet building materials don't just threaten finishes. They can affect the people inside the property. Residual moisture creates conditions where mold can begin growing on affected materials. Porous surfaces are especially vulnerable, which is why practical guidance on mold on porous surfaces can be useful for understanding why simple wipe-downs usually aren't enough.
Wet drywall, carpet padding, insulation, and trim can hold moisture after the surface looks normal. That hidden moisture is what turns a manageable water loss into a bigger restoration job.
In commercial spaces, delayed response can also affect indoor air quality, operations, and occupant confidence. In homes, it often means family members keep using rooms that aren't dry or clean yet. That's one reason professionals move quickly to identify the source, isolate affected areas, and decide what can be dried versus what needs removal.
The Professional Water Damage Restoration Process
You come downstairs after a Tacoma rainstorm and find water spreading across the floor. In that moment, the big question is simple. What happens now?
Professional restoration follows a set process for a reason. In Puget Sound, damp air slows drying, older homes often hide moisture behind plaster, trim, and layered flooring, and a job that looks finished too early can turn into warped materials, lingering odor, or a mold problem weeks later. A trained crew works step by step to stop the spread, dry the structure to a verified standard, and document the loss in a way that supports the insurance claim.
A typical response has five parts: emergency assessment, water extraction, structural drying and dehumidification, cleaning and antimicrobial treatment, and controlled reconstruction.
Here is what that looks like on site.

Phase 1 Emergency contact and assessment
The first job is to make the property safe and stop the water source if that is possible. Crews inspect affected rooms, check for immediate hazards such as wet electrical areas, ceiling sag, contaminated water, or damaged drywall, and identify where the loss began.
Early documentation starts here, not later. Technicians photograph visible damage, record affected materials, sketch moisture boundaries, and take initial meter readings. That paperwork matters more than many owners realize. Insurance carriers often want a clear record of what was wet, what was removed, what was dried in place, and why those decisions were made. Good documentation can make the difference between a smooth claim and a long back-and-forth.
If the leak is still active or the damage is spreading, Wheeler provides emergency water damage restoration for homes and commercial properties dealing with immediate water intrusion.
Phase 2 Water extraction
Once the site is stabilized, standing water needs to be removed quickly. Extraction equipment becomes the priority at this stage. Professionals use pumps, weighted extractors, truck-mounted or portable units, and specialized vacuums to pull water from floors, carpet, pad, and low cavities.
This part works like bailing out a boat before you start drying the deck. The more liquid water you remove up front, the less water can keep traveling into baseboards, adjoining rooms, and subfloors. It also makes the next drying phase more efficient.
This is also a point where homeowners understandably get mixed signals. The floor may look much better after extraction, but visible water and actual dryness are not the same thing.
Phase 3 Structural drying and dehumidification
Drying is the technical center of the whole job. It usually takes several days, and crews monitor conditions throughout because wet materials can keep releasing moisture long after the surface looks normal.
Technicians place air movers, dehumidifiers, and air scrubbers to remove moisture from surfaces, cavities, and hidden corners where water lingers (drying equipment overview).
In Tacoma homes, this step often requires extra care. Older building stock may include multiple finish layers, patched walls, wood subfloors, and previous repairs that create little pockets where moisture gets trapped. Our marine climate does not give you much help, either. Outdoor humidity can work against the drying plan if equipment placement and containment are not handled correctly.
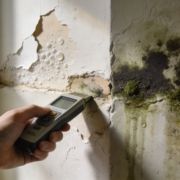
Crews use moisture meters and thermal imaging to check behind walls, under cabinets, and beneath finished flooring. Drying is not complete because the room feels dry. It is complete when readings show the materials have returned to an acceptable range.
This video gives a helpful overview of how the full process looks in practice.
Why this matters: Drywall paper, insulation, trim, and subfloors can still hold moisture after the surface looks normal.
Phase 4 Cleaning and antimicrobial treatment
After bulk water is removed and drying is underway, crews clean affected surfaces and contents based on the type of water involved. That may include antimicrobial treatment, odor control, debris removal, and disposal of materials that cannot be safely saved.
The right approach depends on contamination, not appearance. Water from a supply line is handled differently from dishwasher discharge, drain backup, or floodwater. That difference affects protective gear, cleaning methods, and whether porous materials can stay or need to be removed.
This phase also needs documentation. If carpet pad, drywall, insulation, or cabinetry is removed, the file should show why. That protects the owner, helps the adjuster understand the scope, and reduces disputes about whether the work was necessary.
Phase 5 Controlled reconstruction
The last phase is putting the property back together in a controlled, documented way. That can mean replacing drywall, reinstalling flooring, resetting trim, repainting, rebuilding cabinets, or restoring part of a commercial space after mitigation is complete.
For homeowners, this is when the project finally starts to feel less chaotic. For insurance purposes, it is also where a lot of jobs go sideways if mitigation and rebuild are treated as separate stories. The strongest results usually come from one clear record that connects the original loss, the drying data, the removed materials, and the repairs.
That full-service approach is how a general contractor handles water loss from first response through reconstruction. One local example is Wheeler Painting & Restoration Services, which manages standing water extraction, structural drying with air movers and dehumidifiers, and the repair work needed to restore Puget Sound properties properly.
Understanding Water Categories and Damage Classes
A Tacoma homeowner can walk into two wet rooms that look almost identical and still be facing two very different restoration jobs. One may involve a fresh supply-line leak with limited contamination. The other may involve drain backup or storm-related water that calls for removal, sanitation, and a tighter safety protocol. Professionals sort that out by identifying both the water category and the damage class before they decide what stays, what goes, and how the structure should be dried.

The three water categories
Restoration crews group water into three categories: Clean, Gray, and Black, as outlined in this SafetyCulture water damage restoration guide.
- Clean water starts from a sanitary source, such as a broken supply line or an ice maker line.
- Gray water carries contaminants that can cause illness, such as some washing machine discharge, dishwasher discharge, or certain fixture overflows.
- Black water carries the highest health risk. It includes sewage and floodwater, and it can contain harmful bacteria, pathogens, and debris.
Here is why that matters in real life. A clean-water leak under a sink may allow targeted drying and selective repair if the loss is found quickly. A toilet backup in that same bathroom changes the decision-making right away because porous materials like pad, insulation, and some drywall may no longer be safe to keep.
In the Puget Sound, this distinction matters even more because our damp climate slows natural drying, and many older Tacoma homes have layers of flooring, wall finishes, and framing details that hold moisture longer than owners expect.
The four damage classes
The category tells you how dirty the water is. The class tells you how far it traveled into the building.
| Damage class | What it usually means |
|---|---|
| Class 1 | Minimal absorption and a smaller affected area |
| Class 2 | More absorption, often affecting multiple materials |
| Class 3 | Heavy saturation affecting floors, walls, ceilings, or overhead areas |
| Class 4 | Deep moisture in dense or low-permeability materials such as hardwood, concrete, plaster, or structural wood |
A simple way to picture class is to compare a wet paper towel with a soaked piece of lumber. One releases moisture quickly. The other holds it deep below the surface. That is why a Class 4 loss often takes more time, more testing, and more specialized drying equipment.
Older homes around Tacoma, Gig Harbor, and nearby Puget Sound communities can push a loss into a higher class faster than people realize. Plaster walls, old-growth framing, layered subfloors, and hidden voids under cabinets or stairs can trap water well after the surface starts to look normal again.
When removal is the safer choice
Once contamination rises or materials lose their integrity, removal is often the safer path. Sewage and floodwater commonly affect porous materials in ways that cleaning alone cannot fully resolve. Drywall that swells significantly, insulation that has held contaminated water, and carpet pad exposed to black water are common examples.
This is also where careful records matter. If materials are removed, the file should show the category, the affected materials, meter readings, photos, and the reason each item could not be safely restored. That paperwork helps support insurance decisions and reduces disputes later. Property owners who want to understand the claims side can review this guide on help for water damage claims.
Good documentation protects more than the claim. It protects the repair plan.
Moisture meters, thermal imaging, and daily drying logs help a water damage contractor in Tacoma verify what is happening behind walls, under flooring, and inside structural materials. That matters because surface appearance can be misleading, especially during cool, damp Puget Sound weather when hidden moisture lingers and mold risk rises if the job is rushed.
Managing Costs Insurance and Project Timelines
A water loss can make every hour feel expensive. Tacoma homeowners usually want the same three answers right away. How long will drying take, what will insurance pay for, and what will make the bill rise or fall.
The honest answer is that timeline and cost are tied together. A small clean-water loss found early may dry fast and need limited repair. A leak that sat unnoticed inside an older Puget Sound home can turn into a longer project because moisture moves into plaster, layered flooring, trim, insulation, and other materials that do not release water quickly in our damp climate.
What affects the timeline
Drying time depends on the source of the water, how long it has been present, how far it traveled, and how many materials need to be removed or opened for access. Rebuilding takes longer than drying. Waiting on specialty materials, cabinet parts, flooring transitions, or insurance approvals can add time too.
A simple example helps. A dishwasher leak in a newer kitchen may need extraction, a few days of drying, and minor finish repairs. The same leak in an older Tacoma house may look similar on day one but take longer because water slipped under multiple flooring layers or into wall cavities that are harder to reach and document.
Commercial properties add another layer. Access rules, tenant schedules, and keeping part of the space open can slow the work even when the wet area is smaller.
What usually drives cost
Cost usually rises for a few predictable reasons:
- Contamination level: More contaminated water requires added safety controls, cleaning, and disposal.
- Hidden moisture: Water under flooring, behind cabinets, or inside wall cavities increases labor and equipment time.
- Material selection: Hardwood, trim details, built-ins, and custom finishes take more careful removal and repair.
- Demolition and reconstruction: Drying is only one phase. Replacing drywall, insulation, flooring, and paint adds scope.
- Documentation: Detailed moisture maps, photos, and daily records take time, but they often prevent bigger disputes later.
That last item deserves more attention.
The insurance documentation that often decides the claim
Here's a critical detail that often determines a claim's success: the restoration team needs to document the loss before conditions change. Once wet drywall is removed or equipment has been running for a day, some of the best proof is gone.
Insurance carriers often ask for a clear record of what was wet, how wet it was, what materials were affected, and why removal or extended drying was necessary. In plain language, photos alone are rarely enough. Moisture meter readings, notes on affected materials, room-by-room mapping, and daily drying logs help show the difference between a surface stain and a saturated assembly hidden inside the wall or floor.
That matters even more in the Puget Sound. Our cool, damp air can slow evaporation, and many older homes hide moisture in places that are easy to miss. If the file does not show those conditions early, it can be harder to explain why the job required more drying, selective demolition, or added repair.
A simple way to view it is this. Documentation works like a receipt for the condition of the building before cleanup changes the evidence.
For owners who want a broader overview, help for water damage claims explains how documentation affects insurance outcomes.
If you are working through an active loss, Wheeler's page for a Tacoma water damage contractor shows how restoration work and project records fit together during recovery.
DIY vs Professional Restoration in the Puget Sound
Some water incidents can be handled in-house. Many can't. The difference usually comes down to water source, time elapsed, and whether moisture has moved into building materials.
In Puget Sound, the climate changes the calculation. Damp air slows drying. Older homes in Tacoma, West Seattle, and North Bend often have cavities, flooring layers, and previous repairs that trap moisture. Even newer buildings in Bellevue or Issaquah can hide water under cabinets, below floating floors, or inside wall insulation.

A fair comparison
| Situation | DIY may be reasonable | Professional restoration is the safer choice |
|---|---|---|
| Small clean-water spill | Yes, if cleaned immediately and no materials stayed wet | Better if water reached walls, trim, or subfloor |
| Appliance leak found late | Risky | Yes |
| Sewage backup or floodwater | No | Yes |
| Musty odor with no visible water | No | Yes |
| Commercial or tenant space loss | Limited | Yes |
| Older building with hidden cavities | Limited | Yes |
What DIY can and can't do
A homeowner can often handle a minor, clean-water spill with towels, a wet vac, and fast airflow. That's reasonable when the water is limited, discovered right away, and clearly hasn't soaked into finish materials.
DIY methods usually fall short when the job requires:
- Moisture mapping: Household tools don't confirm whether framing, insulation, or subfloors are dry.
- Commercial drying: Standard box fans don't replace a drying plan built around air movers and dehumidifiers.
- Contamination control: Gray and black water losses need safety procedures and disposal decisions.
- Insurance support: Most DIY cleanups don't create the documentation insurers expect for hidden moisture.
Why Puget Sound properties need a cautious approach
In Snoqualmie, Issaquah, and West Seattle, the outside air often doesn't help much. If materials stay damp, the building can hold that moisture longer than owners expect. That's especially true in basements, ground floors, and shaded wall assemblies.
“Looks dry” is one of the most expensive phrases in water restoration. If the moisture was only on the surface, you're fine. If it reached behind the surface, you need verification, not guesswork.
Restore Your Property with Wheeler Painting
Water damage restoration is a step-by-step professional process. It starts with finding the source and documenting the loss. It continues through extraction, drying, cleaning, and repair. Done correctly, it protects the structure, limits health risks, and gives you a stronger position with your insurance carrier.
That matters even more in Tacoma and the broader Puget Sound, where damp conditions and older building stock can hide moisture long after a room appears normal. A rushed cleanup can leave you with recurring odor, mold concerns, damaged finishes, or claim disputes that could have been avoided with proper drying and documentation.
If you own a home, manage a facility, or oversee a smaller tenant improvement or facility maintenance project in Tacoma, Seattle, New Castle, Issaquah, Bellevue, Kirkland, North Bend, West Seattle, or Snoqualmie, a calm and documented response is the right place to start.
If you need an inspection, emergency response, or a detailed proposal for repairs, contact Wheeler Painting & Restoration Services. They provide residential and commercial restoration, reconstruction, painting, and facility-focused construction services across the Puget Sound, with support for homeowners, business owners, and property managers who need one accountable contractor.



 “Like” us on Facebook!