8 Key Signs of Water Damage in Walls
That musty smell after another long, wet Puget Sound winter is easy to dismiss. A faint odor in a basement in Kent, a small stain near a ceiling in Seattle, or bubbling paint in a Tacoma office can look like cosmetic wear instead of a warning. In practice, those small clues are often the first signs of water damage in walls, and they rarely stay small if the source is still active.
What makes wall damage tricky is that it hides well. Water moves behind drywall, paint, trim, insulation, and wall coverings before you see much on the surface. A pipe leak, roof intrusion, window failure, or drainage problem can soak materials out of sight for days. A crack as small as 1/8 inch in a pipe can release up to 250 gallons of water in a day, which is why hidden leaks can do real damage before anyone spots them.
Around Puget Sound, the usual pattern is familiar. Rain keeps coming, gutters overflow, basements stay cool and damp, and older homes and commercial buildings develop moisture paths that don't show up right away. If you're already wondering whether that stain, smell, or soft wall section means trouble, that's the right instinct. Water damage gets more expensive and more disruptive when people wait for "clearer" proof.
Even simple exterior drainage problems can push moisture where it shouldn't go. If you're troubleshooting below-grade moisture, this breakdown of how gutters cause basement leaks is worth reading alongside the interior signs below.
The good news is that walls usually give you warnings. You just need to know what they look, feel, and smell like. These are the signs I’d tell any homeowner, property manager, or facilities team to watch for before minor repair work turns into restoration.
1. Discoloration and Staining on Walls
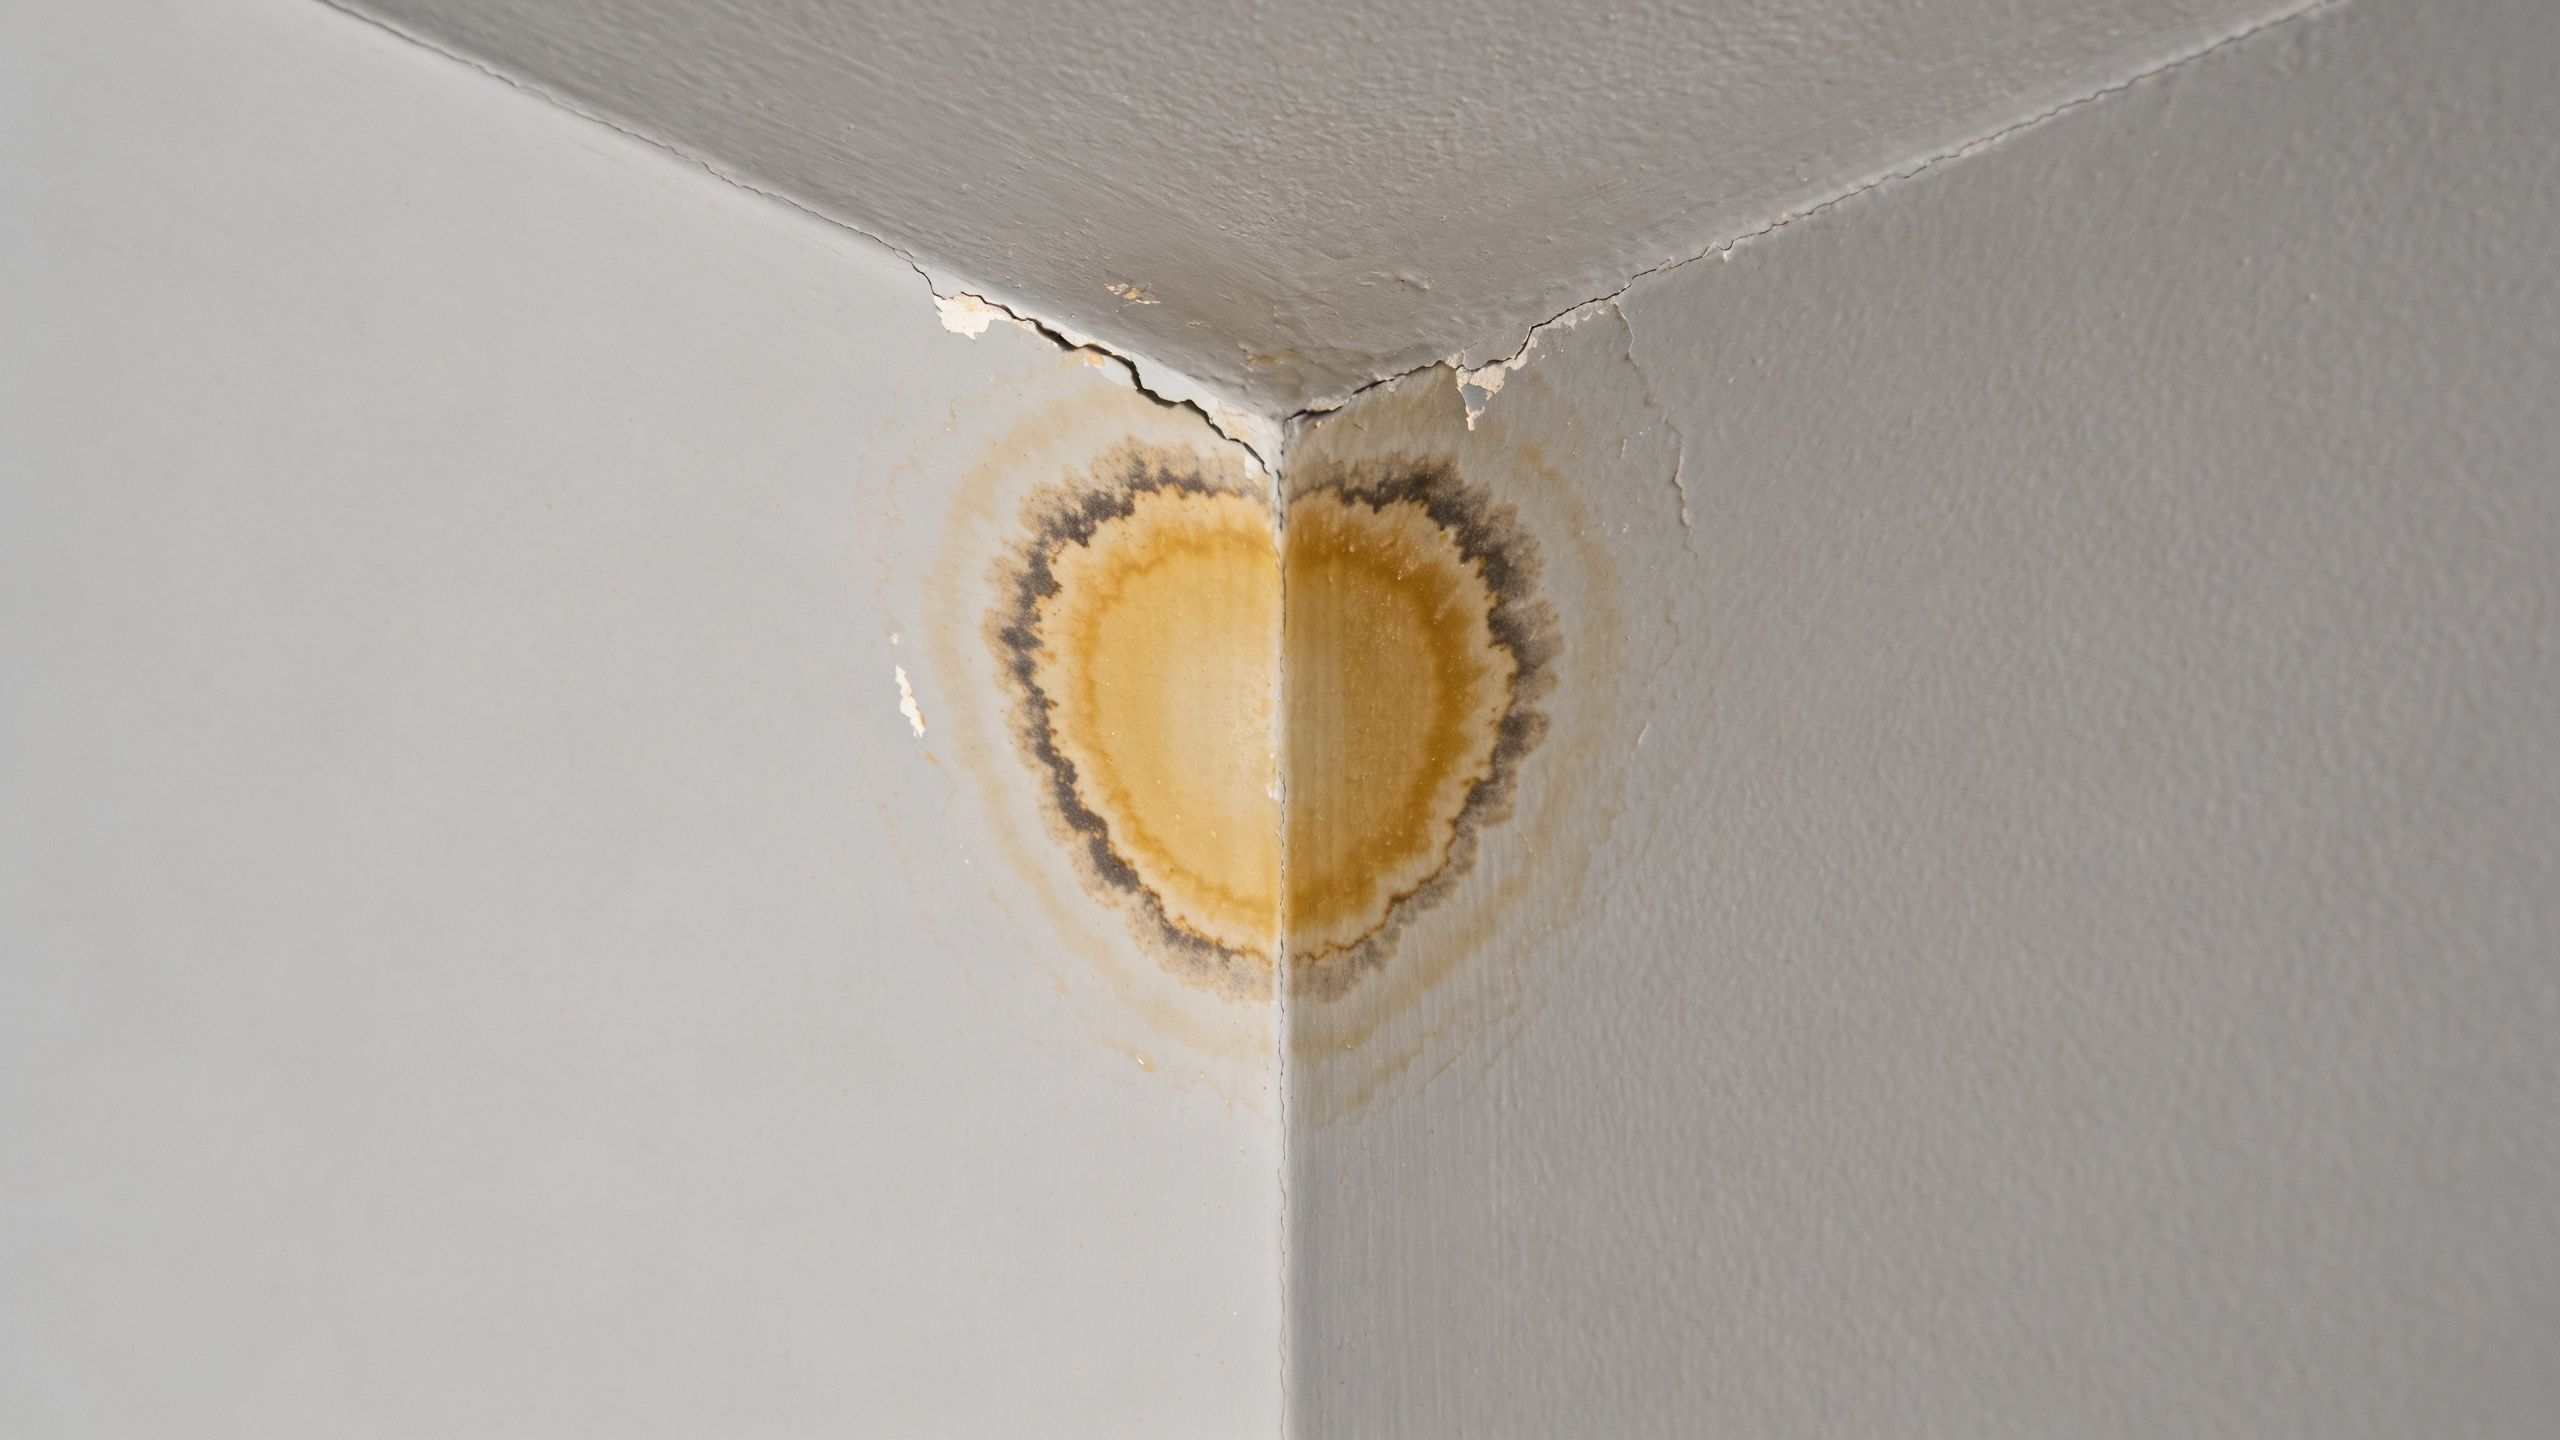
Stains are often the first sign people notice because they interrupt an otherwise normal wall. You see a yellow-brown ring on a ceiling line, a darker patch below a window, or blotchy discoloration behind a commercial tenant’s painted wall. Those marks matter because they usually mean water moved through the material at some point, and sometimes it’s still moving.
In homes between Seattle and Tacoma, I often see this after roof leaks, window failures, shower wall leaks, and basement seepage. A stain may look dry today and still point to an active problem. Water can wick through drywall and framing, then leave behind discoloration when it evaporates.
What staining usually tells you
Fresh stains often look darker and more irregular. Older stains tend to leave rings, spreading edges, or layered marks that show the wall got wet more than once. On basement walls, staining can also track the path of seasonal groundwater intrusion rather than a plumbing issue.
A practical mistake I see all the time is painting over the mark too early. That may hide the symptom for a while, but it doesn’t solve the leak, the moisture in the wall cavity, or the risk of damage continuing behind the finish.
Practical rule: If a stain changes shape, darkens after rain, or reappears after repainting, treat it as an active water issue until proven otherwise.
What works and what doesn’t
A few basic steps help you sort cosmetic damage from ongoing intrusion:
- Take dated photos: Photograph the stain, then compare it after storms or plumbing use. That timeline helps contractors and insurers understand whether the issue is active.
- Check nearby failure points: Look above the stain for roof penetrations, windows, plumbing lines, exterior walls, or bathroom fixtures.
- Watch for companion symptoms: Peeling paint, musty odor, or softness around the area usually means the problem goes deeper than the finish coat.
What doesn’t work is assuming a dry-looking stain means the wall is fine. Water often travels before it shows itself. By the time discoloration appears, the wall has already had more moisture exposure than most owners realize.
2. Soft, Spongy, or Warped Drywall
If a wall feels soft when it should feel firm, take that seriously. Drywall loses strength quickly once it absorbs water, and it won’t regain that strength just because the surface dries out. The paper facing loosens, the gypsum core breaks down, and the wall starts to feel spongy, warped, or slightly swollen at seams and corners.
Bathrooms, kitchens, laundry areas, and basement perimeter walls are common trouble spots. In commercial spaces, I also see this after roof leaks where water runs down inside the wall and collects at the bottom plate before anyone notices.
Here’s a useful visual if you want to see how water-damaged wallboard behaves in real conditions:
What your hand can tell you
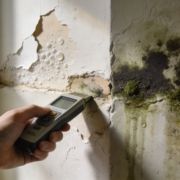
You don’t need to punch on walls to check them. A gentle press is enough. If one section gives more than the surrounding area, or if the drywall surface feels puffy, uneven, or loose near the baseboard, moisture has likely gotten into the wall system.
Professional crews usually verify this with a moisture meter. According to Belfor’s overview of wall water damage signs, moisture meters are a standard assessment tool for detecting hidden saturation before the surface fully fails. In the field, that matters because a wall can look almost normal while still holding enough moisture to keep deteriorating.
Repair trade-offs to understand
Spot repairs work when the wet area is limited and the leak was caught early. Full replacement is the better call when the drywall has lost shape, crumbles, or shows signs that moisture spread into insulation and framing. Trying to save softened drywall usually leads to callbacks.
If your wallboard is already compromised, this guide on repairing water-damaged drywall helps explain what can be patched and what usually needs removal.
- Check lower sections first: Water often settles low, especially after wall-cavity leaks.
- Mark the affected area: Painter’s tape around the soft section helps a contractor inspect the full spread.
- Don’t reinstall finishes too soon: New texture and paint over wet wallboard fail fast.
Soft drywall is one of those signs of water damage in walls that people want to classify as "minor." Sometimes it is. But if the material is mushy, bowed, or separating, replacement is usually more honest and more durable than a cosmetic patch.
3. Mold and Mildew Growth
A common Puget Sound call goes like this: a tenant reports a musty smell near an exterior wall, maintenance wipes off a few spots, and a week later the staining is back. That pattern usually means the wall stayed damp long enough for growth to get established. The surface cleanup was never an adequate fix.
Visible mold on drywall, trim, corners, or wall seams is a moisture problem first and a cleaning problem second. The color can vary. Black, green, white, and gray all show up in the field. What matters is persistence. The U.S. Environmental Protection Agency notes that mold can begin growing within 24 to 48 hours when moisture is present, which is why a small leak behind a wall can become a larger repair job fast.
In our climate, I pay close attention to walls that stay cool, shaded, or poorly ventilated. That includes lower-level rooms, bathroom partitions, exterior-facing walls, and storage areas where furniture or shelving blocks airflow. In commercial buildings, break rooms, janitor closets, and suites with old window assemblies are repeat offenders. Occupants often notice the smell before they see the colony.
Surface spotting is often the part you can see, not the full extent of the problem.
That trade-off matters for both homeowners and property managers. A few dots on painted tile or metal may be a cleaning and humidity-control issue. Growth on drywall is different because the material is porous. If moisture got into the board, paper facing, insulation, or framing, wiping the face of the wall does not address what is feeding it.
The first job is to stop the moisture source. Then verify whether the wall is drying or still active. If paint nearby is also lifting, this guide on what causes paint to bubble on walls helps connect finish failure to moisture trapped below the surface.
For small areas, owners can document staining, improve ventilation, and avoid disturbing suspect material until the source is known. For larger areas, recurring growth, tenant complaints, or any case where drywall may need removal, bring in a contractor who can inspect the cavity and coordinate repairs. Wheeler’s page on restoration companies near me is a practical local starting point. If you want a comparison from a drier climate, this guide on how to identify mold in Phoenix homes is useful, but Puget Sound buildings usually deal with longer damp periods and slower drying times.
Spraying over the patch or painting it in leaves the wet conditions in place. The staining returns, the odor lingers, and the repair bill usually gets bigger once the wall is finally opened.
4. Peeling, Bubbling, or Flaking Paint
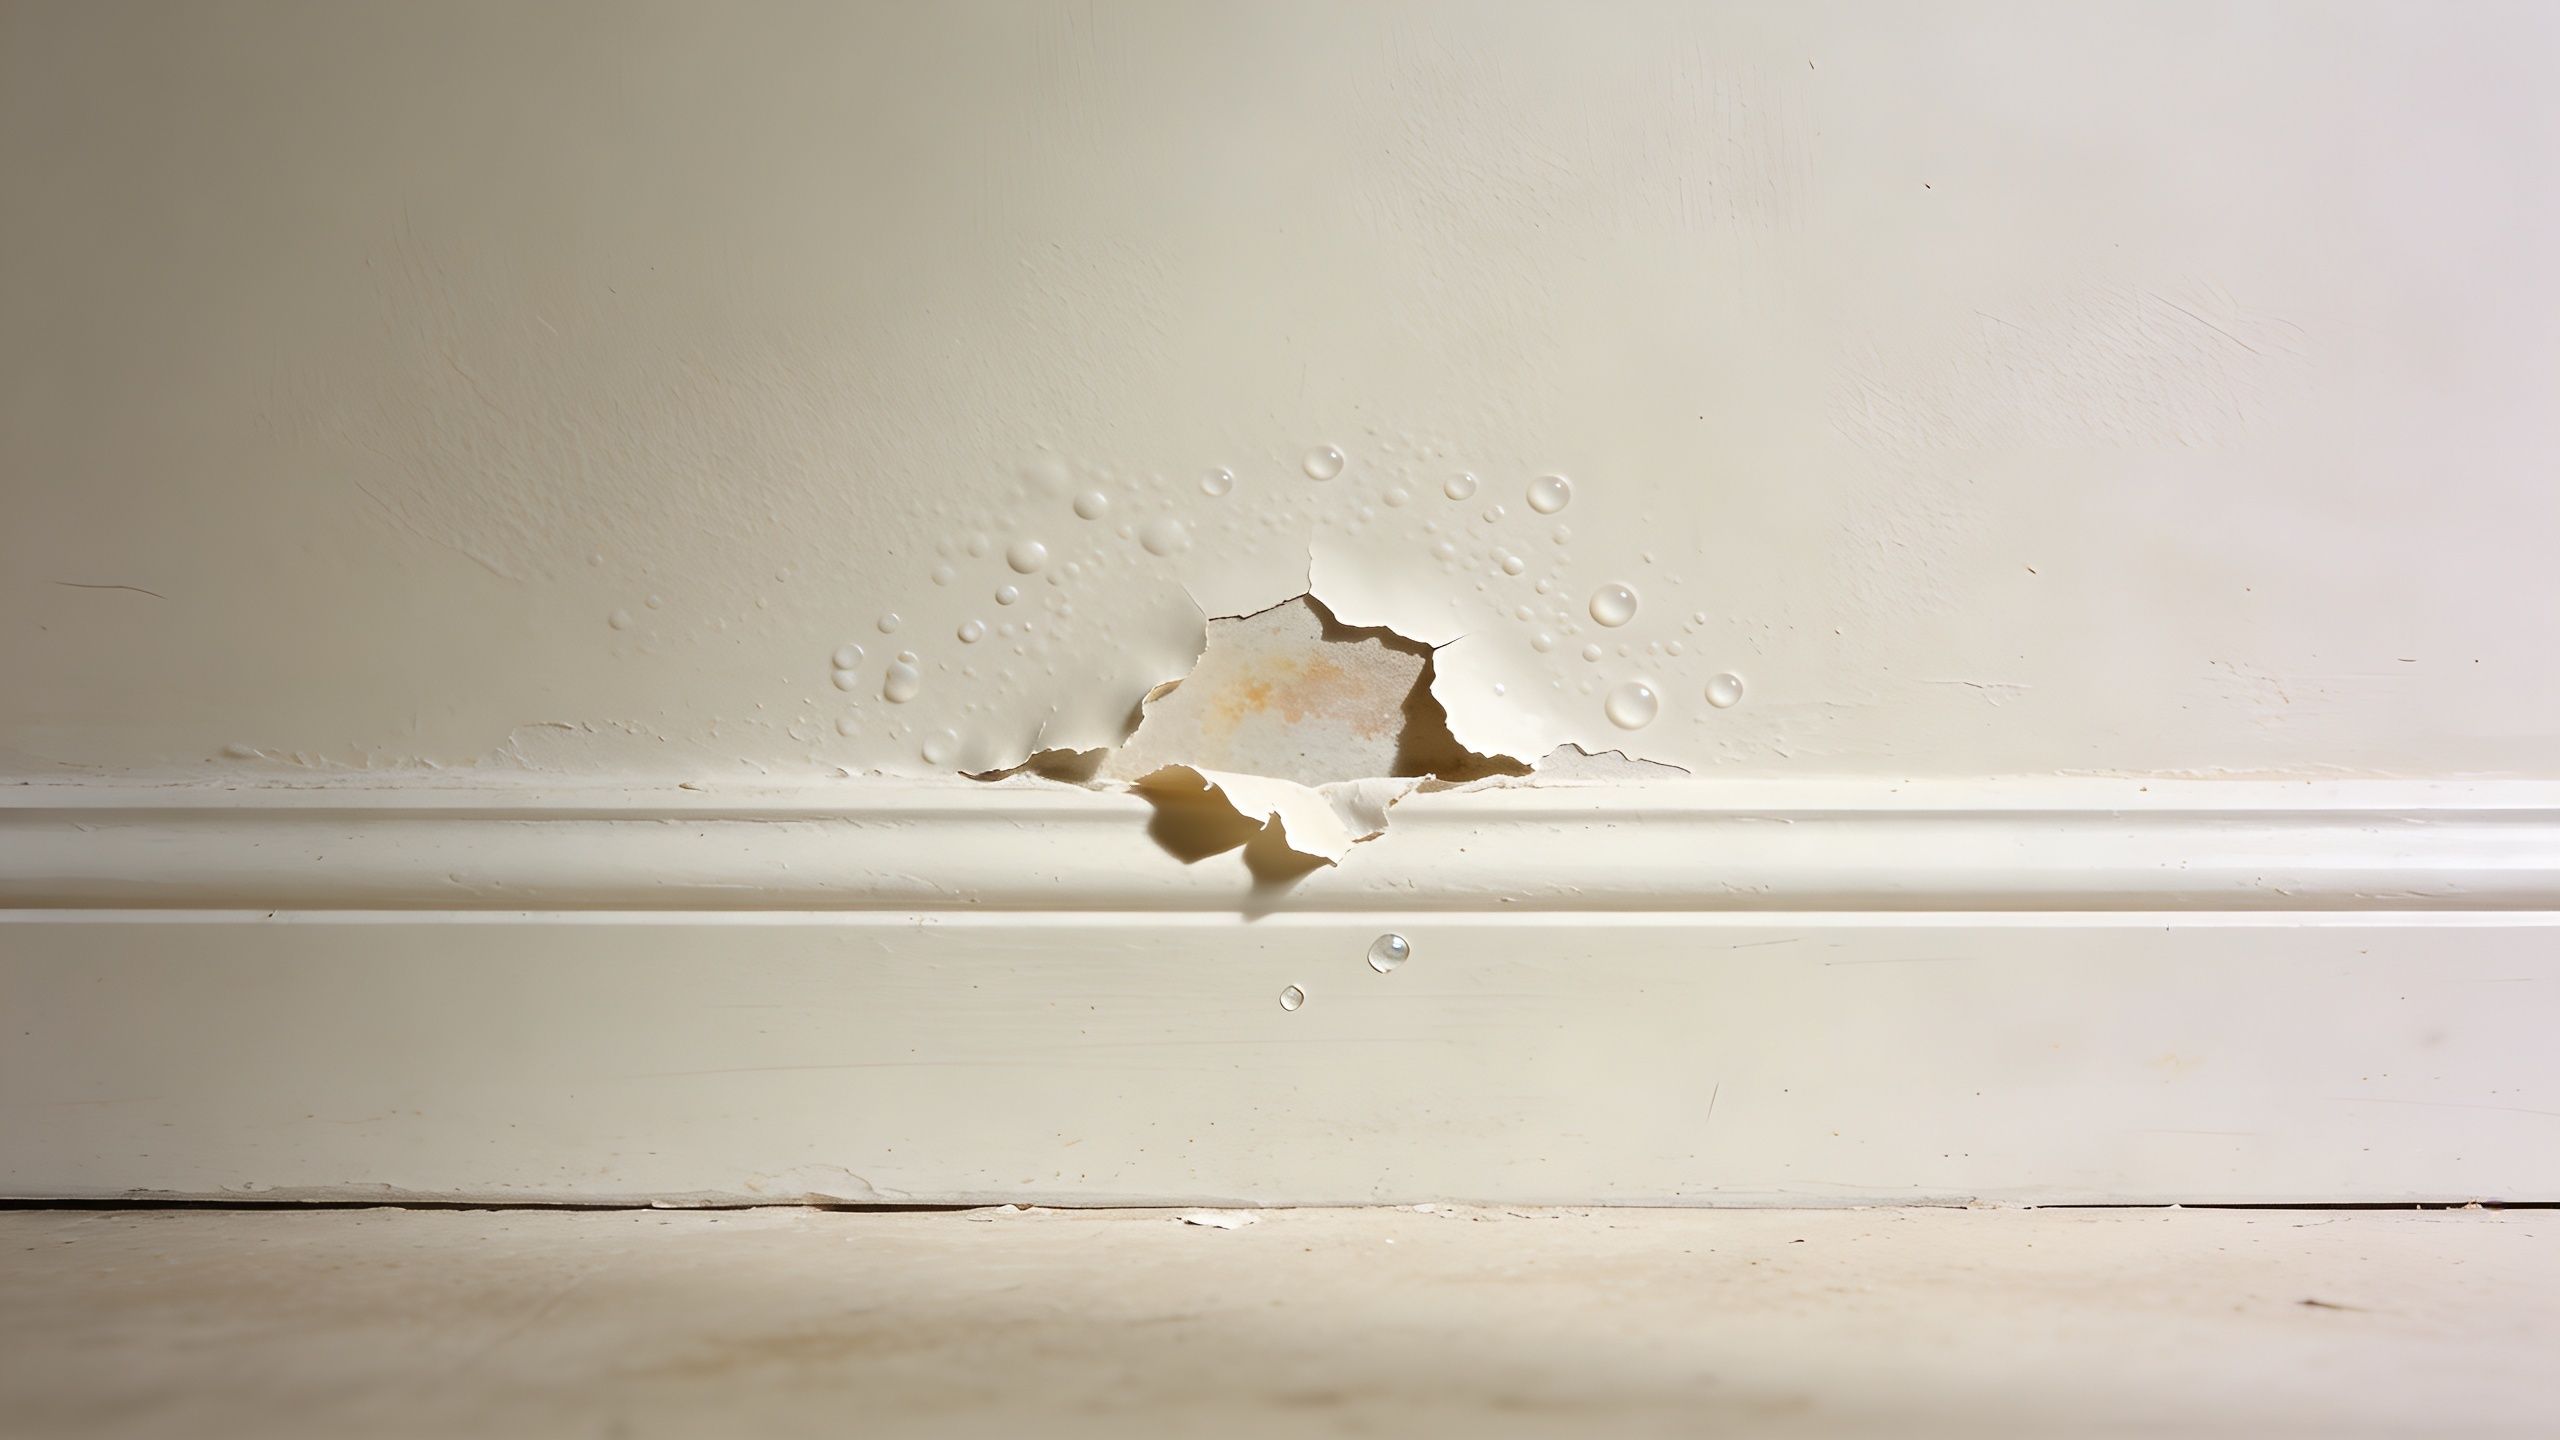
Paint tells on moisture before drywall fully gives out. When water gets behind the paint film, adhesion starts to fail. The finish blisters, bubbles, lifts at edges, or flakes away in patches. On interior walls, that often points to plumbing leaks, condensation, or moisture moving through the substrate. On exterior-facing walls, failed caulking, siding gaps, or window leaks are common culprits.
Bubbling paint is especially useful as a clue because it often signals current moisture pressure, not just old damage. If paint is actively tenting off the wall, something beneath it is still changing.
Why repainting too early fails
A lot of owners want to scrape, prime, and repaint right away because the damage looks superficial. The problem is that moisture trapped in the wall keeps pushing outward. New paint doesn’t fix pressure, trapped vapor, or damp drywall. It just gives you a cleaner-looking failure for a short time.
According to Wheeler’s explanation of what causes paint to bubble on walls, direct and active water leaks are one of the main reasons paint films lose bond. That tracks with what we see on site. The finish problem is rarely the root problem.
A better way to judge paint failure
When I look at bubbling or peeling paint, I want to know three things first:
- Is the substrate solid: If drywall underneath feels soft, this is no longer just a paint repair.
- Is the pattern localized or spreading: Tight damage near a sink, window, or roof line can help narrow the source.
- Did it happen after weather or water use: If the bubbling gets worse after rain, showers, or appliance cycles, that points you toward the cause.
For owners trying to sort cosmetic wear from moisture failure, paint distress has to be read with the wall, not by itself. If there’s stain, odor, or softness nearby, the fix needs to start behind the paint line.
5. Musty, Earthy Odor
You open a basement storage room in Tacoma after a week of rain, or open a commercial suite on Monday morning in Seattle, and the first thing you notice is the smell. It is damp, earthy, and stale. That odor usually means moisture has been sitting in building materials long enough for drywall, insulation, wood, or dust inside the wall cavity to stay wet.
Odor often shows up before you see clear staining or surface growth. That makes it one of the easier signs to dismiss and one of the more useful early warnings if you pay attention to where and when it appears.
Use the smell to narrow the source
A musty odor is more helpful when you treat it like a location clue instead of a whole-building problem. If it is strongest in a closet on an exterior wall, at the base of a stairwell, behind casework, or in one corner of a tenant space, that usually points to hidden moisture nearby. If it gets worse after rain, start with siding transitions, window perimeters, roof edges, and below-grade walls. If it rises after showers, sink use, or HVAC cycles, plumbing lines, condensate issues, or poor exhaust may be part of the problem.
That pattern matters in the Puget Sound area. Lower levels and partly below-grade walls here see recurring moisture pressure, especially through long wet seasons. The U.S. Environmental Protection Agency notes that mold can grow on damp materials within 24 to 48 hours, which helps explain why a persistent earthy smell deserves attention before visible growth spreads. EPA guidance on mold and moisture control lays out that moisture, not age or stale air, is the condition that drives the problem.
If the odor keeps coming back after cleaning or airing out the room, moisture is still present somewhere in the wall, floor edge, or adjacent cavity.
What helps, and what only buys time
Opening windows, running fans, or setting a dehumidifier can make the space easier to use for the moment. Those steps can also help during diagnosis because they reduce indoor humidity and make changes easier to track. They do not dry wet insulation inside a closed wall, stop foundation seepage, or correct a slow plumbing leak.
For homeowners, a practical first check is simple. Walk the space after heavy rain. Smell low along exterior walls, around window trim, near utility penetrations, and inside closets that do not get much airflow. For commercial property managers, compare odor patterns by suite, floor, and wall exposure. If one perimeter office or one basement corridor keeps developing the same smell, that usually points to a building-specific water path rather than a housekeeping issue.
At that point, the trade-off is straightforward. If the smell is light, isolated, and tied to a recent one-time moisture event, monitoring and basic drying may be enough. If it is persistent, seasonal, or coming from a finished wall with no visible source, it is time for a contractor to open the right area, confirm how far the moisture traveled, and repair the assembly correctly instead of covering over the symptom.
6. Visible Efflorescence and Mineral Deposits
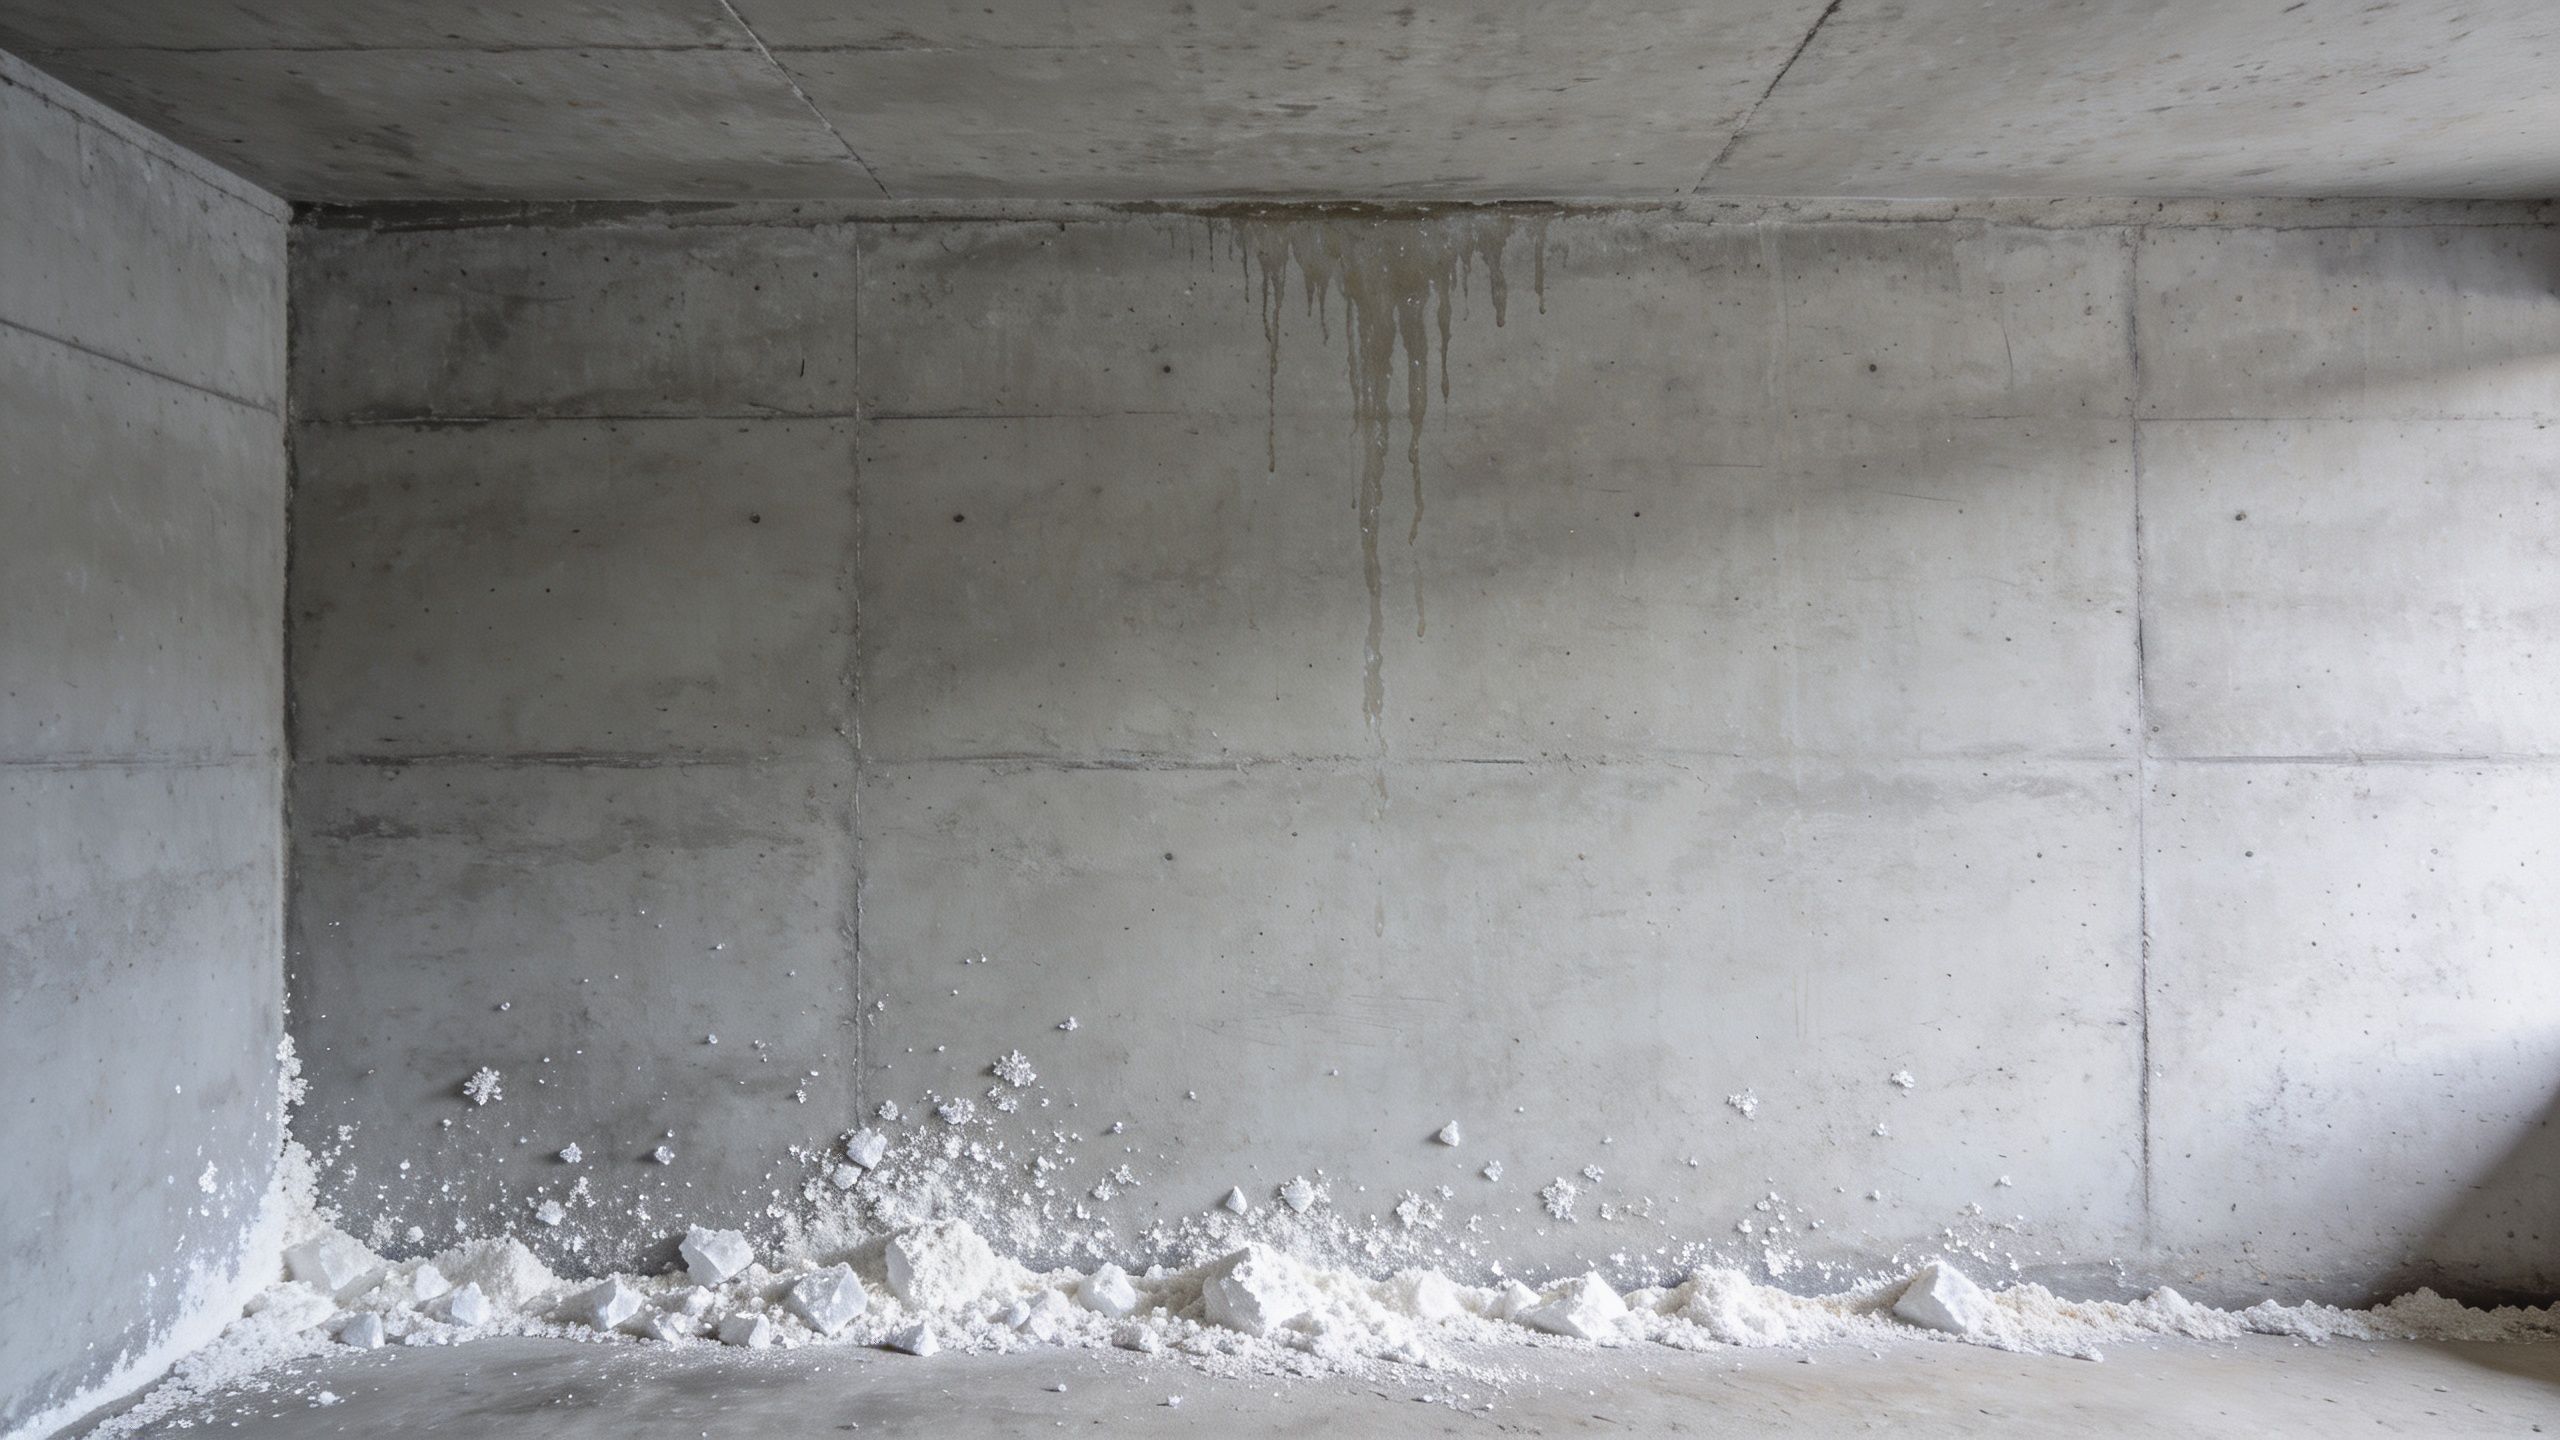
Efflorescence is the white, powdery, chalk-like residue you often see on concrete, block, or masonry walls. It isn’t mold, and it isn’t just surface dust. It forms when water moves through a porous wall, carries dissolved salts with it, and leaves those minerals behind as it evaporates.
In Western Washington basements, this is a common clue that moisture is pushing through foundation walls. The residue itself isn’t the main hazard. The moisture movement behind it is the issue.
What efflorescence usually points to
Unlike a plumbing leak, efflorescence often indicates water pressure or seepage through below-grade material. It tends to show up in patterns. A broad band near the slab line suggests repeated moisture at the base of the wall. A vertical path may line up with a crack or a concentrated exterior drainage issue.
According to Servpro’s signs of water damage in walls overview, white mineral deposits are a key warning sign that moisture is actively moving through wall materials. That’s consistent with what we see in basements from Kent up through Seattle, especially after sustained rain and drainage problems.
The common mistake with basement walls
The mistake is sealing over the white residue without correcting the water path. Waterproof coatings have their place, but they perform better after the wall is evaluated, cleaned properly, and paired with the right drainage or waterproofing approach. If hydrostatic pressure is still working against the wall, cosmetic coating alone won’t hold up.
A few practical checks help:
- Brush a small area clean: If the deposit comes back, moisture is still active.
- Follow the pattern: It often points toward the direction water is entering.
- Look outside too: Grade, gutters, downspouts, and hardscape often explain what’s happening inside.
Efflorescence is one of the clearest signs of water damage in walls when the wall is concrete or masonry. It tells you the wall is not just damp. Water is moving through it.
7. Rust Stains and Discoloration Around Metal Components
You pull a picture off the wall in a Tacoma office suite or a Seattle bungalow and find a rusty streak running down from a fastener, pipe cover, or corner bead. That kind of mark usually means the wall has been staying damp long enough to corrode metal, not just getting hit by a one-time splash.
Rust around metal parts gives you a different clue than ordinary wall staining. It points to moisture meeting steel, iron, or galvanized components inside or at the face of the wall. I see it in older homes around plumbing penetrations, plaster walls with metal lath, and exterior walls where flashing or window details have let in small amounts of water over time. In commercial properties, the usual trouble spots are mechanical rooms, rooftop unit penetrations, utility chases, and tenant improvement areas where pipes or conduit pass through finished walls.
Read the location before you read the color
A rust streak often starts higher than it looks. Water follows gravity, framing, fasteners, and the backside of finish materials before it shows itself. A small orange halo around a screw head can trace back to a slow leak above, repeated condensation on a cold pipe, or wet exterior air getting into the wall cavity.
If the stain is near plumbing, compare it with your recent water use. The EPA’s guidance on fixing household leaks notes that leaks can waste water before they become obvious, which is one reason an unexplained increase in the water bill deserves attention. For property managers, that check matters even more in multi-tenant buildings where a slow leak can keep working behind the wall long before a tenant reports visible damage.
Surface cleanup rarely solves this one. If the metal is still corroding, the stain usually comes back through primer and paint.
What to check before opening the wall
Start with the components closest to the stain and above it, not just the stained spot itself.
- Pipe penetrations and escutcheons: Look for looseness, failed caulk, or signs of condensation.
- Metal corner bead and fasteners: Rust here often means moisture has reached the drywall edge or framing connection.
- Radiators, valves, and older plumbing lines: Slow weeps can stain a wall long before they drip to the floor.
- Exterior wall details: Window perimeters, flashing transitions, and cladding joints are common sources in wet Puget Sound weather.
In plaster walls, rust can spread farther than people expect because metal lath carries the evidence across a wider area. In drywall, the damage may stay more localized at first, but wet insulation and hidden framing can still extend beyond the visible mark.
The repair scope depends on what caused the corrosion. Sometimes it is a straightforward plumbing fix and a small wall patch. Sometimes it means opening the wall, drying the cavity, replacing corroded metal, treating staining correctly, and rebuilding the finish so it does not bleed back through.
Rust stains do not always signal major structural failure. They do tell you moisture has been present long enough to leave a metal fingerprint, and that is worth taking seriously.
8. Cracking, Shifting, or Separation in Drywall Seams and Joints
Not every crack in a wall means water damage. Older homes settle. Materials expand and contract. Tape joints fail from age or poor workmanship. The challenge in Puget Sound is knowing when a crack is ordinary building movement and when moisture is pushing wall materials past their limit.
Water changes the shape of drywall. It swells, softens, and puts stress on taped seams and fasteners. That’s when you start seeing hairline cracks become wider, tape lift away, corners separate, or joints show a ridge that wasn’t there before.
How to read the crack
A drywall seam that opens near a bathroom, below a roof line, or along a basement perimeter wall deserves more suspicion than a random cosmetic crack in a dry interior hallway. If the crack also comes with staining, bubbling paint, softness, or odor, I’d assume moisture is involved until inspection says otherwise.
There’s also a real gray area in older local homes. Consumer Reports notes that wall cracks can reflect water-related compression from wood rot and mold, but they can also come from settling or workmanship issues, which is why a more careful evaluation is often needed in older structures according to this Consumer Reports discussion of water-damage signs.
In older Puget Sound homes, the question often isn't "Is this a crack?" It's "Why did it move, and does it change when the building gets wet?"
Practical ways to tell if it’s changing
You don’t need to guess. Mark the ends lightly with pencil, take a dated photo, and watch what happens after rain or over a few weeks. If a seam keeps widening, tape keeps releasing, or the wall around it grows softer, patching alone is wasted effort.
A few field habits help:
- Track nearby weather or water use: Cracks that worsen after rain or plumbing use deserve faster attention.
- Check the floor and trim nearby: Moisture problems often show in more than one material.
- Wait on cosmetic patching: Finish repairs should come after drying, not before.
When seam failure is moisture-driven, the lasting fix usually involves finding the water source, removing compromised sections, drying the cavity, and rebuilding with appropriate materials. Otherwise the crack comes back, and usually larger.
8-Point Comparison: Signs of Water Damage in Walls
| Indicator | Implementation complexity | Resource requirements | Expected outcomes | Ideal use cases | Key advantages |
|---|---|---|---|---|---|
| Discoloration and Staining on Walls | Low to detect visually; repair complexity variable | Visual inspection, moisture meter, photos for insurance, contractor assessment | Identifies likely water intrusion areas; evidence for claims; may reveal active leaks | Quick checks after rainfall, attic and ceiling inspections, routine home walkthroughs | Highly visible, easy for homeowners to spot, good for documentation |
| Soft, Spongy, or Warped Drywall | Moderate detection (tactile); high repair complexity (replacement) | Physical access, demolition tools, moisture meters, restoration contractors | Confirms internal drywall degradation; typically requires panel replacement | Bathrooms, basements, areas with repeated moisture exposure | Definitive tactile confirmation of structural compromise |
| Mold and Mildew Growth | Low to detect visually/olfactory; remediation complex and hazardous | Mold testing, PPE, certified remediation contractors, possible lab analysis | Removes biological hazards, improves indoor air quality, documents health risks | Visible mold spots, musty odors, post-flood or prolonged moisture events | Strong prompt for immediate professional action and health-focused remediation |
| Peeling, Bubbling, or Flaking Paint | Low to moderate detection; moderate repair complexity | Moisture meter, scraping tools, primers/paints, contractor for substrate repair | Reveals active moisture beneath finish; requires substrate remediation then repaint | Bathrooms, kitchens, exterior siding, areas near plumbing | Early warning sign that often appears before deep structural damage |
| Musty, Earthy Odor | Very low detection (olfactory); locating source can be complex | Systematic inspection, smell-source tracing, dehumidifiers, professional assessment | Early detection of hidden moisture/mold; leads to targeted inspection before visual signs | Basements, closets, attics, enclosed spaces with poor ventilation | Non-invasive early warning that often precedes visible damage |
| Visible Efflorescence and Mineral Deposits | Low detection; remediation of source can be complex | Brush/inspection, documentation, waterproofing contractors, drainage work | Confirms active water movement through masonry; typically leads to waterproofing work | Basements, concrete/masonry walls, foundations after snowmelt or heavy rain | Maps water flow paths visually and indicates foundation moisture issues |
| Rust Stains Around Metal Components | Low detection; repair complexity moderate to high if corrosion present | Visual inspection, trace plumbing/HVAC, replace corroded parts, waterproofing | Pinpoints water contact with metal; may reveal corrosion requiring component replacement | Around pipes, penetrations, radiators, metal framing | Precise localization of water pathways and evidence of prolonged exposure |
| Cracking, Shifting, or Separation in Drywall Seams | Moderate detection; repair often extensive (tape/joint replacement) | Measurement/monitoring, drywall removal/installation, moisture control, contractors | Indicates swelling/adhesion failure; commonly requires joint remediation or panel replacement | Seams, corners, taped joints after humidity cycles or leaks | Clear visual sign of wall-system stress and need for comprehensive repair |
Your Next Steps From Damage Control to Restoration
If you’ve spotted one of these signs, don’t panic. But don’t postpone action either. Water damage rarely improves on its own, and the longer moisture stays in a wall, the more likely you are to move from a manageable repair into mold remediation, structural carpentry, flooring replacement, or a full repaint after demolition and drying.
A good first pass is simple. Photograph what you see. Note whether it changes after rainfall, heavy plumbing use, or HVAC operation. Pay attention to whether the issue is isolated to one area or repeated across several walls. Those details help separate a small localized repair from a building-wide moisture problem.
For homeowners, the biggest mistake is usually cosmetic delay. People repaint a stain, recaulk a joint, or run a fan in a damp room and hope the problem settles down. For commercial property managers, the common mistake is deferring invasive inspection because a tenant can still use the space. In both cases, the wall often keeps deteriorating behind the finish.
The right next step depends on what you’re seeing. A single stain with a clear source may only require a focused repair after the leak is fixed and the wall is fully dried. Soft drywall, recurring odor, visible mold, or repeated basement moisture usually calls for a broader inspection. That’s where a contractor who can connect the whole chain matters. You don’t want one company identifying the issue, another opening walls, another handling coatings, and nobody owning the final result.
Wheeler Painting & Restoration Services handles that process as one accountable contractor for property owners in Kent, Seattle, Tacoma, and the communities in between. That matters because water damage repairs often overlap. The job may start with moisture detection and drywall removal, then move into repairs, waterproofing, specialty coatings, and repainting once the structure is stable again. If you’re managing a tenant improvement project or a facility maintenance issue, that single-point coordination saves time and confusion.
For owners also dealing with insurance questions, this guide to mastering property damage claims is a helpful companion to the repair side of the process.
One more thing matters in our region. Not every crack, smell, or stain means catastrophic damage. Some issues are limited and repairable without major demolition. But the only reliable way to know is to inspect the wall system thoroughly and early. In Puget Sound conditions, waiting for a small sign to become an obvious one usually costs more, disrupts more, and leaves you with fewer repair options.
If you’re seeing signs of water damage in walls, the goal isn’t to overreact. It’s to respond while the scope is still controllable. Find the source, verify the spread, remove what can’t be saved, dry what can be preserved, and rebuild the wall properly. That’s how you protect the building, the finish work, and the people using the space.
If you’ve noticed staining, soft drywall, peeling paint, musty odor, efflorescence, rust marks, or shifting seams, Wheeler Painting & Restoration Services can assess the damage and help you plan the next step. Whether you’re managing a home in Kent or a commercial property in Seattle or Tacoma, the team can identify the source, handle restoration and repairs, and bring the space back to a clean, finished condition.