How to Fix Cracks in Drywall: A Puget Sound Guide
A wall crack has a way of pulling your eye every time you walk past it. One day the wall looks fine. The next day there is a thin line over a doorway, a split in a corner, or a diagonal crack near a window that makes you wonder whether this is a paint issue, a drywall issue, or something bigger.
Most drywall cracks are fixable. The key is not treating every crack the same way.
A small seam crack in a hallway often needs a careful, methodical repair. A wider crack, a recurring crack, or one paired with staining or sticking doors needs a different response. In Kent, Seattle, Tacoma, and the communities in between, that distinction matters because Pacific Northwest buildings move, absorb moisture, dry out, and sometimes shift just enough to reopen a weak repair.
That Unsettling Crack in the Wall and What to Do Next
The most common call starts the same way. A homeowner notices a crack that was not there a few months ago, usually in a living room corner, over a door, or along a ceiling seam. Property managers often spot the same thing during a unit turn or after a tenant mentions “a line in the wall that keeps coming back.”
That reaction is normal. Drywall cracks look dramatic even when the repair is straightforward.
The first job is to identify what kind of crack you are looking at. Some are hairline stress cracks caused by minor movement, seasonal expansion, or an old seam that was not reinforced well enough the first time. Others point to a larger problem, especially if the crack is wide, diagonal, or paired with moisture staining.
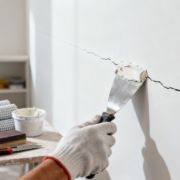
A good repair starts with restraint. Do not smear spackle over a crack just to make it disappear for the week. That is the repair equivalent of painting over rot. It may look better briefly, but it does not hold.
Practical takeaway: If the crack is small and stable, a careful repair can last. If it is growing, recurring, or tied to movement, the wall needs diagnosis before patching.
People searching for how to fix cracks in drywall usually want one clear answer. The solution is simpler than it seems. Match the repair to the cause, use the right materials, and take the finish work seriously. That is how you get a repair that blends in and stays put.
Why Drywall Cracks in Puget Sound Homes and Buildings
In the Seattle to Tacoma corridor, drywall cracks are not just about age. Local conditions play a big role in how walls move and why repairs fail.
Movement is normal, but not all movement is harmless
Washington sees over 1,000 earthquakes annually, and those minor shifts contribute to drywall cracking in 20 to 30 percent of older homes in seismic areas of Western Washington, according to the verified data tied to the Mr. Handyman drywall crack guidance. Many standard DIY articles skip this point. They show how to fill a crack, but not why the crack returned after the last repair.
That matters in older homes around Kent, Seattle, and Tacoma. A recurring crack may reflect ongoing settling, light seismic movement, or repeated stress around openings like doors and windows.
Moisture changes the equation
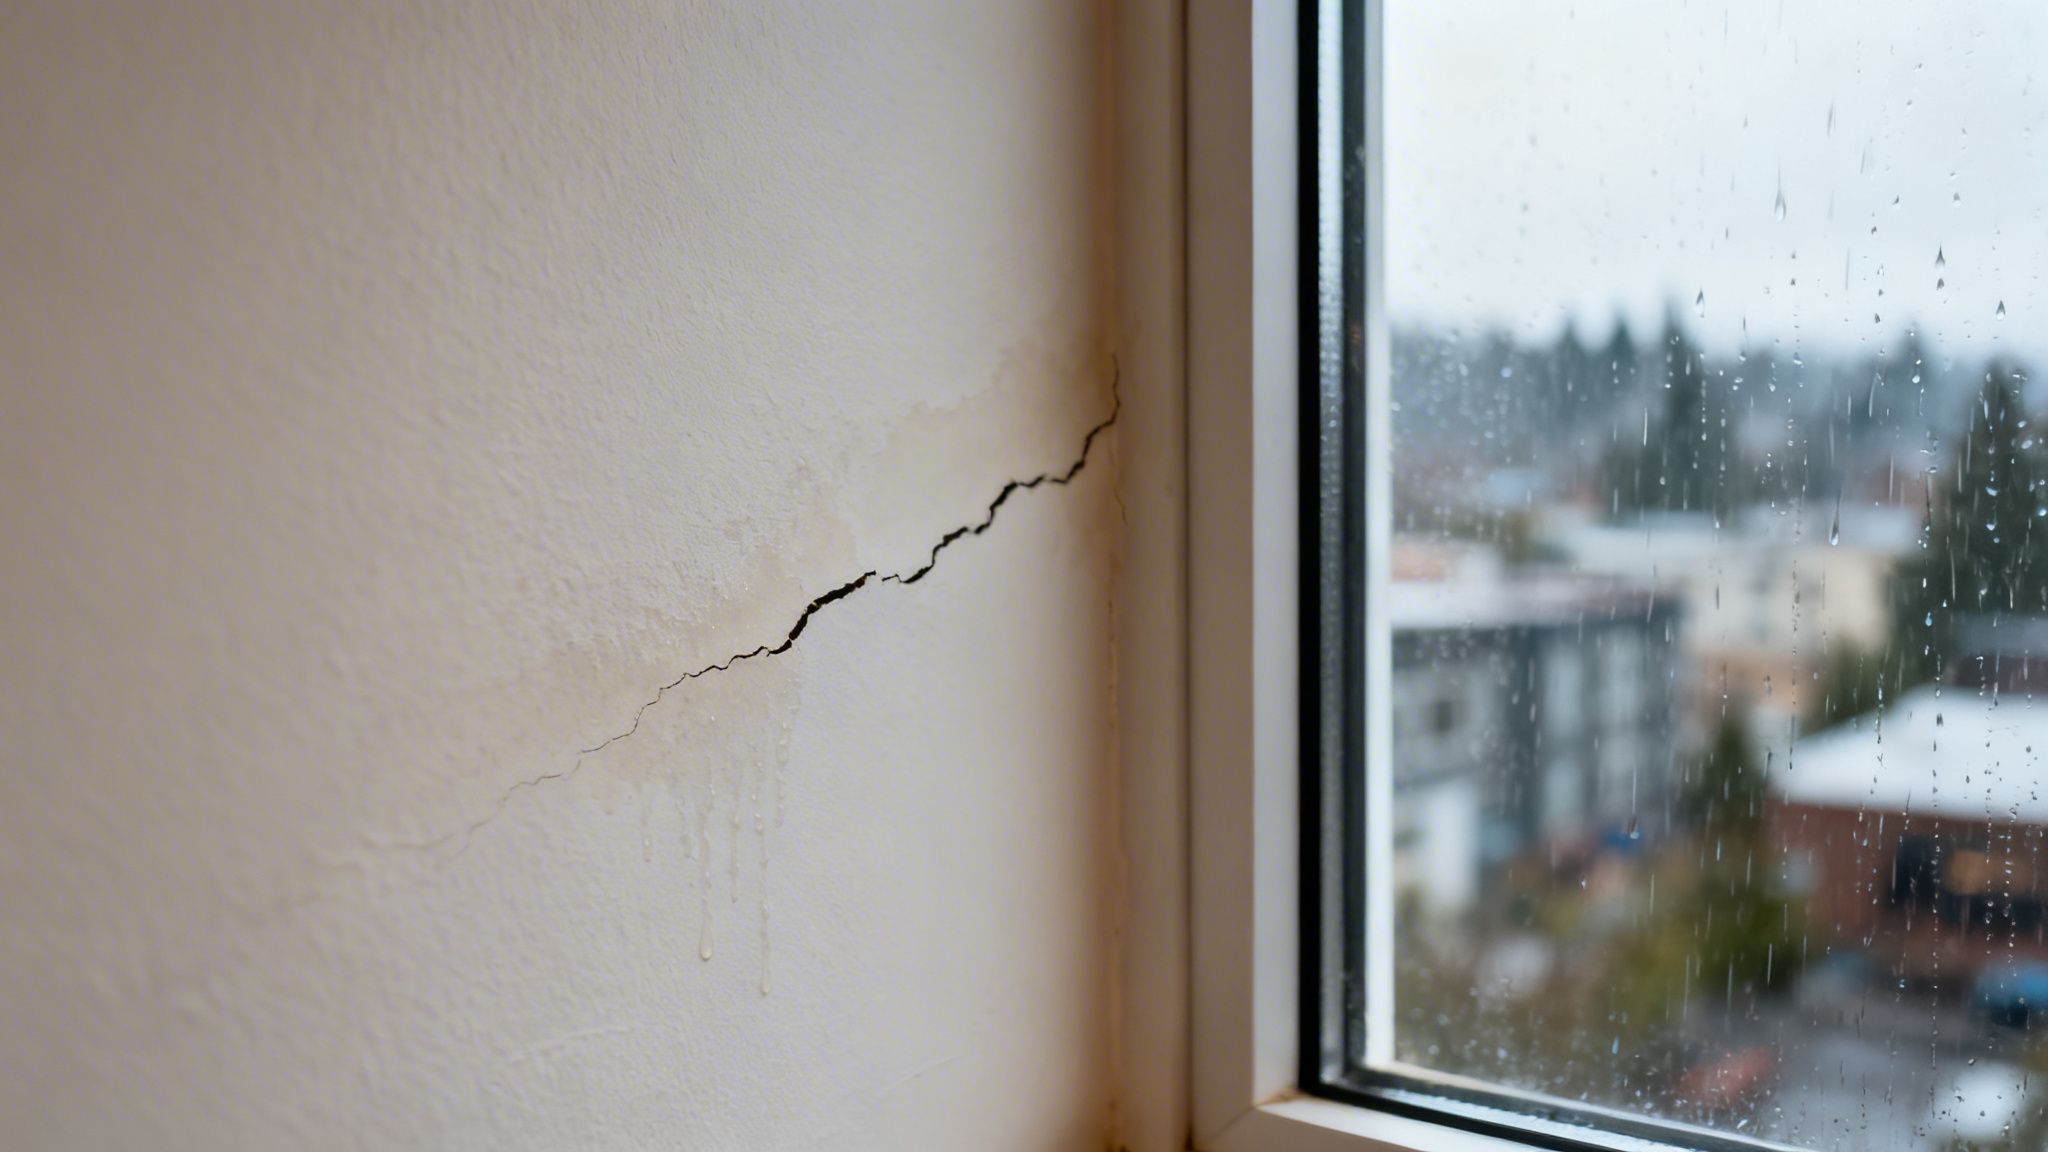
The Pacific Northwest adds another layer. Framing takes on moisture and dries back out. That movement may be subtle, but drywall seams and corners are often where it shows up first. A crack near a window or exterior wall can come from normal expansion and contraction, but it can also be tied to water intrusion or trapped moisture.
If you are also seeing paint bubbling, staining, or soft drywall, it is smart to look at moisture first. This guide on what causes paint to bubble on walls is useful when a crack and a finish failure are showing up in the same area.
The crack pattern tells you a lot
Different crack shapes suggest different causes:
- Thin straight seam cracks often point to tape failure, poor prior repairs, or ordinary movement at a joint.
- Inside corner cracks usually come from seasonal movement where two planes meet.
- Diagonal cracks near doors or windows deserve closer attention because openings concentrate stress.
- Cracks with staining or soft spots suggest moisture, not just movement.
- Cracks that reopen after repair usually mean the wall is still moving or the original repair had weak prep.
Contractor’s rule of thumb: The more a crack reflects movement, the less likely a simple surface fill will last.
Pros sometimes use crack gauges or flexible backer methods in movement-prone situations because the underlying issue is not the surface line. The core issue is whether the structure behind the finish is still shifting. That is why a durable repair in Puget Sound often starts with diagnosis, not mud.
Gathering Your Tools and Materials for a Flawless Repair
If you want a repair that lasts, the materials matter as much as the technique. A lot of failed drywall repairs happen because the wrong product gets used for the wrong job.
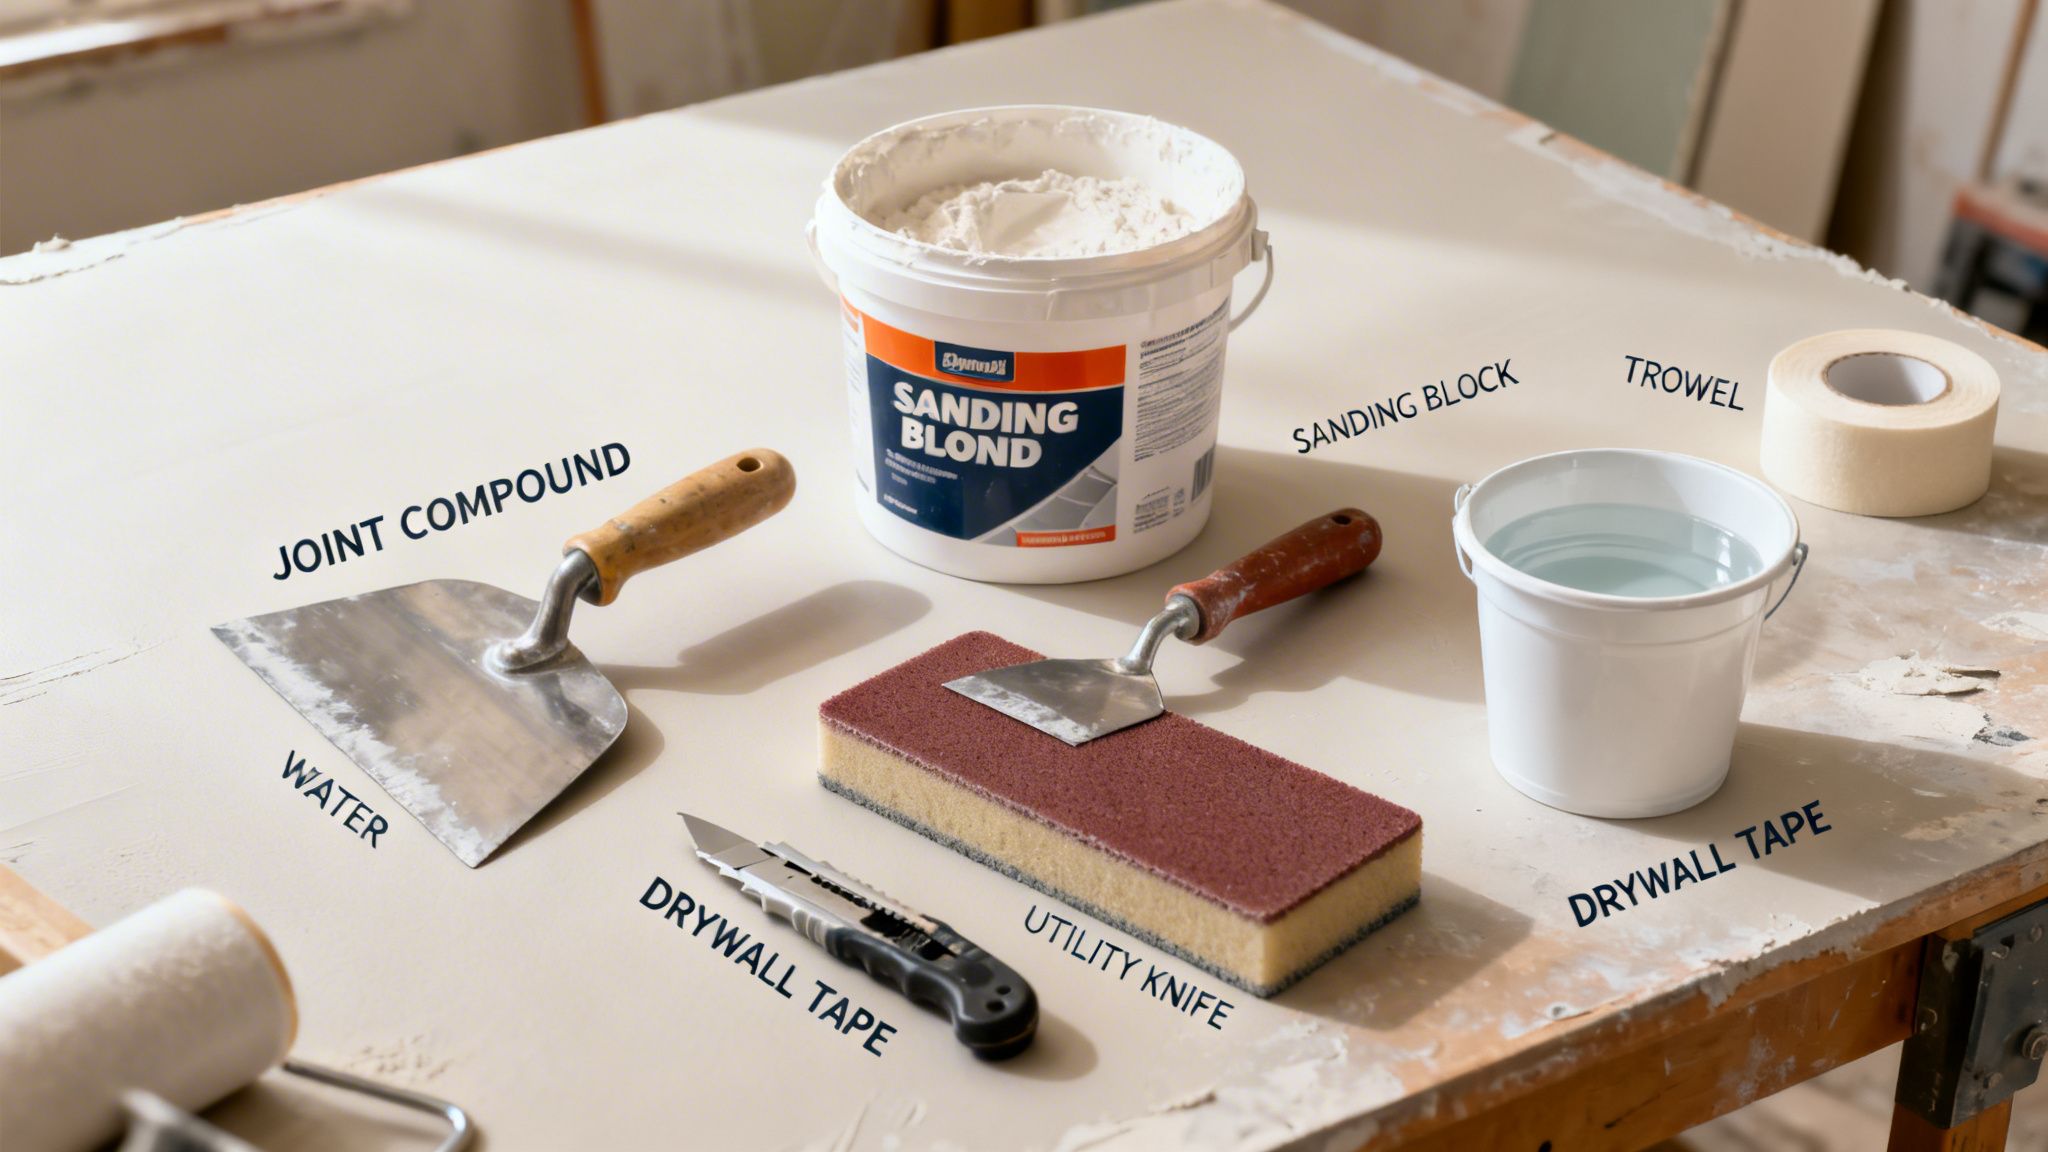
What belongs in your repair kit
Keep the list simple and job-specific:
- Utility knife for opening the crack and trimming loose paper.
- 6-inch drywall knife for filling and first coats.
- 10-inch or 12-inch knife for feathering wider finish coats.
- Setting-type joint compound for the crack repair.
- Fiberglass mesh tape for reinforcing movement-prone cracks.
- Sanding sponge or fine sanding block for smoothing between coats.
- Vacuum or brush for dust removal.
- Primer before paint.
- Matching paint and texture materials if the wall is not smooth.
What works better in Western Washington
Verified data shows hairline cracks often recur in 60 to 70 percent of DIY repairs that do not use fiberglass mesh reinforcement, and pros get about 95 percent permanence using mesh tape over cleaned fissures, versus 40 percent for spackle alone in movement-prone conditions, as summarized in the verified data tied to the CertaPro drywall cracking article.
That lines up with what contractors see in damp climates. Spackle is fine for tiny nail holes. It is a weak choice for an active crack. Mesh tape and proper compound give the repair some structure.
A few material choices make a big difference
Here is a quick comparison:
| Repair item | Better use | Why it matters |
|---|---|---|
| Spackle | Tiny dings and nail holes | Sands easily, but not ideal for moving cracks |
| Setting-type compound | Crack filling and base coats | Harder, stronger, better bond |
| Fiberglass mesh tape | Stress cracks | Adds reinforcement and flex |
| Paper tape | Flat seams on broader patch work | Good for controlled seam finishing |
| Primer | Before paint | Seals the repair so paint finishes evenly |
If you are patching raw drywall or fresh compound, primer is not optional. This page on whether you have to prime sheetrock before painting covers why finish paint alone will not hide a repair properly.
One practical option for homeowners and property managers who want the repair handled from patch through finish is Wheeler Painting & Restoration Services, which includes drywall repair and paint prep as part of broader residential and commercial work in the area.
A Step-By-Step Method for Fixing Hairline Cracks
Hairline cracks are often the focus of quick fixes with a swipe of filler. That is also why so many come back.
For this type of damage, the V-notch method is the better approach. Verified data says this method can achieve 95%+ long-term success rates when done correctly, and skipping the cleaning step causes 40% of repair failures from poor bonding, based on the verified data tied to the drywall crack repair guide from Drywall Repair Utah.
Use this graphic as a quick visual reference.
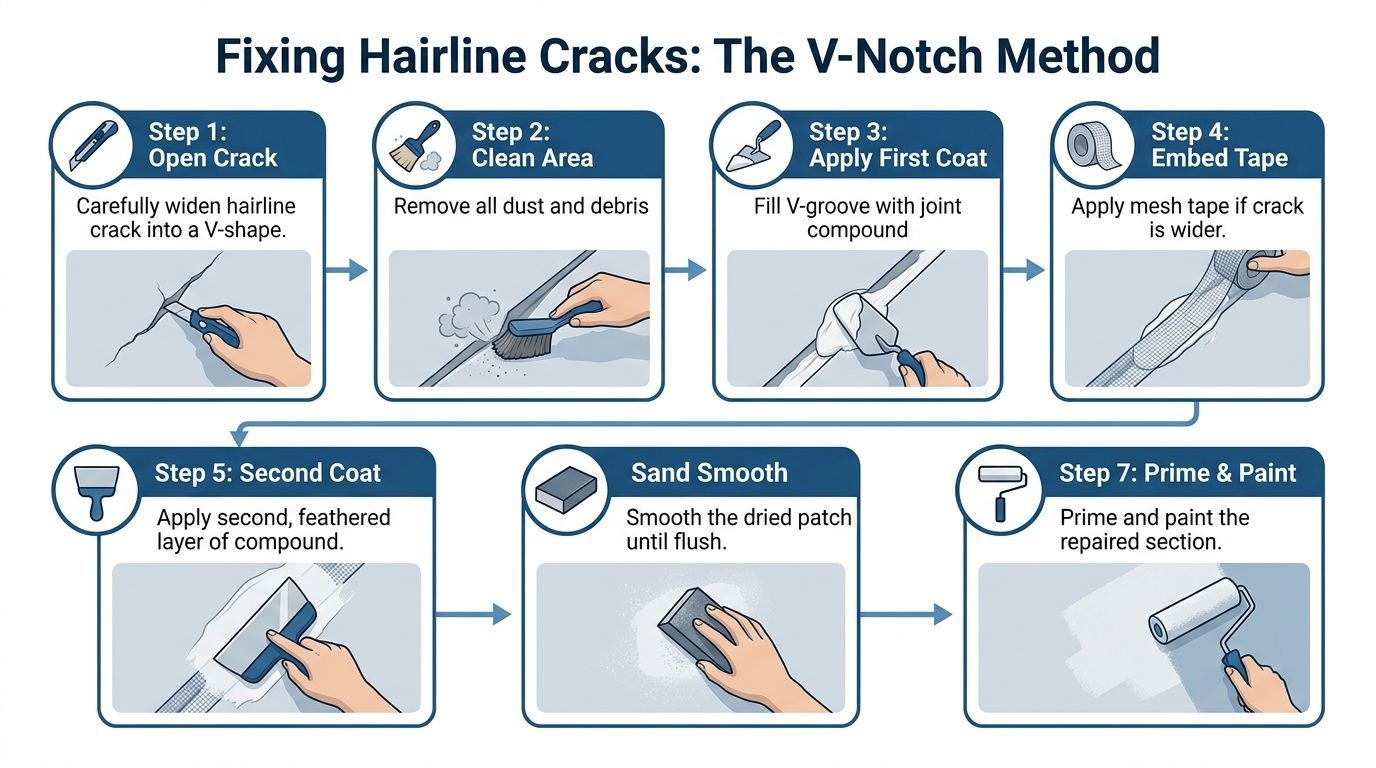
Open the crack on purpose
This feels backward, but it is necessary. Use a sharp utility knife to widen the crack into a shallow V-groove. The verified method calls for a V-notch that is shallow and narrow.
Why do this? Because compound needs something to grip. If you smear mud over a closed hairline crack, you are only bridging the surface.
If the crack ends in a small spidered point, round that end slightly with the knife. That helps reduce future splitting at the tip.
Clean out all the dust
Vacuum the groove thoroughly or brush it out and then vacuum it. Dust inside the groove weakens the bond.
Tip: Most surface repairs fail at the prep stage, not the paint stage. Clean drywall dust out before compound goes in.
This is a good point to stop and inspect the crack. If you can press on the wall and feel movement, or if the crack is wider than it first looked, move to a more structural repair approach.
Fill the groove with setting compound
Mix a setting-type joint compound to a workable consistency. Press it firmly into the V-groove with a 6-inch knife and overfill it slightly. Firm pressure matters because shallow filling can leave air pockets.
The goal is not a pretty first coat. The goal is a solid fill.
A video walkthrough can help if you have not done this kind of knife work before.
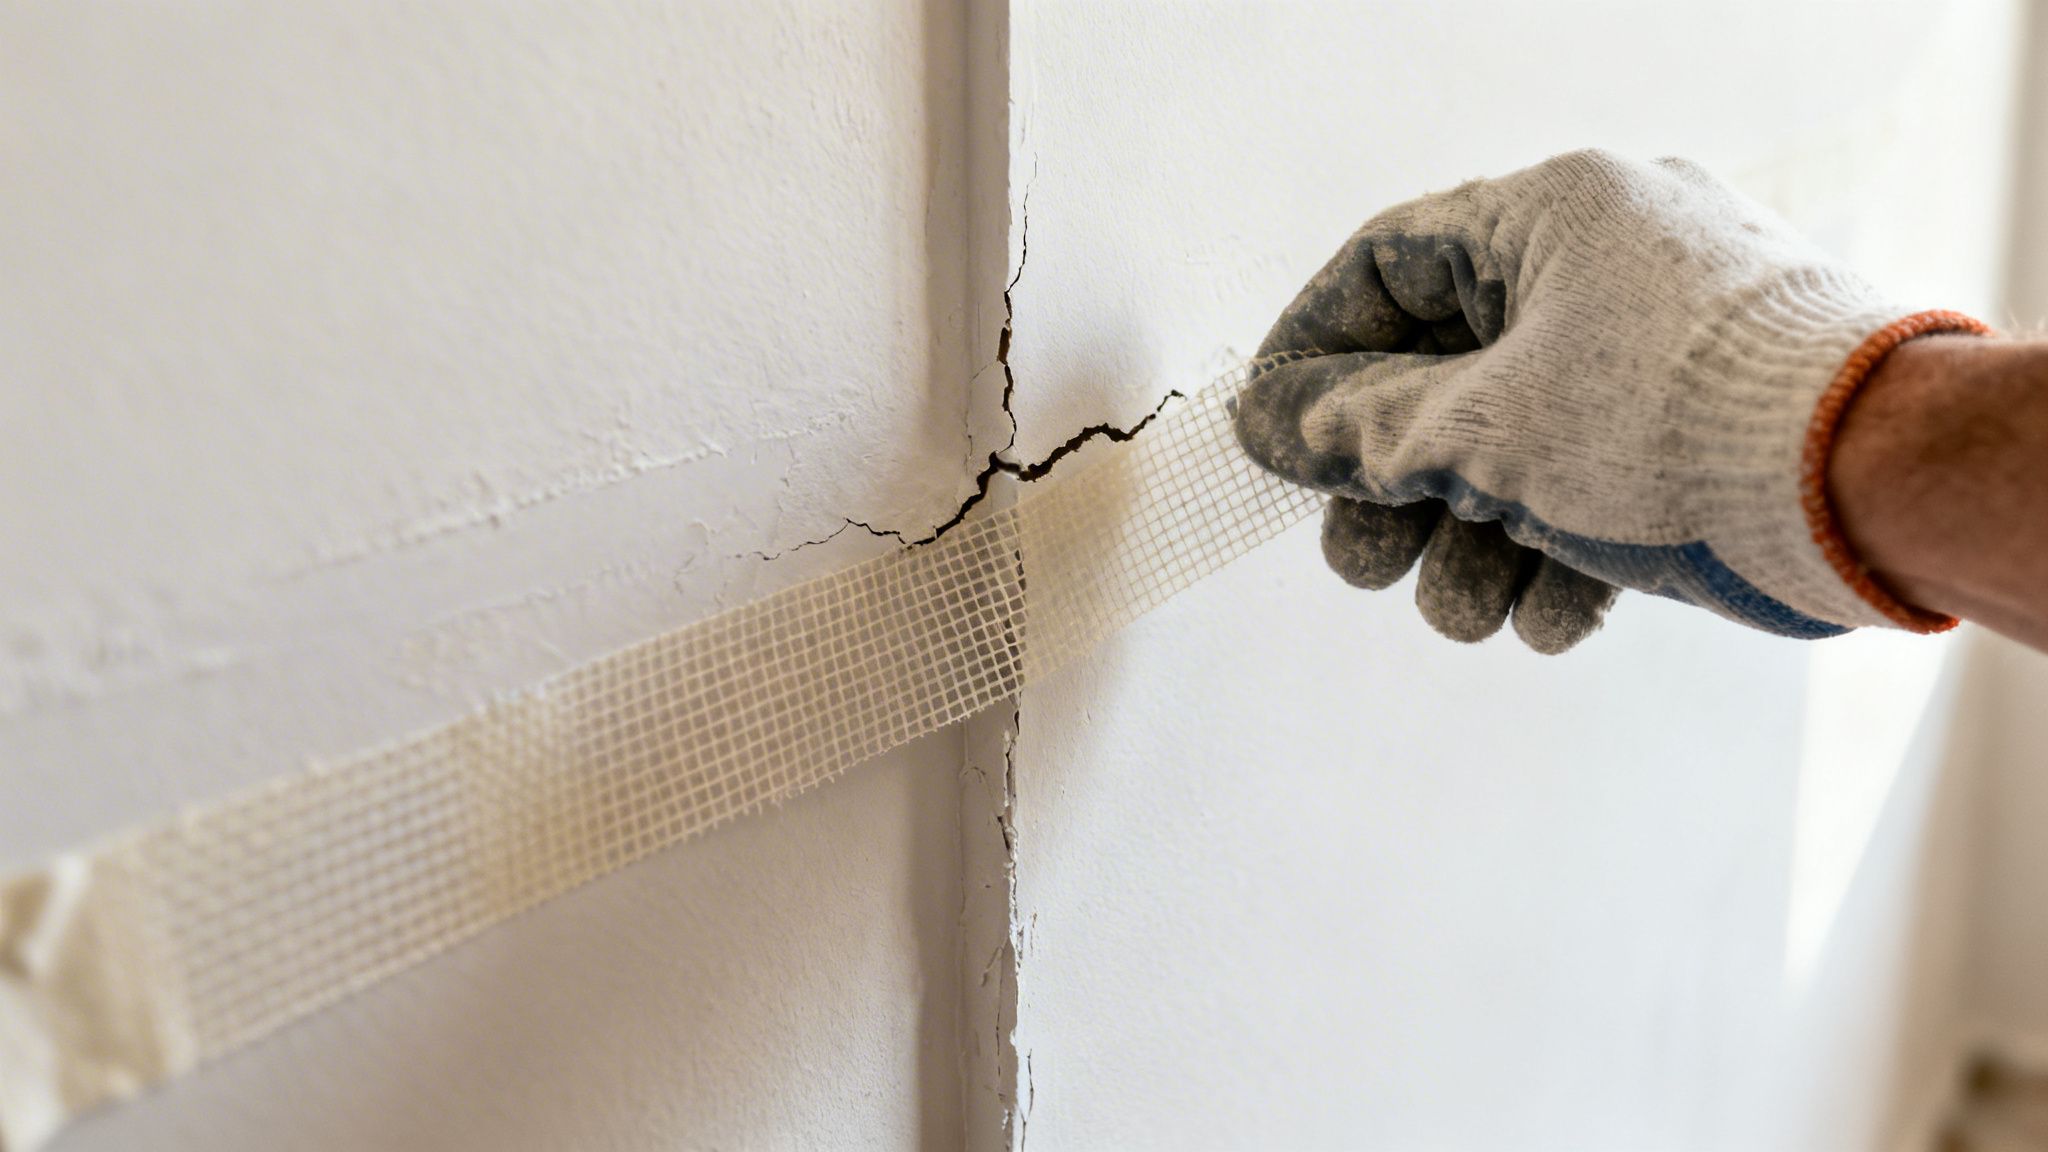
Reinforce with fiberglass mesh tape
Lay 2-inch fiberglass mesh tape over the wet compound. The verified data notes that pros prefer mesh for cracks because it offers increased crack resistance in movement-prone conditions.
Keep the tape centered. Extend it slightly beyond each end of the crack. Press it down evenly so it beds into the compound without bubbles.
Build the repair in thin coats
After the base sets, add finish coats in widening passes:
- First skim coat over tape, about 6 to 8 inches wide.
- Second coat after drying, around 10 to 12 inches wide.
- Final feather coat out to about 14 to 16 inches.
Each coat should be thin. The wider knife comes into play on the second and third coats because it lets you blend the repair into the wall without leaving a hump.
Sand, prime, and paint
Sand lightly between coats with a fine sanding sponge or 120 to 220 grit abrasive. You are smoothing ridges, not grinding the repair down.
Prime the patched area before painting. Then apply your finish paint in a way that blends sheen as well as color. On many walls, the paint match is where DIY work starts to stand out.
If the wall has orange peel, knockdown, or another texture, duplicate that texture before final paint. A flat patch on a textured wall is still obvious, even with a perfect color match.
How to Tackle Large, Recurring, and Corner Cracks
Some cracks need more than tape and compound. If the crack is wider, keeps reopening, or has damaged board edges, the stronger fix is to remove the weak section and install a proper patch.
When a patch beats a fill
Verified data shows that for large cracks greater than 1/8 inch, the backing-plus-patch method yields 90 to 98 percent durability, and 65 percent of large patch repairs fail within a year without backing because the area flexes, based on the verified data tied to the Nations Drywall repair guide.
That is why big cracks should be treated like damaged drywall, not like a cosmetic seam.
The backing-plus-patch method
This is the sequence that holds up:
Square the damage
Mark clean lines around the crack and cut out the damaged section. Clean edges are easier to patch and finish.Install backing
Slip 1×3 furring strips behind the drywall and fasten them so the new patch has solid support.Cut the patch to fit
Match the drywall thickness and trim the patch for a tight fit. Large gaps make finishing harder and weaker.Secure the patch
Fasten the new piece to the backing, keeping screws set properly without tearing the face paper.Tape and mud the seams
Use tape at the seams, then build out finish coats in wider passes.Sand, prime, and paint
Finish the patch like the surrounding wall, including texture if needed.
Why recurring cracks need a different mindset
If a crack has already been “fixed” once or twice, the wall is telling you something. Either the first repair had poor prep, or the assembly is still moving.
That is where trade-offs become real:
- Fast cosmetic fill looks acceptable for a short time.
- Cut-out and stabilization takes longer, creates more dust, and usually solves the right problem.
For owners who like to compare methods before deciding, this overview of DIY Gyprock repairs is a helpful outside resource because it shows the broader logic behind patching damaged wallboard instead of only surface filling.
Inside corner cracks need cleaner technique
Corners are their own category. They move more than field areas of a wall, and they are easy to overbuild with too much mud.
For inside corners:
- Remove loose material first.
- Re-establish the corner with tape, not just compound.
- Keep coats thin and symmetrical on both sides.
- Use a corner knife if you have one, or work each face carefully with a smaller drywall knife.
Key point: A bulky corner repair catches light. Even if it does not crack again, it can still look patched forever.
This comes up often in offices, multifamily properties, and tenant improvement work because corners take abuse from traffic, carts, furniture moves, and repeated repaint cycles. In those settings, durability matters as much as appearance.
When to Skip the DIY and Call a Drywall Contractor
Some cracks are repair projects. Others are warning signs.
The clearest line is width. Verified data states that cracks wider than 1/4 inch are a critical benchmark for potential structural problems and should get professional investigation rather than patching. That same verified data says superficial fixes often fail and reappear within a year, and that ignoring these issues in Puget Sound can lead to repairs in the $5,000 to $15,000 range, compared with $200 to $500 for early professional intervention. It also notes that 80% of recurring cracks come from unaddressed foundational issues, based on the verified data tied to the Proper Painting drywall crack article.
Red flags that move this out of DIY territory
Watch for these signs:
- Crack width over 1/4 inch
- Diagonal cracking above doors or windows
- A crack that reopens after you repair it
- Moisture stains, bubbling paint, or soft drywall
- Doors or windows that start sticking near the same area
- Long horizontal cracking or multiple cracks in one zone
A patch over any of those conditions may look tidy for a while, but it does not solve the cause.
Why paying for diagnosis is usually cheaper
Homeowners sometimes hesitate to make the call because they assume any professional visit means a major project. Usually, the opposite is true. Early evaluation can separate a manageable drywall issue from movement or moisture that will damage more finishes if left alone.
If water is part of the picture, this page on how to repair water damaged drywall is worth reviewing because wet drywall follows a different repair path than dry, stable board.
If you are hiring help and want a practical checklist first, these top questions to ask before hiring a contractor are useful for vetting scope, communication, and who will handle the work.
A simple decision rule
Try the repair yourself only if the crack is minor, stable, dry, and clearly cosmetic. Call a drywall contractor when the crack suggests movement, moisture, or repeated failure.
That is not about selling fear. It is about avoiding the common mistake of treating a structural or moisture symptom like a paint prep issue.
Frequently Asked Questions About Drywall Repair
Can I just paint over a crack
No. Paint does not bridge movement well enough to create a lasting repair. At best, the crack line telegraphs through. At worst, it opens again quickly and leaves a sharper visible line than before.
Is matching texture harder than filling the crack
Usually, yes. On smooth walls, the repair depends on flat knife work and good sanding. On textured walls, you also have to duplicate the surrounding pattern closely enough that the patch does not flash in side light.
What if the crack keeps coming back in the same spot
That usually points to ongoing movement or a weak prior repair. A recurring crack needs a different approach than a first-time cosmetic fix. Depending on the crack, that may mean reinforcement, a cut-out patch, or evaluation of the structure or moisture conditions behind it.
How disruptive is professional drywall repair
For a small crack repair, disruption is usually limited to dust control, drying time, and paint curing. Larger patching work takes more coordination, especially in occupied homes, offices, or tenant spaces, but it is still manageable when the work area is protected properly.
Will the repaired area always show
Not necessarily. A well-executed repair can blend very well. The places where DIY work usually gives itself away are ridges, poor feathering, texture mismatch, and paint sheen mismatch.
Is it worth repairing a small crack before repainting
Yes. Small cracks rarely look smaller after fresh paint. New paint often makes a weak repair more noticeable because the sheen becomes uniform everywhere except at the flaw.
If you have a crack that keeps returning, a damaged seam, or a wall issue tied to moisture or movement, Wheeler Painting & Restoration Services can evaluate the condition and handle the drywall repair and finish work for homes and commercial spaces in Kent, Seattle, Tacoma, and nearby communities.