
Tag Archive for: puget sound contractor

Tub to Shower Conversions: Modernize Your Bath Safely

More and more, we're seeing property owners in the Greater Puget Sound area decide their old bathtub has overstayed its welcome. They're swapping them out for spacious, modern showers, and it's a smart move that goes far beyond just a style update. Here in our local communities, a slippery tub edge isn't just an inconvenience—it can be a daily hazard for families and commercial tenants alike.

Why Puget Sound Home & Business Owners Make the Switch

From Seattle to Tacoma, the standard bathtub-shower combo is quickly falling out of favor, making way for the much more practical walk-in shower. This isn't about chasing a trend; it's a direct response to how we live and work today. For many homeowners, business owners, and facilities managers, the bathtub is an underused fixture taking up valuable square footage that could be put to much better use.

A tub-to-shower conversion reclaims that wasted space, instantly making a cramped bathroom feel more open, functional, and inviting. As a trusted local provider, Wheeler Painting is here to help you understand the process and make an informed decision for your residential or commercial property.

Beyond the Bathtub: Top Reasons for the Upgrade

When property owners call us about this project, their reasons usually boil down to a few key benefits that dramatically improve their daily routine and property value.

  • Safety and Accessibility First: This is, without a doubt, the number one reason. Stepping over a high tub wall every single day is a genuine slip-and-fall risk, particularly for older adults, anyone with mobility challenges, or even just someone nursing a temporary injury. A low-threshold or zero-entry shower removes that barrier, making the bathroom a much safer space for everyone, from your family at home to employees and customers at your business.

  • A Fresh, Modern Look: Let’s face it, a dated, clunky bathtub can make an entire bathroom feel stuck in the past. A beautiful walk-in shower, especially one with sleek frameless glass and contemporary tile, provides an immediate and dramatic update. It transforms the room from purely functional to a spa-like retreat you'll actually enjoy spending time in.

  • Less Time Cleaning: Nobody enjoys scrubbing a deep tub or fighting a losing battle with mildew in old grout lines. It's a chore. Thankfully, modern shower materials like solid surface panels and large-format tiles are specifically designed for easy maintenance, cutting your cleaning time way down—a huge benefit for both busy homeowners and commercial property managers.

To give you a clearer picture, here’s a quick summary of why so many local property owners are making this change.

Quick Look: Why Homeowners Make the Switch

Benefit Why It Matters for Puget Sound Properties Key Consideration
Enhanced Safety Our damp climate can increase slip risks; a low-entry shower provides a secure, daily solution for all ages. Perfect for anyone planning to "age in place" or for businesses needing ADA-compliant solutions.
Modern Aesthetics Updates the entire look and feel of your bathroom, moving away from dated fixtures to a clean, spa-like vibe. A great way to boost your home’s resale value or elevate the appeal of a commercial space.
Space Optimization Reclaims wasted square footage from an unused tub, making small Seattle bathrooms feel larger and more open. A walk-in shower can make a tight floor plan feel significantly more spacious and luxurious.
Easier Maintenance Modern, non-porous materials and fewer grout lines mean less scrubbing and fighting mildew. Choose materials like solid surface panels or large-format tiles to minimize cleaning chores.

This isn't just a project about looks; it's about making your property work better for you, right now and for years to come.

A Smart Move Backed by Real-World Numbers

This shift isn't just something we're noticing locally; it's part of a huge movement in property renovation. Tub-to-shower conversions are a major force in the bathroom fixture market, which was valued at a staggering $27.29 billion globally in 2025 and continues to climb. A big part of that growth is happening right here in North America.

It makes perfect sense. With 10,000 adults nationwide turning 65 every single day, the demand for safer, more accessible living solutions is exploding. If you’re curious about the bigger picture, you can explore more about these industry trends in the full market research report.

For most homeowners and property managers we talk to, the decision comes down to one simple question: "What will make my daily life better and my property more valuable?" A walk-in shower delivers convenience and safety that a traditional tub just can’t.

As a full-service residential and commercial contractor serving our local community, Wheeler Painting has seen this trend up close. The goal is always the same: create spaces that are both beautiful and incredibly functional. A tub-to-shower conversion is one of those rare projects that hits the mark on both fronts, offering immediate benefits and excellent long-term value. It’s simply a smart, practical upgrade that makes homes and businesses in our area better places to be.

A Step-by-Step Look at the Tub to Shower Conversion Process

Thinking about a major bathroom project can feel overwhelming. But a tub-to-shower conversion, when handled by an experienced residential or commercial contractor, is a very methodical and predictable process. Let's walk through each stage, from the first conversation to the final polish, so you know exactly what’s coming.

This whole journey usually starts with one of three main goals: making the bathroom safer, giving it a modern update, or simply creating more usable space.

A flowchart illustrating three key motives for tub to shower conversions: safety, modernizing, and space.

As you can see, the decision is almost always a practical one—a direct solution to a real-world need in your home or facility.

Step 1: Consultation and Design

Every great project starts with a good conversation. We'll come to your property to talk about what you want to achieve, take careful measurements, and get a feel for your vision. This is the time to lay it all out—whether your top priority is a safe, low-threshold entry for your home or an ADA-compliant solution for your office space.

From there, we’ll guide you through selecting materials that match your style and fit your budget. We'll look at shower pans, tile or wall surrounds, fixtures, and any custom features you have in mind, like a built-in bench or grab bars. Afterwards, you'll get a detailed proposal that clearly outlines the scope of work, timeline, and costs, so there are absolutely no surprises down the road.

Step 2: Demolition and Preparation

With a solid plan in place, the real work begins. The first priority is always protecting your property. Our crew will lay down floor protection and seal off the bathroom to keep dust and debris contained. Then, we get to work carefully taking out the old tub and any surrounding walls or tile.

Once the old tub is gone, we can truly see what we're working with. We'll inspect the existing plumbing and the condition of the subfloor to prepare for the new shower installation.

Demolition is more than just tearing things out; it's a phase of discovery. This is our chance to see what's behind the walls and under the floor, confirming we have a solid, problem-free foundation to build on.

Step 3: Plumbing and Waterproofing

This is arguably the most important stage for the long-term health of your bathroom. Our licensed plumber will reconfigure the drain and water supply lines for the new shower. This might mean moving the controls to a more convenient spot or raising the height of the showerhead.

Next comes the single most critical step: waterproofing. Here in our damp climate, proper waterproofing is non-negotiable. We install a comprehensive, multi-layered system, including a waterproof membrane on the walls and a sealed, pre-sloped shower pan. This creates a completely sealed-off "boat" that protects your property’s structure from water damage and mold. Cutting corners here is a recipe for disaster and very expensive repairs later on.

Step 4: Installation and Finishing Touches

Now that all the crucial behind-the-scenes work is done, you'll start to see the beautiful new shower take shape. The team will begin installing all the components you selected.

  • Shower Pan: The foundation of your shower is set perfectly level, ensuring every drop of water heads straight for the drain.
  • Walls and Tile: Your new tile or solid surface panels are installed over the fully waterproofed walls. Every seam is meticulously grouted and sealed for a watertight finish.
  • Fixtures and Glass: The showerhead, control valve, and any other hardware are installed. If your design includes a glass door or panel, it’s professionally fitted at this stage.

Finally, we handle all the finishing touches that bring the room together. The Wheeler Painting team will patch any drywall, then prime and paint to make the new shower look like it was always there. We finish with a final bead of caulk and a thorough cleanup, followed by a final walkthrough with you to ensure you’re 100% happy with your new shower.

Budgeting Your Tub to Shower Conversion in Our Area

Let’s get right to it—the money. For any of us living and working in the Puget Sound region, figuring out the budget is the first real step in any property improvement project. Converting that old tub into a new shower is a fantastic investment in your property’s value and daily life, but the final bill can land anywhere on a pretty broad spectrum.

The total cost really hinges on your vision. Are you looking for a quick and clean swap, or are you dreaming of a fully custom, spa-like walk-in shower? The answer will depend on the materials you choose, how much plumbing needs to be moved around, and what other touch-ups, like new drywall or paint, are part of the job.

Understanding the Cost Spectrum

Think of it this way: a basic conversion using a standard-sized acrylic or fiberglass unit is going to be your most straightforward, budget-friendly option. On the other hand, if you’re picturing a custom-tiled masterpiece with frameless glass and high-end fixtures for your home or retail build-out, you’re looking at a larger, more involved project with a higher price tag.

This isn't just a local trend; it's a huge shift in how people want their properties to function. The bathroom remodeling market, where tub to shower conversions are a major component, is set to hit USD 398.1 billion in 2024. Here in Western Washington, that translates to a typical cost starting around $3,000 for a basic switch. That number can easily climb to $15,000 or more for high-end custom work. If you're a numbers person, you can discover more insights about bathroom remodeling trends from this industry report.

Key Factors That Drive Your Project's Cost

So, what separates a $3,000 project from a $15,000 one? It all comes down to the materials, the amount of labor involved, and the overall complexity. Let's break down where the money goes so you can plan effectively for your residential or commercial renovation.

  • Shower System Type: The most direct route is a pre-fabricated shower kit, usually made of acrylic or fiberglass. They are efficient to install. A custom-tiled shower, however, gives you complete creative freedom but takes a lot more skilled labor for building the pan, applying layers of waterproofing, and meticulously setting the tile.

  • Materials and Fixtures: The tile itself—whether it's affordable ceramic, durable porcelain, or luxury natural stone—is a major cost factor. The same goes for the "jewelry" of the shower: the showerhead, valve, and handles. A simple, functional fixture set costs far less than a thermostatic valve system with a rainfall showerhead.

  • Plumbing and Electrical Work: If we can place the new shower drain exactly where the old tub drain was, we keep the plumbing costs down. But if you want to move the drain, shift the water lines to a different wall, or add fancy new lighting for your office space renovation, that will increase the labor and materials needed.

  • Waterproofing: This is the one area where you absolutely cannot cut corners. Proper, professional waterproofing is the single most important step to prevent leaks, rot, and mold down the road. Trying to save a few hundred dollars here can easily lead to tens of thousands in structural repairs later. It’s a classic "ounce of prevention" scenario.

A quick word of caution: while a DIY approach looks like a great way to save money, it’s a huge gamble. We've seen firsthand how improper waterproofing leads to devastating hidden water damage. Hiring a licensed, insured residential or commercial contractor near you protects your property and your investment.

To give you a clearer picture of how these choices add up, we've put together a table showing typical cost ranges for different parts of the project.

Estimated Cost Breakdown for Conversion Projects

This table helps illustrate how different choices and materials contribute to the final cost.

Cost Factor Budget-Friendly Range ($) Mid-Range and Custom ($) What Drives the Cost
Shower System $1,500 – $4,000 $4,000 – $10,000+ Prefabricated acrylic kits vs. custom tile, pan, and waterproofing labor.
Plumbing Work $500 – $1,500 $1,500 – $3,500+ Using existing plumbing vs. relocating drains or supply lines.
Fixtures & Glass $400 – $1,200 $1,200 – $5,000+ Standard fixtures and a curtain rod vs. designer faucets and frameless glass doors.
Finishing Work $300 – $800 $800 – $2,000+ Minimal drywall patching vs. extensive wall repair, texturing, and professional painting.

As you can see, your decisions directly shape the budget. The good news is that this flexibility allows you to design a project that fits both your aesthetic and your wallet.

At the end of the day, a tub to shower conversion is a smart, practical upgrade that adds real safety, style, and value to your property. By understanding these cost factors, you can make confident, informed decisions. A professional partner like Wheeler Painting will always provide a detailed, transparent estimate, so you know exactly where every dollar is going before any work begins.

Designing for Safety, Accessibility, and Modern Style

When you decide to convert your tub into a shower, you’re doing more than just a simple bathroom update. This is your opportunity to completely rethink the space, creating a bathroom that’s not only stylish but also perfectly adapted to your life and business needs, both now and in the future. It’s about blending smart, essential safety features with the modern design you’ve always wanted.

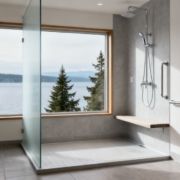
A modern accessible shower with grey tiles, grab bars, a built-in bench, and a rain showerhead.

For many local homeowners and facilities managers, this project is far more than cosmetic—it’s a critical step toward ensuring people can use the space safely and independently for years to come.

Prioritizing Safety and Aging-in-Place

Honestly, the biggest reason we see for tub-to-shower conversions is safety. This is especially true for homeowners who are planning to age in place or businesses looking to improve accessibility. With 76 million Americans set to be over 50 by 2030, the demand for barrier-free bathrooms is skyrocketing. People want to maintain their independence, and a safe bathroom is non-negotiable.

When you consider that over 60% of homes in the U.S. are more than 30 years old, it’s no wonder so many are finally ditching those bulky, high-sided tubs. You can read more about the bathroom remodeling market's growth to see just how big this trend has become.

A few key features are what truly make a walk-in shower a safer, more comfortable space for everyone:

  • Zero-Threshold Entry: A curbless or very low-curb shower pan gets rid of that high tub wall, which is one of the most common trip hazards. This seamless entry is a game-changer for anyone with mobility concerns and essential for ADA compliance in commercial renovations.
  • Built-in Bench or Seating: Adding a built-in or fold-down seat gives you a stable, comfortable spot to sit while showering. It reduces fatigue and dramatically lowers the risk of a slip or fall.
  • Strategically Placed Grab Bars: Forget the institutional-looking bars of the past. Today’s grab bars are stylish and functional. When we install them into reinforced wall blocking, they provide solid, reliable support right where you need it.
  • Handheld Showerhead: An adjustable handheld sprayer on a slide bar is incredibly practical. It allows you to direct the water exactly where you need it, whether you’re standing or sitting.

When you bring these elements together, you're not just remodeling a bathroom; you're creating a safe harbor. It’s less about preventing falls and more about providing genuine peace of mind and preserving dignity for every person using the space.

Embracing Modern Shower Styles and Trends

While safety is the foundation, your new shower is also a chance to seriously upgrade your bathroom's look and feel. Modern shower design has moved far beyond cramped, utilitarian stalls. We’re now creating open, spa-like retreats that become the true centerpiece of the room, whether in a private home or an upscale commercial facility.

For a deeper look at blending safety and style, you can learn more about designing a handicap-accessible shower in our detailed guide.

Here are a few of the most popular trends we’re incorporating into our projects right now:

  • Frameless Glass Enclosures: Using heavy, frameless glass doors and panels makes the whole bathroom feel bigger, brighter, and more open. It’s a clean, sophisticated look that gets rid of the visual clutter of old metal frames.
  • Luxurious Showerheads: A ceiling-mounted rain showerhead, invigorating body jets, or a thermostatic valve that keeps the water temperature perfectly consistent can turn a daily routine into a high-end spa experience.
  • Custom Niches and Storage: We love building tiled niches directly into the shower walls. They offer elegant, out-of-the-way storage for shampoos and soaps, eliminating the need for those clumsy shower caddies.
  • Large-Format Tiles: Big tiles on the walls and floor mean far fewer grout lines to scrub. This not only makes cleaning easier but also creates a seamless, expansive look that feels incredibly clean and modern.

Here at Wheeler Painting, we are a local residential and commercial contractor that specializes in helping property owners find that perfect balance between long-term safety and beautiful design. A tub-to-shower conversion is a smart investment that pays you back every single day in comfort, confidence, and lasting property value.

Waterproofing and Ventilation for Puget Sound Bathrooms

Here in the Pacific Northwest, we know a thing or two about rain. So when you're inviting more water inside your property with a new shower, managing it properly isn't just a good idea—it's everything. The long-term health of your home or commercial building hinges on two things that are easy to overlook: rock-solid waterproofing and smart ventilation.

Detailed cutaway of a shower's construction layers, including cement board, waterproof membrane, tile, shower pan, drain, and exhaust fan.

I always tell my clients to think of their shower as a small boat built right inside their bathroom. Every single seam, corner, and screw hole has to be perfectly sealed to keep water contained. Getting this wrong is one of the most expensive mistakes you can make, often leading to thousands in repairs from hidden rot, mold, and structural damage down the line.

The Layers of Protection Behind Your Tile

Behind the beautiful tile you see is where the real magic happens. This is the waterproofing system, and it’s far more than just a sheet of plastic. It’s a complete, integrated system designed to create a watertight basin from the ground up.

At Wheeler Painting, we are meticulous about this process. A bulletproof shower waterproofing system involves several key components working together:

  • A Flawless Shower Pan: This is the floor of your shower. We create a custom-sloped mortar bed or install a pre-formed pan that ensures every single drop of water is guided directly to the drain. The pan is then integrated with the drain assembly and sealed up the walls, forming the base of your "boat."
  • Continuous Waterproof Membranes: We go over the cement backer board with modern liquid-applied membranes or specialized fabric systems. This creates a seamless, monolithic barrier across the walls, covering every joint and screw head. Water simply can't get through it.
  • Expertly Sealed Details: The most vulnerable spots for leaks are always corners, seams, and built-in niches for shampoo bottles. These areas get extra layers of reinforcement and sealant to make them completely invulnerable.

Without this comprehensive system, water vapor can slowly work its way into your wall cavities, feeding mold and silently destroying your building's framing from the inside out. As a local commercial construction service, we've been called in to fix too many of these disasters; they are silent destroyers that a professional installation completely prevents.

Waterproofing isn't a product you buy off the shelf; it's a system that's meticulously built. A properly constructed shower has multiple layers of defense, so even if grout cracks years from now, your property's structure is still bone-dry and protected.

Clearing the Air: Why Ventilation is Non-Negotiable

Once the water is safely down the drain, you have to deal with the moisture left hanging in the air. A steamy, foggy bathroom isn't just annoying—it's the perfect breeding ground for mildew and peeling paint. In our damp local climate, a powerful exhaust fan is your single best defense.

It's not just about having a fan; it's about having the right fan for the size of your room, and making sure it's ducted properly to vent all that moisture straight outside—not into your attic.

What a Good Exhaust Fan Really Does

A high-quality fan does a lot more than just make a little noise. It actively pulls the warm, humid air out of your bathroom, and that simple action is critical.

  • It starves mold and mildew. By dropping the humidity level quickly after a shower, you remove the moisture that mold needs to grow on your grout, ceiling, and walls.
  • It protects your investment. Excess moisture wreaks havoc on finishes. It can make fresh paint fail, cause wood trim to warp, and even make wallpaper peel right off the wall.
  • It improves air quality. A dry bathroom is a healthier bathroom. Good ventilation reduces airborne spores and creates a much more pleasant space for family, employees, or customers.

A pro will calculate the right fan capacity for your room—measured in Cubic Feet per Minute (CFM)—to ensure it has the muscle to do the job right.

We take this stuff seriously because we've seen what happens when it's ignored. If you want to dive deeper into the technical side, you can learn more about our waterproofing solutions for wet rooms and see how we approach moisture management. At Wheeler Painting, we believe that proper waterproofing and ventilation are the foundation of a residential or commercial renovation that will look great and last for decades.

How to Hire the Right Local Remodeling Contractor

A tub-to-shower conversion is a significant investment, one that boosts your property's value and daily function. But honestly, the success of the whole project really comes down to the team you hire to build it. Choosing the right "residential contractor near me" or "commercial construction near me" isn't about chasing the lowest bid; it's about finding a genuine local partner who will protect your property, keep you in the loop, and deliver work they stand behind.

Here in our community, that means finding someone who truly gets the unique challenges of our climate, especially when it comes to waterproofing. A full-service contractor who handles everything—from the plumbing and framing to the final tile and paint—is your best bet for a seamless project with a single point of accountability.

Your Contractor Vetting Checklist

Before you sign on the dotted line, you’ve got to do your homework. Any contractor worth their salt will expect and welcome your questions, providing clear, straightforward answers. Use this checklist during your initial chats to make sure you're teaming up with a real pro.

  • Licensing and Insurance: The first thing you should ask is, "Are you licensed, bonded, and insured to work here?" Don't just take their word for it—ask for proof. Their license shows they meet state and local requirements, and insurance is what protects you from any liability if an accident happens on your property.

  • Specific Experience: Get right to the point: "How many tub to shower conversions have you actually done?" Ask to see a portfolio of their residential remodeling and commercial renovation work. This confirms they have hands-on, relevant experience with the specific plumbing, framing, and waterproofing challenges that come with these jobs.

  • Written Proposals: Never, ever move forward with just a verbal quote. A professional will give you a detailed written proposal that breaks down the entire scope of work, the specific materials they'll use, a project timeline, and a transparent payment schedule.

This kind of detailed paperwork protects both of you and makes sure everyone is on the same page from the get-go.

The Importance of Communication and Transparency

A great contractor does more than just the physical work; they communicate. From the first meeting to the final walkthrough, you should feel like you're being heard and kept informed. Look for a team that sets clear expectations about their daily work schedule, how they’ll manage dust and protect your property, and who your main point of contact will be.

A contractor’s willingness to answer your questions thoroughly and patiently is one of the best indicators of a successful project. If communication feels difficult before the job even starts, it will only get worse once demolition begins.

A trustworthy local partner will also be upfront about potential surprises. For example, they might explain that it's possible to find hidden water damage or old, failing plumbing once the old tub is out. A transparent contractor will talk about how they handle those "what-if" scenarios and even build contingencies into the estimate, minimizing the chance of sticker shock later.

For a more in-depth look at making the right hire, check out our guide on how to choose a general contractor.

At Wheeler Painting, we’ve built our reputation on trust and clear communication since 1991. Whether we're managing a complex commercial construction project or a residential tub to shower conversion, our goal is to make the process straightforward and stress-free for our clients in the community. We believe that providing detailed proposals and keeping an open line of communication is the only way to get your project done on time, on budget, and exactly how you envisioned it.

Answering Your Top Questions About Tub-to-Shower Conversions

It's smart to ask a lot of questions before you start a bathroom renovation. Here are the answers to the questions we hear most often from homeowners and business owners around the Puget Sound who are thinking about making the switch.

How Long Does a Tub to Shower Conversion Take?

Most of our tub-to-shower projects wrap up in 3 to 7 days. The exact timing really depends on the path you choose. If we're installing a beautiful pre-fabricated shower system, we can often hit the shorter end of that window.

A fully custom tile shower, on the other hand, might lean toward the longer end, especially if we need to move plumbing around. Either way, a professional contractor will give you a clear, day-by-day schedule so you know exactly what to expect and can plan around it.

Will This Project Hurt My Property's Resale Value?

We get this question all the time, and the answer is almost always a resounding "no." In fact, it usually does the opposite. As long as you have at least one other bathtub somewhere in the house, converting a secondary tub into a spacious, modern walk-in shower often increases your property's value.

In the current market, buyers and tenants are looking for updated, functional bathrooms. A well-done shower conversion can deliver a significant return on investment.

The real secret is balance. For a home, keep one bathtub for families with small kids, and upgrade the other bathroom to a sleek, accessible shower. That way, you appeal to the widest possible range of future buyers.

Can a New Shower Actually Fit in the Old Tub's Space?

Yes, absolutely. This is exactly what these conversions are designed for. Most tub to shower conversions are engineered to slot right into the alcove your old tub occupied.

A standard bathtub footprint is about 60 inches long and 30-32 inches wide, which is more than enough room for a comfortable, spacious shower. Sticking to this original layout is the key to making the project efficient and keeping costs down, as it avoids a full-scale bathroom redesign.

Is a Building Permit Required for This?

It really depends on the scope of the project. If we're just swapping out the tub for a shower stall and not touching the plumbing's location, you often don't need a permit.

However, the moment we start moving drains, adding new electrical for lighting, or touching any walls, a permit is almost always required. A reputable residential contractor or commercial construction firm will know the local codes inside and out and will manage the entire permitting process for you, ensuring everything is built to last and completely up to code.


Ready to see how a new shower could transform your bathroom? Whether it's a single residential project or a larger commercial upgrade, Wheeler Painting brings professionalism and quality craftsmanship to every job in our community. Schedule your free consultation with us today!
Your Guide to a Handicap Accessible Shower in Puget Sound

Imagine starting your day without having to navigate a single obstacle. That’s the real benefit of a handicap accessible shower—it's a space designed for genuine independence, safety, and comfort. For homeowners, business owners, and facilities managers in our community, it transforms what could be a challenging part of the daily routine into something smooth and worry-free.

What Makes a Shower Handicap Accessible?

A standard shower, with its high curb and slick floor, can be a daily hazard for many. A truly accessible shower, on the other hand, is all about smart design that puts safety and ease of use first. It’s about removing those physical barriers so that anyone, regardless of their mobility, can use the space comfortably and with confidence.

For anyone planning a project here in the Puget Sound area, whether for a home or a commercial facility, understanding what goes into one of these showers is the first step. This isn't just about ticking boxes on a compliance form; it’s about creating a fundamentally safer and more inclusive experience. The goal is to give people the confidence to bathe on their own, whether they use a walker, a wheelchair, or just need a bit more stability on their feet.

Key Principles of Accessible Design

When you break it down, a handicap accessible shower is built on a few core ideas. Think of them less as "features" and more as practical, reassuring solutions to common problems.

  • Zero-Barrier Entry: This is perhaps the most important element. A curbless or "zero-threshold" entry means there's no lip or step to navigate. A wheelchair can roll right in, and the risk of tripping is virtually eliminated for everyone.
  • Sufficient Space: An accessible shower needs to have enough room to move around. This means plenty of space for a wheelchair user to turn comfortably or for a caregiver to assist without feeling cramped, a key consideration for both residential and commercial renovations.
  • Support and Stability: Safety is everything. Grab bars installed in strategic locations provide crucial support for sitting, standing, and moving around. A built-in or fold-down shower bench also offers a secure place to rest.
  • Ease of Use: Every control needs to be within easy reach from a seated position. This simple consideration, from the faucet handles to the handheld showerhead, makes a massive difference in allowing someone to maintain their independence.

By focusing on these principles, a handicap accessible shower transforms from a medical necessity into a feature of universal design—one that adds value, style, and safety to any property. It's an investment in quality of life.

Whether you're planning a residential remodel, an office space renovation, or a retail build-out, these elements are the foundation of a successful project. Working with an experienced local provider like Wheeler Painting & Restoration Services ensures that every detail is handled correctly, resulting in a shower that is safe, durable, and looks great.

Choosing the Right Accessible Shower Type for Your Needs

Once you have a handle on what makes a shower "accessible," the next big decision is picking the right type for your space. This isn't a one-size-fits-all situation. The best choice comes down to the specific mobility needs of the user, both for today and for the years ahead.

Think of it like buying a car. A person who uses a wheelchair full-time needs the equivalent of a spacious van with a ramp. Someone else might just need a reliable sedan with top-notch safety features for extra peace of mind. Your shower choice should be just as personalized.

This decision tree can help you start visualizing which path makes the most sense for your project.

Decision tree flowchart guiding selection of standard, assisted, or roll-in accessible showers based on user needs.

The main takeaway here is clear: for anyone who uses a mobility aid or needs a bit of help, a true accessible shower with features like barrier-free entry and grab bars is always the safer, more functional choice.

To help you compare the most common options we install for local homeowners and businesses, here’s a quick breakdown of roll-in showers, transfer showers, and tub-to-shower conversions.

Accessible Shower Type Comparison

This table offers a side-by-side look at the three main types of accessible showers, helping you match their features to your specific requirements.

Shower Type Best For Key Feature Typical Threshold Height
Roll-In Shower Full-time wheelchair users or those planning to age in place Completely flat, no-barrier entry 0 inches
Transfer Shower Individuals who can stand and pivot from a walker or wheelchair Built-in bench or seat for seated bathing 0.5 inches or less
Tub-to-Shower Conversion Homeowners wanting to replace a hazardous high-sided tub with a safer shower Dramatically improves safety and accessibility Varies (can be 0 to 3 inches)

Each of these designs solves a unique set of challenges. A roll-in shower offers maximum independence for residential and commercial users alike, a transfer shower provides stable, seated bathing, and a conversion project is a fantastic safety upgrade for almost any home. Let's look at each one in more detail.

Roll-In Showers for Maximum Accessibility

A roll-in shower is exactly what it sounds like—a shower designed for a wheelchair to roll right in. It has a completely flat, zero-threshold entry, meaning there’s no curb, lip, or barrier to overcome. This seamless design is the gold standard for independent living and is a cornerstone of our residential and commercial construction services.

For commercial spaces in Western Washington like hotels, gyms, or office buildings, a roll-in shower is a must-have for serving all patrons. In a home, it’s the ideal solution for anyone who uses a wheelchair full-time or wants the ultimate "age-in-place" design.

We've found that a roll-in shower gives wheelchair users the most freedom, often allowing them to bathe with little to no help. The open, spacious design also makes it far easier for a caregiver to assist without being cramped.

The minimum ADA-recommended size for a roll-in shower is 60 inches wide by 30 inches deep. This provides enough room for a wheelchair to enter and for the user to safely transfer to a shower seat if needed.

Transfer Showers for Seated Safety

A transfer shower is built for someone who can stand up from a wheelchair or walker and pivot onto a shower seat. Unlike a roll-in shower, these can have a very low curb—typically no more than half an inch high. This minimal threshold is great for containing water while still being easy to step over.

These are a very popular choice for residential remodeling where a completely flat floor isn't necessary or practical. The star of the show here is the built-in bench.

  • Integrated Seating: A sturdy, built-in bench is much safer than a freestanding, wobbly shower chair.
  • Smaller Footprint: Transfer showers are versatile and can often be designed to fit in the same space as a standard bathtub or small shower stall.
  • Enhanced Stability: When you pair the bench with well-placed grab bars, users have the confidence they need to move securely from their walker or wheelchair to the seat.

For many homeowners we work with in the Puget Sound area, a transfer shower hits that perfect sweet spot between improved safety and a more conventional bathroom aesthetic.

Tub-to-Shower Conversions

One of our most common accessibility projects is the tub-to-shower conversion. It involves removing a high-sided, traditional bathtub and replacing it with a much safer low-threshold or roll-in shower. This single change is one of the most powerful ways to reduce the risk of bathroom falls, since stepping over a 15-inch tub wall is a major hazard for anyone with mobility challenges.

A tub-to-shower conversion is a full-scale safety upgrade. As local contractors, our team at Wheeler Painting & Restoration Services handles the entire process—from demolition and installing a properly waterproofed shower pan to finishing the walls and installing grab bars to code. It’s a renovation that immediately makes a home safer, more functional, and more valuable.

Must-Have Design and Safety Features for Your Accessible Shower

A well-lit, handicap-accessible shower stall featuring grab bars, a built-in seat, and a handheld shower.

The real magic of an accessible shower isn't just its open design; it’s in the details. After you've decided on a roll-in or transfer style, a handful of specific features come together to create a space that’s truly safe, comfortable, and empowering. These aren't just add-ons; they are the non-negotiable elements that turn a standard shower into a personal sanctuary of independence.

Understanding how each component works is crucial. For homeowners and facility managers here in the Puget Sound, getting these features right from the start ensures your renovation delivers genuine safety and lasting value. Let's walk through the essential components that make an accessible shower actually work.

Strategically Placed Grab Bars

If there’s one feature you can't skip, it's grab bars. They are the single most important safety element in an accessible bathroom, providing vital support for almost every move—from getting in and out of the shower to simply adjusting your position on a bench. Where you put them isn't a guessing game; it’s a science.

  • Horizontal Bars: These are your mainstays for support when pushing up to stand or lowering down to sit. They should run along the side and back walls.
  • Vertical Bars: Placing a vertical bar near the shower entrance gives a steadying handhold right when you need it most—when stepping over a small threshold or pivoting.
  • Diagonal Bars: While not as common, these can be a big help for anyone who needs extra leverage to pull themselves up from a seated position.

The Americans with Disabilities Act (ADA) gives us a clear guideline: install grab bars between 33 and 36 inches from the shower floor. This height makes them easy to reach whether you’re standing or sitting. And this is not a DIY job—they must be professionally anchored into wall studs to withstand at least 250 pounds of force.

A Comfortable and Secure Shower Bench

A shower bench is a game-changer. It offers a stable place to sit for anyone who struggles with standing for long periods, has balance concerns, or just wants a more relaxing shower experience. It completely eliminates the risk posed by those wobbly plastic chairs that can slip out from under you.

A built-in or professionally installed fold-down bench is always the safer, more reliable choice. It’s integrated directly into the shower’s structure and built to handle significant weight, providing a solid foundation for bathing with confidence.

Fold-down benches are especially practical in commercial settings or bathrooms used by multiple people. They simply tuck away when not needed, freeing up space. For a truly custom project, a tiled, built-in bench can be designed to perfectly match the rest of the shower, creating a seamless, high-end look.

A Flexible Handheld Showerhead

An adjustable handheld showerhead mounted on a sliding bar is another absolute must-have. It provides a level of control that a fixed, wall-mounted showerhead just can't offer.

This simple feature allows you or a caregiver to direct the water precisely where it’s needed, which is invaluable when seated on a bench. Being able to bring the water to you, rather than having to maneuver your body under a fixed stream, makes bathing far easier and more dignified.

Slip-Resistant Flooring and Waterproofing

It's no secret that a wet shower floor is a major fall hazard. That’s why your choice of flooring is one of the most critical safety decisions you'll make. Modern non-slip tiles feature textured surfaces that give you excellent grip, even when wet and soapy. For a seamless and incredibly durable alternative, specialized epoxy coatings create a continuous, slip-resistant, and completely waterproof surface ideal for both residential and commercial applications.

Proper waterproofing is the unsung hero of any great accessible shower. You can learn more about how our professional techniques create a fully protected space in our guide on complete waterproofing for wet rooms.

Demand for these features is growing fast. In fact, the global market for handicap bathroom accessories is expected to grow at a compound annual growth rate (CAGR) of 7.5% through 2033. For property owners in Western Washington, this trend highlights the importance of working with a contractor who truly understands these products. A feature like a curbless entry, for example, can improve access for 100% of wheelchair users while also dramatically cutting down on fall risks for everyone.

Navigating ADA Guidelines and Puget Sound Building Codes

Trying to make sense of renovation rules can feel like learning a new language, especially when you’re building a handicap accessible shower. You'll hear about the Americans with Disabilities Act (ADA) and a whole host of local Puget Sound building codes. It’s a lot to take in, but we’re here to translate it for you in simple terms.

At their core, these regulations aren’t about creating hurdles. They exist for one simple, vital reason: to guarantee that the shower is truly safe and usable for anyone, regardless of their mobility. The ADA provides the national standard, and it serves as an incredible blueprint for residential projects, too.

ADA as the Gold Standard for Safety

For public and commercial construction—think hotels, gyms, or office space renovations—the ADA lays out legally binding rules. If you're a business owner or facilities manager in Western Washington, complying with these standards isn't a suggestion; it's the law. These guidelines cover everything from the minimum size of the shower stall to the exact height of the water controls.

Now, for a private home, the story is a little different. Your residential remodeling project isn't legally required to follow ADA rules. But here’s our professional take: treating the ADA as your guide is the smartest move you can make. It’s the best way to build a shower that’s not just accessible today, but safe and functional for decades.

Think of the ADA as a best-practice manual that's been perfected over years with real-world safety data. While your home doesn't need official ADA certification, our commercial and residential contractors build to these standards because they represent the peak of safety and function. It ensures your investment delivers true accessibility, not just the appearance of it.

Following these principles means your remodel will meet the highest level of universal design, making your property significantly safer and adding long-term value.

Key Dimensions and Requirements

The technical details are where a project can get tricky, but understanding the basics helps you see why certain measurements are so important. These aren't just arbitrary numbers; they are the dimensions that make a shower work for someone with mobility challenges.

Here are a few of the most critical specifications we build into our projects:

  • Roll-In Shower Size: The interior needs a clear space of at least 60 inches wide by 30 inches deep. This gives a wheelchair user enough room to roll in, turn, and operate the shower controls comfortably.
  • Transfer Shower Size: These are designed for someone to slide from a wheelchair onto a built-in bench. They require a minimum interior of 36 inches by 36 inches.
  • Grab Bar Placement: Grab bars are non-negotiable for safety. They must be installed 33 to 36 inches from the shower floor and be strong enough to support at least 250 pounds of force. This height is the sweet spot for providing support whether you're standing or seated.
  • Shower Bench Height: For transfer showers, the bench height is crucial. It must be 17 to 19 inches from the floor, which lines up perfectly with the seat of a standard wheelchair and makes transferring much safer and easier.

You Don't Have to Be the Expert

Feeling a little overwhelmed by all these numbers? That's completely normal. The good news is that you don’t need to memorize a single building code or ADA chapter. That’s our job.

As your local residential or commercial contractor, a team like ours at Wheeler Painting & Restoration Services handles all the technicalities. We manage the entire process, from creating a compliant design to pulling the right permits for your specific city or county in the Puget Sound region. We make sure every grab bar is anchored correctly and every floor is sloped for perfect drainage.

Your role is to share your vision for a beautiful, functional bathroom. We’ll handle the rest, ensuring the final result is safe, compliant, and everything you hoped for.

How to Budget for Your Accessible Shower in Western Washington

Alright, let's talk about the dollars and cents. When you're planning for a handicap accessible shower, figuring out the budget is just as important as picking out the tile. For anyone managing a home or commercial property here in Western Washington, getting a handle on the costs early on makes the whole project go a lot smoother, with no surprises down the road.

It helps to think of this as more than just a remodel. You're making a long-term investment in safety and independence, and you're adding real, measurable value to your property. The final price can swing quite a bit, so let's break down exactly what goes into it.

Key Cost Drivers for Your Project

The final number on an estimate depends on the scope of work and the materials you land on. Thinking about these elements one by one will give you a much clearer picture of where your money is going.

  • Project Scope: Are we simply swapping a tub for a shower within the same footprint? That's your most straightforward and budget-friendly option. If you're looking to move walls, reroute a lot of plumbing, or expand the bathroom for a retail build-out or residential remodel, the complexity and cost will naturally increase.
  • Material Choices: This is where you have a ton of control over the budget. High-end porcelain or natural stone tiles will have a very different price tag than classic, clean ceramic options. Likewise, a custom solid-surface wall system will be priced differently than standard tile work.
  • Plumbing and Fixtures: The plumbing work is a major factor. If we can tie into the existing water lines and drains easily, costs stay down. But if we need to move a drain to create a true curbless entry or install premium thermostatic fixtures, that requires more labor and materials.
  • Permit and Inspection Fees: Any remodel in the Puget Sound area that touches plumbing or structural elements is going to require permits. These fees vary from one city to the next, but they're a non-negotiable part of making sure your project is built to code and is completely safe.

A professional proposal from a trusted local provider like Wheeler Painting & Restoration Services is essential. We provide a detailed, line-by-line breakdown of every cost, so you have complete transparency and confidence in your budget before work ever begins.

Seeing the Bigger Picture

It’s not just you—we’re seeing a huge increase in demand for these kinds of renovations. It's part of a bigger shift toward making homes and commercial spaces more inclusive for everyone. In fact, the market for inclusive bathroom products is projected to hit $10.19 billion by 2025 and could soar to over $35 billion by 2030. For property owners in Western Washington, that's a strong signal that investing in these upgrades is a smart move. You can explore more about this growing market and what it means for property values.

Since 1991, Wheeler Painting & Restoration has been on the front lines of these projects. We know how to expertly integrate the features that matter—from fold-down seats and adjustable showerheads to incredibly durable, slip-resistant epoxy-coated floors that will stand up to years of daily use. Whether it's for a private home or a commercial construction project, we make a complex process feel straightforward.

Your Project Roadmap with a Local Contractor

Couple reviews bathroom renovation blueprints, selecting tiles and fixtures for a handicap accessible shower.

Turning the vision of a safe, accessible shower into reality can feel overwhelming. But when you team up with an experienced local contractor here in the Puget Sound, that big project suddenly becomes a clear, manageable process. It’s not just about getting the job done; it’s about having a single, accountable partner who ensures clear communication and reliable timelines from start to finish.

A renovation shouldn't be chaotic. It should feel like a genuine collaboration, where your needs are heard and your vision is respected every step of the way.

The Initial Consultation and Needs Assessment

It all starts with a conversation. A project manager from a trusted local company like Wheeler will meet you right where the project is happening. This isn't just about taking measurements; it's about listening to you. We want to understand the daily challenges, the specific mobility needs, and what you hope to achieve with the new space.

This is the perfect time to ask all your questions and really define what a successful project looks like. Are you planning for a wheelchair user who needs a roll-in shower, or would a transfer shower with a sturdy bench be the right fit? We’ll help you sort through these crucial decisions.

Collaborative Design and Material Selection

Once we have a clear picture of your needs, the fun part begins: the design. We bring our technical know-how, you bring your style, and together we create a plan. We'll guide you through selecting materials that are not only beautiful but also built for safety and long-term durability.

  • Flooring: We’ll look at options like handsome, textured non-slip tile or even a seamless, high-grip epoxy coating.
  • Fixtures: We'll find the perfect handheld showerhead, easy-to-operate controls, and grab bars that blend style with solid, reliable support.
  • Wall Surrounds: You can explore everything from timeless tile to modern, grout-free solid surface panels that are a breeze to maintain.

Every choice we make together is aimed at creating a space that looks and feels completely cohesive. We aim to show that function and style can go hand-in-hand in any residential or commercial renovation.

The goal here is simple: to prove that a handicap accessible shower doesn't have to look clinical. With the right materials, we can build a space that feels like a spa while delivering absolute peace of mind.

Detailed Proposal and Timeline

After we’ve nailed down the design, you’ll get a comprehensive proposal. Think of this as the blueprint for your project. It will provide a transparent, line-by-line breakdown of all the costs and a realistic construction schedule.

No surprises, no guesswork. You'll know exactly what to expect and when, making it easy to plan your budget and your time.

Construction and Final Inspection

This is where the plans on paper become a reality. Our professional crew handles everything—demolition, plumbing, waterproofing, and all the finishing touches—with skill and respect for your home or business. We pride ourselves on working efficiently to minimize disruption.

The need for these types of projects is growing fast. The global market for bathroom and toilet assist devices is set to become a $4.88 billion industry in 2025 and is projected to hit $6.48 billion by 2030. Since 1991, Wheeler Painting & Restoration Services has been a trusted leader for Puget Sound homeowners and businesses, guiding them through the entire process to create results that are durable, compliant, and beautiful.

When the work is done, we’ll do a final, thorough walkthrough with you. We want to make sure every single detail meets your expectations and our own high standards. That’s our promise of a job well done.

A Few Common Questions We Hear About Accessible Showers

As you get closer to starting your project, you're bound to have some questions. That’s a good thing. Building a handicap accessible shower is a big step toward making your property safer and more independent, and you should feel confident about every decision.

Here are some of the questions we answer most often for homeowners and business owners around the Puget Sound.

How Long Does an Accessible Shower Installation Take?

This really depends on the scope of your project. For a straightforward tub-to-shower conversion where we’re working within the existing bathroom footprint, we can often have the job wrapped up in just 3-5 days.

If you're planning a more extensive custom remodel—maybe moving a wall, rerouting significant plumbing, or doing complex tile work for a residential or commercial renovation—you should plan for a timeline closer to 1-3 weeks. A trusted local contractor will always give you a detailed project schedule before a single tool comes out, so you know exactly what to expect.

Can an Accessible Shower Actually Look Modern and Stylish?

Absolutely. The days of institutional-looking, clinical accessible fixtures are long gone. Modern design has completely caught up, blending crucial safety features with high-end style. You don’t have to choose between a bathroom that works for you and one that you love to look at.

  • Sleek Drains: We can install elegant trench-style drains that create a completely seamless, spa-like floor.
  • Designer Grab Bars: Many of the best grab bars now double as towel racks or built-in shelving, making them a stylish and functional part of the design.
  • Beautiful Materials: You have an incredible selection of gorgeous, non-slip tile and solid surface materials to match any aesthetic you're going for.

A well-designed accessible shower can—and should—be a beautiful focal point in your bathroom.

Is a Permit Required for This Kind of Remodel in Washington?

In almost every case across Western Washington, the answer is yes. A permit is usually required for any project that involves changing the plumbing or modifying structural elements. This isn't just bureaucratic red tape; it's an essential safeguard. It ensures all the work meets current building codes, protecting your safety and your property's value.

As your residential or commercial contractor, we handle that entire permitting process from start to finish. Having the right partner makes all the difference, and you can learn more about how to choose a general contractor in our detailed guide.

What’s the Difference Between “ADA Compliant” and “Accessible”?

This is a great question, and it’s a source of a lot of confusion. Think of it this way:

“ADA compliant” refers to a strict set of legally enforceable standards. These are the rules that public and commercial buildings must follow for any commercial renovations or construction.

“Accessible” or “universal design” is what we talk about for private homes. It’s the practice of applying those same safety principles and dimensions to a residential remodeling project.

While your home shower isn’t legally required to meet ADA code, following those guidelines is the absolute best practice. It’s the gold standard we use to make sure your shower is as safe, comfortable, and easy to use as possible.


Ready to transform your bathroom into a safer, more beautiful, and truly accessible space? The team at Wheeler Painting & Restoration Services has been serving Puget Sound since 1991, delivering expert craftsmanship for residential and commercial projects. Contact us today for a straightforward consultation and a detailed, transparent proposal.

Your Guide to Replacing a Shower in Puget Sound

Thinking about replacing a shower in your home or commercial property? It's a great way to update a dated bathroom, improve accessibility, or finally tackle nagging leaks and mold issues. But it's a lot more involved than just picking out new tile. A successful shower replacement hinges on solid planning and a clear understanding of the process, which can feel overwhelming. This guide is here to walk you through it, making you feel confident in your decisions.

Whether you're a homeowner in need of a residential contractor near you or a facilities manager looking for commercial construction services, we'll explain the process in simple, helpful terms.

Defining Your Shower Replacement Project

Before you fall in love with a high-end rain shower head or a specific tile pattern, the most important work happens on paper. A well-thought-out plan is what keeps a project on track, on budget, and ensures the end result is something you’ll love for years.

So, what are you trying to accomplish? Are you just swapping out a leaky, old fiberglass unit for a new one in an office restroom? Or are you dreaming bigger, picturing a spacious walk-in shower for your home that feels like a personal spa? Getting clear on your goals—whether it's a simple update or a full-blown transformation—will steer every decision you make.

Setting a Realistic Budget

Once you have a vision, it’s time to talk money. Budgeting for a shower replacement involves more than just the cost of the visible materials. From our experience serving the Puget Sound community, the real costs are often hiding behind the walls.

A common mistake is underestimating the full scope of expenses. Your budget needs to account for:

  • Materials: This includes the shower pan, wall materials (like tile or solid-surface panels), fixtures, glass, and all the crucial waterproofing membranes and sealants.
  • Labor: Unless you’re a seasoned pro, you’ll be hiring a contractor. This cost covers demolition, plumbing adjustments, installation, tiling, and finishing. For commercial projects, this may include coordinating multiple trades.
  • Permits: Depending on your city and the extent of the work (especially if you’re moving plumbing lines), a permit is often required. A trusted local provider will handle this, ensuring your project is fully compliant with local codes.
  • Contingency Fund: This is non-negotiable. Plan on setting aside an extra 15-20% of your total budget. You never know when you’ll open up a wall and find hidden water damage or old plumbing that needs immediate replacement, especially in older buildings.

To give you a clearer picture, here’s a breakdown of what you can generally expect to spend. These are averages, and costs can vary based on project complexity and material choices.

Shower Replacement Budget Snapshot

Expense Category Average Cost Range (DIY) Average Cost Range (Pro Install)
Materials (Pan, Walls, Fixtures) $800 – $3,500 $1,200 – $7,000+
Plumbing & Labor $0 (Self-performed) $1,500 – $4,000
Demolition & Debris Removal $100 – $300 $400 – $800
Permits & Inspections $150 – $500 $250 – $750
Contingency Fund (15-20%) $225 – $860 $500 – $2,500+
Total Estimated Cost $1,275 – $5,160 $3,850 – $15,050+

Remember, a higher-end custom tile job with premium fixtures will naturally sit at the top of these ranges, while a straightforward swap of a pre-fabricated unit will be more budget-friendly.

Creating a Practical Timeline and Plan

A detailed timeline is your best friend for managing expectations and minimizing how long your bathroom is out of commission. It all starts with the foundational planning process.

Shower project plan infographic showing define, budget, and plan stages with icons.

This process boils down to three key phases: defining your scope, setting your budget, and creating a step-by-step plan. A simple replacement might only take a few days, but a custom tile shower can easily stretch over a week or more, factoring in all the necessary prep, waterproofing, and tile setting.

Working with an experienced local pro like Wheeler Painting means you get a detailed schedule upfront. We coordinate all the necessary trades—plumbers, tile setters, electricians—to make the process as seamless as possible, whether it's a home remodel or a commercial facility construction project.

Of course, sometimes during planning, you might realize a bathtub better suits your needs. If that's the case, you can learn more about how to convert a shower to a bathtub in our guide on that topic.

Key Takeaway: The success of your shower replacement depends heavily on the initial planning phase. Rushing this stage often leads to budget overruns and compromises on quality. Take the time to define your scope, set a comprehensive budget, and consult with a professional.

By putting in the effort at the beginning, you set the stage for a smooth project that results in a beautiful, functional shower you can enjoy for years to come.


Choosing Materials That Last in the Pacific Northwest

When it’s time to pick materials for your new shower, you’re deciding on more than just the look. You’re choosing its durability and how much time you'll spend cleaning it. Here in the perpetually damp Pacific Northwest, moisture resistance isn't just a nice feature—it's essential for keeping mold and mildew at bay in both residential and commercial settings.

Making the right call now will save you from headaches down the road. Let’s walk through the most common choices we see property owners make, weighing the pros and cons so you can find a solution that looks great and holds up to daily use.

Shower Wall Surfaces

The shower walls take the brunt of the water. From classic tile to sleek, modern panels, each material brings its own unique balance of style, maintenance, and performance in our wet climate.

Porcelain and Ceramic Tile

Tile is the classic go-to for a reason; it offers endless design freedom. If you can dream it, you can probably do it with tile. For a shower, you'll want to lean toward porcelain, which is denser and less porous than ceramic, making it a champion in high-moisture zones. The real weakness of any tile job, though, is the grout.

  • What’s to love: You get a huge variety of colors, sizes, and patterns to create a truly custom look. Porcelain is incredibly tough and water-resistant.
  • What to watch out for: Those grout lines need regular cleaning and sealing to keep stains and mold from taking hold. Installation is a skilled craft—this isn't the place for a "good enough" job if you want it to be waterproof.

Our advice: If you love the tile look, go for the largest format tiles your space can handle. Fewer grout lines mean less cleaning. We also strongly recommend upgrading to a high-performance epoxy grout. It's stain-proof and resists mold, making it a brilliant investment for any shower.

Solid Surface Panels

For anyone who dreads cleaning grout, solid surface panels are a game-changer. These are large sheets of material, often acrylic or an engineered composite, that create a seamless and totally waterproof surface.

  • What’s to love: No grout lines means nowhere for mold and grime to hide. They are incredibly easy to wipe down and can often be installed much faster than tile, which is a great benefit for commercial renovations.
  • What to watch out for: The initial cost can be higher than a basic tile job. Your design choices are a bit more limited, though many modern options mimic natural stone or even tile patterns.

Shower Material Comparison

So, how do you choose? It usually comes down to aesthetics versus your tolerance for long-term maintenance. This table breaks down the key differences to help you decide what’s best for your property.

Material Type Pros Cons Best For
Porcelain Tile Highly durable, waterproof, and offers endless design options for a custom look. Grout lines require maintenance, and professional installation is critical for a leak-proof finish. Homeowners and commercial properties wanting a classic, high-end look and are prepared for routine cleaning.
Ceramic Tile A budget-friendly choice with a wide variety of styles and colors available. Less dense than porcelain; can be more prone to chipping and water absorption if the glaze is compromised. Projects with a tighter budget where a traditional tiled appearance is the goal.
Solid Surface Grout-free, making it extremely low-maintenance and quick to install. The initial cost is higher, and there are fewer custom design options compared to tile. Busy households, rental properties, and commercial facilities (like office space renovations or retail build-outs) where durability and easy cleaning are key.
Acrylic/Fiberglass Often the most affordable option, available as a single, integrated unit for fast installation. Can look and feel less premium. It's also more susceptible to scratching and can yellow over time. Quick bathroom updates, secondary baths, or projects where the budget is the primary concern.

Ultimately, a beautiful and functional shower can be achieved with any of these materials. The best one is simply the one that fits your lifestyle, budget, and design vision.

Selecting the Right Shower Pan and Fixtures

The shower pan—the floor of your shower—is arguably the most critical component. A failing pan is one of the most common and destructive sources of bathroom leaks.

  • Acrylic & Fiberglass Pans: These pre-fabricated bases are the industry standard for a reason. They are cost-effective, completely non-porous, and relatively straightforward to install correctly.
  • Custom Tiled Pans: A tiled shower floor gives you that high-end, seamless look. Be warned: this requires expert skill. A proper tiled pan involves a complex, multi-layered waterproofing system. One small mistake here can cause catastrophic water damage.

Finally, let's talk fixtures. Your showerhead, valve, and handle are the workhorses of your shower. Stick with reputable brands to ensure you get reliable performance. When picking a finish—whether it's chrome, brushed nickel, or matte black—think about how it will stand up to water spots and daily cleaning. Working with a professional ensures all these pieces fit together perfectly, from plumbing compatibility to a flawless final look.

Demolition: Uncovering What’s Really Behind Your Shower Walls

Before you can get to the exciting part—setting beautiful new tile or installing a sleek glass door—the old shower has to go. This demolition phase is more than just swinging a hammer; it's an investigation. This is the moment you finally see what’s been happening behind the walls, and for many older properties here in the Puget Sound, it’s when you discover the real scope of your project.

First, we shut off the water supply to the shower. Once the water is off, we remove the old showerhead, faucet handles, and the shower door.

Modern chrome shower faucet, beige tiles, and a shower drain sample on a wet surface.

Once the fixtures are out, it's time to tear out the old surround. This gets messy fast. We make sure to cover your vanity, toilet, and floor with heavy-duty drop cloths and have a plan for hauling away the debris.

The Big Reveal: Inspecting the Studs and Subfloor

With the walls stripped down to the bare studs, the real inspection begins. Don't rush this part. What you find now will dictate the next steps and determine whether your new shower lasts five years or twenty-five.

We see this all the time, especially in older buildings: slow, undetected leaks that have been silently rotting wood for years. Even a hairline crack in old grout can let just enough water in to cause major damage over time.

A shower remodel is one of the few times you get a clear look at your property’s framing and subfloor. Ignoring problems at this stage is the most expensive mistake a property owner can make. Addressing rot, mold, or bad plumbing now is non-negotiable for a lasting result.

This is your one shot to make things right before it all gets covered up again. We grab a good flashlight and closely examine every stud, the subfloor, and the surrounding insulation.

Common Problems to Look For

As you inspect the exposed shower bay, you're hunting for specific red flags. Spotting them now can save you thousands in structural repairs down the road.

  • Water Damage and Rot: Look for dark, stained wood on the studs or subfloor. A tell-tale sign of rot is wood that feels soft or spongy. Poke any suspicious-looking spots with a screwdriver; if it sinks in easily, that wood must be replaced.
  • Active Mold or Mildew: Mold isn't always black. It can be green, white, or even pinkish. Any drywall, insulation, or wood affected by mold has to be carefully removed and the area treated to ensure it doesn't come back.
  • Outdated or Failing Plumbing: This is the perfect time to assess your plumbing. Look for corrosion on copper pipes or heavy rust on old galvanized steel. Upgrading to modern PEX or new copper lines now is a smart investment.
  • Pest Damage: Damp, soft wood is a dinner bell for pests like carpenter ants and termites. Keep an eye out for tunnels in the wood or small piles of sawdust-like frass.

Finding and correctly fixing these hidden issues is what separates a DIY job from a professional-grade remodel. As a commercial and residential contractor, we use a detailed construction quality control checklist on every project to make sure nothing gets missed. This careful, methodical approach is the only way to guarantee the foundation for your new shower is solid and dry.

The One Step You Can't Afford to Get Wrong: Waterproofing

If there's one part of a shower replacement where you absolutely cannot cut corners, it's waterproofing. It’s easy to get excited about the tile and fixtures—the parts you'll see every day. But the most important work is hidden behind the walls. A single pinhole-sized leak in a bad waterproofing job can quietly cause thousands of dollars in mold and rot.

A person with a flashlight inspects severe mold behind a removed bathroom shower wall.

We tell every client to think of waterproofing as the foundation of the entire project. It's a meticulous system designed to create a completely sealed box that guarantees water stays exactly where it belongs.

Building a Bulletproof Water Barrier

Older showers used a flawed "water in, water out" system. Today, we use far superior methods that stop water right at the surface, just behind the tile. Here’s a look at how we build a truly modern, waterproof shower enclosure:

  • Start with the Right Board: We always use waterproof backer boards, like cement board or specialty foam panels. Unlike drywall, these materials won't rot or feed mold.
  • Seal Every Single Weak Point: Every screw head, seam, and corner is a potential point of failure. We meticulously cover them all with waterproof banding and specialized sealant to create one continuous surface.
  • Apply a Waterproof Membrane: Finally, we apply a liquid membrane (which cures into a seamless rubber barrier) or install a sheet membrane over the entire assembly. This is the final layer of defense that makes the shower truly watertight.

This modern approach ensures the structure behind your tile stays bone dry. It's the single biggest reason professionally built showers last for decades, a major concern for property owners here in the damp Puget Sound region.

Peace of Mind Is Priceless: An estimated 98% of basements will experience water damage at some point. While your shower isn't in the basement, the principle holds true: where there's water, there's always risk. Proper waterproofing is your best defense.

This Is a Job for a Licensed Pro

Installing a modern waterproofing system isn't just a matter of following steps; it requires real-world experience and precision. Nowhere is this more true than around the shower valve and plumbing penetrations.

A licensed professional knows how to install the valve flawlessly, tightening every connection and correctly integrating it into the wall. They have the experience to flash the valve body into the waterproofing membrane, creating a bombproof seal.

This is the one stage we always advise property owners against trying to DIY. A tiny mistake here won't show itself for months or even years. But when it does, you could be looking at a catastrophic failure that has rotted out your subfloor and walls.

Fixing a failed shower is far more expensive than building it right the first time. You can learn more about the detail involved by reading our guide on waterproofing a wet room. When you hire a trusted local provider, you’re buying confidence that the job meets code, protects your property, and will stand the test of time.

Bringing Your New Shower to Life

Once all the waterproofing is in, the satisfying work begins. This is when a messy construction zone transforms back into a bathroom—and you finally get to see your vision come together.

Whether you went with timeless tile or a sleek solid-surface system, this stage is all about precision. A pro's experience really shows here, making sure every cut is perfect and every line is true. The goal is a shower that doesn’t just look good on day one, but holds up beautifully for years.

Installing Your Chosen Shower Walls

How we tackle the walls depends on the material you picked. Each one demands a different approach to get that flawless, professional finish.

With a custom tile shower, we start by dry-fitting the layout to create a balanced look and avoid awkward, sliver-thin tiles in the corners. Once the plan is set, we mix the thin-set mortar and start setting the first course, using spacers to keep grout lines perfectly uniform.

Pro Tip for Tile: If you love the look of tile but hate scrubbing grout, pick the largest tiles that look right in your space. Fewer grout lines mean way less cleaning. Pair them with a high-performance epoxy grout, and your shower will be nearly stain-proof and incredibly resistant to mold.

If you chose solid surface panels, the game changes. We meticulously measure and cut the large panels, which are custom-fit to your shower walls and bonded with a high-strength adhesive. A perfect fit is essential to ensure every seam is tight before it gets sealed for good.

Achieving a Perfect Water-Tight Finish

With the walls up, the next job is to seal every single seam, corner, and hole. This is where a shower remodel can either succeed or fail.

Grouting and Sealing Tile

After the tile mortar has cured (24-48 hours is typical), it's time to grout. We work the grout into every joint, packing it in so there are no hidden air pockets. Then comes the tricky part: cleaning the excess haze off the tile face without pulling fresh grout from the joints.

Installing the Shower Door

A well-installed shower door is the final gatekeeper. The process looks something like this:

  • Measure and Mark: We take careful measurements to get the door frame perfectly plumb (vertically straight) and level.
  • Drill with Care: Drilling into brand-new tile or a solid panel requires special drill bits and a steady hand to avoid causing any chips or cracks.
  • Set and Seal: The frame is secured, the glass panels are carefully set, and a clean, continuous bead of high-quality silicone caulk is run along every edge of the frame.

The Final Details That Make the Difference

The project isn't done until the last little details are handled. These are the touches that separate a "finished" job from a professionally finished one.

Installing the Trim Kit

This means putting on the faucet handle, the escutcheon plate behind it, and the showerhead. We caulk the top and sides of the plate but always leave the bottom unsealed. This tiny gap allows any moisture that might get behind the plate to escape, preventing a hidden mold problem.

Final Caulking and Painting

Next, we caulk every transition point with 100% silicone: where the tile meets the shower pan, where the door frame hits the wall, and in all the corners. This flexible seal handles the tiny movements that naturally occur in a building.

Finally, a fresh coat of high-quality, mold-resistant paint goes on the surrounding walls. It’s the finishing touch that makes everything look clean and polished and adds one last layer of moisture protection. This focus on every detail ensures your new shower isn't just beautiful, but built to last.

Answering Your Shower Replacement Questions

A person in a glove applies white sealant with a caulk gun to a shower base.

If you're thinking about replacing your shower, you probably have a few questions. After decades of handling residential and commercial construction projects all over the Puget Sound, we've heard just about everything. Here are some straight answers to the questions we get asked the most.

How Long Does It Really Take to Replace a Shower?

This is always the first thing people want to know, and the honest answer is: it depends.

For a straightforward swap—pulling out an old prefabricated unit and putting in a new one—you're typically looking at 3 to 5 days. That’s assuming we don't find any major surprises.

A full custom tile shower is a different story. The process is much more involved, with demolition, plumbing, meticulous waterproofing, tiling, grouting, and sealing. Each of those steps has its own required curing time. For a custom job, a more realistic timeline is 7 to 12 days. A good contractor will always give you a clear schedule so you know exactly what to expect.

What Are the Most Common Hidden Problems?

Once we get the old shower out, the most common issues we find are water damage and mold. It's shocking how much rot can happen over the years from even a tiny, slow leak.

In older Puget Sound properties, we also frequently run into outdated and failing plumbing, like old corroded galvanized pipes that are waiting to cause a problem.

This is exactly why the demolition phase is so important. It's our one and only chance to uncover and properly fix these hidden issues before your beautiful new shower goes in. It’s a critical step that protects your investment.

Do I Need a Permit for a Shower Replacement?

More often than not, yes. Most local jurisdictions in our service area require a permit any time you alter plumbing supply lines or drains. If you’re doing a simple like-for-like fixture swap, you might not need one, but it’s always best to check.

This is one of the big advantages of hiring a licensed commercial or residential contractor. A professional firm like ours manages the entire permitting process for you, from the initial application straight through to the final inspection. It ensures your project is done right and fully up to code.

Can I DIY a Shower Replacement to Save Money?

We understand the temptation to save money. If you're handy, you could probably handle the demolition or the final painting.

However, we strongly caution anyone against DIY-ing the plumbing and waterproofing. A tiny mistake in either of these areas can lead to a catastrophic failure down the road—one that you might not discover for years. The resulting water damage can be incredibly expensive to fix.

Paying a professional to handle those critical stages isn't just buying labor; it's buying peace of mind and protecting the value of your home or commercial property.


Ready to transform your bathroom without the stress? Whether you're looking for a "residential contractor near me" or "commercial construction near me," the team at Wheeler Painting has the experience to handle your project with skill and precision. Contact us today to schedule your consultation.

Your Guide to the Commercial Painting Cost Estimator

As a facility manager or business owner, the last thing you want is a painting project that derails your budget. A bad estimate isn't just a minor headache; it can lead to project delays, surprise costs, and a lot of frustration. Using a commercial painting cost estimator is a great first step, but its real value comes from understanding what drives the numbers behind the scenes. This guide will help you feel less overwhelmed by the process and build your confidence in making the right choice for your property.

Why a Solid Painting Estimate is Non-Negotiable

Hands holding a tablet displaying a commercial painting cost estimator with paint samples and a roller.

Trying to budget for a commercial painting job can feel like guesswork. Whether you're refreshing a retail space, planning an office space renovation, or managing new facility construction services, a precise estimate is the bedrock of a smooth project. A flimsy budget doesn’t just strain your finances—it can throw off your entire operational timeline and create friction with stakeholders.

This is exactly why a detailed, professional approach to estimating is so critical. It goes way beyond just multiplying square footage by a generic dollar amount. A real estimate digs into the unique conditions of your property and the specific results you're aiming for, providing a clear and reliable plan.

Getting a Handle on the Financials

The U.S. painting industry has grown into a massive $49.0 billion market as of 2024, according to data from IBISWorld.com. For property managers and business owners in our local community, that context is key. It helps you realistically budget, knowing that a mid-sized commercial interior project of 10,000 sq ft can easily fall in the $30,000-$60,000 range when you account for quality labor and durable finishes.

This scale is precisely why a quick online calculator can't give you the full picture. It simply doesn't know the on-the-ground realities of your specific property that can swing a price one way or the other.

A professional estimate is more than a price—it's a project roadmap. It foresees challenges, allocates resources correctly, and ensures the final product meets both aesthetic and performance standards without costly surprises.

The Key Factors That Drive Your Budget

Several make-or-break factors will shape your final painting costs. We see it all the time—overlooking these details during planning is the number one cause of budget overruns. For a number you can actually count on, you have to factor in these variables:

  • Surface Preparation: What condition are the walls in? We're talking about more than just a few scuffs. Is there old, peeling paint? Water damage stains? Does siding replacement or significant drywall repair need to happen first? All that prep work is labor-intensive but absolutely essential for a finish that lasts.
  • Access and Logistics: High ceilings in a lobby, hard-to-reach exterior walls, or needing to paint around a fully operational business all add complexity. This often requires special equipment like lifts and careful, phased scheduling, which impacts the bottom line.
  • Type of Coatings: The paint for a standard office is completely different from what’s needed for a high-traffic warehouse floor demanding epoxy coatings. And for exteriors in our damp local climate, you need robust, waterproof coatings to prevent moisture intrusion.
  • Project Complexity: There's a world of difference between refreshing a simple, open-plan office and a complete retail build-out with a multi-color scheme. That intricacy translates directly into more labor hours.

When you understand these moving parts, you shift from making a rough guess to building a confident, data-driven budget. To get ahead of these issues, take a look at our guide on creating a construction quality control checklist to ensure no detail is missed. Adopting a proactive mindset, like we do at Wheeler Painting, turns what feels like an overwhelming task into a manageable process, setting your project up for success from day one.

Breaking Down a Commercial Painting Quote: What Are You Paying For?

When you get a commercial painting estimate, the final number can feel a bit like a mystery. But for a seasoned professional, that price is the result of a careful calculation, not guesswork. It’s far more than just slapping a cost per square foot on a room.

A truly professional quote breaks the job down into four key areas: labor, materials, surface prep, and equipment. Let's pull back the curtain on each one so you can understand exactly where your money is going.

Labor: The Biggest Piece of the Pie

Labor is almost always the single largest line item on any painting bid, and for good reason. Professional painting is a skilled trade. You're not just paying for someone to roll paint on a wall; you're paying for their efficiency, precision, and the huge amount of time spent on everything but painting.

So, how do we calculate those hours? It comes down to a few things:

  • Job Complexity: Painting a big, flat, empty warehouse wall is one thing. Painting a busy office with cubicles, trim, and high ceilings is another job entirely. Intricate work simply takes more time and focus.
  • Application Method: Spraying is incredibly fast for large, open spaces, but it demands a ton of time for masking off everything you don't want to be painted. Brushing and rolling are slower but give us the control needed for detailed areas.
  • Project Team: The number of painters we assign directly affects how long the project will take. We balance crew size to get the job done efficiently without getting in your way.

A good contractor looks at all these variables to estimate the total hours needed to deliver a finish that lasts.

Paint & Materials: The Foundation of a Lasting Finish

The specific primers, paints, and coatings chosen for your project directly influence the cost and, more importantly, the durability. Here in our local community, with our damp climate, skimping on material quality is a recipe for failure.

On an estimate, you'll see different materials listed, and each serves a critical purpose:

  • Primers: Think of primer as the essential foundation. It ensures the topcoat sticks, blocks stains, and gives you a smooth, uniform surface to work with. For new or repaired drywall, it's a non-negotiable step. You can learn more about why priming sheetrock before painting is crucial in our detailed guide.
  • Standard Paints (Latex/Acrylic): This is your workhorse for most interior walls and ceilings. The commercial-grade paints we use have much better coverage and scuff resistance than what you’d find at a big-box store for home use.
  • High-Performance Coatings: For tough environments—think warehouse floors, commercial kitchens, or healthcare facilities—we bring in the heavy hitters like epoxies and industrial urethanes. They stand up to chemicals, abrasion, and moisture but require specialized application, which affects both material and labor costs.

Now, let's look at how these components typically stack up in a commercial painting budget.

Breakdown of Typical Commercial Painting Project Costs

The table below gives you a general idea of how project costs are distributed. While every job is unique, this shows where the investment is concentrated.

Cost Component Percentage of Total Project Cost Key Factors
Labor 50% – 70% Project complexity, crew size, application method
Materials 20% – 30% Quality of paint, primers, specialized coatings
Surface Prep (Part of Labor) Condition of surfaces, level of repair needed
Equipment & Overhead 10% – 20% Lifts, scaffolding, insurance, project management

As you can see, the people doing the work are the biggest part of the equation. This is why a low bid often signals that corners are being cut somewhere—usually in the prep work.

The most expensive paint job is the one you have to do twice. Investing in the right materials and professional labor from the start saves you money and disruption in the long run.

Surface Preparation: The Work Before the Work

This is the part of the job clients often overlook but pros obsess over. Surface preparation can easily account for 40-60% of the total labor hours on a repaint project. It’s the unglamorous, meticulous work that determines whether your new paint job will peel in a year or look great for a decade.

If we don't do the prep right, even the best paint in the world will fail. This stage includes tasks like:

  • Pressure washing exteriors to blast away dirt and mildew.
  • Scraping and sanding all loose or failing paint.
  • Patching cracks and repairing damaged drywall.
  • Caulking gaps around windows and trim to seal out moisture.
  • Thoroughly cleaning walls to remove oils and contaminants that prevent adhesion.

Any detailed quote from a reputable local company like Wheeler Painting will clearly spell out the prep work involved. If a competitor's bid seems too good to be true, it’s often because they’re skipping these critical steps.

Equipment & Access: Reaching Every Surface Safely

Finally, the estimate has to account for the equipment needed to do the job safely and efficiently. For a simple, ground-floor office, that might just be ladders, plastic, and floor coverings.

But for more complex commercial projects, the needs change:

  • Scaffolding for working on multi-story building exteriors.
  • Scissor lifts or articulating boom lifts to reach high ceilings in warehouses, atriums, or gyms.
  • Containment and ventilation systems when working with strong coatings or in occupied buildings.

The rental, delivery, and setup costs for this gear are factored into the bid. By understanding these four core components, you can review any painting proposal with confidence, ask the right questions, and know exactly what you’re paying for.

How to Accurately Calculate Your Project's Square Footage

When you start thinking about painting costs, the first number that comes to mind is probably your building's floor space. But for a painter, that's one of the least important figures. What we really need is the paintable square footage—the actual surface area of every wall and ceiling getting a new coat.

Let's walk through how to calculate this yourself. Getting this number dialed in is the first real step in turning a vague project idea into a solid scope of work and a realistic budget.

Calculating Paintable Wall Area

Imagine you're looking at a 5,000-square-foot office space in our local area, with standard 10-foot ceilings. To get your wall area, you first need the perimeter, which is just the total length of all the walls you plan to paint.

For this, a laser measure is a professional's secret weapon. It’s dramatically faster and more accurate than a tape measure, especially when you’re navigating around furniture and cubicles. Once you have the perimeter, the math is simple.

Perimeter (in feet) x Ceiling Height (in feet) = Total Wall Square Footage

Let's say the main open area of our 5,000 sq. ft. office has a perimeter of 300 feet. The math looks like this:

  • 300 ft (Perimeter) x 10 ft (Height) = 3,000 sq. ft. of wall area

That gives you a great starting number before we refine it.

Accounting for Doors and Windows

Of course, you aren't painting over doors and windows, so we need to subtract them from the total. While some estimators might use a quick rule of thumb, taking a moment to measure them gives you a much more accurate figure.

  • A standard commercial door is about 21 square feet (3 ft x 7 ft).
  • A typical office window can be around 16 square feet (4 ft x 4 ft).

If our sample office has 10 doors and 20 windows, we can figure out the total deduction pretty easily:

  • Doors: 10 x 21 sq. ft. = 210 sq. ft.
  • Windows: 20 x 16 sq. ft. = 320 sq. ft.
  • Total Deduction: 530 sq. ft.

Now, we just subtract that from our initial wall area: 3,000 sq. ft. – 530 sq. ft. = 2,470 sq. ft. That final number is your true paintable wall surface. It's exactly what a pro uses to calculate the paint and labor needed for the job.

Don't Forget the Ceilings and Trim

Ceilings are easy to overlook but represent a massive surface area in most commercial jobs. The good news is that the calculation is usually straightforward—the ceiling's square footage is almost always the same as the floor's.

  • Ceiling Area = 5,000 sq. ft.

Trim, on the other hand, is a different beast. We measure things like baseboards, door casings, and window frames in linear feet, not square feet. This is always estimated separately because the detailed, precise work involved takes much more time and skill than rolling a flat wall.

These measurements all come together to form the basis of a complete quote, along with the crucial factors of labor and surface preparation.

A three-step process flow illustrating the components for a painting quote: labor, materials, and prep.

As you can see, a final estimate is a blend of the materials (which your square footage helps determine), the labor involved, and the prep work required to get a finish that lasts.

Pro Tip: Always plan for two coats of paint. Any professional-grade job is going to require two full coats to achieve the correct color depth, sheen, and durability. When you're estimating material needs, just double your final paintable square footage.

Putting It All Together for Your Estimate

Once you have these core numbers, you're in a great position. This "paintable square footage" is the key to understanding any commercial painting cost estimator or quote you might get.

Let's recap the totals for our example project:

  • Paintable Walls: 2,470 sq. ft.
  • Ceilings: 5,000 sq. ft.
  • Total Paintable Area: 7,470 sq. ft.

Having this figure, along with the linear feet of trim, provides the foundation for any professional estimate. When you come to a local contractor like Wheeler Painting with these numbers ready, it shows you’ve done your homework. It allows us to have a much more productive conversation from the get-go, focusing on other critical variables like surface condition, paint selection, and your project's unique logistical needs to build a truly reliable proposal.

How Property Type Shapes Your Painting Estimate

Three commercial buildings with different storefronts on a street, featuring retail, office, and warehouse spaces.

It’s a simple truth in our line of work: you can't price a warehouse paint job the same way you’d price a boutique retail store. The building’s day-to-day function is one of the biggest factors driving the final cost, influencing everything from the type of paint we use to how we schedule the work.

A one-size-fits-all estimate just doesn't cut it. An experienced local provider like Wheeler Painting knows that the materials, prep work, and techniques must be tailored to the building's use, foot traffic, and environment.

Retail Build-Outs and Renovations

In retail, looks are everything. A paint job is a core part of the customer experience, setting the mood and reinforcing the brand from the moment someone walks in. This is why these projects are often part of a larger commercial construction or renovation aimed at boosting sales, making it a critical service for any "commercial contractor near me."

Here’s what really drives the costs in a retail setting:

  • Durability and Finish: High-traffic hallways and checkout areas demand tough, scuff-resistant paints that are easy to wipe down. The specific sheen—from matte to semi-gloss—also affects material costs.
  • Branding and Color Schemes: Applying precise brand colors or complex, multi-tone designs takes far more skill, masking, and labor than a simple, single-color paint job.
  • Minimal Disruption: Painting almost always has to happen after hours or overnight. This premium scheduling avoids interrupting business but naturally increases labor rates.

For a retail project, a painter isn't just applying color; they're a partner in creating a space that attracts and retains customers.

Office Space and Corporate Environments

When painting an office, the goals are to create a productive atmosphere for employees and, crucially, to minimize downtime. An office space renovation in an occupied building adds a whole other layer of complexity compared to painting an empty new build.

Several factors will shape your final office painting quote:

  • Low-VOC and No-VOC Paints: Protecting employee health from harsh fumes is non-negotiable. We almost always use low-VOC (Volatile Organic Compound) or no-VOC paints, which can cost more than their conventional counterparts.
  • After-Hours Work: Just like in retail, office painting is typically a nights-and-weekends affair to avoid disrupting the workday. This scheduling requires careful planning and often comes at a premium.
  • Furniture and Obstacles: Maneuvering around cubicles, conference tables, and sensitive electronics is a huge time sink. The job involves tons of extra masking and shifting furniture, which adds significant labor hours.

A team that’s seasoned in office repaints knows the drill: get in, do flawless work, and have the space clean, fresh, and ready for the team on Monday morning.

A professional quote for a commercial property isn't just a price; it's a strategic plan. It considers how the space is used, who uses it, and what the paint needs to accomplish functionally and aesthetically.

Institutional and Industrial Facilities

Painting warehouses, schools, or healthcare facilities is a completely different ballgame. Here, aesthetics often take a backseat to performance, safety, and sheer durability. These projects are less about decoration and more about applying functional coatings as part of broader facility construction services.

Here’s what drives costs in these heavy-duty environments:

  • High-Performance Coatings: Industrial spaces often need specialized products like epoxy floor coatings for chemical resistance or safety markings. Institutional painting of a warehouse ceiling is a far cry from rolling drywall in an office.
  • Intensive Surface Preparation: Surfaces like concrete, steel, and cinder block are the norm. They frequently require heavy-duty prep work like pressure washing, sandblasting, or degreasing before any coating can be applied.
  • Accessibility and Scale: The massive, high ceilings in a warehouse mean renting scissor lifts or boom lifts. This adds equipment rental and specialized labor to the bottom line.

A generic online estimator might give you a rough idea, but it can't account for these critical details. Only a detailed, on-site assessment from an experienced local provider like Wheeler Painting can capture the nuances that ensure a project is done right and built to last.

Sample Commercial Painting Cost Ranges (Per Sq. Ft.)

To give you a better sense of how these factors translate into real numbers, here’s a look at typical cost ranges for different property types in our service area. Remember, these are estimates—your final price will depend on the specific conditions of your property.

Property Type Typical Cost Range (per sq. ft.) Primary Cost Drivers
Office Space $2.00 – $6.00 After-hours work, low-VOC paints, furniture/obstacles
Retail Store $3.00 – $8.00 High-durability paint, brand colors, off-hours labor
Warehouse/Industrial $1.50 – $5.00 High ceilings, specialty coatings (epoxy), surface prep
Medical/Healthcare $4.00 – $9.00+ Antimicrobial coatings, zero-VOC paint, strict containment

These figures show just how much the property's use can impact the budget. A medical facility, with its need for specialized coatings and strict protocols, sits at the high end, while a basic warehouse repaint is generally more straightforward and less costly per square foot.

When an Online Estimator Just Won't Cut It

Online painting cost estimators are a fantastic starting point. They can give you a rough ballpark figure for your budget and help you wrap your head around the potential investment.

But let’s be honest—these tools have a massive blind spot. They can’t see your building. And for a project that impacts your business's curb appeal and protects its very structure, a simple calculator can never replace a thorough, in-person walk-through with a seasoned pro from your community.

Calculators thrive on clean data: square footage, ceiling height, and generic surface types. The real world, however, is rarely so neat and tidy. An on-site evaluation is where a professional painter uncovers the hidden complexities that a digital tool will always miss.

What a Calculator Can't See

The real cost drivers in a quality paint job often have less to do with the paint itself and more to do with the prep work. This is where an experienced contractor earns their keep, spotting the subtle issues that can lead to paint failure and much more expensive repairs down the road.

An online form can’t ask about the faint signs of moisture seeping through a concrete block wall. It won't notice the hairline cracks in your stucco that, if ignored in our damp local climate, will inevitably become major headaches.

For example, when a Wheeler Painting expert is on-site, we’re trained to look for things a calculator can’t process:

  • Hidden Moisture Damage: We can spot the faint discoloration or slight bubbling paint that hints at a leak behind the wall. Just painting over it is a recipe for disaster—it traps the moisture, leading to rot and mold.
  • Substrate Condition: Is your siding getting that chalky film? Is the old paint peeling off in big sheets? The specific type of failure dictates the prep work, which could range from a simple power wash to extensive scraping, sanding, and priming.
  • Complex Architectural Details: An estimator might just see a wall. Our team sees the intricate trim, ornate cornices, or multi-level facades that demand painstaking handiwork and much more time.
  • Accessibility Challenges: A high ceiling is one thing. A high ceiling over an active production line or a grand staircase is a completely different logistical puzzle. We assess the real-world challenges of bringing in lifts and scaffolding while keeping your staff and our crew safe.

These are exactly the kinds of details that can turn a $30,000 online estimate into a $45,000 real-world project. A professional assessment is your best defense against those kinds of expensive surprises.

A professional contractor's most valuable tool isn't a paintbrush—it's their eyes. An on-site evaluation is your best investment for an accurate budget and a finish that actually lasts.

The True Value of an On-Site Evaluation

The goal of an on-site visit isn't to find problems just to drive up the price. It's about building a realistic project plan that guarantees a durable, long-lasting finish.

When one of our experts walks your property, they're shifting from being a simple painter to a problem-solver. Think of it as risk management for your investment.

This consultative approach is absolutely critical for larger jobs, especially those that might involve light construction. For instance, if we discover significant wood rot on an exterior during our assessment, our dual expertise as a general contractor comes into play. We can diagnose the root cause, propose a solid repair plan—such as siding replacement—and fold it seamlessly into the painting project. This saves you the headache of hiring and managing a separate company. If you're facing a more complex project like this, our guide on how to choose a general contractor can offer more insight.

At the end of the day, a free online calculator gives you a number. A professional, on-site consultation gives you a strategy, peace of mind, and a reliable partner. It ensures the quote you receive isn’t just a guess, but a comprehensive roadmap for getting the job done right.

Common Questions About Commercial Painting Costs

When you’re trying to budget for a major painting project, an online cost estimator can give you a decent starting point. But let's be honest, every building has its own quirks, and those ballpark numbers quickly lead to more specific questions.

Here at Wheeler Painting, we've had thousands of these conversations with clients in our local community. We believe in being upfront about costs from day one. To help you plan better, we’ve answered some of the most common questions that come up.

How Much Does It Cost To Paint A 10,000 Sq Ft Commercial Building Exterior?

This is probably the number one question we get, and the honest answer is: it depends entirely on the building. For a standard two-story commercial building in our service area, you could be looking at a range of $2.00 to $4.50 per square foot of the actual paintable surface—not the building's floor space.

So, why such a big window? A few key things will push the price to one end of that range or the other:

  • Building Condition: Is the paint peeling and bubbling? Is there mildew growing in the shady spots? We see a lot of that in our damp climate. Any good painter will tell you that extensive prep work like pressure washing, scraping, and spot priming is non-negotiable for a paint job that lasts.
  • Accessibility: This is a huge cost driver. If we can reach everything with ladders, the job is much simpler. But if the project requires scissor lifts or complex scaffolding to safely reach high or awkward areas, the cost for equipment and specialized labor goes up.
  • Material Choice: You can opt for a solid-quality paint, or you can invest in a premium, weather-resistant coating specifically formulated to stand up to years of Pacific Northwest rain. The better the product, the higher the material cost.

Ultimately, the only way to get a firm number is for a professional to see the building in person.

Does Working After Hours Or On Weekends Increase My Office Painting Cost?

Yes, it almost always will. When we have to work nights or weekends to avoid disrupting your business, our labor costs go up. This is a standard practice for "commercial painting services near me" in occupied spaces like offices, retail stores, or medical clinics where you can't have painters and wet paint around during business hours.

You can typically expect a labor premium of 20% to 50% for this off-hours work. While it adds to the budget, most business owners find the cost is well worth it to avoid any operational downtime and lost revenue.

A professional contractor should always be transparent about these premium rates. At Wheeler Painting, we work with you to create a schedule that minimizes disruption and will clearly outline any associated costs in our proposal so there are no surprises.

This way, you can make a clear-eyed decision that balances your budget with the needs of your business.

What Is The Cost Difference Between Standard Paint And Specialty Coatings?

The difference in price is significant, but so is the difference in performance. A gallon of a good commercial-grade latex paint might cost you $30 to $50. On the other hand, a gallon of a high-performance, two-part epoxy for a warehouse floor can easily run $80 or more.

But that’s just the cost of the materials. Applying specialty coatings is much more demanding and time-consuming. For example, prepping a concrete floor for an epoxy coating often involves heavy-duty machinery for diamond grinding or shot blasting—work that simply isn't needed for standard wall paint.

While the initial bill is higher, specialty coatings provide durability and chemical resistance that standard paints can't touch. For high-traffic areas or demanding environments like commercial kitchens, warehouses, or manufacturing plants, they are often the most cost-effective solution in the long run.

Why Is Surface Preparation Such A Large Part Of The Estimate?

Think of prep work as the foundation of the entire paint job. If the foundation is weak, it doesn't matter how great the rest of the structure is—it's going to fail. In painting, this phase is absolutely critical, and it's not unusual for prep to account for 40% to 60% of the total labor hours on a repaint project.

Proper preparation means we're doing the job right. It involves:

  • Thoroughly cleaning surfaces to get rid of dirt, grease, and mildew.
  • Scraping and sanding all failing paint to create a smooth, stable base.
  • Filling cracks, holes, and repairing other surface damage.
  • Applying the right primer to ensure the new paint bonds correctly.

Cutting corners on prep is the number one reason paint jobs fail prematurely. A low bid that skimps on prep might look good at first, but it will cost you far more down the road when the paint starts peeling in a year or two. A quality, trusted local contractor will never compromise on this step.


Ready to move from a rough estimate to a firm, reliable proposal for your commercial painting or construction project? The team at Wheeler Painting has been serving our local community for over three decades, delivering dependable craftsmanship on projects large and small. Contact us today to schedule your on-site consultation.

Waterproofing Wet Room: Your Guide to a Leak-Free Bathroom

When you're building a wet room for your home or commercial property, the most important part isn't the tile or the fixtures—it's what you can't see. True waterproofing is about creating a completely sealed, "tanked" enclosure. Every drop of water from your open shower has to be meticulously guided to the drain, which means applying specialized membranes and sealants to the entire floor and up the walls. This isn't just a step in the process; it's the foundation of a successful project, and getting it right builds trust and protects your investment.

Why a Small Leak Becomes a Huge Problem

A wet room is a fantastic, open-plan space, but it’s also a construction project with zero margin for error. Unlike a standard bathroom where a shower tray contains the water, a wet room’s floor and walls are constantly exposed. As a local contractor serving homeowners and businesses in our community, we've seen firsthand what happens when this is done incorrectly.

Even a single pinhole-sized leak in the waterproofing membrane can unleash a slow-motion disaster. Trapped moisture is a magnet for mold and mildew, which can seriously affect your property's air quality. Over months, that silent leak can cause structural rot in floor joists and wall framing, compromising the integrity of your home or commercial building.

The Real-World Cost of Cutting Corners

The fallout from a failed wet room isn't just an inconvenience; it's a financial nightmare for any property owner. Inadequate waterproofing is a major driver of insurance claims, accounting for 37% of all claims and contributing to over $13 billion in damages from water issues in the U.S. every single year.

This is why trusted local providers are so serious about the products they use. Liquid-applied membranes, known for creating a seamless, monolithic barrier, dominate the market with a 64.1% revenue share for good reason—they work. For commercial spaces and tenant improvements, which we handle often at Wheeler Painting, a properly waterproofed facility can reduce mold risks by up to 90%.

These numbers aren't just statistics; they tell a story. Investing in professional wet room waterproofing isn't just an expense—it's essential protection for your property.

A properly waterproofed wet room adds luxury and value. A poorly executed one becomes a liability that can cost tens of thousands in repairs, a reality we've seen firsthand. If you're already facing this situation, understanding the steps in professional water damage cleanup can be incredibly helpful.

Ultimately, the entire room needs to be "tanked." This means every corner, seam, and plumbing penetration is obsessively sealed against water. It's this level of detail that separates a beautiful, functional wet room from a catastrophic failure down the road.

Building a Solid Foundation with Planning and Surface Prep

A successful wet room doesn’t begin when the waterproofing goes on. It starts way before that, with careful planning and an almost obsessive focus on preparation. Think of it like building a house—if the foundation is off, everything you put on top of it will eventually fail. This is true for any project, from a simple home remodel to a large-scale commercial construction project.

A person uses a spirit level to check a concrete tile during wet room construction, with blueprints and a tape measure nearby.

The very first thing we do is a deep dive into the existing structure, or what we call the substrate. We’re talking about a thorough inspection of the floor and walls. You’d be surprised how many small issues, if ignored now, can mushroom into major failures down the road.

Assessing the Substrate and Framing

First things first, we check the bones of the room. Is the framing solid? Are the floor joists beefy enough to handle the weight of a new mortar bed and tile? Any bounce or flex in the floor is a major red flag. That movement, however slight, will inevitably crack tile grout and could compromise the waterproofing membrane over time.

For a residential home, this often means hunting for signs of old water damage or rot in the wooden subfloor. In a commercial space, we're usually looking at a concrete slab, making sure it’s stable, free of significant cracks, and ready for what comes next. The goal is simple: get all surfaces perfectly plumb (vertical) and level (horizontal) to create an ideal canvas.

The Importance of the Right Backer Board

With the framing confirmed to be solid, it's time to choose the right backer board. Let me be clear: standard drywall has absolutely no place in a wet room. It’s like a sponge. It will soak up moisture, swell, and completely fall apart, taking your expensive tile job with it.

Instead, we only use materials specifically engineered for these high-moisture areas. The main options are:

  • Cement Board: This is a long-time favorite for a reason. Made from cement and reinforcing fibers, it's incredibly tough and water just doesn't affect it.
  • Foam Core Backer Board: These panels are a newer option and a favorite for many installers. They're lightweight, easy to cut, and come with a waterproof foam core that membranes adhere to very well.
  • Fiberglass-Mat Gypsum Board: Think of this as the super-powered version of moisture-resistant drywall. It uses a fiberglass mat instead of paper, which is far better at resisting moisture and mold.

The best choice depends on the job, but the mission is always the same: build a stable, water-resistant surface before the first drop of waterproofing is even opened.

Any professional will tell you the same thing: a waterproofing membrane is only as good as the surface it's applied to. You need a substrate that is clean, dry, and totally free of dust for a permanent bond. Skipping this step is like trying to paint over a greasy, dusty wall—it’s just going to peel right off.

Final Surface Preparation for a Perfect Bond

Once the backer boards are up, the final prep begins. We fill every seam between the boards with a sealant approved by the manufacturer and then reinforce them with fiberglass tape. Every screw head is mudded over, and any little imperfection is smoothed out. You want a single, seamless surface.

Finally, we clean. And we mean meticulously clean. We vacuum up every speck of dust and wipe the entire area down. This attention to detail is what ensures the membrane gets a tenacious grip, creating that unbroken seal every wet room depends on. To see how this level of detail fits into a larger project, our construction quality control checklist provides helpful insights applicable to any residential or commercial renovation.

Choosing the Right Waterproofing System: A Practical Comparison

With the prep work behind you, we've come to the most critical decision for your wet room: the waterproofing system. This isn't just a minor detail—it's the core of the entire project. The system you choose will dictate the installation process, the final cost, and, most importantly, how well your wet room stands the test of time.

The right choice for a custom-tiled residential shower in a local home might not be the best fit for a high-traffic locker room in a commercial facility. Our goal is to walk you through the pros and cons of each, so you can make an informed decision for your project.

This matters more than ever. The demand for modern, spa-like wet rooms has exploded. The global market was valued at USD 6.4 billion in 2023 and is on track to hit USD 8.3 billion by 2028. Here in the U.S., it's a USD 1.8 billion market for 2024 alone, driven by weather patterns that demand truly robust solutions. You can dig into the numbers yourself in the full report on wetroom waterproofing solutions at MarketsandMarkets.com.

Let’s break down the main players.

Liquid-Applied Membranes

Think of a liquid-applied membrane as a thick, rubberized paint. You roll or brush it directly onto the backer board, floor, and walls. After a couple of coats, it cures into a seamless, flexible, and completely monolithic waterproof barrier.

Its biggest advantage is the lack of seams, which means no weak points. This is a huge benefit for tricky custom shapes, built-in benches, or multiple niches. However, its success is 100% dependent on the applicator. It must be applied to the correct thickness—no thin spots!—which takes a skilled hand and a bit of patience.

Sheet Membranes

Sheet membranes are essentially a big, waterproof blanket for your wet room. They come in rolls of material like modified bitumen or polyethylene, which are unrolled and bonded to the surfaces with a specialized thin-set mortar.

The beauty of a sheet membrane is its factory-controlled thickness. You know you're getting a consistent, uniform layer of protection across the entire space. This makes it a fantastic and reliable choice for large, simple layouts, especially in commercial projects like gyms or institutional facilities where durability is key. The challenge? The seams. Every overlap must be perfectly sealed. This is where professional precision really counts, as a single bad seam can compromise the whole system.

For both homeowners and facilities managers, here's the bottom line: neither system is universally "better." The right choice comes down to your room's layout, your budget, and the expertise of your installer. A trusted local provider will know exactly which system to specify for a guaranteed watertight result.

Choosing the right system involves weighing these trade-offs. To make it easier, here’s a side-by-side look at how they stack up.

Comparison of Wet Room Waterproofing Systems

System Type Best For Application Method Durability Relative Cost
Liquid-Applied Membrane Complex shapes, custom niches, and residential remodeling Roller, brush, or sprayer Good-Excellent (depends on application) Moderate
Sheet Membrane Large, flat areas and new commercial construction Bonded with thin-set mortar Excellent Moderate-High
Cementitious Coating Concrete and masonry subfloors Trowel-applied Excellent (but rigid) Low-Moderate

Ultimately, a conversation with a professional contractor will help you land on the perfect choice for your specific project's needs and long-term goals.

Cementitious Coatings

There's a third option you'll sometimes see: cementitious coatings. This is typically a two-part product—a cement-based powder mixed with a liquid polymer—that gets troweled onto the surface. It cures into a hard, incredibly tough layer that essentially becomes part of the concrete or masonry itself.

These coatings are rock-solid and bond exceptionally well to concrete, making them a great fit for basement bathrooms or commercial spaces with concrete subfloors. They also create an ideal surface for tile adhesive. Their main drawback is their rigidity; they don't have the flexibility of a liquid or sheet membrane, so they aren't suitable for wood-framed buildings that can shift or move over time. The concept is similar to some industrial floor systems, and if you're curious about heavy-duty surfaces, you might find our guide on the benefits of epoxy floor coatings interesting.

Getting the Details Right: Slopes, Drains, and Seams

When it comes to waterproofing a wet room, the big, flat surfaces are the easy part. The real test of a lasting job—and where most failures happen—is in the details. A perfect membrane on a poorly sloped floor is just a ticking time bomb.

We’ve seen it countless times in local homes and businesses: a beautiful new wet room that starts leaking within a year because someone overlooked how the drain was integrated or how the corners were sealed. Getting these small but crucial elements right is what separates a professional, worry-free installation from a future renovation nightmare.

The Unforgiving Logic of the Floor Slope

Every single drop of water in a wet room needs a clear path to the drain. That's the floor's number one job, and we achieve it by building in a very specific, subtle slope, often called the "fall."

The industry standard, and what we always aim for, is a 1/4-inch drop for every foot you move away from the drain. So, for a spot four feet from the drain, the floor needs to be one inch higher than the drain itself. It sounds simple, but it has to be perfect. Too shallow, and you'll get puddles that lead to scum buildup and create a slip hazard. Too steep, and the room will feel awkward and uncomfortable to stand in.

Don't ever let anyone tell you the slope is optional. A flawless waterproofing system can't defy gravity. A proper, consistent slope is your primary defense against standing water.

To get this right, we'll either float a custom slope with a specialized deck mud—a real craft—or use a high-quality, pre-sloped foam tray as the foundation.

Making the Drain Connection Watertight

With the slope set, all eyes turn to the drain. This isn't just a simple grate; it’s a multi-part component that must be perfectly fused with the waterproofing layer. We generally work with two types:

  • Point Drains: The classic round or square drain. To make these work, the floor has to slope towards the drain from all directions, creating a shallow, funnel-like shape.
  • Linear Drains: These long, sleek drains are usually set against a wall. They’re a fantastic choice for a modern look because they only need the floor to slope in one direction. This also makes it much easier to use large, beautiful tiles without a lot of complex cuts.

No matter the type, the most critical step is creating an unbreakable bond between the drain's flange and the waterproofing membrane. A weak seal here is probably the single most common cause of catastrophic wet room leaks.

Sealing Every Last Seam, Corner, and Opening

Your waterproofing is only as good as its weakest point. In any wet room, the weak points are always the seams and any place something pokes through the wall or floor. These are the areas that demand an almost obsessive level of detail.

Think about all the joints: where walls meet the floor, where two pieces of backer board come together, and around every pipe for your shower head and valves. Each one is a potential highway for water to get behind your walls.

A visual process flow of waterproofing systems showing sheet membrane, liquid applied, and cementitious coating steps.

While the overall approach varies between systems, as shown above, sealing the junctions is where the real skill comes in. Our process for creating a bulletproof seal is non-negotiable.

  • First, we treat every joint between backer boards and at all wall-to-floor corners with a manufacturer-specified sealant.
  • Next, we embed a specialized waterproofing band—a flexible fabric—into a thick coat of liquid membrane over every single seam and inside corner. This creates a durable, elastic joint that can handle the minor shifts and movements of a house without breaking the seal.
  • Finally, for every pipe or valve that penetrates the wall, we use pre-formed, engineered gaskets. These "pipe collars" create a perfect, watertight seal that's impossible to replicate with sealant alone.

Taking the time to get these details right is what our reputation at Wheeler Painting is built on. It’s a meticulous, hands-on process that ensures our clients get a wet room that’s not just beautiful, but built to last a lifetime.

Curing, Testing, and Tiling: The Final Hurdles

Alright, the membrane is down, and it looks perfect. It’s tempting to think you’re on the home stretch and ready for tile, but hold on. Rushing these next few steps is a classic mistake that can unravel all your careful work. This is where patience truly becomes a virtue.

A wet room floor undergoing a waterproofing test, filled with water, featuring a drain and ripples.

That freshly applied membrane isn't actually waterproof just yet. It needs to cure—a chemical process where the material hardens to gain its full strength and water-blocking power.

Give It Time to Cure Properly

Every waterproofing product has a specific cure time listed right on the bucket or in its technical data sheet. You have to follow it. This can be anywhere from 24 to 72 hours, sometimes even longer. It’s not just about waiting for it to be dry to the touch; it’s about letting the material fully cross-link and set up internally.

Our local, damp air is a major factor. That persistent humidity can significantly slow down the cure time for liquid-applied membranes. If the manufacturer suggests 24 hours under ideal conditions, we always add a little extra time on a damp day, just to be safe. Keeping a fan going to improve air circulation will definitely help.

Jumping the gun and tiling over a semi-cured membrane is one of the most common—and costly—DIY errors we see. The moisture from the tile adhesive can re-emulsify the membrane, creating weak spots that will eventually fail.

The Flood Test: Your Ultimate Quality Check

Once you're confident the membrane is fully cured, it's time for the moment of truth. The flood test is our non-negotiable quality control check, and it should be yours, too. It’s the only way to be 100% certain your waterproofing wet room is sealed tight before you cover it with expensive tile.

First, you'll need to plug the drain. Don't just stuff a rag in there; that won't work. Get a proper test plug that creates a completely watertight seal in the drain pipe.

Next, fill the entire shower pan with water until it’s at least two inches deep. Take a marker and draw a line right at the water level on the wall or framing. Now, you wait for a full 24 hours. This gives water plenty of time to find even the smallest pinhole or a weak seam that you might have missed.

After the 24 hours are up, check the water line. If it hasn't dropped (a tiny bit of evaporation is normal), you have a successful test. As a final precaution, we always check the ceiling in the room or crawlspace directly below for any hint of a drip or water stain. It’s about being absolutely sure.

Choosing the Right Thin-Set for Tile

You passed the flood test—congratulations! But there’s one last detail before you start mixing mortar. The tile adhesive you choose must be compatible with your waterproofing membrane.

Some thin-set mortars contain solvents or chemicals that can react with certain membranes, slowly degrading them over the years from behind the tile. Using the wrong product can even void the warranty on your waterproofing system.

The only way to know for sure is to check the membrane manufacturer's technical data sheet. They will always specify which types of adhesives are approved for use over their product. This ensures the tile, adhesive, and waterproofing function as a complete, integrated system, giving you total peace of mind for decades to come.

Your Top Wet Room Waterproofing Questions, Answered

Even with a solid plan, it's completely normal for property owners and facilities managers to have questions before diving into a wet room project. In our experience working with clients all over our community, getting these details straight from the start is the key to a stress-free project and real peace of mind.

Let's walk through some of the most common questions we get about waterproofing a wet room.

Can I Just DIY My Wet Room Waterproofing?

We understand—the temptation to save on labor costs is always there. But if there's one part of a residential or commercial renovation we’d urge you not to tackle yourself, it's this one. The risk is just too high.

A wet room isn't just water-resistant; it has to be a completely sealed, monolithic system. A single pinhole, a poorly sealed corner, or an improperly integrated drain can lead to catastrophic failure. The cost of tearing out a leaking wet room and repairing the structural water damage will dwarf any potential savings from a DIY job.

Professional contractors have the right tools, years of training, and the experience that comes from managing these complex details every day. When you hire an experienced team like Wheeler Painting, you're not just paying for labor; you're investing in accountability and a guarantee that it's done right the first time.

What Does Professional Waterproofing Actually Cost?

This is usually the first question people ask, and the honest answer is: it depends. The final cost for waterproofing a wet room is shaped by the room's size, the type of system we use, and the condition of the subfloor we're starting with.

As a ballpark figure, a standard residential wet room in our service area will typically run between $1,500 and $4,000 for the professional waterproofing stage. This covers all the materials and labor for the membrane application and detail work. It doesn't, however, include things like demolition, new plumbing, or the final tile installation.

Here’s what can swing that price:

  • System Choice: A liquid-applied membrane might have lower material costs, but it can be more labor-intensive to get the thickness just right. A sheet membrane system often costs more for materials but can be faster to install.
  • Room Complexity: A simple square room is straightforward. A bathroom with built-in benches, recessed niches for a residential home, or multiple stalls in a commercial facility requires much more time-consuming detail work.
  • Substrate Condition: If we discover the subfloor is rotten or needs significant leveling before we can even start, that prep work will add to the project cost.

We always provide a detailed on-site consultation to give you a firm, transparent proposal for your specific project, whether it's a home bathroom or a commercial locker room.

How Long Does the Waterproofing Process Take?

Patience is your best friend during this phase. Rushing the waterproofing is the number one cause of failure down the road. For the core waterproofing work, you should plan on about 2-4 days from prep to flood test.

Here's how that time usually breaks down:

  1. Day 1: We'll do the final surface prep and apply the first coat of a liquid membrane or install the sheet system.
  2. Day 2: This day is all about applying subsequent coats and meticulously detailing every seam, corner, and pipe penetration. This is where the expertise really shows.
  3. Curing Time: Now, we wait. Depending on the product and local humidity, a full cure can take anywhere from 24 to 72 hours. This can't be rushed.
  4. Flood Test: Once cured, we conduct a mandatory 24-hour flood test. We plug the drain and fill the shower basin with water to ensure it's absolutely watertight before a single tile gets laid.

All in, it’s best to block out 3 to 5 days for the entire waterproofing process. Only after a successful flood test can the tiling begin.

What Happens If a Finished Wet Room Leaks?

Discovering a leak after the tile is in and the fixtures are set is the absolute worst-case scenario. The repair is messy, disruptive, and expensive.

In nearly every case, a leak means we have to demolish all the tile and carefully remove the failed waterproofing membrane just to find the source. From there, the entire system has to be rebuilt from the substrate up. This is exactly why investing in a reputable, experienced contractor from day one is the smartest financial decision you can make.

Our meticulous process, sharpened over decades of serving our local community, is your best insurance policy against leaks. We build it right from the start to protect your investment for years to come.


Your home or commercial property deserves craftsmanship you can trust. At Wheeler Painting, we've spent over 30 years delivering reliable residential and commercial construction, renovation, and painting services to our community. From complex wet rooms to full-scale commercial renovations and retail build-outs, we handle every detail so you don't have to. Ready to start your project with a team that values quality and clear communication? Contact us today for a straightforward consultation and estimate.

Your Guide to Professional Garage Floor Staining in Puget Sound

Let's be honest, your garage floor takes a beating. Most are just plain, dusty concrete slabs that soak up every oil drip, chemical spill, and muddy track that comes through the door. It's functional, sure, but it's rarely an appealing or clean space. Garage floor staining completely changes that, turning that drab concrete into a stylish, durable surface that adds real value to your property.

Think of it this way: paint sits on top of concrete like a coat, which is why it eventually chips and peels under the stress of hot tires and heavy use. Specialized stains, on the other hand, work differently. They actually penetrate the pores of the concrete and trigger a chemical reaction, becoming a permanent part of the slab itself. The result is a rich, translucent color that won’t fade or flake away.

Your Guide to a Durable and Stylish Garage Floor

A spacious, modern garage featuring a silver luxury car, a workbench, and a polished marble-effect stained floor.

For many of us here in Western Washington, the garage is much more than a parking spot. It’s a workshop, a primary storage area, or even the heart of a small business or commercial facility. Given how much life happens in the garage, leaving the floor as bare, porous concrete just doesn’t make sense. That's why investing in professional garage floor staining from a trusted local contractor is one of the smartest upgrades a homeowner or facilities manager can make.

More Than Just a Pretty Floor

Because the stain becomes one with the concrete, the finish is incredibly resilient and looks fantastic. This isn't just about appearances; it's a practical upgrade with tangible benefits for any home or commercial space.

  • Real-World Durability: A professionally stained and sealed floor resists abrasions, stands up to hot-tire pickup, and makes cleaning up spills a breeze.
  • A Major Aesthetic Upgrade: It elevates a purely utilitarian space into a clean, finished room that feels like a true extension of your home or business.
  • A Boost in Property Value: A finished garage is a huge selling point for homeowners. For businesses, it reflects a commitment to quality and maintenance. In fact, studies show that stained garage floors can increase a home's resale value by 5-10%.

This isn't just a niche trend, either. The demand for high-quality garage floors has turned it into a massive global industry, projected to hit USD 23.89 billion by 2032. Homeowners and business owners are realizing that a finished garage is a valuable asset. You can dive deeper into these trends by exploring insights on the global garage flooring market.

Navigating a residential or commercial renovation project can feel overwhelming, but the right partner makes all the difference. Working with a professional turns a complicated job into a straightforward, stress-free process where quality craftsmanship is a given. At Wheeler Painting, our local team is here to guide you every step of the way, from the first conversation to a beautiful, lasting result.

Understanding Your Garage Floor Staining Options

When you start looking into staining your garage floor, you'll quickly find it's not a one-size-fits-all deal. The path you choose really shapes the final character of your floor. The two main players in the game are acid-based stains and water-based stains, and they couldn't be more different in how they work and what they look like.

Figuring out which one is right for your home or business comes down to what you want. Are you after a unique, almost artistic look with lots of natural variation? Or do you need a solid, predictable color for your office or retail space? Let's break down the difference, because understanding this is the first step to getting a floor you'll love.

Acid-Based Stains for a One-of-a-Kind Look

Think of an acid-based stain less like a layer of paint and more like a chemical reaction happening right on your floor. It’s a fascinating process. The stain uses a mild acid to open up the concrete's pores, allowing metallic salts to react with the natural lime present in the slab.

This reaction permanently etches color into the concrete, creating a beautiful, marbled look that’s often compared to natural stone. Because every single slab of concrete is chemically unique, no two acid-stained floors are ever identical. The result is a floor with deep, rich, translucent tones. The color palette sticks to earthy shades—think warm tans, deep browns, terra-cottas, and even some soft blue-greens. It’s the go-to choice for a truly custom, high-end feel in homes and commercial settings alike.

An acid-based stain doesn't just sit on top of the concrete; it becomes a permanent part of it. This gives you an organic, variegated finish with incredible depth and character, guaranteeing your floor is genuinely one-of-a-kind.

Water-Based Stains for Consistent Color

On the other side of the spectrum, you have water-based stains. These behave more like a traditional dye for fabric. Instead of a chemical reaction, these stains use pigments suspended in a water-based acrylic polymer to penetrate the concrete and deposit color. The result is a much more uniform and predictable finish.

The biggest draw for water-based stains is the massive color selection. From subtle grays and beiges to bold blues, vibrant reds, and even solid black, your options are virtually endless. This makes it incredibly easy to match your floor to existing paint colors, cabinetry, or company branding for a retail build-out or office space renovation. They are also very low in VOCs (volatile organic compounds), which means less odor and a more eco-friendly application process.

While staining gives you incredible color, it’s not the same as a protective coating. If you're also exploring thicker, more durable surface options, you can learn more about epoxy floor coatings in our detailed guide.

Acid-Based vs Water-Based Concrete Stains

To help you decide, here’s a direct comparison of the two main types of concrete stains. Think about which features matter most for your project.

Feature Acid-Based Stain Water-Based Stain
Appearance Variegated, marbled, translucent Opaque, uniform, consistent
Color Palette Limited; earthy tones (browns, tans, soft blues/greens) Nearly unlimited; wide range of vibrant and neutral colors
Application Complex; a chemical reaction that must be managed Simpler; soaks into concrete like a dye
Outcome Unique and unpredictable; no two floors are the same Consistent and predictable results
VOCs & Odor Higher VOCs; requires good ventilation Very low VOCs; minimal odor
Best For Creating a unique, natural stone or aged look Achieving a specific color or uniform finish

Ultimately, both acid and water-based stains can deliver a stunning, durable finish. An acid stain is your ticket to a one-of-a-kind floor with organic character, while a water-based stain gives you control, consistency, and a world of color to choose from.

The Professional Staining Process from Start to Finish

Getting a gorgeous, long-lasting stained garage floor isn't about slapping on some color. It’s a precise, multi-stage process where every single step is critical to the final outcome. At Wheeler Painting, we've refined this process over years of experience serving local homeowners and businesses, and believe us, cutting corners just doesn't work.

It all comes down to the prep work. This is the single most important factor for a successful job. A stunning stain can't cover up a badly prepared floor—in fact, it will only highlight the flaws. This is where our professional-grade equipment and know-how as a local residential and commercial contractor truly shine.

Creating the Perfect Canvas

Before we even think about applying stain, the concrete itself has to be ready to accept it. We need to mechanically "open up" the concrete so the stain can soak in deep and create a permanent bond. A simple wash just won't cut it.

  • Diamond Grinding: We start by firing up our industrial diamond grinders. These machines are beasts, designed to strip away old, failing coatings, glues, and stubborn surface gunk. More importantly, this step profiles the concrete, creating the perfect porous texture for the stain to grab onto.
  • Crack and Pit Repair: Next, we meticulously address any damage. We fill any existing cracks, spalls, or pits with professional-grade repair compounds. This creates a smooth, seamless surface and stops small imperfections from turning into big problems down the road.
  • Deep Cleaning and Degreasing: With the grinding and repairs done, we deep clean the entire floor to get rid of every last bit of dust and debris. A perfectly clean surface is absolutely essential for even color. For floors that have seen years of oil leaks and grime, we often have to bring in the heavy hitters. You can see how we tackle the toughest jobs with our professional power washing services near me.

Application and Sealing

Once the concrete canvas is prepped to perfection, the real artistry begins. Our technicians apply the stain using proven techniques to get consistent, beautiful coverage, whether you’re after the uniform color of a water-based stain or the marbled, organic look of an acid stain.

This infographic gives you a quick visual comparison between acid and water-based stains and what to expect from each.

Infographic comparing properties of acid-based and water-based floor stains, detailing finish, application, and durability.

As you can see, the rich, variegated patterns from an acid wash are very different from the solid, predictable color you get with a water-based product.

The final, crucial step is sealing the floor. We apply two coats of a high-performance urethane or epoxy sealer to lock in the color and protect it from hot tires, chemical spills, and daily wear and tear. This tough topcoat is what makes your beautiful new floor truly last.

How Long Does a Stained Garage Floor Last? (And How to Maintain It)

Let's talk about the long game. A beautiful new garage floor is great, but how does it hold up over time? The answer is: incredibly well. When done right by a professional, a stained and sealed concrete floor is one of the most durable and low-maintenance surfaces you can have. It’s a smart investment that pays for itself for years to come.

A person in jeans and work boots cleaning a stained garage floor with a long-handled brush.

The stain itself provides the color, but the sealer is the real hero. Think of it like the clear coat on your car. We apply a commercial-grade polyurethane or epoxy topcoat that creates a tough, non-porous barrier over the concrete. This shield is what stands up to the daily abuse of a garage—from hot tires and dropped tools to oil, antifreeze, and other chemical spills that simply wipe away instead of soaking in and causing permanent damage.

A professionally stained and sealed floor isn't just a cosmetic touch-up. It fundamentally transforms a dusty, high-maintenance slab into a resilient, low-upkeep asset for your home or business.

Keeping Your Floor Looking Brand New

The best part about a properly sealed floor is how ridiculously easy it is to clean. Because the sealer stops dirt and grime from ever reaching the concrete, you can forget about hours of aggressive scrubbing.

For routine upkeep, all you really need to do is:

  • Sweep or Dust Mop: Get rid of loose grit and dirt with a soft-bristle broom or microfiber dust mop. This simple step prevents fine scratches from building up on the sealer.
  • Use a Gentle Cleaner: For a deeper clean, just mix a pH-neutral cleaner with warm water. Harsh chemicals like bleach or ammonia can slowly eat away at the sealer, so it's best to avoid them.
  • Quick Mop and Rinse: Mop the floor with your cleaning solution, then go over it once more with clean water to rinse away any residue. Let it air-dry, and you’re done.

This minimal effort is all it takes to keep your floor looking pristine. In fact, studies on the floor coatings market show that high-quality systems, like the sealers used over stains, can extend a concrete floor's lifespan by 15-20 years. They also improve safety by enhancing slip resistance and slash long-term maintenance costs.

At Wheeler Painting, we rely on our deep experience in Western Washington to choose the perfect sealers that can handle our damp climate, ensuring you get the maximum durability possible. You can learn more about our specific products and methods in our guide to professional concrete stain and sealer services.

Budgeting for Your Garage Floor Staining Project

So, what does it actually cost to get your garage floor professionally stained? It's one of the first questions property owners ask, and the honest answer is: it depends. There isn't a simple, one-size-fits-all price tag. Instead, the final cost is built from a few key factors that we can walk through together.

Think of it less like buying a product off a shelf and more like a custom project for your home or business. At Wheeler Painting & Restoration Services, we always provide a detailed, line-by-line proposal. We want you to see exactly where your money is going and understand the incredible value a professionally finished floor adds over the long haul.

Key Factors That Influence Your Quote

When our team puts together a quote, we're looking at a few specific things. The good news is that these are pretty consistent across the industry.

  • Garage Size: This is the starting point. The total square footage of your garage floor is the biggest factor, as it determines the amount of material and labor needed.
  • Concrete Condition: Here’s where things can really vary. Is your concrete new and pristine? Or is it an older slab with a network of cracks, deep-set oil stains, or even a peeling, failed coating from a previous attempt? The more prep work like diamond grinding and patching we have to do, the more it will influence the cost.
  • Stain Type and Complexity: A simple, single-color water-based stain is more straightforward than a multi-layered, acid-etched design. If you're envisioning custom patterns or multiple colors to create a unique look, that intricacy will be reflected in the price.
  • Sealer Quality: The topcoat is your floor's armor. A standard sealer does a good job, but upgrading to a high-performance epoxy or urethane—especially with an anti-slip additive—will cost a bit more upfront but will pay for itself with much greater durability and a longer lifespan.

For homeowners and business owners here in Western Washington, a good ballpark for professional garage floor staining is anywhere from $4 to $12 per square foot. This range typically covers all the prep work, high-quality materials, and professional labor.

Typical Project Timeline

We know you need to get back to using your space. That's why we’ve dialed in our process to be as efficient as possible, minimizing the disruption to your home or business operations. For a typical two-car garage, the project usually unfolds over three days.

  1. Day 1: This is the heavy-lifting day. We'll diamond grind the concrete to create the perfect surface, meticulously repair any cracks or pits, and then apply the stain itself.
  2. Day 2: We apply the first coat of the protective sealer, which begins to lock in the color and build the foundation of the floor's resilience.
  3. Day 3: The final sealer coat goes down. This is what gives the floor its finished sheen and ultimate protection.

After that final coat, the floor just needs a little time. You can usually walk on it within 24-48 hours, and it will be ready for you to park your car on in about 5-7 days.

Investing in a pro-level installation is more than just a cosmetic upgrade; it’s a smart financial decision. The global market for concrete stains was valued at around USD 1.47 billion in 2024, and for good reason. What's more, industry data shows that professionally treated concrete floors can slash long-term maintenance costs by 30-50% when compared to raw, untreated concrete. You can discover insights on the concrete stain market from DataHorizzon Research to see the trends for yourself.

Why Professional Staining Is a Smarter Investment Than DIY

Worker using a floor grinder and industrial vacuum to prepare a garage floor.

It’s easy to get drawn in by the promise of a quick, cheap weekend project from a DIY garage floor staining kit. The boxes at the big-box stores make it look simple. The truth is, staining concrete correctly is a surprisingly technical job, and the difference between a pro and a DIY attempt is the difference between a floor that lasts for years and one that fails in a few months.

While hiring a professional certainly has a higher upfront cost, we see it as a smart investment in quality and your own peace of mind. The hidden costs of a DIY job—wasted materials, frustrating results, and often, having to hire a pro to fix the mess anyway—can add up fast. For property owners here in Western Washington, working with an experienced local residential and commercial contractor like Wheeler Painting means the job gets done right the first time, period.

The Pitfalls of a Do-It-Yourself Approach

Here’s a secret from the pros: the most critical part of a staining job isn't applying the stain. It’s the prep work that comes before it. This is where almost every DIY project goes wrong, because getting a concrete surface to permanently and evenly accept stain is nearly impossible without the right approach.

You’ll run into some common, and costly, challenges:

  • Inadequate Surface Prep: A pressure washer and some degreaser just can't remove years of deeply embedded oil or properly open up the concrete's pores. Poor prep is the number one cause of staining and coating failure, hands down. It's what leads directly to peeling, chipping, and a finish that looks terrible in no time.
  • Inconsistent, Blotchy Color: DIY-grade stains are notoriously tricky, and getting an even finish requires a specific application technique. This is why you so often see amateur jobs with obvious roller marks, dark patches, and a generally uneven, splotchy appearance.
  • Lack of Proper Tools: We use heavy-duty, industrial diamond grinders to create the perfect surface profile for the stain to bond with. Renting this equipment is expensive, and without experience, it’s easy to gouge or damage your concrete permanently.
  • Serious Health and Safety Risks: The chemicals in concrete stains and sealers are no joke. They require proper handling, and working in a garage without industrial-grade respirators and proper ventilation can pose a real threat to your health.

The Professional Advantage: Peace of Mind and a Flawless Finish

Hiring an experienced contractor like Wheeler Painting completely sidesteps these risks and guarantees a result you’ll be proud of. A professional team brings a proven system—not just labor—to your project.

Investing in professional service means you're not just paying for a stained floor; you're paying for a warrantied, long-lasting result built on expert prep work, commercial-grade materials, and years of local experience.

With a trusted crew, you're really getting access to three key things:

  • Commercial-Grade Materials: The stains and sealers we use are on another level entirely. They are formulated for far greater durability and aesthetic quality than anything sold on a retail shelf.
  • Specialized Equipment: Our powerful diamond grinders are hooked up to dust-containment vacuums. This system achieves that perfect surface prep without sending a cloud of concrete dust through your home or business.
  • Guaranteed Results: Our work is backed by a warranty. If an issue arises with our workmanship, we make it right. That’s a level of accountability you simply don’t get with a DIY kit.

For a feature as visible and hard-working as your garage floor, choosing a professional ensures you get a durable, beautiful finish that adds real, lasting value to your residential or commercial property.

Common Questions About Garage Floor Staining

When you're thinking about upgrading your garage floor, a few questions always come up. We get them all the time from homeowners and business owners around the Puget Sound, so we've put together some straight answers to help you know what to expect.

How Long Does a Stained Garage Floor Last?

With a professional job, you can expect your stained floor to look great for years—even decades. The stain itself soaks into the concrete, but the real hero is the top-tier sealer we apply over it. A quality epoxy or polyurethane sealer is what stands up to cars, dropped tools, and daily life.

To get the most out of it, all it takes is some basic cleaning. We typically recommend reapplying a fresh coat of sealer every 5 to 7 years, depending on how much wear and tear your garage sees. Think of it as a quick refresh that keeps your floor looking brand new.

Can You Stain an Old or Damaged Concrete Floor?

You bet. Staining is actually one of the best ways to bring an old, tired concrete floor back to life. Even floors with cracks or surface damage can be perfect candidates. The key is all in the prep work. We spend a lot of time on this, repairing any damage and diamond grinding the surface so the stain can penetrate evenly.

When we come out for an on-site consultation, the first thing we’ll do is take a hard look at your concrete’s condition. This lets us map out the exact steps needed to give you that clean, durable finish you're looking for.

Will a Stained Garage Floor Be Slippery?

That's a smart question, especially here in Western Washington where things are often wet. A high-gloss sealer on its own can be slick. Luckily, there’s a simple fix. We can mix a non-slip polymer grit additive right into the final top coat.

This additive gives the floor a subtle texture, almost like fine sand, that adds a surprising amount of grip without changing the look. It's a must-have for busy family garages or any commercial space where you want that extra peace of mind.


Ready to see how a stained floor can completely change your garage? The team at Wheeler Painting has the residential and commercial construction experience to get it done right. We'll walk you through the whole process, making sure you get a floor you’ll be proud of for a long, long time.

Schedule your free, no-obligation estimate today

Guide: What Is Epoxy Floor Coating and Its Benefits?

Ever walked into a garage, retail space, or showroom and wondered how the floor could be so seamless, glossy, and impossibly tough? You were probably looking at an epoxy floor coating.

So, what is it, really? Think of it less like paint and more like a protective shield for your concrete. It’s a two-part system—a resin and a hardener—that, when mixed, triggers a chemical reaction. This reaction creates an incredibly strong bond with the concrete underneath, resulting in a hard, durable surface that stands up to just about anything. It’s a smart investment for both homeowners and businesses looking for a long-term flooring solution.

Your Guide to Durable and Beautiful Epoxy Floors

This guide is your complete walkthrough of this powerful flooring solution. We'll cover everything from the science behind it to how it performs in homes and commercial properties right here in our community. We’ll get into the real-world benefits, what it actually costs, and why having a trusted local pro like Wheeler Painting handle the installation is so important for getting the results you expect.

At its core, an epoxy floor coating is a thermosetting resin applied as a liquid that cures into a solid, seamless protective layer. This process forms a powerful chemical bond with concrete that can handle chemicals, scrapes, and heavy foot traffic without breaking a sweat. It's no wonder the global market for it hit USD 2.13 billion in 2024. You can find more insights about these industry statistics if you're curious about the numbers.

What You'll Learn in This Guide

Whether you're a homeowner fed up with a stained garage floor or a facilities manager who needs a bulletproof surface for a commercial space, this guide is for you. We wrote it to be a straightforward, helpful resource for our neighbors, breaking down exactly what you need to know in simple terms.

We’ll cover:

  • How epoxy transforms from a simple liquid into a rock-solid floor.
  • The key benefits you can actually expect, from its famous durability to moisture resistance.
  • The best places to use it in both residential and commercial projects.
  • A realistic look at the cost and true lifespan of a professionally installed epoxy floor.

By the time you're done, you'll have a clear understanding of what an epoxy floor coating is and why folks trust local experts like Wheeler Painting to get the job done right. We believe in giving our community the knowledge to make smart, confident decisions for their properties.

How Epoxy Flooring Actually Works

Ever wondered how a liquid mixture can transform your concrete floor into a tough, seamless surface that looks like it belongs in a showroom? It’s not paint, and it’s certainly not magic—it's all about chemistry. This process is something our team has mastered through years of experience on both residential and commercial projects.

An epoxy floor coating is a two-part system. You have a specialized resin and a corresponding hardener. When you mix them, you kick off a powerful chemical reaction called curing. Think of it less like painting and more like applying a high-strength, industrial adhesive specifically for your floor.

As the two parts react, they generate their own heat and start forming incredibly strong, cross-linked polymer chains. This process doesn't just dry on top of the concrete; it creates a rigid, plastic-like material that chemically fuses with the concrete slab. It becomes a permanent, integral part of the floor, resulting in a surface that’s far tougher than either the concrete or the coating would be on its own.

A three-step diagram illustrates the epoxy coating process: mix, bond, protect and cure.

From mixing the components to the final cure, each step builds on the last to create that durable, protective shield you're looking for. It’s a process we take seriously because we know our clients count on the results.

The Layers of a Professional Epoxy System

A professional epoxy floor isn’t just a single bucket of material slapped onto the concrete. It’s a carefully engineered, multi-layer system where each coat serves a distinct purpose. This methodical approach is what gives the floor its incredible strength and longevity, and it’s why hiring a professional painter and contractor makes all the difference.

Here’s a breakdown of the key stages in a proper installation:

  1. Surface Preparation: We can't stress this enough—this is the most important step. The concrete must be mechanically ground to get rid of old sealers, oils, or any other contaminants. More importantly, grinding creates a porous, sandpaper-like texture that gives the epoxy something to bite into. Without a clean, profiled surface, the system is doomed to fail. You can learn more about why a pristine surface is non-negotiable in our guide to professional power washing services.
  2. Primer Coat: Once the surface is prepped, we apply a primer. This is usually a thinner, lower-viscosity epoxy designed to soak deep into the concrete's pores. It seals the slab, prevents outgassing bubbles, and creates a tenacious bond for the layers that will go on top.
  3. Body Coat: This is the heart of the system. The body coat is a much thicker layer of epoxy that provides the floor's main color and impact resistance. If you’re going for a decorative look, this is when colored vinyl flakes are broadcast or metallic pigments are poured into the wet material.
  4. Topcoat: The final layer is a clear, protective topcoat. Think of it as the floor's shield. It seals in the flakes or pigments and provides the primary defense against scratches, chemical spills, abrasion, and UV rays that can cause lesser floors to turn yellow.

A professional epoxy system is engineered from the ground up. It begins with creating a tenacious bond to the concrete and ends with a tough, wear-resistant surface, ensuring the floor performs as expected for years to come.

Different Types of Epoxy Coatings

Just like with any other construction material, not all epoxy is created equal. The formula can be tweaked for different applications, performance requirements, and budgets. As your local contractor, we help you choose the right one for your space, explaining the options in plain language.

  • 100% Solids Epoxy: This is the gold standard. It contains no water or solvents that evaporate as it cures, meaning the thickness you apply is the thickness you get. It's incredibly durable and dense, making it the go-to choice for high-traffic commercial spaces like warehouses, retail stores, and heavy-duty garages.
  • Water-Based Epoxy: This type uses water as its carrier, so it has very low odor and is easier to work with. It's not as thick or tough as 100% solids epoxy, but it still provides good protection and a great seal. It’s often used as a primer or for lighter-duty residential projects like basements and garage floors that see typical family use.
  • Solvent-Based Epoxy: This formula uses chemical solvents to thin the material, allowing it to penetrate the concrete very well. While it creates a strong bond, it also releases harsh fumes (VOCs) and requires serious ventilation. Due to modern safety and environmental regulations, solvent-based epoxies are far less common today, especially in occupied buildings.

The Real Benefits of an Epoxy Floor System

Sure, a high-gloss epoxy floor looks fantastic, but that’s honestly just the beginning. The real magic of an epoxy system lies in its performance. For property owners and facilities managers in our local area, it’s a solution that tackles our biggest headaches—from relentless dampness to the daily wear and tear that chews up lesser floors. This isn't just about a pretty surface; it's a serious, practical upgrade for your property.

There's a reason you're seeing epoxy floors everywhere. The global market is projected to skyrocket to USD 2,039.1 million by 2030. Here in the U.S., it’s expected to grab a massive 42.35% of the entire floor coatings market by 2026. Those numbers tell a story: people are choosing epoxy because it works. You can dig into the flooring market statistics yourself to see just how fast this trend is growing.

Unmatched Durability and Strength

Let's get straight to the point: epoxy floors are incredibly tough. When the epoxy chemically fuses with the concrete slab, it creates a new, hybrid surface that's far stronger than the original. It shrugs off impacts, abrasion, and heavy loads that would easily chip or crack bare concrete. For a local homeowner, this means you can drop a wrench in the garage or use a car jack without holding your breath.

In a commercial setting—from a retail build-out to a warehouse—that toughness is non-negotiable.

  • Heavy Traffic: It stands up to constant foot traffic, pallet jacks, and even forklift activity day in and day out.
  • Impact Resistance: Dropped tools in a workshop or heavy pallets in a stockroom are no match for it.
  • Longevity: A professionally installed epoxy floor acts like a shield for the concrete beneath it, dramatically extending the slab's functional lifespan and protecting your investment.

A Powerful Moisture and Chemical Barrier

Living in a damp climate means dealing with moisture. It’s a constant battle, especially in basements, garages, and ground-floor businesses. An epoxy floor is completely seamless and non-porous, creating a rock-solid barrier that stops moisture from seeping up through the concrete. This is your best defense against musty smells and crumbling concrete.

An epoxy floor effectively seals your concrete, transforming it into a waterproof and stain-resistant surface. This makes cleanup effortless and protects your slab from corrosive substances.

This seamless shield is also what makes it so resistant to chemicals and stains. If a car leaks oil in the garage, you can simply wipe it up—no permanent dark spot. For businesses like auto repair shops or breweries, this chemical resistance isn't just a bonus; it's essential for safety and simple maintenance. Spills that would ruin regular concrete become a non-issue.

Enhanced Safety and Brightness

Here's a benefit most people don't expect: epoxy can make your space significantly safer and brighter. The standard high-gloss finish is highly reflective, bouncing light around the room and amplifying your existing light sources. A brighter garage, warehouse, or showroom isn't just more inviting; it's also safer because it eliminates shadows and improves visibility.

That reflectivity can even help trim energy bills over time, as you might not need as many light fixtures to keep the space well-lit. And while the surface looks slick, we can easily add anti-slip aggregates into the final topcoat. These additives create a subtle texture that provides fantastic grip, even when the floor is wet, making it a safe and practical choice for any environment.

Where Epoxy Flooring Works Best

So, we know what epoxy is and what it can do. The real question is, where does it actually make the most sense? From a contractor’s perspective, the magic of epoxy isn’t just in the product itself, but in knowing exactly where it will solve a problem and deliver real value for local homeowners and businesses.

Bright, organized garage featuring a gray car on a clean, reflective epoxy floor.

You’re not just imagining it—epoxy floors are becoming incredibly popular, and the numbers back it up. The commercial world has been all-in for years, with epoxy accounting for over 40% of the market share in places like retail malls and offices. Here at Wheeler Painting, we see this firsthand in the commercial construction projects we handle. But the trend is also catching on at home. Residential use is projected to grow by 4.8% annually as homeowners discover how it can completely transform their concrete. For a deeper dive, you can read the full research on flooring market trends and see the data for yourself.

Popular Residential Applications

For homeowners, an epoxy coating is a problem-solver. It takes those standard, boring concrete surfaces and turns them into clean, tough, and genuinely attractive parts of your home. It's one of the most rewarding residential remodeling projects we do.

Garages: This is the #1 application for homes, and for very good reason. An epoxy floor turns a dusty, stained concrete slab into a real, functional extension of your living space.

  • Hot Tire Pickup Resistance: A professionally installed system won't peel or lift when you park a hot car on it. This is a common failure point for DIY kits, but a pro-grade floor is built to handle it.
  • Stain Proofing: Say goodbye to permanent marks from oil, antifreeze, or other garage spills. Everything just wipes right off.
  • Easy Cleanup: During our wet winters, all the mud, salt, and grime your car drags in can be swept or mopped away in minutes.

Basements: In our famously damp climate, a seamless epoxy coating is a fantastic moisture barrier. It stops dampness from wicking up through the concrete, which helps get rid of that musty basement smell and creates a dry, usable space for a home gym, playroom, or workshop.

Workshops and Patios: For the avid hobbyist, a workshop floor coated with epoxy can handle dropped tools and chemical spills without chipping or staining. On a covered patio, it gives you a durable, easy-to-clean, and slip-resistant surface that holds up to foot traffic and weather far better than plain concrete ever could.

An epoxy floor coating isn't just a cosmetic upgrade for your home; it’s a functional one. It adds immense durability, simplifies maintenance, and protects your concrete from the harsh realities of daily life and our local climate.

Versatile Commercial and Industrial Uses

In the business world, the reasons for choosing epoxy are even more diverse. A high-performance floor is often a non-negotiable for safety, hygiene, and projecting a professional image that speaks volumes to customers and staff. Our experience with commercial construction near me has taught us how to pair the perfect flooring system with very specific business needs.

Retail Build-Outs and Showrooms: First impressions are everything. A bright, glossy epoxy floor makes a space feel clean and inviting, allowing the products on display to pop. Critically, it’s also tough enough to handle constant foot traffic for years without showing wear.

Office Space Renovations: Epoxy brings a modern, sleek look to breakrooms, hallways, and other common areas. It’s incredibly easy for cleaning crews to maintain and can be customized with brand colors and logos, reinforcing a polished, professional atmosphere during any office space renovation.

Warehouses and Industrial Facilities: These floors take a beating. Epoxy coatings are engineered to withstand the daily abuse of heavy forklift traffic, scraping pallet jacks, and harsh chemical spills. The seamless surface is also a huge plus for dust control and easy cleaning, which is vital in logistics and manufacturing.

Institutional and Healthcare Facilities: In schools, hospitals, and laboratories, hygiene is the top priority. An epoxy floor is non-porous, meaning it doesn’t give bacteria a place to hide. It can stand up to aggressive cleaning and sanitizing protocols, helping these facilities meet strict health codes. Adding anti-slip aggregates is also essential for keeping everyone safe in these high-traffic public spaces. Whether it’s a retail build-out or a major facility construction service, epoxy delivers where it matters most.

What Does an Epoxy Floor Really Cost, and How Long Does It Last?

When property owners start looking into an epoxy floor, two questions always bubble to the surface: "What's the price tag?" and "How long is this thing actually going to last?" These are the right questions to ask. Thinking about them helps shift your perspective from seeing this as a simple expense to what it truly is—a long-term investment in your property.

There's no simple, one-size-fits-all price for an epoxy floor. The final quote is a blend of several factors, much like a custom building project. The specific materials we use and the amount of labor needed to do the job right all play a part in the final number. We believe in being transparent about this so you feel confident in your decision.

The Factors That Drive Your Epoxy Floor Cost

To really understand the cost, you have to look at what goes into the project. The two biggest drivers are, without a doubt, the current condition of your concrete and the specific type of epoxy system you choose.

A professional contractor will always break down the pricing based on these key elements:

  • Total Square Footage: This is a game of scale. A huge commercial warehouse will naturally have a lower cost per square foot than a small two-car garage, even though the total project cost will be higher.
  • Concrete Condition: The prep work is non-negotiable, and its intensity dictates a large part of the labor cost. A new, clean slab is straightforward. An old, damaged floor riddled with cracks, deep-set oil stains, or a failing coating that needs to be ground off will require significantly more work.
  • The Epoxy System: Not all epoxy is created equal. A high-performance, 100% solids epoxy built for a demanding commercial space will cost more than a standard water-based system for a low-traffic residential basement.
  • Custom Finishes: Aesthetics play a role in the price. A clean, solid-color floor is the most budget-friendly option. Once you start adding decorative flakes or intricate metallic pigment designs, you're adding materials and a higher level of artistry, which will be reflected in the cost.

While it’s impossible to give a precise quote without an on-site evaluation, a professionally installed epoxy floor generally falls in the range of $5 to $12+ per square foot. The lower end of that scale usually covers a basic, solid-color system on good concrete, while the higher end accounts for extensive repairs, premium decorative finishes, and high-performance topcoats.

So, How Long Does an Epoxy Floor Last?

This is where you truly see the return on your investment. The lifespan of your floor is directly tied to the quality of the preparation, the grade of materials used, and the daily wear and tear it endures. A cheap DIY kit from a big-box store might look decent for a year or two before it inevitably starts to peel, chip, and fail. A professional system, however, is engineered for the long haul.

The secret to a long-lasting epoxy floor isn’t a secret at all: it’s meticulous surface preparation and the use of industrial-grade materials. When done right, your floor becomes a permanent, high-performance surface.

Here's a realistic look at what you can expect from a professionally installed floor:

  • Residential Garages: For a typical home garage that sees daily car traffic and foot activity, you can realistically expect your floor to last 10 to 20 years. With a little bit of basic care, it can last even longer.
  • Commercial & Industrial Spaces: In a business with heavy foot traffic, rolling carts, or pallet jacks, the lifespan is generally 5 to 10+ years. Environments with extreme use, like constant forklift traffic, might need a fresh topcoat sooner to maintain peak performance.

Ultimately, putting your project in the hands of a professional contractor like Wheeler Painting ensures it’s built to last. Our deep experience in both residential remodeling and commercial construction services gives us the insight to specify and install a flooring system that will deliver decades of performance and value for your property.

Why Professional Installation Is Not Optional

You've probably seen those DIY epoxy kits at the hardware store and thought, "How hard can this be?" It's a fair question, but the honest answer from a team that fixes these jobs is that the gap between a weekend DIY project and a professionally installed epoxy floor is massive.

Professional installation isn’t just a luxury; it’s the single most critical factor in getting a floor that lasts for decades instead of one that starts peeling within a year.

Worker using a large floor grinding machine to smooth a concrete floor, preparing it for coating.

There’s a reason the market for high-performance industrial floor coatings—which epoxy dominates—is projected to climb to USD 12.3 billion by 2035. Businesses are investing heavily in systems that form a tenacious bond and prevent concrete failure, and those results only come from professional methods. You can discover more insights about this industrial flooring market growth and see for yourself why the pros are in such high demand.

The Professional Process DIY Kits Can't Match

The secret to a flawless, rock-solid epoxy floor lies in meticulous preparation. It’s a step that DIY kits simply can't account for. An experienced contractor like Wheeler Painting follows a rigorous, multi-stage process that guarantees the floor's integrity, starting from the raw concrete slab itself.

Here’s a glimpse at the critical steps that are often missed in a DIY attempt:

  • Aggressive Surface Grinding: We don't just clean the floor; we profile it. Using heavy-duty diamond grinders, we mechanically abrade the concrete to remove old sealers and contaminants. More importantly, this creates a porous, sandpaper-like texture that gives the epoxy something to "bite" into for a permanent chemical bond.
  • Thorough Crack and Pit Repair: We hunt down every crack, pit, and spall. Each one is chased with a grinder and filled with specialized, industrial-grade polymers. This ensures a seamless, monolithic surface with no hidden weak spots.
  • Moisture Testing: This is non-negotiable, especially in our damp local climate. We conduct careful moisture tests to ensure the concrete's vapor transmission levels are low enough. Applying epoxy over damp concrete is a guaranteed recipe for bubbling and peeling down the line.

The Cost of Common DIY Disasters

Trying to cut corners with a DIY kit often ends up being a more expensive mistake. The thin, water-based materials in those boxes are simply no match for the 100% solids epoxy used by professionals and are notoriously prone to failure.

The most common DIY failures—bubbling, peeling, and hot tire pickup—almost always stem from improper surface preparation. A professional fixes these issues before they can ever happen.

These failures leave you with a floor that looks worse than when you started. The only fix is to hire a professional to come in, grind off the failed coating, and start the entire process over from scratch—costing you far more than if the job had been done right the first time.

Our team’s commitment to a strict process is what prevents these costly headaches. Investing in professional installation from the start means you’re paying for expertise, industrial-grade materials, and a flawless finish guaranteed to perform for years.

For property owners and facility managers in our service area, hiring a trusted expert for your commercial construction or residential project is the only way to ensure a durable, beautiful result. Contact Wheeler Painting today for a consultation and see what a professionally installed epoxy floor can do for your space.

Common Questions About Epoxy Floor Coatings

Even after you’ve seen the photos and heard about the benefits, it’s natural to have a few more questions. When you’re investing in your property, you need straight answers to feel confident in your decision. We get it, and as your local experts, we're here to help.

Here are some of the most common questions we hear from homeowners and business owners. Let's clear up any lingering doubts you might have.

Is an Epoxy Floor Slippery When Wet?

That's one of the first things people ask, and for good reason. A standard, high-gloss epoxy finish can be slippery when wet, a lot like polished tile or smooth marble. But this is a known issue with a simple, effective solution that we build into almost every project to ensure safety.

To guarantee a safe surface, we mix a slip-resistant aggregate directly into the final topcoat. This additive is a very fine material that creates a subtle texture, giving you excellent grip without taking away from the floor's clean look. It's the perfect solution for:

  • Garages where you'll be tracking in rain and snow.
  • Commercial kitchens, bathrooms, and food prep areas.
  • Entryways and walkways that see a lot of foot traffic.

You get that beautiful, seamless finish without the worry. It's a standard and non-negotiable part of our professional process.

How Long Does a Professional Installation Take?

Patience is key here. A proper epoxy floor installation is a multi-day process, and rushing it is a surefire way to get a floor that fails. For a typical project, you should plan for about 2 to 4 days from start to finish.

Here’s a look at what that timeline usually involves:

  1. Day 1: This is all about surface preparation. It's the most labor-intensive day, spent diamond grinding the concrete, filling every crack and pit, and vacuuming until the slab is perfectly clean and ready to bond.
  2. Day 2: We apply the epoxy primer to penetrate the concrete, followed by the main color or "body" coat. If you’ve chosen decorative flakes, this is when they get broadcast across the floor.
  3. Day 3: We apply the final, clear topcoat. This is the layer that seals everything in and provides the all-important scratch, chemical, and UV resistance.

After that final coat is down, the curing begins. You can usually walk on the floor in about 24 hours, but we strongly recommend waiting a full 5 to 7 days before driving on it. This gives the epoxy time to achieve its maximum strength and hardness.

Can Epoxy Be Applied Over Any Concrete Floor?

No, and this is a crucial distinction between a professional job and a weekend DIY project. For an epoxy coating to last, it needs to form a powerful, permanent bond with the concrete slab. That means the concrete itself has to be a suitable candidate.

The success of an epoxy floor coating depends almost entirely on the condition of the concrete beneath it. A professional will always test and prepare the slab to guarantee a lasting bond, preventing issues like the paint bubbles that can plague walls and other improperly prepped surfaces.

There are a few deal-breakers. Epoxy simply won't stick to:

  • Sealed or Polished Concrete: These smooth, non-porous surfaces won't let the epoxy soak in and grab hold. The existing sealer has to be completely ground off first.
  • Concrete with Moisture Issues: If moisture is constantly pushing up through the slab from the ground below, it will eventually lift the coating, causing it to bubble and peel. We always perform moisture testing before we even consider starting a job.
  • Previously Painted Floors: You can't put a strong new coating over a weak old one. Any existing paint or failing coating has to be mechanically removed by grinding. It’s like building a new house on a crumbling foundation—it’s destined to fail.

A Guide to Painting Hardie Board Siding

Yes, you can paint your Hardie Board siding. In fact, it’s a critical step in protecting your investment. While fiber cement is incredibly tough, the primer it comes with from the factory is only temporary. To truly shield your home or business from the elements and get the full lifespan out of your siding, a professional paint job is a must—especially here in the damp Puget Sound.

Why Painting Hardie Board Is a Smart Investment

Close-up of light gray house siding with water droplets after rain, beside a white window frame and blurred lake.

Painting your Hardie Board is about much more than just picking a color. It's one of the most important maintenance tasks you can perform for your home or commercial property.

Think of that factory primer as a transport cover. It's there to get the siding from the warehouse to your wall without damage, but it was never designed to withstand years of sun and rain. Without a solid paint coating over it, that primer will eventually break down, leaving your siding exposed and vulnerable.

For property owners and facilities managers in Western Washington, this is a serious concern. Our relentless drizzle and damp air can wreak havoc on building exteriors. A high-quality paint job is your building's best defense.

For homeowners and commercial property managers alike, a professional paint job on fiber cement isn't an expense—it's one of the smartest investments you can make in your building's long-term health and value. It's how you prevent much bigger, more expensive repairs down the road.

Protecting Against the Puget Sound Climate

When we talk about a "quality paint job," we're specifically talking about two solid coats of 100% acrylic latex paint. This creates a durable yet flexible shell over the fiber cement that serves a few vital purposes:

  • Moisture Barrier: It seals the board, stopping rainwater from soaking in. This prevents problems like efflorescence (the chalky white stains you sometimes see) and protects the board's core from long-term decay.
  • UV Protection: The sun's UV rays are surprisingly harsh, even on our cloudy days. They can make the factory primer brittle and cause it to fail. Good paint acts like sunscreen for your siding.
  • Enhanced Durability: The extra layers of paint add to the siding's already impressive strength, giving it more resilience against chipping, scuffs, and general wear and tear.

This proactive approach is essential, whether you own a home in Bellevue or manage a commercial property in Seattle. Proper painting is what transforms Hardie Board from a good siding material into a great one, ensuring your property is protected by a trusted local provider.

The Financial Sense Behind a Professional Paint Job

It's no secret that fiber cement siding is everywhere. The Hardie Board siding market is on track to grow from $3.5 billion in 2025 to $5.8 billion by 2033, and James Hardie itself owns a staggering 90% of the market in North America.

Across the board, industry experts recommend applying two coats of 100% acrylic latex paint to get the most out of your investment. The data backs this up: a shocking 15-20% of improperly painted jobs end up peeling because of skipped priming or shoddy prep work. That failure turns what should have been a straightforward project into a costly headache, proving that getting it done right the first time is the only way to go.

Choosing the Right Primer and Paint for Fiber Cement

The secret to a beautiful, long-lasting finish on your Hardie Board siding isn't really a secret at all—it’s about making the right product choices from the very beginning. The primer and paint you select is the single most important decision you'll make, determining how your siding will look and perform for years to come.

For property owners and facility managers, this choice has a direct impact on curb appeal and long-term maintenance budgets. Get it right, and you protect your investment. Get it wrong, and you could be looking at premature fading, peeling, and a costly repaint sooner than you think.

Why 100% Acrylic Latex is the Professional Standard

When our Wheeler Painting crews provide residential or commercial painting services near you, we almost exclusively use 100% acrylic latex paint. There are very practical reasons for this. This type of paint is flexible, allowing it to expand and contract right along with the siding as temperatures change.

Here in Western Washington, we see chilly, damp mornings that can give way to warmer, sunnier afternoons. That constant thermal movement puts a lot of stress on a paint film. Acrylic latex moves with the fiber cement, preventing the kind of cracking and peeling you'd see with a less forgiving paint. It creates a durable, yet breathable, shell that protects the siding without trapping moisture.

This is especially vital for commercial properties, where durability and low maintenance are the name of the game. A paint job that fails early means disruption and added costs, so sticking to proven materials is always the smartest path forward.

The Non-Negotiable Role of a Quality Primer

Think of primer as the essential bridge connecting the fiber cement siding to your topcoat of paint. Hardie Board is fundamentally a masonry product, and it absolutely requires a specific type of primer to guarantee proper adhesion. Before a single drop of color goes on, we always apply a high-quality masonry primer.

This step accomplishes two critical things:

  • Adhesion: It gives the paint a perfectly prepared surface to grab onto, creating a powerful bond that won't let go.
  • Stain Blocking: It prevents "efflorescence"—that chalky white residue that can sometimes leach out of cement-based materials and ruin an otherwise perfect paint job.

Skipping the primer might save a few hours on the front end, but it's a shortcut that almost guarantees paint failure within just a few years. It's a corner we will never cut.

Understanding the Value of a Professional Paint Job

The global siding market hit $104.8 billion in 2024, with home renovation trends fueling much of that growth. For property owners, this underscores the importance of making smart, long-term investments. A professional paint job on fiber cement siding is expected to last 15-25 years—a massive return compared to the 7-10 year lifespan you'd get on painted wood.

In fact, a proper coating can slash maintenance costs by up to 50% over a 20-year period compared to vinyl siding, which often fades and chalks. You can dig deeper into these siding market trends and their financial implications in this detailed market analysis.

A high-quality paint job is more than a color choice; it's a financial decision that pays you back with years of durability and minimal upkeep.

Choosing the Right Sheen for Your Property

The paint's sheen, or finish, has a big say in both its appearance and how well it holds up over time. Picking the right one depends entirely on your goals for the property, whether you're aiming for a modern residential look or need something tough for a high-traffic commercial building.

A sheen's job is to balance aesthetics with performance. Here's a quick breakdown of how the common options compare.

Paint Sheen Comparison for Hardie Board Siding

Sheen Appearance Durability Best For
Flat/Matte Non-reflective, hides imperfections well Low-Medium Low-traffic areas; not ideal for siding as it can be harder to clean.
Satin/Eggshell Low-lustre, elegant finish Medium-High The most popular choice for residential homes; offers a great balance of durability and a clean, modern look.
Semi-Gloss Noticeable shine, very easy to clean High Trim, doors, and high-traffic commercial exteriors where durability and washability are the top priorities.
Gloss Highly reflective, extremely durable Very High Typically reserved for accents, railings, or specific architectural features where a high-shine finish is desired.

For the vast majority of residential projects, we recommend a satin finish. It provides a sophisticated look that isn't overly shiny but is durable enough to handle our damp Pacific Northwest climate. For commercial properties or institutional painting, a semi-gloss is often a better fit because of its superior cleanability and toughness.

Gearing Up: The Pro-Grade Tools and Materials You'll Need

Before a single drop of paint hits your siding, you need to assemble your toolkit. This is a critical step, and honestly, it’s what separates a DIY paint job from a professional finish that’s built to last. At Wheeler Painting, our trucks are stocked with a specific set of gear for every project we tackle. It’s not just about having a checklist; it’s about knowing why each tool is essential for painting Hardie Board siding.

Making the right choices here is the foundation of a great paint job. Think of it as investing in a flawless, durable finish before you even open a can of paint.

Gear for Prep Work and Safety

The real workhorse of any exterior prep job is a good pressure washer. We typically use a unit in the 2,500 to 3,000 PSI range. The most important thing, though, isn't raw power—it's using a wide-angle tip (25 or 40 degrees) and keeping your distance. The goal is to clean the siding, not damage it. You'll also want a few hand tools at the ready:

  • Paint Scrapers: A sharp, carbide scraper is your best friend for getting rid of any small spots where old paint is starting to fail.
  • Sandpaper: Keep some medium-grit sandpaper (around 80 to 120-grit) on hand to feather out any rough edges after you scrape. A sanding block helps, too.
  • Caulk Gun: Don't skimp here. A quality, dripless caulk gun gives you the control you need to lay a perfect bead along seams and joints.

For homes and commercial properties here in the damp Puget Sound climate, we exclusively use a high-performance elastomeric sealant, not your standard painter's caulk. Elastomeric products have incredible flexibility and waterproofing capabilities, which is absolutely vital for protecting joints from the constant moisture and temperature shifts we see in Western Washington.

Protecting yourself and your property is just as crucial as the painting itself. Your personal protective equipment (PPE) isn't optional—grab some safety glasses, gloves, and a dust mask, especially for when you're scraping or sanding. For masking, spend the extra dollar on good painter's tape and heavy-duty plastic or canvas drop cloths. You’ll thank yourself later when you don't have to clean paint off your windows, trim, and landscaping.

Tools for a Flawless Paint Job

Once everything is prepped and masked off, it's time to think about application. While many homeowners get great results with a brush and roller, professional painters almost always use a combination of tools to get the best of both worlds: efficiency and quality.

  • Brushes: A top-notch 2.5 to 3-inch angled sash brush is the go-to for "cutting in." It's designed for getting those clean, sharp lines along trim, corners, and any other tight spot a roller can't touch.
  • Rollers: If you're rolling the siding, make sure you use a roller cover with a ¾-inch nap. That thicker pile holds a good amount of paint and does a much better job of getting into the texture of the Hardie Board.
  • Airless Paint Sprayer: This is the professional's choice, hands down. A sprayer atomizes the paint, laying down an incredibly smooth and even coat that looks like it was done at the factory. For large residential exteriors or commercial renovations, it’s the only way to get a truly uniform finish efficiently.

Getting all this gear together before you start is non-negotiable. Having the right tools isn't just about making the job easier; it’s a direct investment in how good your siding will look and how long the paint will last.

Getting the Surface Ready: The Foundation of a Flawless Finish

If you ask any experienced painter, they'll tell you the same thing: about 80% of a great paint job happens before you crack open a can of paint. When it comes to painting Hardie board siding, that's not just a suggestion—it’s the golden rule. Meticulous prep is what guarantees a beautiful finish that can hold up to the demanding Puget Sound climate.

This is absolutely not the place to cut corners. The time and effort you put in here will pay off tenfold, creating the durable, long-lasting result you're after. It's the single most important factor in preventing premature paint failure, whether we're talking about a family home or a large commercial facility.

Deep Cleaning and Tackling Mildew

First things first, the siding needs a thorough wash. Over the years, your siding collects a film of dirt, grime, pollen, and chalky residue. Here in Western Washington, you can almost always count on finding some mildew or algae, too. If you paint over that layer of contamination, the new paint will stick to the grime, not the siding itself, and you'll see peeling and bubbling in no time.

We start with a pressure washer, but we're very careful about it. Too much pressure can easily damage fiber cement, so we use a lower setting—usually between 1,500 and 2,000 PSI—and a wide-angle tip (either 25 or 40 degrees). The idea is to gently wash the surface, not blast it. For any stubborn mildew, we'll treat it with a specialized, eco-friendly cleaner to kill the spores at the root. This ensures nothing grows back underneath your fresh paint.

Having the right tools for the job makes all the difference, ensuring every step is done right from start to finish.

A three-step process flow with icons for a pressure washer, caulk gun, and paint sprayer tools.

These are the workhorses of any professional siding project, taking you from the initial deep clean all the way to that final, protective coat.

Inspection, Repairs, and Sanding

Once the siding is squeaky clean and has had plenty of time to dry out, we do a detailed, board-by-board inspection. This is where a trained eye really counts. We're looking for any signs of trouble—cracks, chips, or boards that are starting to delaminate from moisture or an impact.

We address any minor issues right then and there. For small chips or spots where the old paint is failing, we use a carbide scraper to carefully remove all the loose material. Then, we feather the edges of the scraped spot with 80 to 120-grit sandpaper to create a perfectly smooth, seamless transition. Done right, you’ll never even know a repair was made once the new paint is on. If a board is too damaged to save, it will need siding replacement, a service we handle as a residential and commercial contractor.

A critical pro-tip: Let the siding dry completely after washing. Trapping moisture under a fresh coat of paint is one of the fastest ways to guarantee bubbles and peeling. In the Puget Sound area, that can mean waiting 24-48 hours or even longer, depending on the weather.

It's also essential to keep a close eye on the forecast. As our guide on what temperature is too cold to paint an exterior explains, paint needs the right conditions to cure properly and form a durable bond.

Caulking for a Weatherproof Seal

The last step before primer and paint is caulking. Every seam, joint, and gap—around windows, doors, and trim pieces—needs to be sealed tight. This isn't just for looks; it's a vital waterproofing measure that protects your building's structure from our region's relentless rain.

We always use a high-performance elastomeric or 100% acrylic sealant. These are far superior to a basic painter's caulk because they offer incredible flexibility and longevity. They can expand and contract with the shifting temperatures without cracking, keeping that watertight seal intact for years. Applying a clean, consistent bead of caulk takes a steady hand and a good bit of patience. We then "tool" the bead, smoothing it out to create a perfect finish that blends right in.

This entire prep process—cleaning, repairing, sanding, and sealing—is labor-intensive, but it creates the perfect canvas. It's the only way to ensure your freshly painted Hardie Board siding not only looks incredible but also provides the uncompromising protection your property deserves.

Mastering Pro Application Techniques

A person uses both a brush and a paint sprayer to apply fresh white paint to exterior house siding.

Alright, you've done the hard prep work. The siding is clean, repaired, and everything is masked off. You have set the stage for a perfect paint job. Now comes the moment of truth: applying the paint. How you do this—with a brush, roller, or sprayer—will make all the difference in the final look, the project's efficiency, and how long that new paint job will last.

For our Wheeler Painting crews, we almost always use a combination of these methods. It’s about using the right tool for the right part of the job to get that flawless, professional finish, whether we're working on a home in Bellevue or a commercial space in Seattle.

Precision Cutting In with a Brush

No matter what, every great paint job starts with a brush. We call this "cutting in," and it’s where you meticulously paint the edges where siding meets trim, windows, and corners. This is all about control. A good 2.5 to 3-inch angled sash brush becomes an extension of your hand, letting you create laser-sharp lines.

This careful brushwork is what separates a truly professional job from an amateur one. It’s what makes architectural details pop and ensures you get complete coverage in all the nooks and crannies a sprayer or roller just can't touch. While you could brush the entire building, it would take forever and you’d likely be fighting brush marks the whole way.

For some extra tips on getting those crisp lines, check out our guide on tips for painting trim—the same principles apply here.

Choosing the Right Roller for Siding Texture

Rolling is a solid choice for many property owners. It’s accessible and doesn’t require a huge investment in equipment. The secret to getting it right on Hardie siding is picking the right roller cover, or "nap." Since fiber cement comes in different textures, from perfectly smooth to a deep wood grain, you need a roller that can get paint into every single groove.

  • For most textured Hardie Board: We always grab a ¾-inch nap. It holds plenty of paint and has enough depth to push that coating deep into the texture.
  • For smooth Hardie Board panels: A ½-inch nap will give you a beautiful, uniform finish without creating unwanted texture.

If you’re rolling, the key is to work in manageable sections and always keep a wet edge to prevent ugly lap marks. It's a reliable method, but be prepared—it’s much slower than spraying, especially on larger buildings.

The Professional’s Choice: Airless Spraying

When you want the absolute best finish in the most efficient way possible, nothing beats an airless paint sprayer. This is the go-to method for nearly every professional painter, including our crews. A sprayer atomizes the paint, laying down a fine, even coat that settles perfectly on the siding. The finish is so smooth it looks like it came from the factory.

On a typical residential home, using a sprayer can cut the application time by more than 50% compared to just rolling. For a property owner, that means less disruption. For us, it means we can deliver a superior finish more efficiently.

Spraying is a skill, though. In the hands of someone inexperienced, it can quickly lead to drips, runs, or an uneven coat. Our painters are trained to manage pressure and spray patterns to build that perfect, protective shell that will defend your siding against the elements for years to come.

Maximizing Adhesion with Back-Brushing

Here’s a technique that truly separates the pros from the pack: "back-brushing." Immediately after a section is sprayed, a second painter follows behind with a brush or roller, working the fresh paint into the siding's surface. This one extra step is a game-changer. It physically forces the paint into every tiny pore and texture of the fiber cement, which dramatically boosts adhesion and builds a thicker, more durable paint film.

As fiber cement siding continues to grow in popularity—it's projected to be on 23% of new single-family homes by 2026—painting it correctly has never been more important. Techniques like back-brushing, which can improve adhesion to 95% on a properly primed surface, have been shown to slash callbacks by 30%. In our wet Puget Sound climate, where humidity often soars above 80%, this step is non-negotiable for preventing the chalky efflorescence that can plague 10-15% of improperly sealed jobs.

Answering Your Top Hardie Board Painting Questions

To make sure you're completely confident in your project, let's walk through some of the most common questions we hear from property owners. Our goal is to give you the clear, straightforward answers you need—the kind that come from years of experience with this exact material. This way, you’ll know your siding is getting the best possible treatment, whether you do it yourself or hire a professional.

How Often Does Hardie Board Siding Need to Be Repainted?

This is easily the biggest question we get, and for good reason. You want to know how long your investment will last. A professionally applied, high-quality acrylic paint job on Hardie Board can last 15 years or even longer, even with the wet, demanding climate we have here in the Pacific Northwest.

That kind of longevity is a massive upgrade over traditional wood siding, which often needs a new coat every 5 to 7 years. Why the difference? Fiber cement is incredibly stable; it doesn't swell and shrink with moisture changes like wood does. Because the surface underneath is so reliable, the paint on top simply holds on longer. The two things that make or break that lifespan are the quality of the prep work and the paint itself. Using premium products built for our region's heavy moisture is non-negotiable for maximizing the time between paint jobs.

Can I Paint Brand New Unprimed Hardie Board Siding?

Technically, yes, you can paint unprimed Hardie Board, but it absolutely must be primed first. While most James Hardie products now arrive pre-primed from the factory, you can still find unprimed boards. Think of these raw boards like a dry sponge—they’re incredibly porous and will soak up paint unevenly, leaving you with a blotchy, inconsistent finish and a weak bond.

If you paint directly over an unprimed board, the paint simply can’t form a strong, lasting connection. We see this all the time on repair jobs. The original paint starts peeling or flaking within just a few years because that crucial priming step was skipped. That’s why we always apply a high-quality acrylic latex primer designed for masonry before a single drop of color hits the wall.

Skipping the primer is one of the costliest mistakes you can make when painting Hardie Board siding. It might save you a few hours upfront, but it almost guarantees premature paint failure and can even void your siding’s warranty.

What Happens if I Don't Paint My Hardie Board Siding?

Even though James Hardie siding is incredibly tough, that factory primer is not a permanent finish. Its only job is to protect the board during shipping and installation. It was never designed to stand up to years of sun and rain on its own.

Left unpainted and exposed to the elements, that primer will eventually start to break down. The sun's UV rays will make it brittle, and our constant rain will slowly wear it away. Once the primer fails, moisture can get into the board itself, leading to a few predictable problems:

  • Efflorescence: You might see white, chalky, or powdery deposits on the surface. That's a sign of minerals leaching out of the cement.
  • Chipping and Degradation: Without the protective shell of paint, the board becomes more vulnerable to surface damage and dings.
  • Reduced Lifespan: Over time, consistent moisture intrusion can shorten the overall life of your siding.

Most importantly, painting is a mandatory step to keep the James Hardie warranty valid. If you leave it unpainted, you're giving up that valuable protection.

What Is the Best Time of Year to Paint Siding in the Puget Sound?

The ideal window for any exterior painting project here in the Puget Sound is during our drier, milder months. While everyone thinks of summer as "peak season," the real key is finding a stretch of days with stable temperatures and no rain.

Most 100% acrylic latex paints need the air and surface temperature to stay between 50°F and 90°F to cure correctly. The dry, mild days we often get in late spring, summer, and early fall are perfect. If you paint when it’s too cold, the paint won't bond properly. If you paint in the direct, intense summer sun, it can dry too fast, which causes ugly bubbles and lap marks.

For any project, our focus is on ensuring two things:

  1. The siding is completely dry before we even think about opening a can of paint.
  2. There is a clear 24-48 hour window with no rain in the forecast after the final coat is on.

An experienced local painting contractor knows how to watch weather patterns and schedule the work to hit that sweet spot. That careful planning is what guarantees a flawless finish that cures properly and lasts for years to come.


Ready to give your home or commercial property the durable, beautiful finish it deserves? The team at Wheeler Painting has been serving the Puget Sound region for over three decades, combining expert craftsmanship with a commitment to clear communication and reliable results. Contact us today for a free, no-obligation estimate and let us make your project straightforward and stress-free.

A Guide to Kitchen Cabinet Doors Painting for a Flawless Finish

Thinking about giving your kitchen a facelift without the sticker shock of a full remodel? Painting your cabinet doors is one of the most effective and wallet-friendly ways to completely transform the space. It’s a project that delivers a high-end look for a fraction of the cost, letting you update outdated colors, erase years of wear and tear, and even boost your home's value.

This is a design refresh that really packs a punch.

Two kitchen cabinet doors, one dark brown and one newly painted white.

Why Painting Cabinet Doors Is Such a Smart Home Upgrade

If you're tired of staring at dated, scuffed-up kitchen cabinets but don't love the idea of a massive bill for new ones, painting is the perfect solution. It beautifully blends dramatic visual change with smart financial planning. Here in our local community, we see homeowners and property managers choose this option all the time, and for good reason.

This isn't just about slapping on a new coat of paint. It's a chance to completely redefine the heart of your home or rental property. You can finally ditch those dark, heavy wood tones for a bright, airy white, or maybe go bold with a contemporary color that truly shows off your personality.

The Financial and Aesthetic Payoff

The appeal becomes undeniable when you break down the numbers. Opting to paint your existing cabinets can cost 50-70% less than a full replacement, giving you a fantastic return on your investment. It’s a major reason why cost-effective updates like professional painting are driving growth in the kitchen renovation market.

Beyond the significant savings, the visual impact is instant. A fresh, professional paint job makes the whole kitchen feel cleaner, more spacious, and infinitely more welcoming. This guide will walk you through everything you need to know, whether you're gearing up for a DIY weekend or thinking about hiring a pro to get that flawless, durable finish.

A professional paint job doesn’t just look good—it delivers a durable, factory-like finish that adds real, measurable value to your home. It’s an upgrade that pays for itself, both in your daily enjoyment and its appeal to future buyers.

By getting a handle on the process, you can make a confident decision that fits your budget and vision. For a closer look at how these costs fit into the bigger picture, check out our guide on understanding the kitchen remodel cost breakdown.

Planning Your Project and Gathering the Right Supplies

A flawless finish on your kitchen cabinets starts long before you ever pick up a paintbrush. Thorough planning is what truly separates a frustrating, messy job from a project you can be proud of. If you take the time to map out your timeline, set up a dedicated workspace, and get all your supplies in order first, you’ll save yourself a world of headaches down the road.

Think of it as setting the stage. This isn't a project you can knock out in a single afternoon. Realistically, painting kitchen cabinet doors properly often takes two full weekends—the first for disassembly and prep work, and the second for painting, curing, and putting everything back together. Trying to rush it is a surefire way to end up with smudges and chipped paint.

Setting Up Your Workspace

Your first move is to create a dedicated project zone. You need a space that's well-ventilated, protected from dust and debris, and big enough to lay out all your cabinet doors and drawer fronts. A garage or basement is usually your best bet.

Make sure to lay down drop cloths to protect the floors. We also recommend using plastic sheeting to wall off the area, which helps keep sanding dust from drifting into the rest of your house.

Your workspace should have room for a few key areas:

  • A cleaning station: This is where you'll be doing the critical degreasing and washing of the doors.
  • A prep area: For all your sanding, filling, and priming.
  • A drying rack system: You don't need anything fancy. Painter's pyramids are great, but even some 2x4s with screws driven through them will work to elevate the doors. This lets you paint both sides with less waiting time in between.

Choosing Your Paint and Application Method

Here’s where you’ll make one of the most important decisions for your project: what kind of paint to use and how to apply it. This choice directly affects the final look, the durability of the finish, and the amount of work involved. For most property owners, the big debate is whether to brush or spray the paint.

To help you figure out what’s right for you, we've put together a quick comparison.

Paint and Application Method Comparison

This table breaks down the key differences between common paint types and application methods for cabinet doors, highlighting the pros, cons, and best-use cases to help you choose the right combination for your project.

Feature Brushing/Rolling Spraying (HVLP)
Finish Quality Can show subtle brush marks; takes a skilled hand to get a perfectly smooth finish. Best for textured or rustic styles. Gives you that smooth, factory-like finish with zero brush marks. It's the go-to for modern, sleek kitchens.
Skill & Learning Curve The learning curve is much lower since most people have used a brush before. There's a definite learning curve. You’ll need to practice to avoid drips, runs, and an uneven coat.
Cost & Equipment Very budget-friendly. All you need are high-quality brushes, mini-rollers, and trays. A higher initial cost because you need to buy or rent an HVLP (High Volume, Low Pressure) sprayer.
Prep & Cleanup You don't have to do much masking, but the actual painting process is slower. Cleanup is pretty simple. Requires extensive masking of your kitchen to protect everything from overspray. Cleaning the sprayer itself can also be time-consuming.
Best For Smaller kitchens, DIYers on a tight budget, or anyone who prefers a more hands-on, traditional approach. Large kitchens, anyone determined to get a flawless professional look, and those who are comfortable handling the equipment.

So, what's the verdict? The best method really comes down to your confidence level, your budget, and the final look you're after. If you're tackling a larger renovation, understanding these trade-offs is crucial. You can see how this piece fits into the bigger picture in our guide on how to plan a kitchen remodel.

Ultimately, both brushing and spraying can give you a beautiful result. The key is knowing what you're getting into and preparing for it properly.

Mastering the Critical Surface Preparation Steps

If painting is the exciting part of the transformation, then prep work is the unglamorous foundation that ensures it all lasts. Any pro painter will tell you the same thing: 90% of a quality finish comes from the prep. Skipping these steps is, without a doubt, the biggest mistake you can make. It's the difference between a durable, factory-smooth finish and a paint job that chips and peels within a year.

We know it can feel tedious, but trust us, every minute you spend here pays off tenfold in the final result. Think of it as methodically getting your canvas ready for a masterpiece.

Let's break down the project into three core phases: planning your timeline, prepping your surfaces, and finally, getting that paint on.

Infographic showing a three-step project planning process: Plan, Prep, and Paint, with descriptive text and icons.

As you can see, proper prep is the essential bridge between your plan and the final coat of paint. It’s what makes or breaks the project.

Removing and Labeling Doors and Hardware

First things first, you need to systematically dismantle your kitchen before you can clean or sand anything. Start by emptying all your cabinets. Then, carefully take off each door and drawer front.

This is where a simple labeling system becomes your best friend. A piece of painter's tape on the inside of a door or in the hinge cup with a number (like "U1" for the first upper cabinet, "L3" for the third lower one) will save you a massive headache later. Put all your hinges, screws, and pulls into labeled Ziploc bags. You’ll thank yourself during reassembly.

Pro Tip: Whatever you do, don't try to paint around hinges or hardware. It’s impossible to get a clean line, and the paint will start to chip and peel around those areas almost immediately. Taking the extra 30 minutes to remove everything is non-negotiable for a pro-level job.

The All-Important Cleaning and Degreasing

Kitchens are ground zero for grease, food splatters, and cooking oils. Even if they look clean, they aren’t. Paint simply will not stick to a grimy surface, so you have to thoroughly clean every inch of your cabinet doors and frames.

A dedicated degreasing cleaner is a must for this step.

  • What to Use: A solution of trisodium phosphate (TSP) or a TSP substitute is fantastic for cutting through tough, baked-on kitchen grease. Always follow the manufacturer's directions and wear gloves and eye protection.
  • The Process: Grab a non-abrasive sponge and get to scrubbing. Pay extra attention to the cabinets around the stove, microwave, and sink—and especially around the handles and knobs where grime builds up.
  • Rinse It Off: After degreasing, you absolutely must rinse the surfaces with clean water. Any leftover chemical residue will sabotage your paint job just as much as the grease did. Let everything dry completely before you even think about sanding.

Sanding and Filling for a Silky Smooth Surface

With your cabinets clean and bone-dry, it's time to create a perfectly smooth surface for your primer to grab onto. Sanding does two crucial things: it scuffs up the old finish to give the new primer a "tooth" to bond with, and it smooths out any minor flaws.

For most projects, a medium-grit sandpaper (120- to 150-grit) is the perfect starting point. If you have older cabinets with a thick, glossy varnish, you might want to start with a slightly coarser grit to knock down that shine. The goal here isn't to strip the old finish completely, but to create a uniform, dull surface.

After that initial sanding, wipe away every speck of dust with a tack cloth or a microfiber cloth lightly dampened with mineral spirits. Now, run your hand over every door and inspect it closely for dings, dents, or deep scratches. Use a high-quality wood filler and a small putty knife to fill these spots.

Once the filler is totally dry, sand it smooth with fine-grit sandpaper (220-grit) until you can't feel the patch with your fingertips. This is the kind of meticulous detail that separates a good DIY job from a truly flawless, professional finish.

Applying Primer and Paint for a Flawless Finish

Okay, you've done the hard part. All that cleaning, sanding, and prep work is about to pay off in a big way. Now comes the moment of truth: applying the primer and paint that will completely transform your kitchen. This is where you get to see your vision come to life.

A person spray paints a light-colored kitchen cabinet door on sawhorses in a garage.

Before you even think about color, you need to prime. Don't skip this step! A quality bonding primer is the unsung hero of any cabinet painting project. It’s what grabs onto the cabinet surface and gives your paint something to really stick to.

Primer also acts as a stain blocker, which is absolutely essential for wood like oak or cherry. Without it, you’ll likely see ugly yellow or reddish spots—a phenomenon called tannin bleed-through—seep through your beautiful new paint job weeks or months later.

Brushing and Spraying Techniques for a Pro Look

Whether you're brushing or spraying, your technique is what separates an amateur job from a professional one. The universal rule? Two thin coats are always better than one thick one. This simple guideline helps you avoid drips, pooling, and an uneven, globby finish.

If you're using a brush:

  • Always maintain a "wet edge." This just means you overlap your fresh brush strokes onto the still-wet paint from the previous stroke. It’s the key to making the paint level out smoothly and hiding those pesky brush marks.
  • Invest in a good angled brush for the details. A quality brush holds paint better and gives you more control, especially for cutting in around panels and intricate trim.
  • After brushing the details, switch to a small foam roller for the flat areas. This one-two punch is a fantastic way to get a much smoother finish than brushing alone.

If you're using a sprayer:

  • Consistency is everything. Hold the sprayer about 6-8 inches from the door and move in steady, even passes. If you stop or linger in one spot, you’re guaranteed to get drips.
  • Start spraying just before the edge of the door and stop just after. This prevents paint from building up too heavily at the start and end of each pass.
  • Your first pass should be a very light "tack coat." This fine mist gives the next, heavier coat something to grip onto, which dramatically reduces the chance of runs.

Exploring the Two-Tone Cabinet Trend

Painting cabinets isn't just about refreshing an old look anymore; it's a powerful design choice. One of the most stylish trends we're seeing is two-tone cabinetry, where the upper and lower cabinets are painted in different colors. It's a fantastic way to add depth and make a kitchen feel more spacious and custom. A common combination is dark, grounding lowers with light, airy uppers.

This isn't just a niche trend, either. A surprising 24% of homeowners are now opting for a two-tone look in their kitchen renovations. It really shows how painted finishes have become central to modern kitchen design. The entire U.S. kitchen cabinet market is booming, expected to hit USD 43.03 billion by 2032, and custom paint jobs are a huge part of that growth.

You can explore more kitchen cabinet painting statistics to see just how dominant painted doors have become in today’s most popular styles.

Curing, Reassembly, and Long-Term Care

You’ve laid on that final coat of paint, and your cabinet doors are looking absolutely phenomenal. We know the feeling—you're so close to the finish line, you can almost taste it. But this is where patience becomes your most important tool. There's a huge difference between paint that's "dry to the touch" and paint that's fully "cured," and understanding this is the key to a lasting finish.

Paint might feel dry in just a few hours, but the curing process is a different beast entirely. This is when the paint chemically hardens into that durable, protective shell you want in a high-traffic area like a kitchen. Depending on the product and the humidity in your home, this can take anywhere from 7 to 30 days. If you rush it, you’re practically asking for dings, smudges, and heartbreak.

Putting It All Back Together

Alright, once you're confident the paint has had enough time to cure—we always recommend waiting at least a few days as a bare minimum—it’s time for the fun part. This is where that labeling system you set up in the beginning becomes your best friend.

Grab your labeled baggies of hardware and start by reattaching the hinges to the doors themselves. Then, you can carefully hang each door on its matching cabinet frame. Go slow and be methodical here; the last thing you want is an accidental scratch after all your hard work.

With the doors up, it's time for the final adjustments.

  • Get the Alignment Just Right: Most modern hinges have little adjustment screws. Grab a screwdriver and tweak them until all your doors are perfectly level with nice, even gaps. It's this attention to detail that really separates a DIY job from a professional one.
  • Install Your Knobs and Pulls: Carefully screw your hardware back on. If you opted for new pulls with different spacing, you should have already filled the old holes and drilled new ones during the prep stage.
  • Don't Forget the Bumpers: This is a small step people often forget, but it makes a huge difference. Stick a few small felt or rubber bumpers on the inside corners of your doors. They’ll prevent that harsh thwack of the door hitting the frame and protect your beautiful new finish for years.

Seriously, be patient. Letting that paint fully cure before you start slamming doors and drawers is the best insurance policy you can have for your project. This simple act of waiting is what makes the finish last.

Keeping Your "New" Cabinets Looking New

Your kitchen now has a stunning new focal point, and a little bit of care will keep it that way. The golden rule is to be gentle. Avoid harsh, abrasive cleaners or scrub pads at all costs—they will absolutely dull, or even strip, the paint over time.

For everyday smudges and fingerprints, a soft, damp microfiber cloth is all you need. If you run into something a little more stubborn, a mild mix of dish soap and warm water will do the trick.

Life happens, so be prepared for the occasional accident. Keep a small, well-sealed container of your leftover paint and primer for quick touch-ups. When you see a small chip or scuff, deal with it right away before it gets worse. A little proactive care goes a long way in making sure your newly finished cabinets remain something you’re proud of for years to come.

When to Hire a Professional Painting Contractor

Taking on a kitchen cabinet painting project yourself can be incredibly satisfying, but it's definitely not for everyone or every kitchen. Knowing when to step back and call in an expert is a smart move. It can save you a ton of time, frustration, and even money in the long run. The real key is to take a hard look at the size of the job and your own limits.

For example, do your cabinets have intricate molding, detailed trim, or glass panels? The precision needed for a perfect finish on those goes way up. The same applies to big kitchens. What seems like a fun weekend project in a small galley kitchen can quickly turn into a months-long nightmare when you're faced with 30 or 40 doors and drawer fronts.

The Value of Professional Expertise

Hiring a professional painting contractor brings so much more to the project than just a steady hand. You're really investing in a guaranteed result—a durable, beautiful finish without all the stress of managing it yourself. A professional crew has the dedicated workshop space, specialized gear like HVLP sprayers, and access to commercial-grade coatings that you just can't find at a local hardware store.

That professional-grade finish is a big deal, especially with today's design trends. While we're seeing natural wood grain make a comeback, painted cabinets are still king in the kitchen design world. The global market is projected to hit an incredible USD 253.96 billion by 2035, driven by the demand for durable, custom-painted finishes. In fact, industry reports show a 34% surge in preference for low-VOC finishes, which pros are perfectly set up to apply safely and effectively. You can read the full 2026 Kitchen Trends Report to see how these tastes are shaping modern kitchens.

Hiring a pro turns a potentially stressful, time-consuming DIY job into a predictable, seamless project. You get the peace of mind that comes with knowing the job will be done right, on schedule, and with a finish that will withstand years of daily use.

Signs It’s Time to Call the Pros

Still on the fence? Here are a few clear signs that bringing in a professional painter is your best move:

  • You're Out of Time: Let's be real—a proper cabinet painting job is a major time sink. If your calendar is already bursting at the seams, a pro can get the work done efficiently without turning your home into a construction zone for weeks.
  • You Don't Have a Dedicated Workspace: If you don't have a well-ventilated garage or workshop, the mess and fumes from sanding and spraying can take over your entire home. It gets difficult, fast.
  • Your Cabinets Need Major Repairs: Are you looking at peeling laminate, water damage, or warped doors? A professional can handle complex repairs and restoration that go far beyond just slapping on a coat of paint.
  • You Demand a Flawless, Factory-Like Finish: That perfectly smooth, glass-like finish with zero brush marks takes serious skill and specialized spray equipment. If you won't be happy with anything less than perfection, an experienced crew is the only way to guarantee it.

At the end of the day, whether you're a homeowner or a facilities manager looking for "commercial painting services near me," the goal is the same: a beautiful, long-lasting result. Our teams are experienced in both residential and commercial painting services, and we know what it takes to deliver top-tier quality every time.


For a project as central to your home or business as your kitchen, you deserve a partner you can trust. Wheeler Painting & Restoration Services has been delivering reliable craftsmanship to local homeowners and businesses since 1991. If you're ready for a stunning, durable finish without the headache, contact us for a consultation. You can learn more about our comprehensive painting services at https://wheelerpainting.com/painting/.

Retaining Wall Design: A Homeowner’s and Business Owner’s Guide

A retaining wall isn't just a pile of rocks. It's an engineered system designed to fight gravity and immense pressure, 24/7. Here in the Puget Sound, with our notoriously hilly and water-logged terrain, a proper retaining wall design isn't just a good idea—it's absolutely critical for preventing erosion and creating stable, useful space for your home or business.

Why Professional Retaining Wall Design Is a Smart Investment

Think of a retaining wall as your property's silent guardian. Done right, it stands firm against the incredible force of soil and water, protecting your landscape and structures. But a wall that's poorly designed or shoddily built? That's not just an eyesore; it's a serious safety hazard and a ticking financial time bomb.

Understanding the fundamentals helps you make smarter choices, ensuring the final structure is both beautiful and built to last. This is non-negotiable in Western Washington, where our relentless rain can saturate the ground, massively increasing the load pushing against a wall. A professional design anticipates this from day one, giving property owners, business owners, and facilities managers peace of mind.

The Core Principles of a Successful Design

Every successful retaining wall is a masterclass in balance. On one side, you have lateral earth pressure—the constant push of the soil. On the other, you have the wall's strength and mass pushing back. An experienced local contractor knows exactly how to balance this equation for our specific conditions.

Here’s what a solid professional plan always focuses on:

  • Structural Integrity: The wall's materials and size must be calculated to handle the forces at play without bowing, cracking, or tipping over.
  • Proper Drainage: This is the most critical element. A great design must include a way for water to escape, typically using gravel backfill and perforated pipes. Without it, you get hydrostatic pressure, the number one killer of retaining walls.
  • A Solid Foundation: The wall needs a stable footing dug down to firm, undisturbed soil. This is the bedrock of its entire stability, preventing it from sinking or shifting over the years.

I've seen it a hundred times: a retaining wall fails because the designer didn't plan for drainage. When water gets trapped behind a wall, the pressure it exerts is immense. It can—and will—push a wall over.

More Than Just a Wall

For homeowners, a well-built wall can be a game-changer. It can turn a useless, muddy slope into a gorgeous terraced garden, create a flat lawn for the kids, or provide a stable base for a new patio.

For business owners and facilities managers, it’s just as vital. A good wall can create the level ground needed for a parking lot expansion, a new building foundation for a retail build-out, or safe, accessible walkways for an office space.

Ultimately, professional retaining wall design isn’t a cost; it’s an investment in your property's safety, function, and value. It's the difference between a temporary fix and a permanent solution that gives you peace of mind for decades to come.

A Look at the Different Types of Retaining Walls

Before starting a retaining wall project, you first have to understand your options. It's like picking the right tool for a tough job—choosing the correct wall type is absolutely critical for long-term success, whether you're terracing a small garden at home or securing a massive commercial site. Each style works in a fundamentally different way to fight back against the immense force of soil and water.

At its core, any retaining wall is an engineered system designed to perform a few critical jobs for your property.

This diagram breaks down how a single wall system serves three distinct but closely related purposes.

Diagram illustrating the engineered purposes of a retaining wall for erosion control, water management, and usable land.

As you can see, a well-designed wall is all about controlling erosion, managing water, and carving out usable, flat land. In the hilly, rain-soaked terrain of Western Washington, these functions are absolutely essential for both residential and commercial properties.

H3: Gravity Walls: Relying on Pure Mass

The most straightforward design is the gravity wall. It's the heavyweight champion of retaining walls, holding back soil simply by being too heavy to push over. You'll see these built from massive materials that provide all the necessary bulk.

  • How They Work: Their secret is simple: sheer weight combined with a slight backward lean (called a "batter") into the hillside. The incredible mass of the wall is more than enough to counteract the lateral earth pressure pushing against it.
  • Common Materials: Think big. Large concrete blocks, natural stone boulders, and gabions (wire cages filled with rocks) are all popular choices.
  • Best For: These are fantastic for shorter walls, usually under four to six feet, where you have plenty of room to build a nice, wide base. They’re a common sight in residential landscaping.

While the concept is simple, a proper gravity wall still needs a deep, stable foundation to keep it from settling over time.

H3: Cantilever Walls: Using Leverage to Your Advantage

When you need to go taller, the cantilever wall is a much more efficient and common choice, especially in commercial construction. This design is all about leverage. It uses a reinforced concrete footing shaped like an "L" or a "T" to cleverly convert downward pressure into rock-solid stability.

The vertical stem of the wall is what you see, holding back the soil. But the magic happens in the horizontal footing buried behind it. The weight of the soil on top of the footing’s "heel" helps pin the entire structure down, making it incredibly stable without needing the brute-force mass of a gravity wall. This engineering trick makes it a go-to for professional jobs.

A shocking number of retaining wall failures come down to a design that simply wasn't up to the task. A cantilever wall's engineered footing is specifically designed to handle the intense pressures found at greater heights—which is why you never skip the professional plans.

H3: Segmental Retaining Walls (SRWs): The Modern Workhorse

Today, perhaps the most versatile and popular option you'll see is the Segmental Retaining Wall (SRW). These are sophisticated systems of high-strength, interlocking concrete blocks. Think of them as industrial-strength LEGOs, creating walls that are both incredibly strong and surprisingly flexible.

  • How They Work: The blocks are designed with a shear key or lip that locks them together. For any wall of significant height, this system is paired with geogrid reinforcement—a super-strong, flexible mesh laid in horizontal layers between the blocks that extends deep into the soil behind them. This creates a reinforced soil mass that acts as a single, unified structure.
  • Aesthetic Flexibility: SRW blocks come in a dizzying array of colors, textures, and sizes. This allows for beautiful designs that can complement any property, from a sleek modern storefront to a classic Pacific Northwest home and garden.

H3: Anchored Walls: For the Toughest Jobs

When you’re dealing with enormous loads or have very little room to excavate, an anchored retaining wall provides the ultimate level of support. This design uses high-strength cables or rods—known as "tie-backs" or "anchors"—that are drilled deep into the stable earth behind the wall and expanded.

It’s a bit like pitching a tent on a windy day. The wall itself is the fabric, but the anchors are the stakes holding it firm against the force. This technique allows for much thinner and taller walls because the load is transferred from the wall face deep into the ground. You'll see this method used in major commercial construction and facility construction services where failure is simply not an option.

To help you visualize these options, here's a quick breakdown of how they stack up for different scenarios.

Comparing Common Retaining Wall Styles

Wall Type Primary Material Best For Typical Height Range
Gravity Boulders, Large Blocks, Gabions Shorter walls with ample space Up to 6 feet
Cantilever Reinforced Concrete Medium to tall walls, professional builds 4 to 20+ feet
Segmental (SRW) Interlocking Concrete Blocks Versatile, residential & commercial 2 to 30+ feet (with geogrid)
Anchored Concrete, Steel Very tall walls, tight spaces, heavy loads 15 to 50+ feet

Each of these designs has its place, and choosing the right one for your specific property is the first and most important step. This is where getting professional advice from an experienced local contractor pays for itself many times over.

Why Modern Retaining Wall Engineering Matters

To really appreciate the stability of a modern retaining wall, it helps to see how far we've come. For centuries, builders relied on trial and error. They stacked massive stone walls that stood the test of time, but their success was based more on brute force and a bit of luck than precise math.

Today, designing a retaining wall is a completely different process. The move from simple barriers to carefully engineered systems is a huge leap forward. This progress boils down to two things: the widespread use of reinforced concrete and a deep, scientific grasp of soil mechanics. These advances let us build walls that are not just stronger, but far more efficient.

From Ancient Mass to Modern Mechanics

The real game-changer was shifting from relying on sheer weight to using smart engineering principles. This evolution, mainly taking place in the 20th century, saw us move from basic masonry to reinforced concrete. By around the 1920s, engineers were using foundational theories to make precise calculations, building safety factors into their designs that made walls more reliable than anything that came before.

This modern approach means we no longer have to guess. We can accurately predict all the forces at play—the specific soil on your property, the hydrostatic pressure from our wet winters, and even the weight from a driveway or building above—and design a structure built to handle it all.

A modern, code-compliant retaining wall is engineered to be a permanent solution. It's not just stacking blocks; it’s creating a balanced system where every single piece, from the footing to the drainage, works together for long-term stability and safety.

The Value of Engineered Safety

All that history has a direct impact on homeowners and property managers today. An old, non-engineered wall might look solid for a decade or two before it starts to lean, bulge, or crack. A modern wall, on the other hand, is designed from the ground up for a lifespan of 50 to 100 years.

Here’s why that matters for your project:

  • Predictable Performance: Modern engineering takes the guesswork out of it. We can design a wall knowing exactly how it will behave under the unique conditions of your Puget Sound property.
  • Long-Term Durability: By using durable materials and sophisticated drainage systems, we build structures that can stand up to the constant pressure of soil and water for decades.
  • Safety and Compliance: Following strict building codes isn’t just about red tape. It's about preventing a catastrophic failure that could damage property and put people at risk.
  • Peace of Mind: An engineered wall means you don't have to worry every time a heavy winter rain rolls through Western Washington.

Tapping into these engineering principles is how a trusted local provider delivers real, lasting value. A well-built retaining wall is a critical asset, and it all starts with a design grounded in proven science. Building it right the first time is non-negotiable, which is why having a meticulous process is so vital. You can see how we apply these principles by looking over the importance of a construction quality control checklist.

The Unseen Enemy: Why Drainage and Site Assessment Are Everything

If you ask what the single biggest threat to a retaining wall is, the answer isn't the weight of the dirt. It's water. Here in Western Washington, where rain is a constant companion, managing water isn't just part of the job; it's the job. Our persistent drizzle can turn stable soil into a heavy, soupy mess, and that saturated earth exerts an almost unbelievable amount of force on anything trying to hold it back.

A newly constructed retaining wall with a visible drainage pipe and gravel channel on a sloped property.

The physics behind this is called hydrostatic pressure. Think about the force pushing against the walls of a full swimming pool—that’s exactly what happens when water gets trapped behind your retaining wall. The soil gets saturated, and with nowhere to go, that water starts pushing. And pushing.

This relentless pressure is the undisputed, number-one cause of retaining wall failure. I’ve seen walls that should have lasted a century start to bulge and lean after just a few wet seasons because the drainage was done poorly or, worse, not at all.

Fighting Back with Smart Drainage

Any professional worth hiring will design a retaining wall with a multi-layered drainage system. The entire goal is to give water an easy way out before it can build up dangerous pressure. This isn't just sticking a pipe in the ground; it's creating a "safe zone" behind the wall where pressure can't accumulate.

Here’s what a properly designed system looks like:

  • Granular Backfill: Instead of piling native soil back behind the wall, we use a thick layer of clean, crushed gravel. This creates a porous zone where water can flow freely down to the base instead of getting trapped in dense clay.
  • Perforated Drain Pipe: Tucked at the bottom of that gravel layer is a perforated pipe, sometimes called a French drain. Its job is to collect all that water and channel it away from the wall's foundation to a safe discharge point.
  • Weep Holes: You'll often see small holes or openings near the bottom of a concrete or masonry wall. These are weep holes, and they act as a critical pressure relief valve, letting any trapped water escape harmlessly.
  • Filter Fabric: This is the unsung hero. A special geotextile fabric goes between the native soil and the gravel backfill. It acts like a screen, letting water pass through but stopping the fine silts and clays that would otherwise clog up the gravel and pipe over time.

This isn't just best practice; it's the only way a residential or commercial contractor can ensure the wall you’re paying for will last a lifetime. It turns water from a destructive force into a manageable, predictable element.

Why You Can't Skip a Professional Site Assessment

Before anyone even thinks about digging, a thorough site and soil assessment is non-negotiable. This is where we gather the data that dictates the entire engineering of the wall. Skipping this step is like building a house without checking what it’s sitting on—it’s just asking for trouble down the road.

A common cause of retaining wall failures is a design that does not provide for—or a contractor who does not install—sufficient drainage behind the wall. Water is heavy, and as it builds up in the soil behind the wall, the force acting on the wall dramatically increases.

Here in the Puget Sound, our soils are a special challenge. We have a lot of clay, which is notorious for holding water and expanding. A geotechnical engineer needs to know the exact soil mix to properly calculate the forces your wall will have to fight against every single day.

The assessment will also pinpoint the local groundwater levels and how surface water runs across your property. This tells us how deep the footing needs to be and precisely how to design the drainage. A wall designed for the sandy soils of Eastern Washington would fail in a heartbeat in our wet, clay-heavy environment. This upfront work is the true foundation of a successful retaining wall—one that protects your property for decades to come.

Navigating Local Building Codes and Permits

For most property owners, the mere mention of building permits can sound like a headache. But when it comes to retaining walls, these rules aren't just bureaucratic hoops to jump through. They are critical safety measures that prevent your new wall from becoming a very expensive, and dangerous, problem.

Here in Western Washington, there’s a key number to remember: four feet. If your retaining wall is designed to hold back more than four feet of soil (measured from the bottom of the footing to the top of the wall), it’s no longer considered simple landscaping. At that point, it becomes an engineered structure, which almost always means you’ll need a building permit.

What Does the Permit Process Look Like?

This is where hiring a seasoned local pro really pays off. They know the ins and outs of the permit offices in Seattle, Bellevue, Tacoma, and all the surrounding communities. A good contractor will handle the entire process, so you don't have to.

The journey from plan to approved wall typically follows these steps:

  • Engineered Plans are Submitted: A licensed structural engineer drafts detailed blueprints. These are precise documents showing the foundation, materials, drainage, and all the math that proves the wall can handle the immense pressure behind it.
  • The City Reviews the Plans: Your local building department will go over the engineer's plans carefully, making sure everything is up to code and meets all safety and zoning rules.
  • The Permit is Issued: Once the plans get the green light, the city issues the permit. Construction can now officially begin.
  • Inspections Happen on Site: A city or county inspector will visit your property at key moments. For example, they’ll come to check the trench and rebar before the concrete footing is poured to ensure it matches the approved plans exactly.

Think of a permit as your official seal of approval. It's independent verification that your wall is designed to be safe, protecting your investment, your family, and your neighbors from the consequences of a failure.

Why You Can't Afford to Skip This Step

Building codes exist for a very good reason: to keep the incredible forces of soil and water in check. Trying to bypass the permit process by building a non-compliant wall can backfire spectacularly. You could be hit with stop-work orders, hefty fines, or even a lawsuit if the wall fails and damages the property next door.

The technology behind these walls has come a long way. The industry has pushed for safer, more resilient designs, especially in the last few decades. In fact, advanced materials like geosynthetic grids are now a huge part of the market, accounting for roughly 50 percent of segmental retaining wall sales in some areas. You can discover more insights about these advancements on masonryandhardscapes.org.

Working with a professional who gets this process right from the start is the only way to guarantee your project is built correctly and legally. The right project management approach makes a world of difference. To see how this works in practice, check out our guide on the design-build project delivery method.

How to Choose the Right Retaining Wall Contractor

Two contractors review building plans on a construction site with a concrete retaining wall.

The success of your retaining wall hinges almost entirely on the skill of the team you hire to build it. Making the right choice here is the single most important decision you'll face. It's what separates a structure that stands firm for generations from one that shows signs of stress after just a few wet Puget Sound winters.

A common mistake is to treat this like a simple landscaping job. It's not. A structural retaining wall demands a completely different level of expertise. A licensed general contractor who specializes in this work understands the complex dance between soil mechanics, structural loads, and water management in a way a general landscaper likely won't.

Questions to Ask Any Potential Contractor

When you start interviewing contractors, you have to look beyond the price tag. A low bid might seem attractive, but it often means corners are being cut on materials, drainage, or engineering—shortcuts that will cost you dearly down the road.

To protect your investment, walk into that conversation prepared. Here’s a practical checklist of questions to help you vet any "residential contractor near me" or "commercial construction near me" and make sure they’re up to the task.

  • Are you licensed, bonded, and insured in Washington? This is your first and most important question. Ask for their license number and verify it. Proper insurance is non-negotiable; it protects you from liability if an accident happens on your property.

  • Can you show me a portfolio of similar walls you’ve built in my area? You want to see experience that matches your project's scale and complexity. A contractor with a deep portfolio of local work will have firsthand knowledge of our region's specific soil and weather challenges.

  • Who handles the engineering and permits? A seasoned contractor will manage this entire process. They should have established relationships with local geotechnical engineers and know exactly how to submit plans and schedule inspections with the city or county.

  • How do you handle drainage? A good answer will be specific and immediate. They should start talking about clean gravel backfill, perforated drain pipes, filter fabric, and weep holes. This shows they understand that what’s behind the wall is just as important as the wall itself.

A true professional understands that a retaining wall is a complete system. It's not just the blocks you see. It’s the hidden foundation, the careful drainage network, and the engineered plans that guarantee its long-term safety and stability.

Differentiating Professionals from Amateurs

A real pro will welcome these questions and give you clear, confident answers. They’ll be transparent about their process, materials, and timeline. The history of retaining walls shows a clear evolution from simple mass to sophisticated engineering, especially after reinforced concrete revolutionized the industry in the 20th century. This shift allowed for taller, stronger, and more flexible retaining wall systems. A top-tier contractor not only knows this history but applies these modern, proven principles to every job. Learn more about this history from Garrett Precast.

Ultimately, you are hiring a partner to protect your property. Their expertise is your best insurance policy against a failed wall. Taking the time to find the right person is a critical first step. For more guidance on this important decision, check out our guide on how to choose a general contractor.

Common Questions About Retaining Wall Design

Even after you've got the basics down, it’s natural to have questions. When you're talking about a major structural addition to your property, you want to be sure you're making the right calls. Let's tackle some of the most practical questions we hear from clients all over the Puget Sound area.

Think of this as the real-world stuff—the concerns that pop up when the plans are off the page and you're ready to break ground.

How Long Does a Professionally Built Retaining Wall Last?

This is the big one, and for good reason. A professionally engineered and well-built retaining wall isn't a temporary fix; it's a permanent feature of your landscape. With the right design and materials, you should expect it to last 50 to 100 years, sometimes even longer.

Of course, "it depends" is always part of the answer. A wall's ultimate lifespan really hinges on a few crucial things:

  • Materials: There's a world of difference between a treated timber wall and one built from reinforced concrete or high-quality segmental blocks. The better the material, the longer the life.
  • Drainage: I can't stress this enough: drainage is everything. More walls fail from hydrostatic pressure (water pushing from behind) than anything else. A great drainage system is the secret to a century-long lifespan.
  • Installation Quality: A brilliant design on paper is useless if it isn't built correctly. Following the engineer's plans to the letter—no shortcuts—is absolutely essential.

What Are the Warning Signs of a Failing Retaining Wall?

A retaining wall almost never fails suddenly. It gives you plenty of warning signs first, whispering before it shouts. Knowing what to look for can help you catch a problem early, before it turns into a catastrophe.

A failing retaining wall is a serious safety hazard. When you see it start to lean, bulge, or crack, that’s the wall telling you its structural integrity is compromised. Don't wait. Acting fast can prevent a dangerous and incredibly expensive collapse.

Keep your eyes peeled for these key indicators:

  • Leaning or Bulging: If the wall is tilting outward or has a noticeable belly, that's a classic sign of pressure winning the battle.
  • Cracking: Look for significant horizontal cracks or "stair-step" cracks in block or concrete walls. These are telltale signs of stress.
  • Separation: Gaps opening up between blocks or seeing the wall pulling away from the soil behind it means things are moving in the wrong direction.
  • Poor Drainage: If you see water weeping through the face of the wall or pooling at the base after a rain, it means the drainage system behind it has failed or was never there to begin with.

Can I Build a Small Retaining Wall Myself?

It's tempting. A small, decorative garden wall under two or three feet can feel like a weekend project. But once you're talking about a wall that's actually retaining a slope, the game changes completely. Here in Washington state, any retaining wall over four feet tall requires a permit and an engineered design, period.

Trying to DIY a structural wall is a massive liability. A professional ensures the footing is deep enough, the drainage is perfect, and the whole thing is built to code. It's about protecting your property, your investment, and frankly, giving you peace of mind that it's not going to fall over.


A well-built retaining wall is a critical investment that protects your property and adds real value. At Wheeler Painting, we specialize in managing complex residential and commercial construction projects, making sure every detail is handled with expert care from start to finish. If you have questions about a retaining wall or another project, contact us for a consultation.