10 Crucial Questions to Ask a Contractor Before Hiring in Kent, WA

Embarking on a residential remodel, commercial build-out, or even a large-scale painting project is a significant investment. For homeowners, property managers, and facility managers in the Puget Sound area, from Tacoma to Seattle, the success of your project hinges on choosing the right partner. A great residential or commercial contractor brings not just skill but also transparency, reliability, and local expertise. The difference between a smooth, successful outcome and a stressful ordeal often comes down to asking the right questions upfront.

Before you sign any contract, it’s critical to ask the right questions. This guide provides the essential list of questions to ask a contractor to ensure you're hiring a professional, trustworthy partner like Wheeler Painting, who can navigate your project with confidence. By using this checklist, you’ll be empowered to make an informed decision, protecting your property and ensuring your vision for a residential remodel or commercial renovation is realized on time and on budget.

The vetting process is a crucial first step. It's about more than just finding the lowest bid; it’s about finding a local provider who understands the needs of businesses and homeowners in Kent, Seattle, and Tacoma. A well-prepared list of questions helps you compare potential partners systematically, ensuring you cover critical areas like licensing, payment schedules, and how unexpected issues are handled. To delve deeper into the overall process, a comprehensive guide on how to hire contractors can be invaluable. This list will equip you with the specific queries needed to verify credentials, understand project workflow, and set clear expectations, whether you're planning a tenant improvement in Kent or siding replacement in Tacoma.

1. Are You Licensed, Bonded, and Insured?

This is the most critical of all the questions to ask a contractor, acting as your first line of defense against financial risk and subpar work. Before you discuss project details, verify that any potential partner has these three credentials. In Washington State, these protections are foundational requirements that separate legitimate professionals from those who could leave you with a costly mess.

A hand points to a licensed contractor ID card, insurance certificates, and a phone on a white desk.

Understanding these three components is key to protecting your home or business in the Seattle, Tacoma, and Kent areas.

  • Licensing: General contractors must be registered with the Washington State Department of Labor & Industries (L&I). This confirms they have met state requirements, including obtaining a bond and insurance.
  • Bonding: A surety bond protects you. If a contractor fails to complete the job, doesn't pay for permits, or neglects to pay subcontractors, you can file a claim against the bond to recover financial losses.
  • Insurance: This covers accidents. General liability insurance protects your property from damage, while workers' compensation covers injuries to the contractor's employees on your job site, preventing you from being held liable.

How to Verify Contractor Credentials

Never take a contractor's word for it. Always perform your own due diligence.

  • Request Physical Copies: Ask for current certificates of insurance, a copy of their bond, and their L&I contractor number.
  • Verify with L&I: Use the "Verify a Contractor, Tradesperson or Business" tool on the L&I website. This will show if their license is active and if they have any outstanding infractions.
  • Confirm Insurance Directly: Call the insurance agent listed on the certificate to confirm the policy is active and the coverage limits are adequate for your project's scope.
  • Check Subcontractor Coverage: Ask how they ensure their subcontractors are also fully licensed and insured. Reputable general contractors like Wheeler Painting have a strict vetting process for every partner they bring onto a job site.

2. What is Your Experience With Projects Similar to Mine?

Past performance is the best predictor of future success. This essential question helps determine if a contractor has proven, hands-on expertise with your specific project type, whether it’s a commercial renovation, residential remodeling project, or an exterior painting job. A mismatch in experience is a significant red flag, as a contractor specializing in new home construction may not have the nuanced skills required for a complex commercial tenant improvement project in downtown Seattle.

Digging into a contractor’s portfolio is crucial. For instance, a "remodeling contractor" might excel at custom decks and patios but lack the specific knowledge for a large-scale retail build-out or the precision needed for institutional painting. You need a partner whose background aligns directly with the scope, complexity, and unique challenges of your job.

  • Residential vs. Commercial: The logistics, materials, and codes for residential home improvement services in Kent are vastly different from those for a commercial facility in Tacoma. A contractor must have experience navigating the right set of challenges.
  • Project-Specific Skills: A general painter may not have the training to apply durable waterproofing coatings, just as a general builder might not understand the specific demands of a facility maintenance contract.
  • Relevant Scale: A firm accustomed to small repairs may be overwhelmed by a multi-floor office space renovation. Ensure their team and resources can handle the size of your project. Wheeler Painting is perfect for building owners or facility managers looking for a smaller firm that specializes in small to mid-size tenant improvement and facility maintenance projects.

How to Verify Relevant Experience

Go beyond a simple "yes" and ask for tangible proof of their expertise. A professional contractor will be proud to showcase their work.

  • Request a Detailed Portfolio: Ask for photos and descriptions of 3-5 recently completed projects that are similar to yours in scope and style.
  • Ask for Relevant References: Inquire about clients from these specific projects. Speaking with a past customer who had a similar job is one of the most valuable forms of due diligence.
  • Inquire About Specific Challenges: A great follow-up question is, "What was the biggest unexpected challenge on that project, and how did you resolve it?" Their answer reveals problem-solving skills.
  • Discuss Your Project's Nuances: Explain any unique aspects of your project, like the need for custom cabinets or wood and tile floors, and ask how they would approach them. This tests their critical thinking and confirms their understanding. Wheeler Painting, with decades of experience in the Puget Sound region, can provide detailed case studies for everything from commercial renovations to residential siding replacement.

3. Can You Provide References From Recent Clients?

While a portfolio showcases their best work, references reveal the reality of working with them day-to-day. This is one of the most insightful questions to ask a contractor because it provides direct feedback on their communication, timeliness, and professionalism from clients who have already been through the process. Verifying recent references is your best tool for predicting your own experience with a "residential contractor near me" or a local commercial construction firm.

Hearing directly from past customers in the Seattle, Kent, or Tacoma areas offers a layer of assurance that a glossy brochure cannot.

  • Recent Projects: References from jobs completed within the last 12-24 months are most relevant. They reflect the contractor's current team, processes, and quality standards.
  • Similar Scope: Ask for references from clients who had projects similar to yours. If you need commercial painting services, a reference from a small residential deck and porch staining job is less helpful.
  • Willingness to Share: A contractor’s confidence and transparency in providing a list of contacts is a positive sign. Hesitation could be a red flag.

How to Effectively Check References

Don't just collect names and numbers; conduct a thorough inquiry to get the full picture.

  • Request 3-5 References: A quality contractor should have a healthy list of satisfied clients. Wheeler Painting can readily connect you with facility managers or homeowners who have recently completed projects.
  • Prepare Specific Questions: Go beyond "Were you happy?" Ask about their communication style, how they handled unexpected issues, if the project stayed on budget, and if the cleanup was thorough.
  • Inquire About the Team: Ask the reference about their experience with the on-site crew and project manager. Were they professional, respectful of the property, and communicative?
  • Ask the Ultimate Question: A powerful final question is, "Would you hire them again?" The answer, and any hesitation behind it, often tells you everything you need to know.

4. How Will You Handle Change Orders and Unexpected Issues?

No project is immune to surprises, making this one of the most important questions to ask a contractor. A clear, documented process for handling change orders and unforeseen problems is the hallmark of a disciplined professional. This process protects both you and the contractor from scope creep and budget overruns when unexpected issues arise, such as discovering hidden damage or needing a drywall contractor for unforeseen repairs.

A Change Order document on a clipboard with a pen, sticky notes, a yellow hard hat, and a measuring tape.

Understanding how a contractor manages these changes reveals their project management maturity. Whether it's a residential remodel in Seattle or a commercial tenant improvement in Kent, a formal change order process is essential.

  • What is a Change Order? A change order is a written amendment to the original contract that documents a change in scope, price, or schedule. It should be signed by both you and the contractor before any new work begins.
  • Why is it Necessary? It prevents misunderstandings by formally documenting new agreements. Issues like discovering rotted wood during an exterior painting job or finding outdated plumbing during a remodel require a formal change order to adjust the budget and timeline fairly.
  • What it Protects Against: A solid process prevents a contractor from billing you for unauthorized work and protects the contractor from performing extra work without compensation. Understanding specific scenarios, like those in a guide to emergency storm damage repair, can help you formulate questions about a contractor's readiness for unforeseen challenges.

How to Clarify the Change Order Process

Your contract should explicitly detail the procedure for managing changes. Discuss these points before signing anything.

  • Require a Formal Process: Insist that all changes be documented in writing on a formal change order form before work proceeds.
  • Define Approval Authority: Clearly state who has the authority to approve changes and associated costs, whether it's you, a property manager, or an architect.
  • Set Approval Timelines: Agree on how quickly you must review and approve a change order to prevent work stoppages and project delays.
  • Demand Justification: The contractor should explain the reason for the change, provide a detailed cost breakdown, and outline any impact on the project schedule. Reputable contractors like Wheeler Painting will transparently provide this documentation for any necessary changes.

5. What is Your Payment Schedule and Invoice Process?

One of the most important questions to ask a contractor revolves around money. A clear payment schedule and invoicing process are vital for managing your project's cash flow. This conversation establishes firm expectations for when and how you pay, which helps prevent billing disputes and protects you from paying too much for incomplete work. In Washington State, payment terms must be explicitly documented in your contract.

Agreeing on a payment structure before work begins is non-negotiable for any project, whether it's a "house painting near me" job in Seattle or a commercial build-out in Kent.

  • Progress Payments: Payments should be tied to specific, verifiable project milestones, not arbitrary dates. For example, a payment might be due after framing is complete and has passed inspection.
  • Deposit: A reasonable deposit secures your spot on the contractor's schedule and allows them to order initial materials. However, this initial payment should be a modest percentage of the total cost.
  • Final Payment & Retention: The final payment should only be made after all work is 100% complete, the site is clean, and you are fully satisfied. Holding back a small percentage (retention) is a standard practice that ensures the contractor finishes every last detail.

How to Structure Contractor Payments

A professional contractor will have a standard process but should be willing to negotiate terms that work for you.

  • Negotiate the Schedule: Propose a payment schedule that aligns with key construction phases. For a home addition, you can explore cost estimators to better understand the phases and their associated costs.
  • Limit the Deposit: Avoid paying more than 10-25% upfront. A contractor demanding a large deposit may be a red flag for financial instability.
  • Require Detailed Invoices: Each payment request should come with an invoice that itemizes labor, materials, and any subcontractor costs for that phase.
  • Ask for Lien Waivers: With each progress payment, request a signed lien waiver. This document confirms that the contractor and their suppliers have been paid, protecting your property from a mechanic's lien.
  • Define ‘Completion’: Clearly state in the contract what constitutes "completion" for the final payment. This should include passing final inspections, completing a final punch list, and removing all tools and debris.

6. What is Your Timeline and What Happens if You Miss Deadlines?

A clearly defined timeline is the backbone of a successful construction or painting project. This question establishes expectations for start and completion dates and, crucially, what happens if deadlines are missed. For homeowners and business operators in the Puget Sound area, understanding the project schedule is essential for managing disruptions. A professional contractor should provide a realistic timeline that accounts for project complexity and their current capacity.

This discussion also reveals a contractor's organizational skills. A vague timeline can be a major red flag, while a detailed, phase-by-phase schedule demonstrates foresight. In Western Washington, where weather can impact exterior work like siding replacement or exterior painting, this conversation is even more critical.

How to Discuss and Document Project Timelines

A verbal agreement on timing is not enough; the schedule must be part of your written contract.

  • Request a Detailed Schedule: Ask for a schedule that includes start and end dates for each major phase. For a kitchen remodel, this would mean dates for demolition, framing, electrical/plumbing rough-ins, drywall, and finishing.
  • Define Work Hours: Clarify the contractor’s standard work hours (e.g., 7:00 a.m. to 3:30 p.m., Monday-Friday). This helps you manage expectations for noise and activity on your property in Seattle or Tacoma.
  • Establish Delay Protocols: Specify which events qualify for a timeline extension, such as client-requested changes, unforeseen site conditions, or significant weather delays.
  • Include Accountability Clauses: For larger commercial or residential projects, consider a "liquidated damages" clause. This stipulates a set amount the contractor pays for each day the project runs past the agreed-upon completion date, excluding approved extensions.
  • Plan for Weather: For any exterior work in the Kent area, such as exterior painting or custom decks and patios, ensure your contract includes specific language about weather contingencies.
  • Require Progress Updates: Reputable firms like Wheeler Painting provide regular progress reports to keep you informed and ensure the project is tracking against the established schedule.

7. How Do You Manage Subcontractors, Permits, and Code Compliance?

A successful renovation or construction project involves more than just the general contractor; it’s an ecosystem of specialized trades and municipal regulations. This is one of the most important questions to ask a contractor, as their answer reveals their ability to manage the entire project. A professional "commercial construction near me" contractor takes full ownership of coordinating subcontractors, securing permits, and ensuring every aspect of the work is up to code.

In Washington State, a licensed general contractor is legally responsible for the project's compliance. A contractor with clear processes demonstrates the experience needed to protect you from liability and delays. They act as the single point of accountability, ensuring the project runs smoothly without you having to juggle multiple vendors or navigate complex city requirements in Seattle or Tacoma.

How to Verify Project Management Capabilities

A well-managed project is a stress-free project. Dig into the details to understand how a contractor will handle these critical tasks.

  • Permits and Fees: Confirm the contractor will obtain all required permits. Ask who pays the permit fees and how those costs are presented in the bid.
  • Subcontractor Vetting: Request a list of the primary subcontractors they work with for trades like electrical and plumbing. Reputable contractors like Wheeler Painting have a roster of trusted partners they rely on for projects like a full kitchen remodel or floor repairs and replacements. You can learn more about how these elements fit together by exploring a guide on how to plan a kitchen remodel.
  • Code Compliance Responsibility: The contract should state that the contractor is responsible for ensuring all work meets local and state building codes and for correcting any work that fails an inspection at their own cost.
  • Inspection Coordination: Ask about their process for scheduling and managing building inspections with the relevant city department, whether in Kent or a surrounding municipality.
  • Documentation: Request that you receive copies of all passed inspection reports and the final signed-off permit before you make your final payment.

8. What is Your Warranty and What Does It Cover?

A project isn’t truly complete until you have a clear understanding of the contractor’s responsibility after the final payment. Asking about the warranty is a critical question for any contractor, as it defines their commitment to quality. In Washington, the law implies certain warranties, but a detailed written warranty provides superior protection and clarity.

The scope and duration of a warranty can vary depending on the work. It's essential to understand these differences to set realistic expectations for your project in the Seattle, Tacoma, or Kent areas.

  • Painting & Coatings: A professional interior or exterior painting warranty might offer two years on labor and a longer term on materials. Exclusions often include issues not caused by the contractor, such as pre-existing moisture problems.
  • Remodeling & Construction: For a kitchen remodel or tenant improvement, a contractor typically offers a one-year workmanship warranty. This is separate from manufacturer warranties on appliances and fixtures.
  • Facility Construction Services: For services like waterproofing or floor repairs and replacements, the warranty should be specific to the materials used and the application process.

How to Verify Warranty Details

A verbal promise is not enough. You need the warranty terms documented to protect your investment.

  • Request Written Terms: Ask for the full warranty language to be included directly in your contract.
  • Clarify Inclusions and Exclusions: Ask for a specific list of what is covered and, just as importantly, what is not.
  • Understand Labor vs. Materials: Confirm if the warranty covers both the cost of replacement materials and the labor to install them.
  • Review the Claims Process: Ask how you should report a defect. What is the expected timeframe for a response and repair? This process is a key part of an effective construction quality control checklist.
  • Confirm No-Cost Repairs: A reputable contractor like Wheeler Painting stands behind their work and will confirm that valid warranty repairs will be performed at no additional cost to you.

9. How Will You Handle Safety, Cleanliness, and Site Management?

A project's success isn't just about the final product; it's also about how the work gets done. This question to ask a contractor reveals their professionalism and respect for your property. A well-defined plan for these elements minimizes disruption and protects your family or employees, whether it's a home in Tacoma or a commercial facility in Kent.
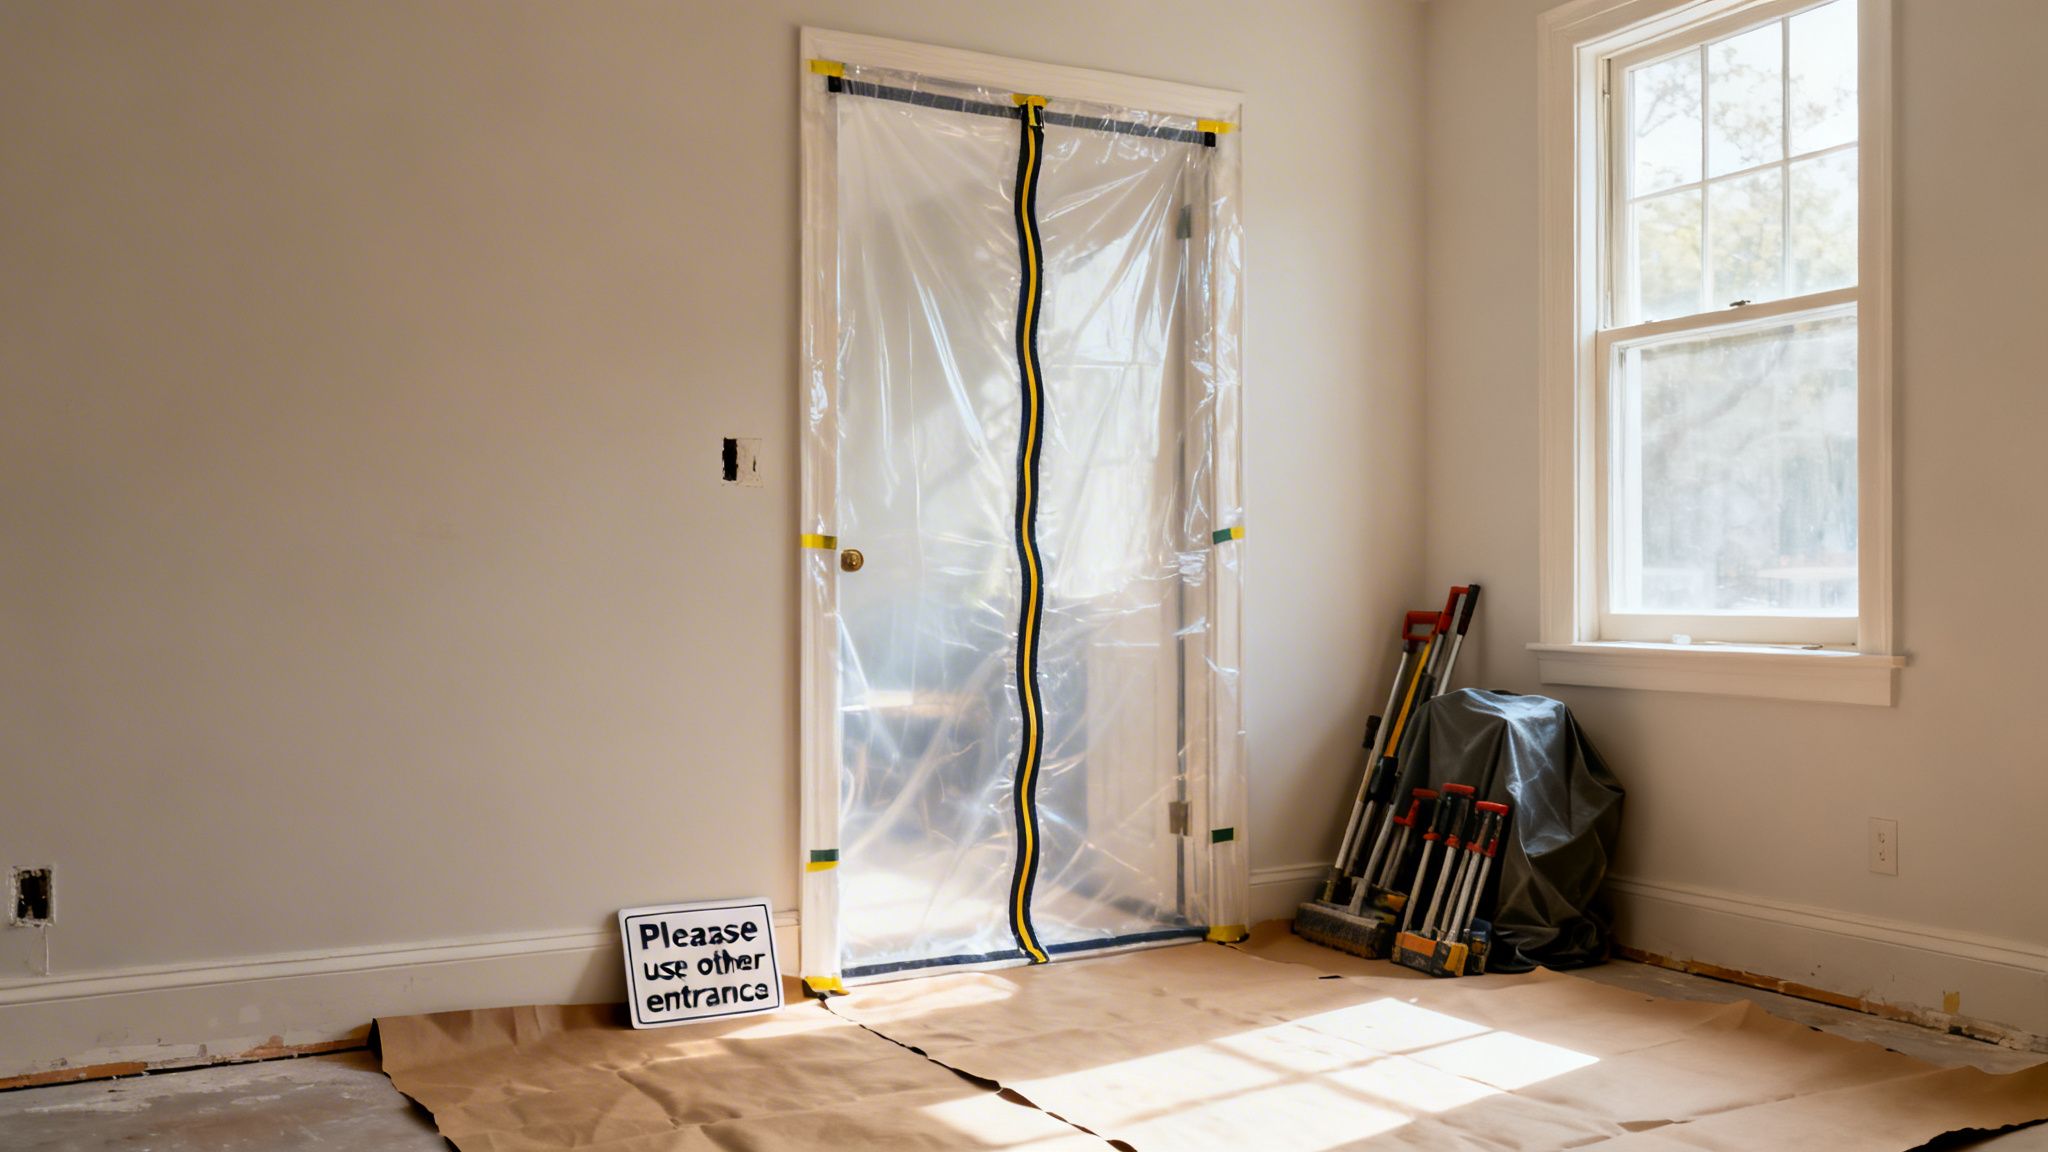
A room undergoing renovation with a plastic dust barrier over a doorway and construction tools.

Understanding a contractor’s approach to site management is crucial for both residential and commercial projects where daily life or business operations must continue.

  • Safety: A professional contractor will have clear protocols for securing the work area, managing tools, and addressing potential hazards.
  • Cleanliness: This goes beyond a final sweep. It involves daily cleanup, dust containment methods like plastic barriers, and organized material storage to keep your space orderly.
  • Site Management: This covers the logistics of the project, including work hours, noise levels, parking for crew vehicles, and protection for landscaping and adjacent structures.

How to Confirm a Contractor's Site Management Plan

A verbal promise isn't enough; you need specific commitments written into your agreement.

  • Describe a Typical Day: Ask the contractor to walk you through their standard daily routine from arrival to departure. What does their cleanup process look like?
  • Discuss Protection Measures: For interior painting, ask how they will contain dust and protect your furniture and flooring. For exterior projects, clarify how they will shield landscaping and windows.
  • Review Work Hours and Noise: Confirm their proposed work schedule. Discuss flexibility for commercial properties in Seattle trying to minimize business disruption.
  • Request a Safety Plan: Ask for their safety procedures, emergency contacts, and how they secure the site at the end of each day. Reputable firms like Wheeler Painting have established safety and cleanliness standards for every project.

10. How Are Disputes Handled, and Will I Receive a Written Contract?

Even the best-laid plans can encounter bumps. Discussing dispute resolution before a project begins is a sign of a mature, professional contractor. It establishes a clear, fair process for addressing disagreements over quality or costs, preventing small issues from escalating. This discussion should always conclude with a comprehensive, written contract that documents every detail.

In Washington State, a detailed contract is your best tool for ensuring clarity and accountability. A vague, lump-sum quote is a major red flag.

  • Written Estimate/Contract: This document is the blueprint for your project. It must itemize all costs, including labor and materials, and specify brands and quantities. It should also outline the project timeline, payment schedule, change order process, and warranty details.
  • Dispute Resolution Clause: A good contract specifies the steps to resolve conflicts. This often starts with direct negotiation, followed by mediation (using a neutral third party).
  • Protecting Your Investment: Having these processes defined protects both parties. It ensures there is a pre-agreed method for solving problems and keeping the project on track.

How to Ensure Your Contract is Complete

A thorough contract is your project’s most important document. Don’t rush this step.

  • Request an Itemized Estimate: Never accept a single lump-sum price. Ask for a breakdown of costs for materials, labor, permits, and other expenses.
  • Verify All Agreements: Read the contract carefully to ensure all verbal promises—such as details about color consultation or specific materials—are included in writing. If it’s not in the contract, it’s not guaranteed.
  • Clarify the Dispute Process: Ask the contractor to walk you through their standard dispute resolution clause. Is good-faith negotiation the first step?
  • Review with a Professional: For large-scale projects in the Seattle or Tacoma area, consider having an attorney review the contract. Reputable contractors like Wheeler Painting will provide their standard agreement for review and are transparent about every clause.

10 Key Contractor Questions Comparison

Item Implementation complexity Resource requirements Expected outcomes Ideal use cases Key advantages
Is the Contractor Licensed, Bonded, and Insured? Low — document verification and database checks Minimal — time, access to L&I and insurer contacts Legal protection, verified legitimacy, reduced liability Any hire; projects with regulatory or liability exposure Liability protection, recourse, professionalism
What is Your Experience With Projects Similar to Mine? Medium — portfolio review and follow-up questions Time for portfolio review, reference checks, possible site visits Better fit, fewer mistakes, realistic approach to scope Specialized or complex projects, niche trades, restorations Proven competence, local code knowledge, efficient execution
Can You Provide Multiple References From Recent Clients? Medium — conducting and documenting reference interviews Time, prepared questions, phone/email contact effort Direct insight into performance, communication, timeliness High-value contracts or unfamiliar contractors Real-world verification of claims; reveals reliability
How Will You Handle Change Orders and Unexpected Issues? Medium–High — contract clauses and approval workflows Clear change-order forms, documentation processes, approval timelines Controlled scope changes, documented decisions, fewer disputes Projects with unknowns (remodels, restorations) Transparency, cost control, dispute prevention
What is Your Payment Schedule and Invoice Process? Medium — define milestones and invoicing requirements Financial planning, lien waivers, invoice tracking Aligned cash flow, protection against overpayment Large or phased projects, projects requiring retention Financial clarity, retention leverage, reduced billing disputes
What is Your Timeline and What Happens if You Miss Deadlines? Medium — detailed scheduling and penalty clauses Project schedule, monitoring tools, contingency planning Predictable schedule, contractor accountability Time-sensitive commercial work or occupied homes Timely completion incentives; better coordination
How Do You Manage Subcontractors, Permits, and Code Compliance? High — coordination with multiple parties and jurisdictions Permit fees, subcontractor vetting, liaison time, inspections Regulatory compliance, single-point responsibility, fewer reworks Permitted projects, multi-trade build-outs, commercial jobs Reduced owner burden, inspection coordination, code compliance
What is Your Warranty and What Does It Cover? Low–Medium — specify duration and exclusions in writing Written warranty documents, clarity on labor vs. materials Post-completion protection and defined remedies Work with long-term performance concerns (coatings, finishes) Assurance of quality, recourse for defects, confidence in workmanship
How Will You Handle Safety, Cleanliness, and Site Management? Medium — establish daily protocols and containment methods PPE, dust containment, cleanup supplies, supervision Minimized disruption, lower injury and property-damage risk Occupied residences, ongoing business operations Safer site, protected property, professional site appearance
Disputes, Resolution, and Written Estimates/Contracts High — legal clauses, itemized estimates, resolution paths Legal review, detailed documentation, third-party experts Clear dispute process, enforceable expectations, fewer surprises High-value projects, multi-stakeholder contracts Reduces litigation risk, clarifies scope/costs, structured resolution

Build with Confidence: Partner with a Trusted Local Contractor

You have now worked through a detailed checklist of critical inquiries for any potential construction or painting partner. Moving beyond a simple price comparison to a thorough vetting process is the single most important step you can take to protect your investment. Asking the right questions to ask a contractor isn't about being confrontational; it's about establishing a foundation of clarity, accountability, and mutual respect.

A truly professional contractor, whether for "commercial painting services near me" in Seattle or a residential siding replacement in Tacoma, will appreciate your diligence. They understand that informed clients make the best partners. Their willingness to openly discuss licensing, insurance, and payment schedules is a direct reflection of their business ethics. Conversely, any hesitation or refusal to provide this information is the brightest red flag you can encounter.

Key Takeaways for Your Contractor Search

This comprehensive list of questions is your framework for a successful hiring decision. Let’s distill the most crucial takeaways to guide your next steps:

  • Documentation is Non-Negotiable: Always verify a contractor's license (via the L&I website), proof of insurance, and bond details. This is your primary shield against liability and financial risk.
  • Experience Must Be Relevant: A contractor’s experience is only valuable if it aligns with your specific project. Ask for a portfolio and references for projects that are similar in scope, size, and complexity to yours.
  • The Contract Governs Everything: Your written contract is the ultimate source of truth. It should explicitly detail the scope of work, a clear payment schedule, material specifications, the change order process, and warranty terms.
  • Communication is Key: Pay close attention to how a contractor communicates during the bidding process. Are they responsive, clear, and professional? This initial interaction is a strong indicator of how they will communicate once the project is underway.

Turning Questions into a Confident Decision

Armed with these questions, you can move forward with a clear plan. Start by shortlisting three to four potential contractors in your area, whether in Kent, Seattle, or surrounding Puget Sound communities. Conduct initial phone screenings, then invite your top candidates to provide a detailed, written bid. Use these bids not just to compare costs but to evaluate the thoroughness and professionalism of each company.

You are not just hiring a service; you are entering into a significant business relationship. The goal is to find a partner who will respect your property, communicate transparently, and deliver high-quality craftsmanship. For facility managers, this means finding a reliable team like Wheeler Painting for ongoing facility maintenance and tenant improvements. For homeowners, it's about entrusting your most valuable asset to a team that values quality and integrity. By using this guide, you empower yourself to make a choice that leads to a smooth, successful project and a final result you can be proud of for years to come.


The team at Wheeler Painting has built a three-decade reputation by providing clear, honest answers to every one of these questions. We believe an informed client is our best partner, and we welcome your detailed inquiries for any residential or commercial project in the Puget Sound area. Find out how our commitment to transparency and quality sets us apart by visiting Wheeler Painting & Restoration Services to schedule your detailed estimate.


How to Plan a Home Addition: A Homeowner’s Guide for the Puget Sound

So, you're thinking about an addition. Before you get lost in paint swatches and Pinterest boards, there are four things you need to nail down first: checking if your property can even support an addition, getting crystal clear on your goals, figuring out the budget, and digging into local zoning rules. For homeowners in the Seattle, Kent, and Tacoma areas, getting these fundamentals right from the start is the difference between a smooth project and a series of expensive headaches.

Assessing Your Property and Project Goals

The very first move is a reality check. It’s tempting to jump straight to the fun stuff, but you need to know what’s physically and legally possible on your property. This initial homework grounds your project in the real world, whether you're on a tight lot in a dense Seattle neighborhood or have a bit more room to breathe out in Kent.

Taking the time to do this now will save you from major surprises down the road. It ensures the money you’re about to spend will translate directly into usable, valuable space for your home.

Two construction professionals review blueprints and plans on a marked residential building site with houses nearby.

Evaluating Your Property's Physical Limits

Every single lot has its own set of rules and limitations. Your job is to uncover them. This goes way beyond just measuring your yard; it's about understanding what your property can actually handle from a structural and legal standpoint.

  • Zoning and Setbacks: Your city or county planning department has rules about how close you can build to your property lines—front, back, and sides. These setbacks are non-negotiable. In cities like Seattle and Tacoma, these can be quite strict and will be the first thing that defines the potential footprint of your new addition.
  • Lot Coverage: There’s also a limit on the total percentage of your lot that can be covered by buildings. This lot coverage calculation includes your house, garage, and any sheds, plus the addition you want to build. This number is absolutely crucial for figuring out how big a ground-floor addition can be.
  • Existing Foundation and Structure: Is your current home strong enough? A second-story addition puts an incredible amount of stress on the original structure. For any vertical expansion, getting an expert to evaluate your home's foundation and framing is a must. A ground-level addition will get its own new foundation, but we still need to make sure the connection to the existing house is sound.

Defining the "Why" Behind Your Addition

Once you know your physical boundaries, it's time to get specific about your vision. Simply wanting "more space" isn't enough. A successful design solves a specific problem. What is yours?

A home addition is more than just construction; it’s an investment in your lifestyle. The most successful projects are those that are born from a clear, well-defined need, whether that's accommodating a growing family, creating a dedicated workspace, or enhancing your home's connection to the outdoors.

Think about the main purpose of this new space. Are you looking to build:

  • A primary suite addition to create a quiet, private escape?
  • An expanded family room for movie nights and get-togethers?
  • A dedicated home office that isn’t the kitchen table?
  • An in-law suite or ADU for multi-generational living?

The answer to that question will guide every decision that follows, from the floor plan and window choices to the lighting and outlet placement. A home office needs plenty of power and data ports, while a family room might need durable flooring and an open layout. As a trusted residential contractor near you, Wheeler Painting has seen time and again how a clear "why" leads directly to a more functional and beloved space.

Creating a Realistic Budget and Securing Financing

Alright, you’ve got the vision for your new space. Now comes the part that grounds your dream in reality: the money. Building a realistic, detailed budget is arguably the most important piece of the puzzle. It’s what keeps a project on track and prevents sleepless nights down the road.

This isn't just about one big number. It's about breaking down every single cost, from the architect's initial sketches to the final coat of paint, so you can move forward with confidence.

Understanding the True Costs of an Addition

So, what does a home addition actually cost? The honest answer is, it varies—a lot. Here in the Puget Sound area, project costs can range from a simple sunroom for around $22,000 to complex additions topping $115,000. And if you're talking about a high-end build or adding a second story, costs can easily exceed $300,000.

These numbers are influenced by size, the quality of finishes you choose, and the complexity of the work. If you're curious about what drives these figures in our region, we break it all down in this full cost analysis.

To give you a clearer picture, let's look at a typical 400 sq. ft. mid-range addition. Here in Western Washington, our team at Wheeler Painting knows our unique climate plays a role. Seismic requirements and the need for robust waterproofing can easily increase foundation and framing costs by 10-15% compared to other parts of the country.

Here's a sample budget table to show you where the money typically goes.

Sample Budget Allocation for a Mid-Range Home Addition

This table illustrates a typical percentage-based breakdown of costs for a standard home addition project in the Puget Sound area, helping homeowners understand where their investment goes.

Project Phase Percentage of Total Budget Key Activities
Foundation & Masonry 12% Excavation, concrete pour, seismic retrofitting, blockwork
Framing & Roofing 20% Wall and roof structure, sheathing, shingles or metal roofing
Exterior & Windows 15% Siding replacement, trim, weather barriers, window and door installation
Mechanical Systems 18% HVAC, plumbing, and electrical rough-in
Interior Finishes 25% Insulation, drywall, flooring, paint, trim, fixtures
Soft Costs 10% Permits, architectural/design fees, engineering

Keep in mind, these are just averages. A high-end kitchen or bathroom in your new space would shift these percentages significantly toward finishes and mechanical systems. For a quick, personalized estimate to get you started, our home addition cost estimator is a great resource.

The All-Important Contingency Fund

If we can offer one piece of advice from years of experience, it's this: plan for the unexpected. No matter how perfectly you plan, something will come up. You might open a wall and find hidden rot, or discover your old electrical panel can't handle the new load.

This is exactly what a contingency fund is for. It’s not a "nice-to-have," it's essential. We always tell our clients to set aside 15-20% of their total construction budget for these surprises.

Think of your contingency fund as project insurance. If you don't use it, you'll have extra funds for upgrades at the end. But if you need it, you’ll be incredibly relieved it’s there, preventing a small issue from derailing your entire project timeline and budget.

Common Financing Options for Your Project

Unless you’re paying with cash, you'll likely need to secure financing for your addition. The good news is there are several solid options available, and the right one just depends on your financial picture.

  • Home Equity Line of Credit (HELOC): This works like a credit card secured by your home's equity. You can draw money as you need it to pay contractors in stages, and you only pay interest on what you use. It's incredibly flexible.
  • Home Equity Loan: This is a more traditional loan where you get a lump sum upfront. It comes with a fixed interest rate and a predictable monthly payment, which is perfect if you have a firm quote from your builder and value budget stability.
  • Cash-Out Refinance: With this, you take out a new, larger mortgage that pays off your old one. You get the difference in cash to fund the project. This can be a smart move, especially if you can lock in a lower interest rate than your current one.

Navigating these options can be tricky, so we always recommend sitting down with a financial advisor you trust. They can help you weigh the pros and cons and find the best path forward for your family. Getting your finances in order is the bedrock of a smooth and successful build.

Getting Through City Hall: Permits and Zoning in the Puget Sound

Hands holding an approved building permit document on a desk with a map, checklist, pen, and glasses.

Before a single nail is hammered, you have to get through city hall. Every single city in our region, from Tacoma and Kent right up to Seattle, has its own unique rulebook for construction. This isn't just red tape—it's a process designed to make sure your new addition is safe, sound, and respectful of the neighborhood.

We’ve seen countless homeowners get their hearts set on a design only to find out it’s not allowed. Getting a handle on these local rules early on is the single best way to avoid frustrating delays and expensive redesigns later. A little bit of homework here goes a very long way.

First, You Have to Decode the Zoning

Think of zoning as your property's DNA. It defines the absolute, fundamental limits of what you can build, and you can’t change it. It's the first thing you need to understand.

When you’re planning an addition in the Puget Sound area, you'll hear these terms thrown around constantly:

  • Setbacks: This is the required empty space between your structure and your property lines. If your city mandates a 15-foot rear setback, the back wall of your addition absolutely cannot be closer than 15 feet from your property's back boundary. No exceptions.
  • Lot Coverage: This one is a big deal. It’s the total percentage of your lot that can be covered by buildings. Let's say you have a 5,000-square-foot lot with a 30% lot coverage limit. This means your house, garage, and the proposed addition combined can’t have a footprint larger than 1,500 square feet.
  • Height Limits: These codes dictate how tall your home can be. This is obviously crucial for second-story additions and can even influence things like your roof pitch and interior ceiling height.

These rules aren't just slightly different between cities—they can be worlds apart. The regulations for a quiet Renton cul-de-sac will look nothing like those for a historic block in Seattle. Your first call should always be to your local planning department before you get too attached to any specific design.

The Permit Counter: Your Next Hurdle

Once you have a design that actually fits within your zoning limits, it’s time to get it approved. This means submitting a mountain of paperwork to your city’s building department for a formal review.

Depending on what your project involves, you’ll likely need a whole stack of permits.

The permitting timeline is a huge, often underestimated, part of the schedule. Around here, it's not unheard of for the permit review process to take just as long as the construction itself. A seasoned local contractor knows how to anticipate these waits and keep things from grinding to a halt.

For a typical home addition, expect to apply for:

  • Building Permit: This is the master permit for the structure itself, covering the foundation, framing, roofing—the whole shell.
  • Electrical and Plumbing Permits: Any new circuits or pipes require separate permits and inspections. This is non-negotiable for safety.
  • Mechanical Permit: Installing a new furnace, heat pump, or other HVAC equipment? You’ll need a mechanical permit for that.

To even get in the door, you need a bulletproof set of construction documents. This means architectural blueprints, structural engineering calculations (especially vital in our seismic zone), and a detailed site plan. The most common reason for a permit application to be rejected is missing or incomplete information. This is where meticulous preparation pays off. As your residential contractor near you, we at Wheeler Painting handle the entire submission, follow-up, and paperwork headache, making sure every detail is perfect so your approval doesn't get stuck in bureaucratic limbo.

From Dream to Blueprint: Designing Your Home Addition

You’ve confirmed the budget and gotten the nod from your local planning department. Now for the fun part—turning those daydreams into a real, buildable plan. This is where your vision starts to feel tangible, moving from abstract ideas scribbled on a napkin to a detailed set of blueprints.

This stage is all about translating your family's needs and your personal style into a concrete design. We're moving beyond "we need another bedroom" to defining exact room dimensions, deciding where every window will go, and even picking out the specific style of trim. The goal here is a crystal-clear scope of work, which becomes the essential guide for your entire construction team.

From Rough Sketch to Permit-Ready Plans

The design journey happens in phases, with each step adding a new layer of detail and bringing your project into sharper focus. It’s a collaborative process that starts with your initial wish list and ends with the documents a builder needs to get to work.

  • Schematic Design: This is the big-picture starting point. We’ll take your goals and sketch out a basic floor plan. It's often the first time you'll see a visual of your future space, showing how the new rooms will connect and flow with your existing home.

  • Design Development: Once the basic layout is set, we start adding the meat to the bones. We’ll develop exterior views (elevations), refine the interior details, and often create 3D renderings to help you truly visualize the finished space. This is also when you'll begin selecting finishes like flooring, countertops, and light fixtures.

  • Construction Documents: This is the final, most technical step. We create the official blueprints that include everything needed for a successful build. In the Pacific Northwest, this means incorporating detailed structural engineering plans for our seismic codes and mapping out the precise locations for every light switch and electrical outlet.

As you move through this process, it’s good to remember that even small changes can have a ripple effect. If you decide you need to modify your house plan midway through, understanding the best way to do so can save you a lot of time and money down the road.

Architect or a Design-Build Firm?

A big question you’ll face is who should lead the design. For homeowners in the Seattle-Tacoma area, you generally have two solid options, each with its own rhythm.

Hiring an Architect First: This is the traditional path. You work with an architect to create a full set of plans. Once they’re complete, you take those plans to several residential contractors and ask them to bid on the job. This approach separates the design phase from the construction phase.

Choosing a Design-Build Firm: This newer, integrated model puts the designer and builder on the same team from day one. Your plans are developed with constant, real-time feedback on construction costs and feasibility. This synergy often leads to a smoother process and a design that’s baked in with budget realities from the start.

When the designer and builder are under one roof, accountability is built-in. There's no finger-pointing between separate companies if a problem arises. Everyone shares the same goal: delivering your project on time and on budget.

For many homeowners, the streamlined communication and single point of responsibility make the design-build route incredibly appealing. If this sounds interesting, you can learn more about the design-build project delivery method and see how it simplifies complex projects.

Critical Design Decisions for a Seamless Addition

A great addition is more than just extra square footage—it should look and feel like it was always part of your home. A few thoughtful design considerations can make all the difference.

First, focus on creating a natural extension of your existing home, not a box that looks tacked on. This means paying close attention to matching the roofline, siding, and window styles. Inside, think about how to create a smooth transition. Using the same flooring or carrying a trim detail from the old space into the new can make the entire house feel cohesive.

Function is just as important as form. How will the addition improve your daily life? Maximize natural light with smart window placement and think about how the new layout will affect foot traffic. A truly successful design makes a home more livable, not just larger. Our experience in residential remodeling helps us guide clients in Kent, WA, and the surrounding areas toward additions that are both beautiful and incredibly functional.

Finding and Hiring the Right Local Contractor

You’ve got your design, and now you’re facing what is arguably the most important decision of your entire home addition project: picking the right person to build it. This single choice will set the tone for the next several months. A great contractor makes the process feel manageable and even exciting, while the wrong one can turn your dream into a nightmare of delays, surprise costs, and constant stress.

Your mission is to find a reliable, professional residential contractor near you who is more than just a builder. You need a partner—someone who communicates well, understands your vision, and who you can trust with a significant investment. This isn't about finding the cheapest price; it's about getting the best value and peace of mind.

The Non-Negotiables of Hiring a Contractor

Here in Washington State, some things aren't just good ideas—they're absolute must-haves. Never, and we mean never, hire a contractor who isn't licensed, bonded, and insured. This trifecta is your primary layer of protection, separating the true professionals from the folks who could leave you high and dry.

  • Licensed: This confirms they have met the state's requirements for competency and know the local building codes.
  • Bonded: A bond is your safety net. If the contractor bails on the job, fails to pay their subcontractors, or breaks state laws, the bond helps cover your financial losses.
  • Insured: This means they have general liability and workers' compensation. If someone gets hurt on your property or an accident causes damage, their insurance policy handles it, not your homeowner's policy.

Always verify these credentials yourself. Any reputable contractor will be happy to share their license number. You can—and should—look it up on the Washington State Department of Labor & Industries website to see if their status is active and in good standing.

Vetting Potential Building Partners

Once you have a shortlist of contractors who meet those basic requirements, it’s time to do some real homework. This is where you look at their portfolio, talk to people they’ve worked for, and see how they approach the bidding process.

This is also where collaboration is key. The early stages are a dance between you, your designer, and the builders you’re considering. Learning how to choose the right residential architect is a crucial part of this, as it ensures your vision is actually buildable from day one.

A contractor’s bid tells you more than just a number; it reveals their process. A detailed, line-item proposal shows they’ve dug into the plans and thought through every step. A vague, one-page estimate is often a red flag that you'll be hit with "unforeseen" costs later.

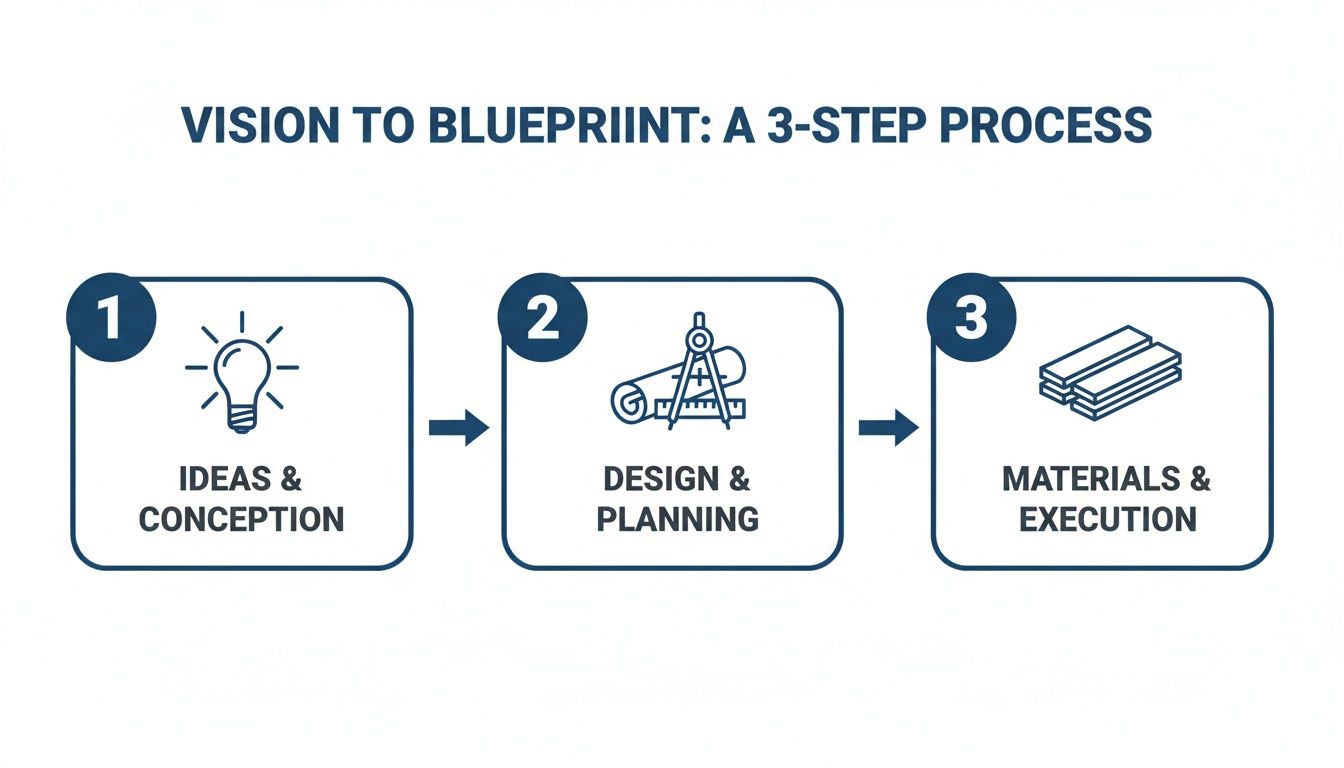
The path from a simple idea to a set of permit-ready plans and material choices is a journey in itself.

A 3-step process showing ideas & conception, design & planning, and materials & execution.

As you can see, having professional guidance is what turns a concept into a concrete, well-defined project.

Beyond the Bid: Your Partner in Project Management

When those bids come in, it’s tempting to jump at the lowest number. Don't. A bid that’s significantly lower than the others is a major warning sign. It often means the contractor has missed something, is planning on using cheap materials, or isn’t paying their crew a fair wage—all of which will end up costing you more in fixes, change orders, and headaches.

Instead, look for a partner. A great general contractor does so much more than swing a hammer. At Wheeler Painting, for example, we act as the central hub for the entire project. We manage the schedule, coordinate all the subcontractors (from foundation specialists to the crew handling the final interior painting), and ensure every detail meets our quality standards. For a deeper dive, you can check out our guide on how to choose a general contractor.

Ultimately, hiring the right contractor for your Kent, Seattle, or Tacoma home addition is about trust. You’re choosing a team with a proven local track record and a dedication to clear communication, turning a complex construction project into a smooth and successful reality.

Understanding the Return on Your Investment

Let's be honest: an addition is a massive undertaking, and while you're dreaming of that extra space, the financial side is always top of mind. It’s more than just a home improvement project; it's a major financial move. Thinking about the return on investment (ROI) from the very beginning is what separates a good project from a great one.

The goal is to build something that not only makes your life better today but also adds real, measurable value when it's eventually time to sell. It’s about making smart choices that will resonate with future buyers right here in our local market, whether you're in Kent, Seattle, or anywhere in between.

Maximizing Your Financial Return

We've seen it time and again: not all additions are created equal when you look at the numbers. In the Puget Sound market, some projects consistently bring in a much better return than others. Knowing what's in demand helps you pour your money into features that future buyers will actually pay a premium for.

Based on what we see in the field, these are some of the additions that really deliver:

  • Primary Suite Addition: A true owner's retreat with a beautiful en-suite bathroom and a walk-in closet is a game-changer. It adds a layer of luxury and privacy that seriously boosts a home's perceived value.
  • Expanded Family Room: For families, an open, spacious living area is a huge draw. This is the space where life happens, and a well-designed family room can easily become the heart of the home and a key selling point.
  • Kitchen Expansion: A cramped kitchen is one of the first things buyers notice. Expanding your kitchen's footprint as part of an addition is almost always a winning bet. Spacious, modern kitchens are at the top of nearly every homebuyer's list.

Your project’s ROI hinges on three critical things: the quality of craftsmanship, the materials you choose, and how well the new space integrates with the original home. A seamless, high-quality build will always outperform a cheap, tacked-on-looking addition, no matter how big it is.

Smart Strategies for the Puget Sound Market

Knowing how to plan also means knowing when to stop. You have to be careful not to over-improve for your specific street or neighborhood. For example, spending $300,000 on an addition in an area where homes max out around $750,000 is a recipe for losing money. A local contractor who knows the area can give you a crucial reality check on this.

When you look at the data, home additions typically recoup 50-80% of their cost at resale. That makes them a pretty solid investment, especially as homeowners are looking for ways to modernize. A huge portion of homes in our area are over 40 years old, so additions are a fantastic way to update an outdated layout, often funded by the home equity people have built up. This market overview offers some great insights into how additions are driving value right now.

As a full-service residential contractor with decades of experience in the region, we at Wheeler Painting specialize in helping homeowners find that perfect balance between their dream and a sound financial strategy. We can guide you toward design choices and material selections—like durable siding replacement or critical waterproofing—that not only make your home better for you but also appeal directly to future buyers in the Pacific Northwest. That's how you make sure your investment serves you well today and pays you back tomorrow.

Your Home Addition Questions, Answered

Embarking on a home addition is a huge undertaking, and it's completely normal to have a list of questions. After helping countless homeowners across the Puget Sound, we've heard them all. Here are the straight-up answers to the ones that come up most often.

How Long Does a Home Addition Take From Start to Finish?

Realistically, you should plan for a home addition to take anywhere from 4 to 12 months. That’s from our very first conversation about your ideas to the final walkthrough.

This timeline splits into two distinct chunks. First, there's the design and permitting phase, which usually takes about 1 to 3 months. Then, once we have permits in hand, the actual construction can last another 3 to 9 months. The final schedule really hinges on the complexity of your project, any delays from our classic Pacific Northwest weather, and how swamped your local city permit office is at the moment.

Can I Live in My House During Construction?

Most of the time, absolutely. You can stay put. But, it's crucial to go in with your eyes open. Construction means a daily dose of noise, dust, and a bit of chaos added to your routine.

Any good contractor will make it a priority to seal off the work zone with plastic barriers to keep your living space as clean as possible. That said, if you're planning something massive—like a full second-story addition that involves removing the roof—it's often safer and far less stressful for your family to find a temporary place to stay.

What Are the Most Common Planning Mistakes to Avoid?

We see a few common missteps that can derail a project before it even gets off the ground. The biggest ones are almost always financial or administrative.

  • Skimping on the budget. Always, always build a contingency fund of at least 15% into your budget. Unexpected issues will come up.
  • Ignoring local rules. Don't wait to investigate zoning laws and building codes in your specific city, whether it’s Kent, Tacoma, or anywhere in between.
  • Hiring the wrong person. Trying to save a few bucks by hiring an unlicensed or uninsured contractor is a recipe for disaster and often leads to shoddy work and expensive fixes.

Beyond those, starting demolition with a vague or incomplete plan is a major pitfall. Any ambiguity in the scope of work is a direct path to frustrating delays and a string of costly change orders.


Ready to turn your vision into a reality with a trusted local partner? Wheeler Painting has guided homeowners through every step of the home addition process, from initial design to final finishes. Let us make your project straightforward and stress-free.

Schedule Your Free On-Site Consultation Today

Finding Waterproofing Contractors Near Me in the Puget Sound

When you start searching for "waterproofing contractors near me," you're not just looking for a service—you're looking for peace of mind. Here in the Puget Sound, the best defense against water damage for both homes and commercial properties is a good offense. Tackling potential issues before they turn into costly structural failures is always the smartest move for any property owner.

Why Waterproofing is Non-Negotiable in the Puget Sound

A person in a raincoat inspects a newly constructed house with muddy ground and surrounding trees on a rainy day.

Living in the Pacific Northwest means embracing the rain. But for our homes and commercial buildings, that constant moisture is less a charming feature and more of a relentless threat. Our damp climate creates a unique set of challenges that demand a specialized defense system for your property, whether you're a homeowner or a facilities manager.

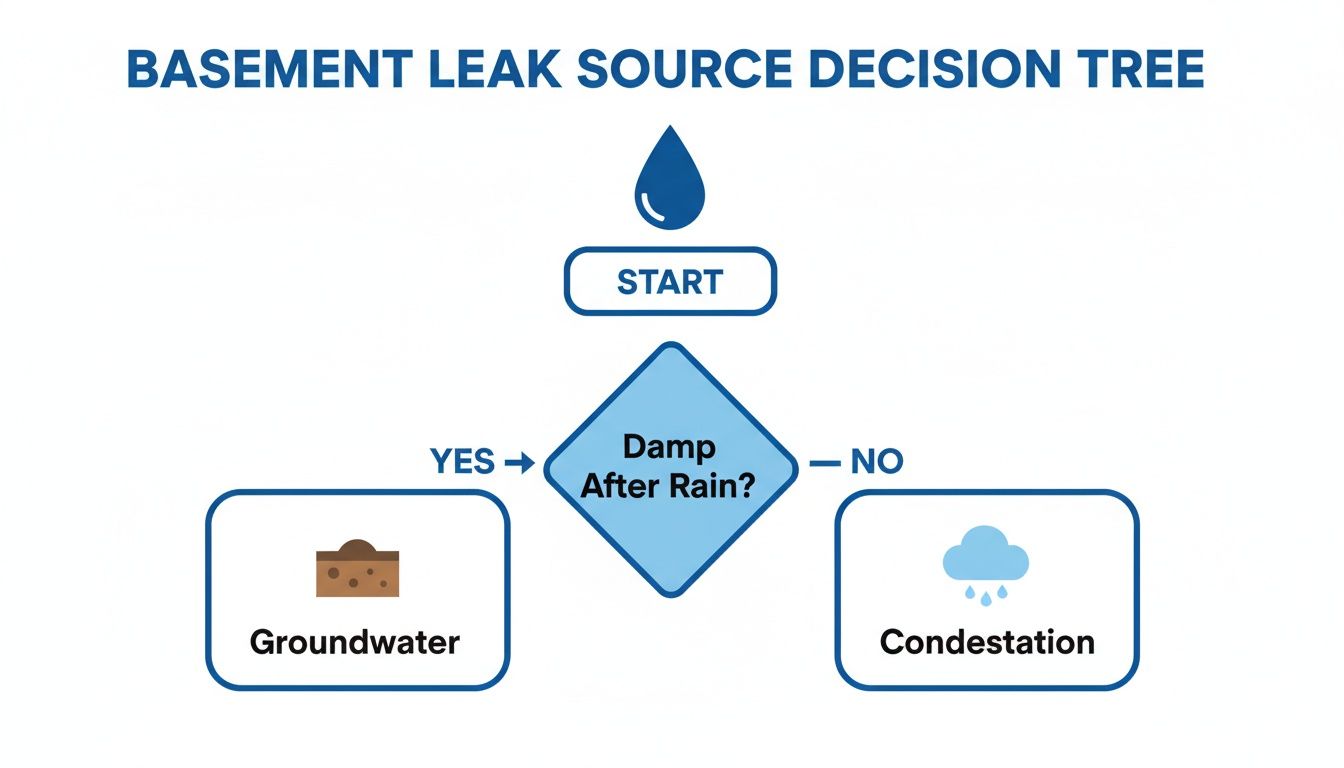
It all starts with the soil. The persistent rain keeps the ground around your property saturated, creating immense hydrostatic pressure. This force is constantly pushing water against your foundation walls, looking for any way in. It’s the number one reason basements, crawl spaces, and ground-floor commercial units end up wet.

Our Unique Climate Challenges

It’s not just the rain, either. The freeze-thaw cycles we get in the colder months are especially destructive. Water seeps into tiny, invisible cracks in your concrete or masonry, and when it freezes, it expands. Over time, that expansion can turn a minor flaw into a significant structural problem.

This is a serious concern for business owners and property managers, too. A leaky foundation in a commercial space can ruin thousands of dollars in inventory, shut down operations, and create an unsafe environment for employees and customers. Whether you’re managing a new retail build-out or an established office space, water intrusion will steadily chip away at your building's integrity and value.

A proactive waterproofing plan is the most powerful tool you have to prevent foundation damage, toxic mold growth, and expensive structural repairs for any residential or commercial property in our climate.

Why a Local Pro Makes All the Difference

This is exactly why hiring a residential or commercial contractor with deep roots in the Puget Sound is so important. A true local expert brings an irreplaceable understanding of our specific soil compositions, regional building codes, and unique weather patterns. Frankly, that regional knowledge is your best defense against having to do the same repair twice. They know which materials and methods hold up against the constant dampness we face year after year.

A great waterproofing partner won’t just sell you a quick fix. They’ll work with you to create a comprehensive plan that's actually right for your building. This could mean:

  • Applying a high-performance exterior membrane during new commercial construction.
  • Installing an interior drainage system to manage water in an older home's basement.
  • Using specialty sealants on a retail space's porous concrete walls.

Ultimately, investing in professional waterproofing is an investment in your property's future. Of course, if you’re already dealing with the aftermath of a leak, you can learn more about professional water damage cleanup in our detailed guide.

How to Spot the Early Warning Signs of Water Intrusion

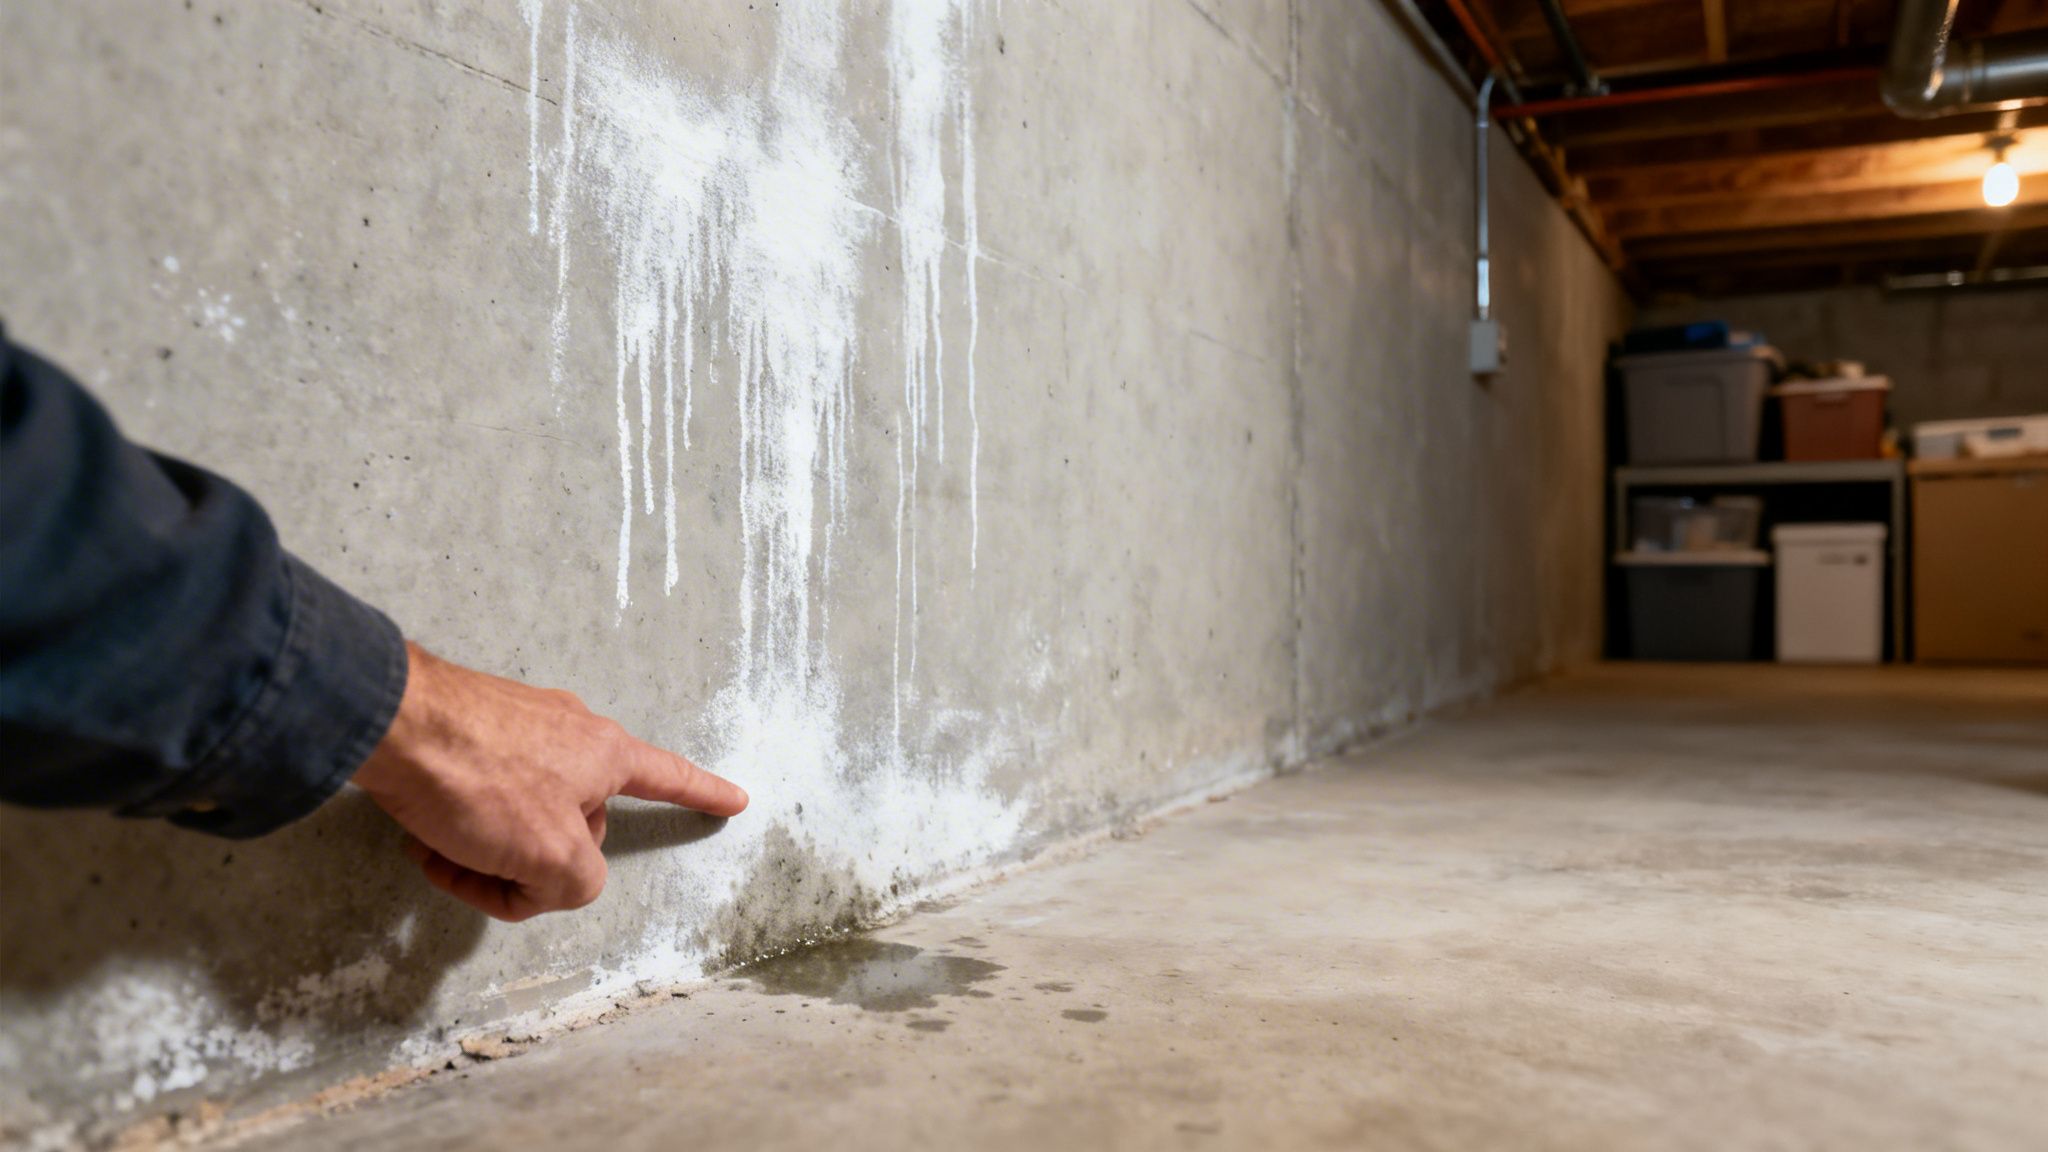
A hand points at a concrete basement wall showing efflorescence and a water puddle, indicating water damage.

Water problems rarely start with a flood. Long before you're dealing with a standing puddle in your basement or crawl space, your property will give you subtle hints that something is wrong. The real trick is learning to recognize these clues for what they are—an early warning system that can save you from major headaches down the road.

Don't just rely on your eyes. One of the most telling signs of a moisture problem is a persistent, musty smell. If your basement, ground-floor storage room, or crawl space has that unmistakable damp, earthy odor, it’s a red flag for hidden moisture and potential mold, even if the area looks completely dry.

What to Look For on Walls and Floors

On concrete or masonry surfaces, a common giveaway is efflorescence. This is a powdery, white crystal-like substance that appears on the surface. It’s not harmful on its own, but it’s a clear sign that water is wicking through your foundation and evaporating, leaving these mineral deposits behind.

Also, keep a close eye on your finishes. Is the paint on your walls bubbling, flaking, or peeling? That’s a classic sign that moisture is trapped underneath. Dark, stained patches on drywall or ceiling tiles are another telltale sign of a leak that needs immediate attention, whether you’re managing your own home or a large commercial property.

By the time you notice visible water damage like stains or peeling paint, moisture has already been moving through your building’s structure for a while. Catching these early signs means you can get a professional involved before the underlying issue gets worse and more expensive to fix.

Common Symptoms and What They Mean

Water intrusion can show up in different ways. To help you connect the dots, here's a quick-reference table for a few of the most common symptoms we see on both residential and commercial projects.

Symptom What It Looks Like Potential Problem Area
Efflorescence A chalky, white powder on concrete, brick, or stone walls. Foundation, basement walls, retaining walls.
Peeling/Bubbling Paint Paint that is blistering or flaking off the wall, often near the floor. Interior/exterior walls, basement walls.
Musty Odor A persistent damp, earthy smell in a specific area. Basements, crawl spaces, poorly ventilated rooms.
Wall/Ceiling Stains Discolored, brownish, or dark patches on drywall or ceiling tiles. Leaky pipes, roof leaks, or condensation from HVAC systems.
Warped Wood Wood floors, paneling, or trim that is buckling, cupping, or swelling. Areas with high humidity or near foundation leaks.
Cracks in Foundation Hairline or larger cracks in the concrete foundation, inside or out. Foundation walls, concrete slab floors.

This isn't an exhaustive list, but it covers the main culprits. If you spot any of these, it's a good idea to start investigating.

Real-World Examples

These symptoms often appear in common scenarios that property owners in the Puget Sound area face all the time. Here are a few examples:

  • The Damp Crawl Space: You peek into your crawl space and notice the ground is always damp, even during a dry spell. The wooden support beams feel moist, and there’s a general feeling of humidity. This is a perfect breeding ground for wood rot that can threaten your home's structural integrity.

  • The Cracked Commercial Foundation: While doing a routine walk-around of your retail building, you discover a network of small, hairline cracks along the exterior foundation. Even tiny cracks are an open door for hydrostatic pressure, which can force our relentless Pacific Northwest rain right into your building during facility construction or years later.

  • The Warped Basement Paneling: The old-school wood paneling in your finished basement suddenly looks wavy or buckled near the floor. This is a strong clue that water is seeping in at the cove joint—the critical point where the basement floor meets the foundation wall.

Finding any of these signs doesn't mean you need to panic. It just means it's time to bring in an expert. When you search for "waterproofing contractors near me," having a clear list of what you've observed will help them diagnose the problem accurately and recommend the right solution.

How to Vet and Choose the Right Local Contractor

So, you’ve searched for "waterproofing contractors near me" and now you're staring at a wall of search results. It can feel overwhelming, but figuring out who to trust is easier than you think if you know what to look for.

Your goal isn't just to hire someone to do a job; you're looking for a partner who will protect your property for the long haul. The best ones have a solid local reputation, all the right credentials, and a deep understanding of what our Puget Sound weather throws at us.

First Things First: Check Their Credentials

Before you even think about calling for an estimate, your first move should be a quick background check. Here in Washington State, any residential or commercial contractor worth their salt must be registered, licensed, bonded, and insured. This is non-negotiable.

You can easily verify any contractor’s status on the Washington State Department of Labor & Industries website. It only takes a minute. A valid license shows they meet the state’s standards, and proper insurance protects you from any liability if an accident happens on your property. Skipping this step is a gamble you just don't want to take.

Go Beyond Star Ratings and Read the Reviews

Once you’ve confirmed a few contractors are properly licensed, it's time to see what their actual customers have to say. Head over to review sites like Google and Angi but don’t just glance at the star rating. The real story is always in the comments.

Look for reviews that talk about the actual experience:

  • Did they explain the problem and the solution clearly?
  • Was the crew respectful of the property and did they show up on time?
  • If a problem came up unexpectedly, how did they handle it?

These details give you a real sense of what it's like to work with a company. As you're looking, it can also be helpful to understand the different roles that various types of restoration companies near me can play in projects involving water damage.

A strong portfolio of local work is a direct indicator of a contractor's experience with Puget Sound-specific challenges. Ask to see examples of projects similar to yours, whether it's a residential basement or a large commercial facility.

Why Local Experience Matters So Much

Hiring a contractor who is truly local to the Puget Sound area gives you a massive advantage. They've seen it all—our unique clay soil, the local building codes, and of course, our notoriously wet weather. They understand the physics of hydrostatic pressure in our region and know which waterproofing methods will last and which will fail in a few years.

This kind of specialized expertise is becoming more valuable. In fact, the global waterproofing market was valued at USD 35.83 billion in 2024 and is projected to keep climbing. You can read more about these growing waterproofing market trends to see why property owners everywhere are investing more in protecting their assets.

By focusing on these key areas—credentials, real-world reviews, and proven local experience—you can cut through the noise. This simple vetting process ensures you’re only inviting qualified, trustworthy professionals to bid on your project.

Making Sense of Contractor Bids and Waterproofing Methods

The bids are starting to roll in. Now comes the hard part—figuring out what they actually mean. Getting a few different quotes is always a good idea, but the real skill lies in comparing them effectively.

Be wary of any contractor who hands you a vague, one-line estimate. A true professional will give you a detailed, itemized proposal that breaks everything down. This isn't just a bill; it's their plan of attack. You should be able to see the full scope of work, the exact materials they intend to use, a realistic timeline, and a clear payment schedule. Anything less makes an apples-to-apples comparison impossible and leaves you vulnerable to surprise costs.

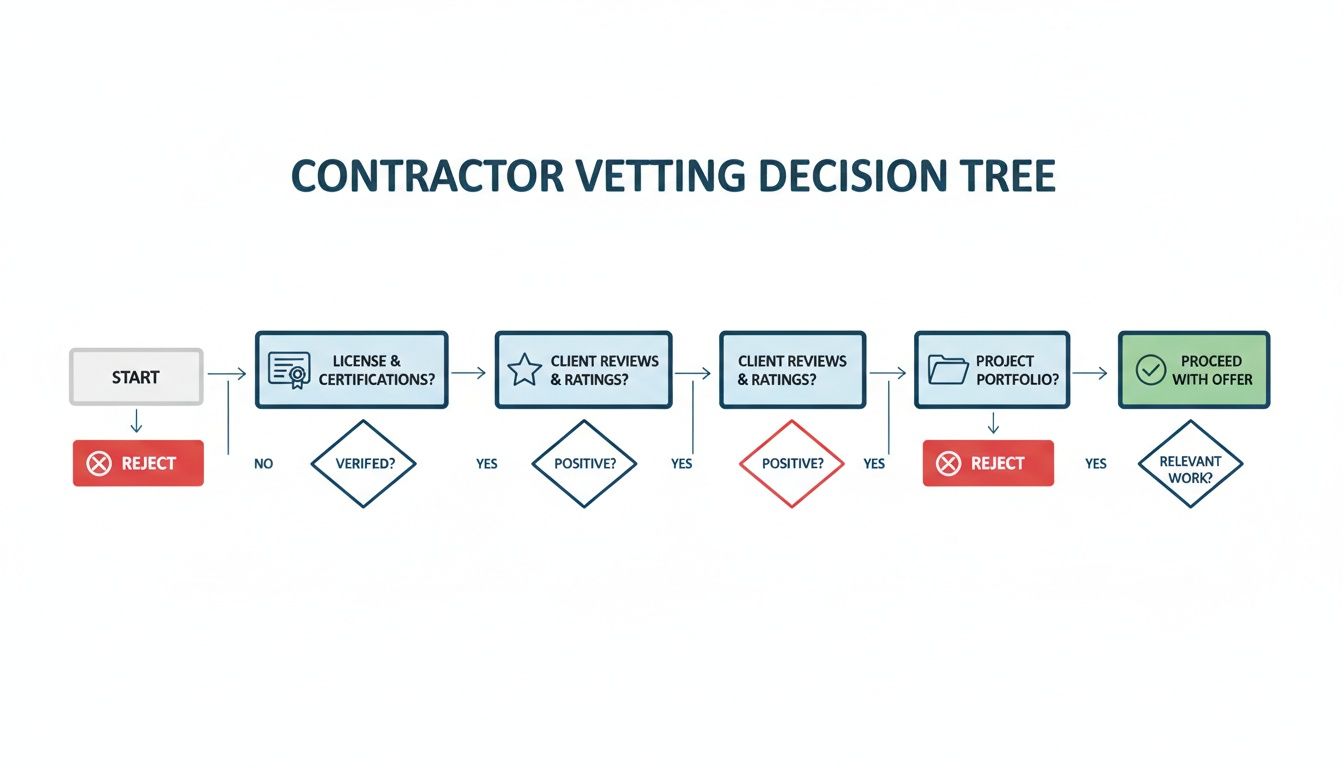
A flowchart detailing a contractor vetting decision tree with steps from start to offer or rejection.

This flowchart visualizes the vetting process we’ve been talking about—checking licenses, reading reviews, and looking at past work. By following these steps before asking for bids, you ensure that every proposal you receive comes from a credible, well-qualified professional ready to do the job right.

Interior vs. Exterior: Understanding the Approach

One of the first things you'll notice in different bids is the proposed method. Will they work from the inside or the outside? This is probably the biggest decision you'll face, as interior and exterior waterproofing are two fundamentally different strategies.

Here’s the breakdown:

  • Exterior Waterproofing: Think of this as creating a fortress for your foundation. The crew excavates down to the footing, cleans the foundation walls, and applies a waterproof membrane directly to the exterior surface. This stops water in its tracks before it can even touch your foundation, which is the only way to truly relieve hydrostatic pressure. It's a bigger, more disruptive job, but it's the definitive solution for severe, persistent water problems.

  • Interior Waterproofing: This approach is more about water management than water-stopping. Instead of blocking water outside, it deals with it once it has already seeped through the foundation. A typical interior system involves installing a drainage channel around the inside edge of your basement floor. This channel catches any intruding water and funnels it to a sump pump, which then ejects it away from your property. It's often less invasive and can be a very practical choice for dealing with issues like a high water table.

It's not about which method is better, but which one is right for your specific issue. A good contractor will diagnose the root cause of the leak and explain why they're recommending one approach over the other, not just push the easiest or most expensive option.

What's in the Mix? Looking at Materials

Your proposal should also get specific about the products being used. The technology here has come a long way. In fact, the global market for waterproofing membranes is projected to hit USD 59.32 billion by 2032, driven by powerful new materials. You can read up on these waterproofing material innovations to see how much things have advanced.

For example, a common high-performance material you might see listed is a liquid-applied membrane (LAM). This is a special coating that's painted or sprayed on, creating a flexible, seamless barrier that's perfect for fitting around the unique angles and pipes of a foundation.

Ultimately, a detailed bid is a sign of professionalism. It tells you the contractor has done their homework on your property and is committed to transparency. That level of detail is your best protection, ensuring you're investing in a lasting fix, not just a quick patch. For insights on how these principles apply to specific indoor projects, our guide on waterproofing a wet room has some great targeted advice.

You’ve done the hard part—you've vetted contractors and signed on the dotted line. Now, what can you do to make sure the actual project goes off without a hitch? A little bit of prep work on your end can make a world of difference for the crew, helping them work safely, efficiently, and with minimal disruption.

If you're a homeowner getting your basement waterproofed, the biggest help you can provide is clearing the space. We typically ask clients to move furniture, boxes, and anything else stored along the walls at least three to four feet back. This gives the team a clear, safe perimeter to work in. It's also a good idea to secure your pets in another part of the house or even off-site, just to keep them safe and out from underfoot.

For commercial properties, the prep work is more about communication. If the waterproofing impacts common areas, like in an office building or institutional facility, notifying tenants well in advance is absolutely essential. Give them a clear heads-up about the timeline, what areas will be off-limits, and who they can reach out to with any questions.

The All-Important Pre-Project Walkthrough

Before a single tool comes out of the truck, a final walkthrough with your contractor is a must. This isn't just a formality; it's your last chance to iron out every detail and make sure everyone is on the same page before the work starts.

This is the perfect time to point out that one corner you're especially worried about or ask any lingering questions. You'll want to confirm the crew's access points, figure out where materials will be staged, and just do a final sanity check on the entire plan. I’ve found that this simple meeting prevents countless headaches down the road.

A pre-project walkthrough is more than a formality; it's the foundation of a great working relationship. It confirms all expectations and demonstrates a shared commitment to a smooth, organized project.

Setting the Stage for Success

Getting these details right matters because a professional waterproofing job is a serious investment in your property's health. More and more owners are realizing this, which is why the global waterproofing chemicals market is expected to jump from USD 8.29 billion in 2026 to USD 14.92 billion by 2035. You can dig into the numbers and see the insights on waterproofing chemical trends for yourself—it’s clear that this is a critical piece of property maintenance.

So, what are the concrete steps you should take? Here's a quick checklist that applies to both residential and commercial projects:

  • Create a Clear Path: Make sure the crew has an unobstructed path from their truck to the work area. This is for safety and to prevent accidental dings on walls or doorframes.
  • Protect Your Stuff: Even the most meticulous crews create dust. Cover nearby furniture, electronics, or inventory with plastic sheeting to keep everything clean.
  • Handle Access Logistics: On a commercial site, this might mean arranging for security access, providing key cards, or having a point person available to let the crew into restricted areas.
  • Talk About Utilities: Ask the contractor if they'll need access to water or specific electrical outlets. Making sure they're available and working from day one prevents delays.

By taking care of these simple logistics, you’re not just being helpful—you’re empowering the team you hired to get started immediately and focus on delivering the quality work you paid for. It’s a small effort that helps ensure your project is a success from start to finish.

Got Questions About Hiring a Waterproofing Contractor? We've Got Answers.

Making the call to hire a professional is a big decision, and you’re bound to have questions. We hear a lot of the same concerns from homeowners and property managers all over the Puget Sound. Let's tackle the most common ones head-on so you can move forward with confidence.

How Much Does Professional Waterproofing Cost?

This is always the first question, and the honest answer is that it truly depends on what’s causing the problem. There's no one-size-fits-all price.

A simple crack injection on an interior wall might just be a few hundred dollars. But for a full-scale exterior excavation to install a waterproof membrane around your home's foundation, you could be looking at a range of $10,000 to $30,000 or even more. Commercial jobs, such as for a retail build-out or office space renovation, are a different beast entirely, quoted based on the sheer square footage and unique needs of the space.

The only way to get a real number is with an on-site inspection and a detailed estimate. If a contractor throws out a price over the phone without ever setting foot on your property, be wary. They can't possibly know what they're up against.

Is This a Permanent Fix?

When done right, a professional waterproofing system is absolutely a long-term solution. The goal is to address the root cause of the water intrusion—like hydrostatic pressure pushing against your foundation—not just patch a symptom.

While nothing lasts forever without some care, a quality installation using the right materials should protect your property for many, many years. This is where the warranty becomes crucial.

A strong, clearly written warranty is a hallmark of a reputable contractor. It demonstrates their confidence in the materials they use and the quality of their installation, giving you peace of mind.

Should We Waterproof from the Inside or the Outside?

This is a great question, and it's not about which method is "better," but which one is right for your specific situation. Both are effective, but they solve different problems.

  • Exterior Waterproofing: This is the most comprehensive approach. We dig down to the foundation and apply a seamless waterproof barrier. It stops water before it can even touch your foundation walls. It's a bigger job, but it’s the definitive way to stop water from getting in.
  • Interior Waterproofing: This method is designed to manage water that has already found its way through the foundation. It typically involves installing a drainage system that collects the water and channels it to a sump pump. It’s an excellent and far less disruptive solution for dealing with a high water table.

A contractor who knows their stuff will inspect your property thoroughly and explain exactly why one approach makes more sense than the other for you.

What Kind of Warranty Should I Expect?

Don't even consider a contractor who doesn't offer a solid, written warranty. It should cover both the materials they use and the labor to install them. The terms and length will naturally vary depending on the type of system installed.

For example:

  • An exterior membrane might carry a 10 to 25-year warranty.
  • An interior drainage system could even come with a lifetime warranty.

Make sure you read the fine print. Understand exactly what's covered, what isn’t, and if there are any maintenance tasks you need to perform to keep it valid. A good warranty isn't just a piece of paper; it's a promise that the contractor stands behind their work.


From the first phone call to the final inspection, we know that tackling a water problem can feel overwhelming. At Wheeler Painting, our job is to make it simple and stress-free. With decades of hands-on experience in both residential and commercial construction here in the Puget Sound, we pride ourselves on clear communication, top-notch craftsmanship, and solutions that last.

If you’re ready for a trusted partner to protect your property, let's talk.

Schedule Your On-Site Estimate Today

How to Waterproof Basement Walls in Your Puget Sound Home

Walking into your basement after a solid week of rain and finding damp, weeping walls is a feeling every property owner dreads. It’s a common problem, but thankfully, one with a clear solution. Fixing it really boils down to three things: finding where the water is getting in, shoring up your foundation, and then applying the right kind of waterproofing barrier. The process can feel overwhelming, but a dry, usable basement is absolutely achievable with a clear plan.

Why Puget Sound Basements Are So Prone to Leaks

If you live anywhere in Western Washington, you know our climate is defined by one thing: relentless, soaking rain. That constant saturation creates a unique headache for property owners, turning what should be valuable square footage into a major source of stress. For homeowners, business owners, and facilities managers alike, the first step to a real, long-term fix is understanding why our local conditions are working against us.

The main issue is the ground itself. Much of the Puget Sound region is built on dense, clay-heavy soil. Unlike sandy soil that lets water drain right through, clay holds onto water like a sponge, keeping it pressed directly against your foundation walls. This creates what we call hydrostatic pressure—the constant, powerful force of water trying to push its way inside.

The Real Impact of Our Wet Climate

Over time, that constant pressure finds every little weakness. Water will force its way through tiny pores in the concrete, hairline cracks you can barely see, and the cold joints where the walls meet the floor. That musty smell you can’t get rid of or that chalky white powder (called efflorescence) on your walls? Those are the classic early warnings of this slow-motion water invasion.

Making matters worse is our region’s high water table, especially from fall through spring. When the ground becomes completely saturated, the groundwater level can rise dramatically, essentially putting the lower part of your foundation underwater. For many properties around here, it's not a question of if this will happen, but when.

This isn't just a local problem, either. It’s a surprisingly widespread issue. A staggering 98% of basements in the US will experience some form of water damage in their lifetime. For property owners here in the Pacific Northwest, that statistic feels particularly real. You can read more about the prevalence of basement water damage and see why getting ahead of the problem is so important.

Playing Detective: Identifying Your Basement's Symptoms

Not all basement moisture is created equal. The clues your basement gives you—a damp patch here, a trickle there—can help you and a trusted contractor zero in on the root cause. Knowing what to look for is the key to choosing the right fix.

To get you started, here’s a straightforward table we put together to help property owners connect what they're seeing with what's likely causing it.

Common Basement Moisture Issues and First-Step Solutions

Symptom Likely Cause First Action Step
Water trickling down from top of wall Poor exterior grading, clogged gutters, or faulty downspouts Check and clean gutters; ensure downspouts direct water at least 6-10 feet away from the foundation.
Damp patches low on walls or near floor Hydrostatic pressure pushing groundwater through the concrete Investigate interior sealing options and consider exterior drainage solutions for a long-term fix.
Musty smells and high humidity with no visible water Condensation from humid air meeting cool basement walls Improve ventilation with a dehumidifier and check for air leaks around pipes or windows.
Water seeping up from the floor High water table creating pressure from below the slab Evaluate the need for an interior drainage system and a sump pump installation.

Think of these as your first leads. Understanding these specific challenges is crucial before you commit to any one solution. At Wheeler Painting, we help homeowners and commercial property managers across the Puget Sound area diagnose and solve these exact problems every day. By getting to the root cause, we can finally turn that damp, unusable basement into a dry, secure, and valuable part of your property.

Where Is That Water Really Coming From?

Before you buy a single tube of sealant or call a "residential contractor near me," you need to play detective. The biggest and most expensive mistake property owners make is jumping to a solution before they've found the real problem.

Slapping a coat of waterproof paint on the walls is a waste of time and money if your gutters are dumping gallons of water right against the foundation. Getting the diagnosis right from the start is the single most important step. The good news is, you can often figure it out yourself just by paying attention. Water always leaves clues.

Is It a Leak or Just Humid Air?

First, let's figure out if the water is coming from inside or outside. The moisture you're seeing usually falls into one of three buckets: interior condensation, surface water runoff from outside, or groundwater being pushed through your foundation.

Think about the conditions when you notice the dampness. A basement that feels consistently clammy and damp, especially in the warmer months, is often just dealing with condensation. This is when warm, moist air hits your cool foundation walls and forms water droplets—just like on a cold can of soda on a summer day. It's a humidity problem, not a structural leak.

But if the damp spots, water stains, or trickles appear or get worse right after a heavy rain, you're almost certainly looking at water getting in from the outside.

This flowchart can help you visualize the process and narrow down the cause.

A decision tree flowchart identifying basement leak sources based on dampness after rain, leading to groundwater or condensation.

As you can see, moisture that shows up with rain points toward groundwater or runoff. If it’s a constant issue regardless of the weather, condensation is the likely culprit.

The Easiest Way to Get a Definitive Answer

There's a classic, incredibly simple method we use to know for sure: the plastic sheet test.

Find a damp spot on your basement wall and firmly tape a one-foot square of plastic sheeting over it. Use heavy-duty duct tape or painter's tape to seal all four sides completely, making sure it's airtight.

Now, just leave it alone for a day or two.

When you come back, check the plastic. Is the moisture on the outside of the plastic, facing the room? That’s condensation. Your basement air is too humid. If the moisture is trapped behind the plastic, against the wall, you’ve confirmed it: water is coming through the foundation from the outside.

Our Two Cents: Don't skip this test. It takes five minutes to set up and tells you everything. Knowing if water is coming from the air or through the wall dictates your entire waterproofing strategy. The fixes are completely different.

Follow the Water Trail Outside

If your plastic sheet test proves water is penetrating the foundation, your next job is to head outside. The source is often simpler than you think. If you can do it safely, take a walk around your property during a steady rain and look for obvious flaws.

Pay close attention to these problem areas:

  • Gutters & Downspouts: Are your gutters overflowing? This is a huge red flag. Downspouts should be clear and discharge water at least six to ten feet away from your foundation. If they're dumping water right at the base of your building, you’ve found a major part of your problem.
  • Grading & Landscaping: Look at the soil around your foundation. It needs to slope away from the building to carry water away. If it's flat or, even worse, slopes toward it, you're basically funneling every raindrop straight to your basement.
  • Window Wells: These are classic weak points. If a window well doesn't have a good drain or a solid cover, it will fill up like a bathtub, creating intense hydrostatic pressure against that one section of your wall.

Here in the Puget Sound, with our notoriously wet seasons, these exterior drainage issues are the cause of most "leaky basements." Correcting them is always the first, most effective line of defense before you even think about more complex solutions.

Effective Interior Waterproofing Methods and Materials

Person applies grey waterproofing coating to a concrete basement wall with a roller.

If you've traced your moisture problems to water seeping directly through the foundation walls, your first and most direct line of defense is creating a barrier from the inside. For minor dampness or general humidity, this approach can completely transform a basement from a damp storage area into a usable living or operational space.

This can sometimes be a manageable project for a determined property owner. But we can't stress this enough: the success of any interior coating comes down to how well you prepare the walls. Slapping a coat of "waterproof paint" over a dirty, cracked surface is a recipe for failure. It won't be long before it blisters and peels, and you're right back where you started.

It All Starts with Meticulous Wall Prep

You have to get this part right. Before you even think about popping the lid on a can of sealant, your basement walls need to be clean, dry, and structurally sound. This prep work is absolutely non-negotiable.

First, deal with any existing problems. If you see a chalky, white powder on the walls, that’s efflorescence. You need to get it all off using a stiff wire brush and a masonry cleaning solution. Efflorescence is a salt deposit left behind as water evaporates, and trying to paint over it is like painting over dust—the new coating simply won't stick.

Next, get up close and personal with your walls. Inspect every square inch for cracks, holes, or gaps. Even a tiny, hairline fracture is a potential path for water to sneak past your new waterproof barrier.

A Pro's Tip for a Permanent Fix: For any active leaks or visible cracks, your standard patch or filler just won't cut it. You need to use hydraulic cement. This product is incredible—it actually expands as it cures, forcing its way into the crack to form a powerful, watertight plug. It can even stop flowing water in its tracks, which is why it's a go-to for professionals and a must-have for any serious repair.

Choosing Your Interior Waterproofing Product

With your walls finally clean, patched, and dry, you’re ready to pick your sealant. The waterproof coatings aisle at the hardware store can be overwhelming, but most products fall into three main categories, each designed for different levels of moisture.

  • Waterproof Paint (Acrylic Formulas): This is the most common DIY-friendly product you'll find. It's basically an extra-thick acrylic paint that creates a water-resistant film on the surface. It works well for handling minor dampness and cutting down on that musty basement smell, but it is not designed to hold back any real water pressure.

  • Silicate-Based Concrete Sealers: These are a significant step up. Instead of just forming a film on top, these sealers penetrate deep into the concrete. They trigger a chemical reaction with the lime and minerals already there, forming a hard, crystalline barrier inside the concrete's pores. This makes the wall itself the barrier, and it's fantastic for stopping moisture from wicking through the foundation.

  • Epoxy Coatings: When you need the most robust interior barrier possible, epoxy is the answer. These are two-part systems that, when mixed, cure into an incredibly thick, hard, and durable waterproof shell. Epoxies are far more resilient than any paint and can withstand moderate hydrostatic pressure. This makes them a perfect choice for workshops, commercial basements, or any area that demands a high-performance, long-lasting finish.

The application itself is a skill, especially for high-solids epoxies. Mixing ratios, application thickness, and cure times have to be spot on. A professional crew ensures these systems are applied perfectly to deliver the full, warrantied protection you're paying for. These concepts are key to many residential and commercial construction services, from institutional painting to office space renovations.

Proper Application for a Lasting Barrier

Applying these coatings is a lot more involved than a simple paint job. For any of these products to work as advertised, you'll need to apply at least two generous coats. Keep in mind that a single gallon might only cover 75-100 square feet—far less than standard interior paint—so measure your walls and buy accordingly.

Work the first coat into the wall's texture with a thick-nap roller or a high-quality brush. You want to force the material into every little pore and crevice. Let it dry completely, which can take several hours depending on the product and basement humidity. Then, apply your second coat, ideally in the opposite direction (e.g., vertical strokes first, horizontal strokes second) to ensure a seamless, pinhole-free finish.

While interior coatings are an excellent solution for many basements, it's important to remember what they do: they stop water that has already made it through the concrete. They are a defensive measure. For homes and businesses with serious, ongoing water intrusion, the real solution often lies on the other side of the wall.

When to Use Exterior Waterproofing and Drainage

A person installs a black perforated French drain pipe in a gravel trench next to a house foundation.

Interior sealants and coatings are great for handling minor dampness, but they're ultimately playing defense. They only stop water after it has already pushed its way through your foundation. When you're dealing with serious, persistent water intrusion—especially from the kind of heavy hydrostatic pressure we get here in Western Washington—you have to get to the root of the problem.

The only truly permanent solution is on the other side of the wall.

Exterior waterproofing is the offensive strategy. It stops water from ever touching your foundation in the first place. This is the definitive answer for protecting the structural integrity of your home or commercial building for the long haul.

The Professional Exterior Waterproofing Process

Let's be clear: this isn't a weekend DIY job. True exterior waterproofing is a major project that requires heavy equipment and a deep understanding of excavation, foundations, and drainage. It’s a job for a qualified "commercial construction near me" contractor who has done this before.

The process is intensive, but it creates a completely sealed building envelope. It starts with digging. A crew will carefully excavate all the soil around your foundation's perimeter, going all the way down to the footing. This gives them full access to the walls.

Once the foundation is exposed, it gets power-washed to strip away all the dirt, clay, and any old, failing sealant. The crew then inspects the bare concrete, looking for cracks, holes, or crumbling mortar joints. Any weak spots are patched with hydraulic cement or other high-strength compounds to create a solid, uniform surface.

Next comes the barrier itself. A thick, rubberized waterproof membrane is applied directly to the foundation. This could be a liquid-applied coating that cures into a seamless barrier or a self-adhering sheet membrane. Either way, it creates a flexible, impermeable shield that water simply can't get through.

Why Proper Drainage Is Half the Battle

Just sealing the walls isn't enough. You have to give all that groundwater a new place to go. This is where a modern drainage system becomes non-negotiable, as it’s the key to relieving the intense pressure pushing against your new waterproof barrier. To effectively manage water around your property and prevent basement leaks, exploring various drainage solutions for homes is essential.

Nearly every exterior waterproofing job includes a new French drain system. Here’s how it works:

  • A perforated pipe is laid in a trench filled with gravel right at the base of the foundation.
  • The pipe collects groundwater as it flows toward your building.
  • Gravity then carries the water away from your foundation to a lower point on the property or into a sump basin to be pumped out.

Key Insight: A proper exterior system is a one-two punch: the waterproof membrane is the shield, and the French drain is the moat. The membrane stops the water, and the drain relieves the pressure. One without the other is an incomplete job that's bound to fail.

The Investment in Long-Term Protection

Exterior waterproofing is a significant investment in your property—there's no way around it. It involves excavation, specialized materials, and a lot of skilled labor. But for homes and commercial buildings with chronic water problems, it is the only permanent fix.

Think of it as an investment in your primary asset. You're preventing the slow-motion destruction of your foundation, stopping structural damage before it starts, and eliminating the source of musty smells and dangerous mold. A well-installed exterior system can last for decades, giving you a level of peace of mind that interior methods just can't match.

The principles of managing water on this scale often overlap with other large landscaping projects. In fact, many of the same concepts are critical to our local guide on retaining wall design.

Whether you're a homeowner or a facilities manager, hiring a contractor experienced in large-scale residential and commercial construction is crucial. You need a team that can handle the complexities of excavation safety and drainage to deliver a dry, secure basement that will last.

Knowing When to Call a Waterproofing Professional

We get it. You see a little dampness on the basement wall and your first thought is, "I can fix that." A trip to the hardware store for some high-quality sealant seems like an easy weekend project, and sometimes, for minor condensation, it's the right move.

But you have to know when you're in over your head. Some water problems are simply beyond a DIY fix, and trying to patch a major issue can do more harm than good. You might just be hiding a serious problem behind a fresh coat of paint, letting structural damage get worse just out of sight. Here in the Puget Sound, knowing when to call in a professional is one of the most important things you can do to protect your property.

When Your Basement Is Crying for Help

Some symptoms are your foundation's way of telling you that the forces at play are way bigger than a little seepage. These aren't the kind of things you can solve with a bucket of hydraulic cement. If you spot any of these, it's time to pick up the phone.

Here are the warning signs we tell every property owner to watch for:

  • Large, Horizontal Cracks: Small, vertical hairline cracks are often just the concrete settling. But large, horizontal cracks are a different beast entirely. They signal that immense pressure from water-logged soil is pushing against your foundation, threatening its integrity.
  • Bowing or Bulging Walls: If you look down the length of your basement wall and it appears to be curving or bulging inward, that’s a serious red flag. You're witnessing severe hydrostatic pressure in real-time, and this is a structural emergency that needs an expert, fast.
  • Water Coming Up from the Floor: Is water seeping in where the floor meets the wall, or even right up through cracks in the concrete slab? That's a classic sign the water table is high and pushing up from below. No amount of wall sealant will fix this. You're likely looking at a job that requires an interior drainage system and sump pump.
  • Efflorescence That Won't Quit: You scrub off that chalky white residue, and a week later, it’s back with a vengeance. This means a significant amount of moisture is constantly being forced through the concrete.

These aren’t just cosmetic blemishes. They're symptoms of a serious battle between your foundation and the ground it sits in. A professional has the tools and experience to figure out exactly what’s happening and design the right solution.

The Real Cost of a Failed DIY Fix

Trying to tackle a major water issue yourself can quickly become a very expensive mistake. The numbers don't lie. Data shows that a staggering 60% of basements in the US leak, and the average cost to repair water damage hovers around $4,250. Those figures are even more pointed in a rainy climate like ours. You can learn more about basement leak statistics to see just how common this is. A failed DIY project only adds to that final bill.

Hiring a professional isn't admitting defeat; it's a strategic move to safeguard your property. An expert contractor brings an arsenal of tools, materials, and experience that simply aren't available to the average property owner. They provide an accurate diagnosis, implement a solution with industrial-grade materials, and offer a warranty for their work.

This is doubly true for commercial buildings, where a leak can shut down operations, ruin inventory, and create serious liability. Whether it's your home or your business, a professional waterproofing job protects your property's value and buys you priceless peace of mind. And if the water has already done its damage, your first call should be to one of the best local restoration companies near me to manage the cleanup.

Ultimately, calling a team like Wheeler Painting means bringing in a local partner who knows the unique challenges of building in Western Washington. From single-family homes to large-scale commercial renovations, we make sure the job is done right the first time, protecting your biggest investment from the ground up.

Common Questions About Basement Waterproofing

Alright, we've covered a lot of ground on how to diagnose and fix a wet basement. But we know from experience that this is usually where the real questions start popping up for homeowners and property managers. Let's tackle some of the most common ones we hear from clients all over the Puget Sound area.

Our goal here is simple: to give you the straight answers you need to protect your property with confidence.

How Long Does Waterproofing Last?

This is the big one, and the honest answer is: it completely depends on the method you choose. The lifespan can vary dramatically.

  • DIY Interior Coatings: If you're using a good acrylic waterproof paint for minor dampness, you can probably expect it to last 3-5 years before needing a touch-up.
  • Professional Interior Sealants: When a pro applies a high-quality silicate or epoxy system, you're looking at a much more durable solution. These can easily last 10 years or more because they bond with the concrete itself.
  • Exterior Waterproofing Systems: This is the gold standard for a reason. A full exterior excavation with a modern membrane and drainage system is considered a permanent fix. When done right, it can last the life of your home—often 50 years or longer.

Is Waterproofing Paint Really Effective?

Waterproofing paint definitely has its place, but it's critical to know its limits. Think of it as a good raincoat. It's great for keeping you dry in a light drizzle (like minor humidity or damp spots) but it’s not going to do much if someone is pointing a firehose at you.

That "firehose" is hydrostatic pressure—the force of groundwater pushing against your foundation. The paint creates a surface barrier, but it can't stop the pressure from building up behind the wall. Eventually, that pressure will cause the paint to bubble, peel, and fail.

The Takeaway: Waterproof paint is a decent tool for managing slight dampness and musty smells. It is not a real solution for active leaks or significant water pressure.

What's the Difference Between Damp Proofing and Waterproofing?

People mix these terms up all the time, but they refer to two very different things.

Damp proofing is a basic moisture control measure, usually done during new construction. It's typically a thin, black, asphalt-based coating sprayed onto the outside of a foundation to block moisture from the soil. It's designed to stop water vapor, not liquid water under pressure.

Waterproofing, on the other hand, is a complete system designed to keep both moisture and liquid water out. A true waterproofing barrier is robust enough to withstand hydrostatic pressure, creating a seal that stops water from getting through even when the ground is completely saturated. For more insights on various approaches, you can review some general resources on Basement Waterproofing.

Can Waterproofing Increase My Property Value?

Absolutely. In fact, a wet basement can seriously tank your property's value. Studies from the National Association of Realtors have shown that a basement with water issues can slash a home's market value by 10% to 25%.

Fixing the problem not only restores that lost value but also becomes a major selling point. For a homeowner, it means gaining dry, usable living or storage space. For a commercial property owner, it means having a safe, leasable area without the constant threat of water damage to inventory or equipment. A dry basement is also a key feature in retail build-outs and facility construction services.

A professionally waterproofed basement with a warranty tells potential buyers that the building is solid from the ground up. That kind of peace of mind is priceless.


Figuring out the right way to waterproof your basement walls can feel like a huge task, but you don't have to tackle it alone. For over three decades, Wheeler Painting has been providing expert residential and commercial construction services to the Puget Sound community. If you have questions about your property, we have answers.

Contact us today for a professional consultation and let’s create a plan to protect your investment.

How to Stain Wood Cabinets for a Flawless Finish

If you're looking for a project that delivers a serious transformation, staining your cabinets is tough to beat. It’s about more than just a new color—a great stain job will protect your wood from the chaos of daily life and can even give your property’s value a nice bump.

Why Staining Is Your Best Bet for a Cabinet Refresh

Two kitchen cabinet doors, one light natural wood and one dark stained wood, showing finish comparison.

When your kitchen or bathroom starts to feel a little tired, the classic debate begins: paint or stain? While a coat of paint offers a clean, modern slate, staining works with the wood, bringing out its natural character and grain. For many homeowners and business owners in our community, the choice is clear once you see the results.

Stain doesn’t just sit on top like paint does. It actually soaks into the wood fibers, enriching the color and highlighting all the unique swirls and patterns that make wood so beautiful. Not only does this refresh the look, but it also adds a vital layer of defense against moisture, grease, and all the bumps and scrapes of a busy home or commercial space.

The Value of Stained Wood

The appeal of stained wood cabinets goes beyond aesthetics; it's a smart investment, too. Natural, warm materials are a top feature for homebuyers and can elevate the look of any commercial interior. If you’re thinking about selling or upgrading your property down the road, this is an update that can really pay off.

Here’s a little inside scoop: Local real estate data shows that professionally stained cabinets can increase a home's sale price, making it a fantastic upgrade with a clear return on investment.

This isn't just something we're seeing locally. The demand for quality wood finishes is booming worldwide. The wood coatings market is on track to grow from $12.7 billion in 2026 to $18.8 billion by 2036, which just goes to show how much people value the timeless appeal of well-finished wood. You can find more data on the wood stain market's growth and its drivers if you like to dig into the numbers.

Is This a DIY Project or a Job for Professionals?

Figuring out how to stain wood cabinets also means deciding who is going to do the work. Taking the DIY route can be rewarding and save you money, but it’s a job that demands patience, attention to detail, and a proper workspace. It can be an overwhelming task for a busy homeowner or facilities manager.

Before you commit, think honestly about these points:

  • Time Commitment: This isn’t a quick project. You’re looking at several days of removing doors, cleaning, sanding, staining, sealing, and reinstalling. It takes time to do it right.
  • Cabinet Condition: Are your cabinets in good shape, or are you dealing with deep gouges, layers of old paint, or complex trim? The prep work can become difficult quickly, especially for a beginner.
  • Desired Finish: Getting a perfectly even, streak-free finish takes practice. If you’re aiming for a flawless look and don’t have much experience, hiring a pro is often the best call.

For many homeowners and business owners, bringing in an expert just makes sense. A professional team like Wheeler Painting has the experience to deliver a durable, high-end finish without the headache and time commitment of a DIY project.

This guide will walk you through the entire process, whether you decide to tackle it yourself or just want to understand what goes into a professional job.

To give you a clearer picture of the journey ahead, here’s a quick breakdown of what to expect. This will help you plan your time and focus your efforts where they matter most.

Your Cabinet Staining Project at a Glance

Phase Estimated Time Key Focus
1. Planning & Prep 3-5 hours Choosing your stain and finish; setting up a dedicated workspace.
2. Removal & Cleaning 2-4 hours Carefully removing hardware and doors; deep cleaning with a degreaser.
3. Sanding 4-8 hours Stripping the old finish and creating a smooth, receptive surface.
4. Staining & Drying 3-6 hours Applying stain evenly; allowing for 24-48 hours of dry time.
5. Topcoating & Curing 3-5 hours Applying a protective clear coat; waiting for the finish to fully cure.
6. Reassembly 2-3 hours Reinstalling hardware, doors, and drawers.

As you can see, the sanding and drying phases are where you'll spend a good chunk of your time. Rushing these steps is the number one mistake people make, so plan accordingly and give your project the time it deserves for a finish that will last for years.

Choosing Your Stain and Gathering Essential Supplies

Before you touch a single piece of sandpaper, let's talk about the most crucial part of the prep work: your game plan. Getting your stain and supplies sorted out first is the secret to a smooth project. Nothing kills momentum like a last-minute trip to the hardware store.

Think of this as your master list to get everything you need in one go, so you can focus on bringing your vision to life.

Oil-Based vs. Water-Based Stains

The first big decision you'll make is the stain itself: are you going with an oil-based or water-based product? They each have their place, and the right choice depends on your project goals.

For years, oil-based stains were the standard. They seep deep into the wood grain, creating a rich color. They also have a longer "open time," meaning they stay wet longer. This gives you more time to work the stain in and wipe off the excess, which is a huge help for avoiding lap marks, especially if you're new to staining.

Lately, however, water-based stains have become very popular, and for good reason. They dry quickly, letting you apply multiple coats in a single day and shortening your project timeline. More importantly, they have far fewer volatile organic compounds (VOCs). That means a much less intense smell, which is a game-changer for any indoor project, particularly in a home with kids or an active commercial space.

The entire industry is moving toward these greener options. Water-based stains are expected to cut VOC emissions by 70-80% compared to their oil-based counterparts, driving a massive shift in the US wood stain market through 2036. This move is part of a larger trend you can read about in these industry trends and growth opportunities in wood coatings.

Picking the Perfect Color

The wall of stain colors at the store can be intimidating. To narrow it down, start by looking at the fixed elements in your room—your flooring, countertops, and backsplash. Are you aiming for a dramatic contrast or a more blended, harmonious feel?

Pro Tip: Never trust the color on the can or the small sample chip in the store. Every type of wood takes stain differently. A color that looks great on maple might look totally different on oak. Always buy a small test can and try it on an inconspicuous area, like the back of a drawer front, to see how it will actually look on your cabinets.

If you’re trying to modernize classic honey-oak cabinets, try to avoid stains with heavy yellow or red undertones, as they'll just amplify the orange. Instead, look for cooler tones—muted browns, grays, or even a deep charcoal can neutralize the warmth and give you a fresh, updated look.

Your Complete Shopping List

Walking into the hardware store with a detailed list is your best defense against overspending and forgetting something critical. Here’s a full rundown of what you’ll need.

Preparation & Cleaning

  • Drill or Screwdriver: To remove cabinet doors, drawers, and all hardware.
  • Painter's Tape and a Marker: For labeling where each door and hinge belongs. Don't skip this!
  • Drop Cloths or Plastic Sheeting: To protect all surrounding surfaces.
  • Degreaser: A powerful cleaner like TSP (trisodium phosphate) is a must for cutting through kitchen grime.
  • Buckets and Sponges: For your cleaning and rinsing solutions.

Sanding & Staining

  • Sandpaper in Multiple Grits: You'll want 120-grit to start and 220-grit for the final smoothing pass.
  • Orbital Sander: This will save a significant amount of time on large, flat surfaces.
  • Sanding Sponges: Perfect for getting into the detailed or curved parts of your doors.
  • Pre-Stain Wood Conditioner: This is essential, especially for soft or blotch-prone woods like pine and maple, as it helps the stain absorb evenly.
  • Wood Stain: Your chosen color and formula (oil or water-based).
  • Lint-Free Rags or Foam Brushes: For applying the stain and wiping away the excess.

Finishing & Safety

  • Polyurethane Topcoat: A satin or semi-gloss finish provides great durability for kitchen or commercial cabinets.
  • High-Quality Brush: Use a natural bristle brush for oil-based topcoats and a synthetic brush for water-based ones.
  • Safety Gear: Always use safety goggles, gloves, and a respirator to protect yourself from dust and fumes.

Having everything on hand makes the work flow much better. These same principles of good preparation apply to any staining job, inside or out. For more tips on choosing the right product for an exterior project, take a look at our guide to finding the best stain for fences.

The Critical Prep Work for a Professional Result

I can't stress this enough: your final stain job will only be as good as your prep work. This is the stage that makes or breaks the entire project. If you've ever seen a cabinet staining job that looks splotchy or uneven, it's almost always because this step was rushed.

This isn't the glamorous part, but taking the time to properly dismantle, clean, and sand your cabinets is what creates the smooth, durable finish you're after. Let's walk through the process.

Setting Up Your Workspace and Removing Hardware

First, you need a dedicated work zone. A garage or a well-ventilated basement is ideal. Lay down drop cloths to catch dust and drips, and set up a pair of sawhorses or a large work table. This gives you a proper station to work on the doors.

Now it's time to take everything apart. Grab a drill or screwdriver and carefully remove all the cabinet doors and drawer fronts. As you take each one down, you must label it. A small piece of painter's tape with a simple code (like "UR" for upper right, or "BS" for below sink) placed inside the hinge pocket and on the cabinet frame will save you a massive headache later. You don't want a frustrating puzzle on your hands when it's time to reassemble.

Finally, take off all the hardware—hinges, knobs, pulls, everything. Put them into labeled plastic baggies so you know exactly which screws go with which hinge. Years of use can cause subtle shifts, and mixing them up can lead to misaligned doors.

Process flow diagram showing three steps of supply gathering: Choose, Gather, and Test with corresponding icons.

As the diagram shows, once your supplies are gathered, testing your stain is a non-negotiable step before you commit to the whole project.

The All-Important Deep Clean

Over the years, kitchen cabinets get coated in a fine layer of grease, cooking fumes, and grime. Stain simply won't penetrate that layer. You have to start with a thorough degreasing.

For this job, a heavy-duty cleaner like TSP (trisodium phosphate) or a quality TSP substitute is your best bet. Mix it according to the directions on the box and scrub every surface of the cabinet boxes, doors, and drawer fronts. The amount of grime that comes off can be surprising.

After scrubbing, you have to rinse every trace of the cleaner off. Any residue left behind will interfere with the stain and topcoat. Wipe everything down with a clean rag and fresh water, then go over it a second time with another clean, damp rag to be sure. Let the wood dry completely before you move on to sanding.

Sanding for an Even Finish

Sanding is a grind, but it's also the single most crucial step for getting a beautiful, even stain color. Your goal is to completely remove the old, glossy topcoat (like lacquer or polyurethane) so the new stain can soak into the wood. For most projects, you need to get down to bare wood.

Key Takeaway: You must sand down to the raw wood. Staining over an existing finish is a recipe for disaster. The stain will sit on top, creating a sticky, blotchy mess that will never cure properly and will scratch off easily.

Start with 120-grit sandpaper on a random orbital sander for the large, flat surfaces. It has enough power to remove the old finish without damaging the wood. For detailed areas—like routed edges or panel inserts—a sanding sponge of the same grit is perfect for getting into the contours.

Once the old finish is gone, switch to a finer 220-grit sandpaper for your final pass over every surface. This critical step erases any sanding marks from the coarser grit and prepares the wood grain to accept the stain evenly.

Now for cleanup. Any dust left behind will get trapped in your stain, creating a gritty, rough texture. A tack cloth is the old-school standard, but a microfiber cloth lightly dampened with mineral spirits works even better to pick up every last particle. To do the job right, using one of the best shop vac for dust collection is a game-changer for getting the area truly clean.

With your cabinets clean, sanded smooth, and completely dust-free, you're finally ready for the fun part: applying the stain.

How to Apply Stain Evenly Without Streaks

A hand applies wood conditioner or stain to a brown wooden cabinet door with a cloth.

This is where all that tedious prep work really starts to pay off. With your cabinets sanded smooth and clean, it’s finally time to add the color that will completely transform your space. Applying stain properly is what separates a DIY-looking job from a professional one.

It's less about force and more about technique. We’ll walk through the exact methods to get a rich, even color, ensuring your hard work results in a streak-free finish you can be proud of.

Don't Skip the Wood Conditioner

Before you open that can of stain, there's a crucial step you can't ignore: applying a pre-stain wood conditioner. Think of it as a primer for stain. It’s a thin, clear liquid that soaks into the wood, evening out the porosity of the surface so your stain absorbs uniformly.

Without it, you’re asking for trouble, especially with certain woods. Softwoods like pine and maple are notorious for getting blotchy. But even some hardwoods, like cherry and birch, have unpredictable grain patterns that can absorb stain unevenly. Conditioner is your insurance policy against a splotchy, amateur-looking finish.

Application is simple. Just wipe a liberal coat onto the bare wood with a clean, lint-free cloth. Let it soak in for about 15-30 minutes—always check the can for the manufacturer's specific instructions—then wipe off any excess. The key is to apply your stain within a couple of hours after conditioning for it to work properly.

The Art of Wiping On and Wiping Off

For staining cabinets, your best tool is often the simplest: a clean, lint-free rag. A cloth gives you excellent control and lets you feel the surface as you work the stain into the grain. Foam brushes are also an option, but many find rags more forgiving, especially for beginners.

Here’s the fundamental process for a perfect application:

  • Stir, Don't Shake: First, open your can of stain and stir it thoroughly with a paint stick. Never shake the can. Shaking introduces tiny air bubbles that can get trapped in your finish. Make sure you scrape the bottom to mix all the settled pigments.
  • Apply a Generous Coat: Dip your rag into the stain and wipe a wet coat onto the wood, always moving in the direction of the grain. Don't be shy with it; you want to fully saturate the area you're working on.
  • Work in Manageable Sections: Avoid trying to stain an entire door at once. Instead, break it down. Stain the center panel first, then move to the surrounding frame. This helps you maintain a "wet edge" and prevents lap marks where sections overlap.
  • Let It Penetrate: Let the stain sit for a few minutes. The final color is directly related to how long you let it penetrate before wiping. A longer wait time means a deeper color.
  • Wipe Off the Excess: This is the most critical part of the process. Take a clean, dry cloth and wipe away all the excess stain, again moving with the wood grain. If you leave a thick film on the surface, it will become a sticky mess that refuses to dry properly.

Your goal is to color the wood, not coat it. The rich, final hue should come from pigment that has absorbed into the wood fibers, not from a thick layer of stain sitting on top. When you're done wiping, the surface should feel almost dry to the touch.

Controlling Color Depth and Consistency

Getting the perfect shade is a delicate balance. It’s determined by two things: how long you let the stain penetrate and how many coats you apply.

If you test a spot and decide you want a deeper color, the best approach is to apply a second coat—not to let the first coat sit for an excessive amount of time. A single, super-heavy coat is a recipe for a sticky finish.

For applying a second coat, here’s what you do:

  1. Let the first coat dry completely. This can take anywhere from 4 to 24 hours, depending on whether it's an oil-based or water-based product and the humidity in your room.
  2. Once dry, lightly apply the second coat using the exact same "wipe on, wipe off" technique.
  3. The second coat won't absorb as much as the first, but it will subtly deepen the color, adding a beautiful layer of richness.

Mastering this method gives you precise control over the final look. While a DIY cabinet project is rewarding, remember that large-scale renovations or complex jobs often benefit from professional expertise to guarantee a flawless, long-lasting finish.

Applying a Durable Topcoat and Final Reassembly

You’ve done the hard work with the staining, and your cabinets probably look fantastic. But don't put the tools away just yet. This next step—applying a protective topcoat—is what separates a good DIY job from a professional, long-lasting finish.

Think of the topcoat as armor for your hard work. It’s what stands between your newly stained wood and the reality of a busy kitchen or office: sauce splatters, clanking dishes, and daily scuffs. Without it, your beautiful stain is left vulnerable and won't hold up for long.

Choosing the Right Polyurethane

When it comes to protecting cabinets, polyurethane is the go-to finish. Your main decision will be between classic oil-based formulas and more modern water-based versions. The choice will affect your project's final look and your application experience.

  • Oil-Based Polyurethane: This is the traditional workhorse, famous for its incredible durability. It cures to a very hard finish and adds a warm, amber glow that can deepen the look of many wood stains. The trade-offs? It dries slowly, the fumes are strong (high VOCs), and cleanup requires mineral spirits.

  • Water-Based Polyurethane: This is a popular choice today, as it dries quickly with very little odor. It cleans up with just soap and water, which is a huge plus. It also provides a crystal-clear finish that won’t change your stain color. Modern water-based polys are exceptionally durable.

For most home and commercial projects, water-based polyurethane is an excellent choice. The low odor and fast drying time make the process much smoother and less disruptive.

How to Apply a Bubble-Free Finish

Applying a topcoat is all about finesse. The secret to a glass-smooth finish isn't one thick coat; it's several thin, even coats. This builds strength and eliminates drips, bubbles, and brush marks.

Your applicator matters. Use a high-quality natural bristle brush for oil-based products or a synthetic bristle brush for water-based ones. A cheap brush may shed bristles into your finish—a frustrating mistake.

When you're ready, stir the polyurethane can gently but thoroughly. Never shake the can. Shaking creates a foam of tiny air bubbles that will transfer to your wood and ruin the surface.

Dip your brush and apply the finish in long, smooth strokes, always moving with the wood grain. Overlap each pass slightly to maintain a "wet edge" and prevent lap marks.

Let the first coat dry completely—check the can for the specific recoat time. Once dry, give the surface a very light sanding with 220-grit sandpaper. This quick "scuff" knocks down any dust nibs and gives the next coat something to grip onto. Wipe all dust away with a tack cloth before applying your next coat. For cabinets, two to three coats will give you the rock-solid protection you need.

For a deeper dive into getting that perfect look, it's worth the time to review the finer points of mastering wood finishing techniques.

The Final Reassembly

This is the moment you've been waiting for. Once that final topcoat has fully cured—which can take anywhere from 24 hours to several days—it's time to put everything back together. Be patient here. A finish that feels dry to the touch might not be fully hardened, and you can easily scratch it if you rush.

Grab those labeled bags of hardware. It’s usually easiest to reattach the hinges to the doors first, then hang each door on its original cabinet frame. Finally, install your knobs or pulls.

Take a step back and enjoy the new look. You've just tackled a major project and given your space a complete refresh. While it's an incredibly satisfying DIY, a flawless result requires a serious investment of time and patience.

When to Call a Professional for Cabinet Staining

There's a special kind of pride that comes from a successful DIY project, and staining cabinets can certainly be one of them. But it’s not a simple weekend task. Sometimes, the smartest move you can make for your home or business is recognizing when to let an expert take over. This isn't admitting defeat; it’s making a smart decision for a guaranteed, high-quality result without the headaches.

For most property owners, it really boils down to time versus money. A proper cabinet staining job can easily take up several weekends, and that's if everything goes smoothly. If your schedule is already stretched thin, hiring a professional contractor gets you that flawless finish without sacrificing your valuable time.

Signs You Should Hire a Professional

While the basic idea of staining seems straightforward, some cabinets are just plain tricky. If any of these descriptions sound like your project, it’s a strong signal that calling in an expert is your best bet.

  • Intricate Details or Ornate Doors: Do your cabinets have deep grooves, detailed carvings, or louvered slats? These are a nightmare to sand and stain evenly by hand. A pro has the right spray equipment and techniques to get into every nook and cranny without leaving drips or blotchy spots.
  • Existing Damage: If you're dealing with deep gouges, water stains, or peeling veneer, staining over it won't fix the problem. A professional contractor knows how to properly repair the underlying wood, which is crucial for a finish that looks good and lasts.
  • You're Making a Drastic Color Change: Going from a dark espresso stain to a light, natural wood tone is a huge job. It means chemically stripping the old finish completely, then meticulously sanding to remove every last trace of the old color. It’s a messy, time-consuming process that often requires more than what most DIYers bargain for.
  • You Have a Large Kitchen or Commercial Space: The sheer volume of work in a big kitchen, an office space renovation, or a retail build-out makes a DIY approach almost impossible. A professional crew can complete the project in a fraction of the time, keeping disruption to your home or business at a minimum.

The biggest advantage of hiring a professional isn’t just speed—it's the guarantee of a flawless, durable finish. Professionals have controlled environments for spraying, access to commercial-grade products, and the experience to troubleshoot issues that can derail a project for a first-timer.

The Value of Professional Cabinet Refinishing

Bringing in a pro is more than just a time-saver; it’s an investment in a top-tier result that adds value to your property. This is especially true for business owners and facilities managers who need reliable, long-lasting work for their commercial construction and renovation projects.

A team like Wheeler Painting manages every detail, from the painstaking prep work to applying the final protective topcoat. We understand how different wood species—like oak, maple, or cherry—absorb stain, and we know how to achieve that perfect, even color that only comes with years of hands-on experience.

For homeowners, it means your kitchen update is done right the first time. For business owners, it ensures your renovation stays on track with minimal downtime. While there's satisfaction in DIY, there's certainty in a professional job. For a closer look at our process, see what you can expect when working with professional cabinet painters near me.

Ultimately, if you’re looking for a high-end finish without the steep learning curve and time commitment, calling a pro is the way to go.


Ready to transform your cabinets with a guaranteed professional finish? Whether it's a residential kitchen remodel or a large-scale commercial renovation, the expert team at Wheeler Painting is here to help. Contact us today for a stress-free consultation and a detailed estimate for your project.

How to Remove Old Paint Like a Pro in Puget Sound

That cracked, peeling paint isn't just an eyesore—it's the only thing standing between you and a beautiful, durable finish. For homeowners and business owners alike, getting rid of that old layer is the most important part of any paint job. The process comes down to four core methods: good old-fashioned manual scraping, chemical stripping, heat application, and media blasting. Choosing the right one depends on what you're working with and the size of your project.

Your Guide to Removing Old Peeling Paint

A metal scraper removes peeling light green paint from wooden house siding, with paint flakes on a towel.

Whether you're a homeowner tackling a weekend project or a facilities manager planning a major refresh, knowing how to properly remove old paint is the key to success. When you strip and prep a surface the right way, your new coat of paint will adhere properly, look fantastic, and hold up for years to come. This guide is designed to give you a clear, practical path forward, helping you feel less overwhelmed by the process.

We'll break down the tools and techniques we use in the field, because a professional-grade finish starts with understanding the fundamentals—especially here in the demanding Puget Sound climate. Our goal is to provide simple, helpful terms to build your confidence.
Understanding Your Options

Before you grab a scraper or can of stripper, it helps to see the big picture. Every method has its place, from small residential touch-ups to large-scale commercial renovations.

Here's a quick look at how these methods compare.

Paint Removal Methods at a Glance

Method Best For Difficulty Level Key Tools
Manual (Scraping/Sanding) Small areas, already flaking paint Low Scrapers, sanders, wire brushes
Heat Guns Multiple paint layers on wood, metal Medium Heat gun, scrapers, respirators
Chemical Strippers Intricate details, metal surfaces Medium Stripper, brushes, scrapers, PPE
Media Blasting Large exterior surfaces, industrial jobs High (Pro-level) Blasting equipment, compressor, media

As you can see, the right tool for the job really depends on the situation. Let's dig a little deeper into these options.

  • Manual Methods (Scraping & Sanding): This is your go-to for small patches where paint is already failing. It’s straightforward but labor-intensive.
  • Heat Guns: These are great for softening thick, stubborn layers of old paint on durable surfaces like wood siding, making it much easier to scrape away.
  • Chemical Strippers: Perfect for furniture with intricate details or for removing paint from metal without causing damage. The chemicals do the hard work of dissolving the paint's bond.
  • Media Blasting: This is the heavy-duty, professional option for huge projects, like stripping an entire commercial building or cleaning industrial equipment.

The key is matching the method to the surface material, the number of paint layers, and the scale of the job. A heat gun might be ideal for vintage wood trim but a poor choice for drywall.

Choosing the wrong method doesn't just waste time—it can permanently damage the surface underneath. We've seen it happen. A simple repaint can quickly turn into a costly repair, which is a real risk for historic homes and commercial buildings alike.

As a local general contractor serving Western Washington since 1991, we’ve handled it all. From restoring classic Puget Sound homes to prepping large retail spaces for a new look, our team at Wheeler Painting & Restoration Services knows how to pick the right strategy. We're sharing our hands-on experience here to help you get started with confidence.

Safety First: Prepping Your Work Area Like a Pro

Before a single flake of old paint comes off the surface, your most important job is setting up a safe and contained workspace. We can't stress this enough. Whether you're working on a bathroom in your home or a large commercial space, this step is non-negotiable. It’s how we protect our crew, and it’s how you’ll protect yourself, your family, or your employees from potential hazards.

The biggest concern is always lead-based paint. If your property was built before 1978, you have to work under the assumption that it's there. The EPA's data is sobering: a staggering 87% of homes built before 1940 contain lead paint. The moment you scrape, sand, or heat that paint, you can release toxic dust and fumes. This is a serious risk that requires careful management.

Identifying and Dealing with Lead Paint

So, what's the first move? Test for lead. You can find an EPA-recognized lead test kit at most hardware stores. They're straightforward to use and give you a clear answer on the spot.

If that test comes back positive, the game changes. You are now dealing with hazardous material, and there are strict federal and local rules for handling and disposal. Honestly, for most property owners, this is the point where you should put the tools down and call in a certified professional. At Wheeler Painting, our teams are fully trained and certified in lead-safe practices. We have the proper equipment and knowledge to manage the risk correctly from start to finish.

Your Personal Protective Equipment (PPE) Checklist

Even if you’ve ruled out lead, paint removal is messy work. You'll be dealing with dust, debris, and potentially strong chemicals. Your PPE is your personal shield. The gear you need depends on the removal method you choose.

  • Respirator: For any kind of sanding or dry scraping that creates dust, an N95 or P100-rated respirator is a must. If you're using chemical strippers, you absolutely need a respirator with organic vapor cartridges to protect your lungs from fumes.
  • Eye Protection: Don't even think about starting without it. Safety glasses are good; sealed goggles are better. They'll keep paint chips, dust, and chemical splashes out of your eyes.
  • Gloves: For scraping and sanding, a pair of heavy-duty work gloves will do. For chemical strippers, you need chemical-resistant gloves—usually butyl or nitrile—to prevent skin burns.
  • Coveralls: A simple set of disposable coveralls keeps dust and chemicals off your skin and clothes. This makes cleanup easier and prevents you from tracking contaminants through your home or job site.

When the job is done, it's just as important to follow the right steps for removing personal protective equipment (PPE) to avoid spreading any contaminants.

Containing the Mess

Proper containment is what separates professionals from amateurs. It protects the rest of your property and makes the final cleanup much easier.

First, remove everything you can from the room—furniture, rugs, décor, and equipment. For heavy items you can't move, cover them completely with thick plastic sheeting and tape down every seam.

Next, cover the floor with a quality drop cloth (canvas works well) and extend it several feet beyond your work area. If you're inside, use plastic sheeting and tape to seal off doorways and shut down any HVAC vents. You do not want dust getting into your ventilation system.

Pro Tip: When you lay down drop cloths, overlap them by at least a foot and tape them together. This small detail prevents dust and paint chips from getting into the cracks while you work.

It's also interesting to see how the industry is shifting toward safer products. There's a growing demand for more effective paint removers, with a push toward sustainable, bio-based solvents. The market is projected to see a 3.7% CAGR through 2030 as these newer, safer formulas become standard. This is great news for both professionals and DIYers. You can learn about the paint remover market's growth and see how these trends are shaping the products we use.

Choosing Your Removal Method From Scraping to Stripping

Alright, your space is prepped and you're ready to tackle that old paint. Now for the real question: how are you going to get it off? The path you choose impacts your timeline, budget, and the quality of your final finish. From basic scraping to heavy-duty media blasting, let's walk through the options so you can pick the right tool for your project.

But first, a crucial safety check. Before you touch a single paint chip, you have to think about lead. This is non-negotiable, especially in Western Washington where we have so many beautiful older homes and commercial buildings.

Flowchart guide on lead paint safety, determining risk based on house construction year and suggesting test kits.

Use this guide as your starting point. The rule is simple: if the building was constructed before 1978, you must test for lead before you do anything else.

Manual Scraping and Sanding

This is the foundation of paint removal, relying on good old-fashioned elbow grease. It’s the natural starting point for nearly any project, especially where paint is already peeling, bubbling, or cracking.

You'll want to tackle any loose, flaky areas on wood, metal, or drywall with this method first. Even if you plan to use another technique later, you always start by scraping off the easy-to-remove sections.

Your go-to tools here will be a 5-in-1 painter's tool, a set of pull scrapers with various blade profiles, and a stiff wire brush. Once the loose paint is gone, you can move on to sanding—a power sander for large, flat areas and flexible sanding sponges for getting into detailed curves.

A pro tip: Don't force a flat scraper on a curved piece of trim. You’ll just end up gouging the wood. Match your scraper’s shape to the surface. It takes a little more time but ensures a clean removal and avoids a repair job.

Using a Heat Gun

When you're facing multiple, stubborn layers of paint, a heat gun can work wonders. By applying high heat (often 750 to 1,000°F), the paint softens and bubbles, letting you peel it away with a scraper.

Imagine stripping an old door with five coats of paint. Scraping it cold would be an exercise in frustration. With a heat gun, you can often lift those layers in long, satisfying sheets.

Be warned, though: heat guns pose a very real fire risk, especially on old, dry wood. More importantly, they can vaporize lead paint, creating toxic fumes you can easily inhale. This is why the EPA's RRP rule strictly limits their use on pre-1978 properties.

Never use a heat gun on:

  • Drywall or plaster, as it can easily scorch the surface.
  • Vinyl siding, which will melt almost instantly.
  • Any surface near flammable materials like drapes or insulation.

Applying Chemical Strippers

For intricate surfaces—think detailed crown molding, antique furniture, or ornate metal railings—chemical strippers are often the best solution. They work by dissolving the paint’s bond, doing the hard work for you.

You'll generally find two types:

  1. Solvent-Based: These are the traditional, fast-acting strippers. They're incredibly effective but release potent fumes (volatile organic compounds or VOCs). If you use them, you need fantastic ventilation and a respirator rated for organic vapors.
  2. Caustic-Based: These are often sold as thick pastes. They work more slowly—you might apply the product, cover it, and let it sit for hours. They have lower VOCs but can be messy to clean up and may darken some woods.

If a business owner needs to restore an old, ornate metal gate at their property's entrance, a chemical stripper is the perfect choice. It gets into every detail without the abrasion of sanding, preserving the metalwork.

Media Blasting

When the job is huge, professionals turn to media blasting. This process uses a high-pressure airstream to shoot abrasive particles (the "media") at a surface, literally blasting the paint off.

This is absolutely not a DIY technique. It requires expensive, specialized equipment and a skilled operator to avoid destroying the underlying surface. For a facilities manager stripping a large concrete warehouse or a steel-framed industrial building, however, it’s the fastest and most efficient option.

Common media types include:

  • Sand: The classic choice, but creates hazardous silica dust.
  • Soda: Gentle and cleans the surface simultaneously.
  • Walnut Shells: A biodegradable option that’s great for softer materials.
  • Glass Beads: Used for creating a fine, polished finish on metal.

For massive commercial renovations or removing tough industrial coatings, nothing matches the power of media blasting. For most home projects, it’s overkill. When a project feels overwhelming, that's your cue to call in a professional. At Wheeler Painting, we have the experience to handle everything from residential home improvement services to those big "commercial construction near me" projects, ensuring the right method is used safely and effectively.

Mastering Surface-Specific Removal Techniques

Not every surface is created equal. Using the wrong paint removal technique can turn a simple project into a costly repair. A method that works beautifully on rugged wood siding might ruin delicate interior drywall. This is where experience pays off—knowing which tool and technique to use for the job at hand.

Whether you're a homeowner in the Puget Sound area or a facility manager overseeing a commercial renovation, let’s walk through the right way to tackle the most common surfaces. These are the field-tested strategies we use every day to get professional results.

Preserving Wood Siding and Trim

Wood is probably the most common material people need to strip, from exterior siding to historic interior trim. The goal is always to get the old paint off without gouging or splintering the wood.

For flat, exterior wood siding, a combination of scraping and sanding is often your best bet. Start with a sharp pull-scraper to lift away all loose, peeling paint. Once the bulk of it is gone, an orbital sander with medium-grit paper will smooth out the remaining paint edges.

The secret to handling curved or detailed trim is to ditch the flat scraper. You'll inevitably dig into the wood. Instead, invest in a scraper set with multiple blade profiles—concave, convex, and pointed. Matching the blade to the trim's contour makes all the difference.

If you’re facing thick layers of paint on old wood, a heat gun can be helpful, but you must be careful. It softens the paint for easy removal but is also a fire hazard, especially with the aged wood found in many historic Western Washington homes. Always keep a water spray bottle handy to mist the area.

Tackling Metal Railings and Fixtures

From wrought-iron fences to steel handrails in a commercial building, metal presents its own challenges. The main goal here is to strip the paint completely while prepping the surface to prevent rust—a constant battle in our damp climate.

For metal, especially ornate pieces, chemical strippers are often the most practical choice. A gel-based stripper clings to vertical surfaces like railings, dissolving multiple paint layers without the abrasive damage of sanding. Apply the stripper, let it work, and then use scrapers and wire brushes to clear away the softened paint. To learn what comes next, our guide on how to properly paint metal surfaces has you covered.

After stripping, it’s critical to clean the metal to remove all chemical residue. Any leftover stripper will ruin your new primer and paint. Wipe the surface down with mineral spirits or the recommended solvent, then apply a rust-inhibiting metal primer as soon as possible.

Stripping Porous Masonry Like Brick and Concrete

Brick and concrete are tough, but their porous nature means paint can seep deep into the surface, making it difficult to remove without scarring the material.

For light paint jobs, a pressure washer paired with a specialized masonry cleaner can sometimes work. But for a fully painted brick wall, you'll likely need a caustic-based chemical stripper. These thick pastes are applied to the surface and covered with paper or plastic, letting them sit for up to 24 hours. This poultice method actually draws the paint out from the brick's pores.

It's a messy, patient process, but it's the surest way to strip paint from brick without damaging it. For huge projects, like an entire commercial facade, media blasting with a gentle abrasive might be the answer, but that's a job strictly for professionals.

Handling Delicate Interior Surfaces

When you move indoors to surfaces like kitchen cabinets and drywall, you need a much lighter touch. Aggressive scraping, high heat, or harsh chemicals can easily ruin these materials.

  • Drywall: Never use a heat gun or caustic strippers on drywall. The heat can scorch the paper, and moisture from strippers will weaken the gypsum core. The right way is to carefully scrape any peeling paint, then use a sander to feather the edges. You may need to skim-coat the area with joint compound to get a perfectly smooth surface.

  • Kitchen Cabinets: If you're stripping paint from wood cabinets, a quality solvent-based stripper is a good choice. It works faster and is less likely to raise the wood grain than water-based options. Ensure you're in a well-ventilated space and wearing a respirator with organic vapor cartridges.

  • Windows and Glass: Getting old paint off glass panes without scratching them is a common headache. You can learn some great techniques on how to remove paint from window glass like a pro.

This demand for proper paint removal is huge. The global paint remover market hit $1.805 billion in 2023 and is on track to reach $3.179 billion by 2033, spurred by post-pandemic renovation booms. Here in Puget Sound, where regional data suggests 40% of commercial spaces need a refresh every 5-7 years, calling in a pro like Wheeler Painting helps you avoid the 25% failure rate from chemical burns or residue common in DIY jobs.

Prepping for a Flawless New Coat of Paint

A person's hand wiping sawdust from a wooden trim with a cloth, preparing it for painting.

Getting all that old paint off feels like a huge win, but the job’s not over yet. What you do next is what separates a decent DIY paint job from a professional finish that lasts. This final prep work creates the perfect canvas for your new coat of paint.

We've seen it countless times—property owners get impatient here. Rushing this step is a surefire way to watch your new paint start failing in less than a year. A clean, smooth, and properly prepared surface is the foundation of a great paint job, whether you're updating a room or tackling a large commercial project.

Clean and Neutralize the Surface

After stripping, your surface is likely covered in dust, paint flakes, and possibly chemical residue. The first thing you need to do is get it completely clean. This is non-negotiable if you used a chemical stripper, as any leftover residue will ruin your primer.

A simple wipe-down with warm water and a powdered detergent usually does the trick, followed by a clean water rinse. For wood that's been chemically stripped, we often recommend a final rinse with a vinegar-and-water solution to neutralize any lingering chemicals.

This whole process of stripping old coatings is a massive business. The global paint remover market hit roughly $6.8 billion in 2023, driven by a boom in renovation projects. In North America alone, the market is worth about $2.0 billion, as property owners—especially in places with tough weather like the Puget Sound—look for better ways to refresh their buildings. You can see more on the trends shaping the paint remover market on datainsightsreports.com.

Make Those Necessary Repairs

Now that the surface is bare and clean, you can see every little flaw. This is your chance to fix them. It's tempting to paint over dings, gouges, and cracks, but they will show through the new paint.

  • For Wood: Use a high-quality, sandable wood filler and a putty knife to fill any gouges, old nail holes, or cracks. Overfill the spot slightly to allow for shrinkage, then sand it perfectly flush.
  • For Drywall: Use spackling or joint compound for small holes and cracks. For larger repairs, use drywall tape with your compound to prevent cracks from returning.
  • For Masonry: On brickwork, repair any crumbling mortar joints. For concrete, fill cracks with a dedicated masonry patching compound. This is key to preventing water intrusion.

Taking the time to make these small repairs is what creates that flawless, uniform look. It’s the difference between a project that looks "finished" and one that looks professionally executed.

Sand Smooth and Prime for Success

Even after patching, your surface probably isn't perfectly smooth. A final sanding creates a uniform texture for the paint to grip. For most surfaces, a quick pass with fine-grit sandpaper (180-220 grit) is all you need. The goal isn't to remove more material, but to "scuff" the surface.

Wipe away all sanding dust with a tack cloth. Now, you're ready for the most important step before painting: primer. A good primer does three critical jobs:

  1. Seals the Surface: It prevents porous materials like bare wood or fresh drywall mud from soaking up your expensive topcoat.
  2. Improves Adhesion: It gives the new paint a solid surface to grab onto, which is your best defense against peeling.
  3. Blocks Stains: It prevents any stubborn stains or tannins from bleeding through and ruining your new paint color.

Choosing the right primer is key, especially after patching drywall. If you’re working with sheetrock, our guide can walk you through the specifics of whether you need to prime sheetrock before painting. Follow these prep steps, and you're guaranteeing a new paint job that won't just look incredible—it will last.

When to Call a Professional for Your Project

There's a real satisfaction in tackling a project yourself, but with paint stripping, it's crucial to know the difference between a manageable task and a job best left to the pros. Sometimes, the smartest move is knowing when to step back to protect your property, your schedule, and your health.

The biggest non-negotiable is the potential for lead-based paint. If your home or commercial property was built before 1978, you must assume lead is present until proven otherwise. Once lead is confirmed, the project becomes a hazardous material abatement. Federal and local laws have specific, strict rules for handling this to prevent toxic dust from contaminating your property and harming people.

For projects involving lead paint, hiring an EPA Lead-Safe Certified firm like Wheeler Painting & Restoration Services isn't just a good idea—it's essential for safety and compliance. We have the specialized training, containment systems, and disposal methods to manage the risk correctly.

Assessing Project Scale and Complexity

Beyond the critical issue of lead, the sheer size and complexity of the job can quickly overwhelm even the most ambitious person. Stripping a single piece of furniture is one thing; stripping the entire exterior of a multi-story building is another beast entirely. The time, labor, and specialized equipment required for large-scale work are often more than a property owner can manage.

Think about these real-world scenarios where calling a pro makes all the difference:

  • Large Commercial Spaces: We often work on retail build-outs and office space renovations where thousands of square feet of surfaces need stripping on a tight deadline. Our crews use equipment like industrial media blasters to get the job done efficiently, minimizing downtime for the business.
  • Multi-Story Exteriors: Working high up on ladders and scaffolding isn't just difficult, it's dangerous. Our teams are fully trained, licensed, and insured for working at height, which takes all that risk off your shoulders.
  • Intricate Historic Details: Old homes are filled with beautiful, often irreplaceable, woodwork. Trying to strip a century-old mantle or detailed crown molding without the right touch can easily lead to permanent damage. This work demands a finesse that only comes from years of experience.

Hiring a professional team means you're not just paying for labor; you're paying for a guaranteed result. You get the benefit of our experience and avoid the common pitfalls that can ruin a surface. For these bigger jobs, knowing how to choose a general contractor is your first step toward a successful project.

The Value of Professional Efficiency

Finally, you have to ask yourself what your time is worth. A project that could consume all your weekends for a month is often something our crew can complete in just a few days. For business owners and facility managers in the Puget Sound, that speed is everything—it means less disruption and a faster return to business as usual.

When you bring in Wheeler Painting, you're investing in a smooth, streamlined process. We handle the assessment, the messy removal work, and the proper disposal of all waste. You're left with a clean, perfectly prepared surface, ready for its new finish. For any significant residential or commercial construction near me project, calling in the experts is the smartest and safest decision you can make.

Your Paint Removal Questions, Answered

Over the years, we've heard just about every question there is when it comes to stripping old paint here in the Puget Sound. It’s a job that seems straightforward but can quickly get complicated. Here are some of the most common things people ask us, with straightforward answers from our experience in the field.

Can I Just Paint Over Old Peeling Paint?

This is probably the number one question we get, and the answer is always a firm no. You should never paint over peeling, cracking, or bubbling paint.

Think of it this way: the new paint needs something solid to stick to. If the layer underneath is already failing, your fresh coat has a weak foundation and will start to peel right along with the old stuff, often in a matter of months. You'll just end up with a bigger, more expensive problem. Proper prep means removing all the unstable paint first.

How Do I Know if I Have Lead Paint?

This is a critical safety question. If your house or commercial building was built before 1978, you should assume it has lead-based paint until you prove otherwise.

The only way to be certain is to test for it. You can pick up an EPA-recognized lead test kit at most hardware stores for a quick check.

For a definitive answer, especially before a large project, hiring a certified professional to conduct an inspection is the safest route. This is particularly important for facilities managers or business owners responsible for employee and public safety.

What Is the Fastest Way to Remove Paint From a Large Area?

Everyone wants to find the quickest method, but the "fastest" way really depends on the job. For a DIYer tackling a large, flat surface like wood siding, the most efficient approach is often a combination of scraping the loosest flakes off, then using a power sander.

However, for large-scale commercial renovations or industrial jobs, media blasting is almost always the quickest and most thorough method. This isn't a DIY task—it requires specialized equipment and a skilled operator who knows how to strip the paint without damaging the substrate. It's our go-to for big concrete walls or structural steel.


Feeling overwhelmed by a paint removal project? Whether it’s a historic home restoration or a large-scale commercial space, Wheeler Painting & Restoration Services has the expertise to handle it safely and efficiently. Let our team deliver a perfectly prepped surface for a flawless finish. Contact us today for a professional consultation.

How to Paint Over Wood Stain: A Guide for Home & Business Owners

Giving stained wood a clean, painted finish is one of the most satisfying upgrades you can make, whether it’s for your home or a commercial space. A fresh coat of paint can completely transform a room, making it feel brighter and more modern.

The whole job really comes down to four key stages: figuring out what you’re working with, prepping the surface, picking the right primer, and finally, applying the paint. Nailing these steps is the secret to getting a finish that looks like a pro did it, ensuring your property looks its best.

Transforming Wood From Stained to Painted

Painting over old stained wood is a fantastic way to modernize a space. We've seen it countless times—homeowners ready to say goodbye to dated honey oak trim, or facilities managers tasked with updating an office filled with dark, imposing molding. The visual payoff is huge. Rooms instantly feel brighter, cleaner, and more current.

But here’s the catch: you can't just grab a brush and start painting. Success depends on creating a new surface that will properly bond to the old one. This guide is built on our experience as a trusted local painting and construction contractor, and we’ll walk you through exactly how to get it right.

Why Proper Technique Matters

Simply painting directly over an old stain, especially one with a glossy topcoat, is a recipe for disaster. The new paint has nothing to grip, which leads to all the classic DIY frustrations property owners want to avoid.

  • Peeling and Chipping: Without proper cleaning and sanding, the paint will lift right off that slick surface. It's a common sight in high-traffic areas of both homes and businesses.
  • Stain Bleed-Through: Tannins and old pigments from the wood and stain can leach through your fresh paint, leaving ugly yellow or brown blotches that ruin the entire look.
  • Uneven Sheen: If the surface isn't prepped uniformly, you’ll end up with a blotchy, unprofessional finish where some spots are shiny and others are flat.

Projects like painting hardwood floors white are a perfect example of just how critical this prep work is for achieving a finish that can actually withstand daily life.

At Wheeler Painting, we always say that preparation is about 80% of the job. It doesn't matter if we're working on a residential home improvement project or a large-scale commercial renovation—taking the time to assess, clean, and prime the wood is what makes a paint job last.

By following a proven method, you avoid these headaches and get a beautiful, durable finish that actually boosts your property's value. We're going to show you the same foundational process our crews use on projects throughout our service area, so you can get it right the first time.

Identifying Your Wood Stain and Finish

Before you even think about picking up a paintbrush, you need to know what you’re up against. Painting over stained wood isn't just a matter of slapping on a new color; the success of your project hinges on understanding the existing finish. Is it an oil-based or water-based product? Is there a tough topcoat like polyurethane sealing everything in?

Getting this wrong is a primary reason paint jobs fail. If you use a primer that can't stick to the old finish, you're guaranteed to see peeling and chipping down the road. It's a little bit of detective work upfront that saves you a world of frustration later.

The Simple Alcohol Test

Here’s a trick we’ve used on countless jobs. Grab a cotton ball, some denatured alcohol, and find an inconspicuous spot on the wood—the inside of a cabinet door is perfect. Rub the alcohol-soaked cotton ball firmly on the finish for about 30 seconds.

Now, check your cotton ball:

  • Did the finish get sticky and rub off? You're looking at a shellac finish. Shellac dissolves in alcohol, which is actually good news—it’s one of the easier surfaces to prep for paint.
  • Did nothing happen? You most likely have a modern polyurethane or varnish, either oil or water-based. These finishes are built for durability. You'll need to rough up the surface to give your primer something to grab onto.

This simple test tells you exactly what you need to know. For example, if you're tackling classic oak cabinets from the 90s, chances are you've run into a tough, oil-based polyurethane that will demand some serious prep work.

This flowchart can help you map out your project, whether you're doing it yourself or deciding when it’s time to call in a professional painting service.

Flowchart guiding users on painting stained wood, based on visible grain and desired opaque finish.

If you're aiming for a solid, opaque color, the path forward really depends on how big the job is and how comfortable you are with the prep work involved. Sometimes, hiring a professional painting contractor is the surest way to get a flawless, lasting finish.

Oil vs. Water-Based Stains

While the topcoat is your biggest hurdle, the stain underneath still matters. A lot of older woodwork features deep, oil-based stains that have a nasty habit of "bleeding" through new layers of paint, especially lighter colors. This is where a good stain-blocking primer becomes non-negotiable.

Remember, you’re not just covering a color—you're sealing in a chemical compound. The right primer acts as a barrier, locking in old pigments so they can’t ruin your beautiful new paint job.

Think about this: up to 70% of stained surfaces in homes and older commercial properties have deep-set pigments that will cause issues if they aren't properly sealed. With oil-based products making up around 45% of the wood stain market, it's a common problem. For these, a thorough sanding with 120-150 grit sandpaper is essential to create enough "tooth" for the primer to bond, a step that can slash the risk of paint failure by 60%.

Getting Stained Wood Ready for Paint: Prep and Sanding

A hand sands a stained wooden frame, revealing raw wood, creating sanding dust.

Now that you know what kind of finish you're dealing with, we’ve arrived at the most important part of the entire job: the prep work. A great paint job is built on a great foundation, and skipping these steps is the fastest way to a finish that peels, chips, or just looks amateur.

Proper prep is more than just a quick once-over with sandpaper. It all starts with getting the surface squeaky clean. Just think about it—kitchen cabinets get coated in years of cooking grease, and baseboards in a busy office collect dust and grime. Your new paint needs something clean to grab onto, not a film of dirt.

First Things First: A Deep Clean

Before you even touch a piece of sandpaper, you have to clean the wood thoroughly. For most jobs we tackle, both residential and commercial, a trisodium phosphate (TSP) substitute is our go-to. These cleaners are fantastic at cutting through years of built-up grease, wax, and dirt without the harsh chemicals of old-school TSP.

Just mix the cleaner based on the instructions and get to scrubbing with a sponge or cloth. Really focus on the areas that get touched the most, like the wood around doorknobs and handles. Those spots are notorious for collecting oil from hands. Once you're done, rinse the surface with a clean, damp cloth and let it dry completely.

Over the course of thousands of jobs here in our community, we've seen that a simple 50/50 mix of white vinegar and water can be surprisingly effective. It often removes up to 90% of the residue from standard polyurethane finishes. Whatever you use, this initial cleaning is absolutely non-negotiable.

The Art of Sanding for a Great Grip

With the surface clean and bone-dry, it's time to knock down that glossy sheen. This step is called deglossing, and it's all about creating a surface that your primer can bite into. Paint simply can’t stick to a slick, glassy finish.

You have two solid options here: old-fashioned sanding or a chemical deglosser.

Traditional Scuff-Sanding

This is the tried-and-true method for a reason—it works. Your goal isn't to strip off all the old stain and finish down to bare wood. You just need to scuff up the surface enough to give the primer some "tooth." For this, a medium-grit sandpaper (120 to 150-grit) on a sanding block or a random orbital sander is perfect.

Always sand with the grain of the wood, using light and even pressure. You'll know you're done when the shine is gone and the whole piece has a uniform, dull look. Don't leave any shiny spots behind; those are future peeling points.

Choosing the right sandpaper grit is crucial for getting the right surface profile without damaging the wood. Here’s a quick guide to help you pick the right one for your project.

Sanding Grit Guide for Painting Over Stain

Sandpaper Grit Primary Use Case Pro Tip
80-100 Grit (Medium) For very glossy, thick finishes or minor imperfections. Use with caution. This can leave visible scratches. Only use it for the initial rough-up, then follow with a finer grit.
120-150 Grit (Medium) The ideal "sweet spot" for general scuff-sanding on most stained surfaces. This is your workhorse. It dulls the sheen effectively without being too aggressive. Perfect for cabinets and trim.
180-220 Grit (Fine) For very light scuffing or sanding between primer and topcoats for an ultra-smooth finish. We use this grit after priming to knock down any raised grain before applying the first coat of paint.

After you've done your main sanding, a quick pass with a finer grit can give you an even smoother base, but for most projects, 120-150 grit is all you need to get the job done right.

Liquid Deglosser (Sandpaper in a Can)

If you're working with something really ornate, like intricate crown molding or carved cabinet doors, sanding can be a nightmare. This is where a liquid deglosser, or "sandpaper in a can," becomes your best friend. It’s a chemical that softens the top layer of the finish, making it tacky and ready for primer.

You just wipe it on with a lint-free cloth, wait for the time specified on the can, and you're ready to prime. It's a huge time-saver on those tricky, detailed surfaces.

No matter which method you choose, don't rush this part. It's been shown that a shocking 80% of paint failures on stained wood come from improper or skipped deglossing. A little extra time here can prevent a massive headache down the road. If you want to dig deeper, this guide on how to prep wood for painting is a great resource.

Final Dust Removal with a Tack Cloth

Sanding creates a lot of fine dust, and that dust is the enemy of a smooth paint job. If you paint over it, you'll get a gritty, bumpy texture. First, vacuum everything with a brush attachment to get the majority of it.

Then, for the final, critical cleanup, grab a tack cloth. This is basically a sticky cheesecloth made specifically to pick up every last speck of dust. Gently wipe down every surface, refolding the cloth as it fills with dust. You’ll be surprised how much it picks up even after vacuuming.

This final wipe-down is the secret to a perfectly clean, dull surface—the ideal canvas for your primer. It might seem like a small thing, but it’s a non-negotiable step for getting that flawless finish you see on professionally painted kitchen cabinets.

Choosing the Right Primer and Paint for Durability

Three paint primer cans (shellac, oil-based, bonding), a brush, and molding on a workbench.

Alright, your surfaces are clean, dry, and scuffed up perfectly. You’ve built a great foundation, but now comes the part where your project’s long-term success is truly decided: choosing the right products. Slapping a standard wall primer on stained wood is a recipe for disaster.

You need a specialized primer—one designed to lock down that old finish and stop stains from bleeding right through your new paint. Think of it as the crucial mediator between the stubborn old stain and your fresh topcoat. Its job is to create a barrier and give your paint a uniform surface to grab onto.

Selecting the Ideal Stain-Blocking Primer

Not all primers are created equal, and this distinction is absolutely critical when you’re painting over stain. You’re looking for a high-adhesion, stain-blocking primer. These are formulated to grip slick surfaces and—most importantly—prevent tannins from the wood and pigments from the old stain from creeping into your new paint color.

Without the right primer, you could apply three coats of the most expensive paint, and still see ugly yellow or brown blotches emerge weeks or even months later. Here’s a breakdown of the main types you'll be choosing from.

  • Shellac-Based Primers: This is the original champion of stain-blocking and still our go-to for the absolute toughest jobs. It’s a powerhouse for sealing in everything from stubborn wood tannins to smoke, water stains, and knotty pine that loves to bleed. If you have any doubt, a shellac-based primer is your safest bet for a residential or commercial painting project.

  • Oil-Based Primers: For decades, oil-based primers were the industry standard for adhesion and durability. They grip like nothing else, sand down to a glass-smooth finish, and do a fantastic job blocking most common stains. While water-based tech has caught up, a good oil primer is still a rock-solid choice, especially for older wood with an unknown finish.

  • Water-Based Bonding Primers: Paint technology has come a long way. The best modern water-based bonding primers offer incredible adhesion and very good stain-blocking power, all with the benefits of low odor and easy soap-and-water cleanup. For most residential projects like painting oak cabinets or trim, these are more than enough to get the job done right. If you want to dig deeper into when primer is necessary, our guide on priming sheetrock before painting offers some good context.

Selecting the right product isn't just a professional recommendation; it's backed by data. Industry findings show that painting over stain can fail 35% of the time without proper product selection. Using a shellac-based sealer on VOC-heavy stains, for instance, provides a 98% effective seal, while certain blocking primers can reduce moisture ingress on exterior wood like decking by 65%—a vital consideration for exterior painting in our region.

Choosing Your Topcoat for a Lasting Finish

Once your primer has fully cured, it’s time for the rewarding part—the color. But don't let the excitement cause you to grab just any can of paint. Your topcoat choice is just as important as the primer for long-term durability. You need a finish that can handle the wear and tear of its environment, whether it's a high-traffic kitchen or a bustling commercial hallway.

For most interior work on cabinets, doors, and trim, a top-quality acrylic-latex enamel is your best bet. These modern paints are engineered for durability, curing to a hard, scrubbable finish that stands up to daily abuse. They also have low VOCs and clean up easily, making them perfect for homes and most commercial spaces.

In some extremely demanding commercial environments, like a restaurant kitchen or retail space, the exceptional hardness and chemical resistance of an oil-based enamel can offer an edge. But their strong odor and much longer dry times make them impractical for most occupied projects.

In the end, pairing the right specialty primer with a tough, durable enamel is how you guarantee all your prep work pays off. That combination is the secret to a professional-grade finish that won’t just look good on day one—it will stay beautiful for years to come.

Applying Paint for a Smooth, Professional Finish

All that careful prep work brings you to this moment. This is where your patience and technique will pay off, turning a prepped surface into a beautiful, durable finish. Getting it right is about more than just slapping on some paint; it's about building a smooth, flawless surface, one coat at a time.

The goal is to eliminate any sign that there was ever a stained finish underneath. This means creating perfectly crisp lines and avoiding common pitfalls like brush marks or drips. These are the same standards our crews at Wheeler Painting follow every day, whether we're transforming residential interiors or updating commercial properties.

The Right Tools and Techniques

Your best friends for this job are a quality angled brush and a mini roller. The brush is for "cutting in"—tackling all the corners, edges, and detailed profiles where a roller just can't get a clean line. For the flat areas, like cabinet doors or wide trim, a mini-roller with a foam or low-nap cover is your secret to a factory-smooth finish, free of brush strokes.

The key to avoiding those dreaded lap marks is to always maintain a "wet edge." Simply put, you should always be rolling or brushing from the unpainted section back into the wet paint you just applied. This lets the strokes melt into each other seamlessly, creating a single, uniform surface before anything starts to dry.

One of the biggest mistakes we see is someone trying to get full coverage in one thick coat. It’s a recipe for drips, sags, and an uneven surface. The professional method is to apply two or three thin coats, letting each one dry completely. This builds up both color and strength for a much smoother, more resilient finish.

Build Your Finish in Layers

Don't panic if the first coat of paint looks a little thin or streaky. That's completely normal. Its job is to bond with the primer and lay down the initial base of color.

Once that first coat is dry (check the can for timing), give it a quick, gentle once-over with 220-grit sandpaper. This will knock down any tiny dust particles or imperfections that have settled in the paint. After a wipe-down with a tack cloth, you’re ready for the next layer.

This is where you'll really see the magic happen. The second coat will go on more smoothly and deliver much better coverage. For most jobs, two coats over your primer is the sweet spot. But if you're making a dramatic change—like going from a dark cherry stain to a crisp white—a third thin coat is often necessary for that perfect, solid color.

Painting trim, in particular, requires a steady hand. For more in-depth advice, you can check out our other tips for painting trim.

Dry vs. Cured: Why Patience is Key

This is a detail that trips up a lot of people, but understanding it is critical for a long-lasting finish on high-traffic surfaces like doors, cabinets, and railings.

  • Drying Time: This is when the solvents evaporate, making the surface feel dry to the touch, which often happens in just a few hours. At this stage, the paint is still very delicate.

  • Curing Time: This is the real-world timeline for the paint to fully harden and reach its maximum durability. The paint molecules are cross-linking to form a tough, protective shell. This can take anywhere from a few days to 30 days, depending on the paint and the environment.

Resist the urge to put things back on shelves or close cabinet doors too soon. While the paint may feel dry, it hasn't cured. Rushing this final step can cause dents, scratches, or peeling, undoing all your hard work. A little patience at the very end ensures your new finish will look great for years to come.

When to Hire a Professional Painting Contractor

There's nothing quite like the pride of a finished DIY project. But many property owners find that painting over old wood stain can be overwhelming. It’s a job that looks simple on the surface, but one wrong step can lead to a peeling, tacky mess that’s a nightmare to fix.

So, how do you know when to trade your paintbrush for the phone? The answer often comes down to the project's scale, complexity, and your available time.

Signs You Should Call a Pro

Let's be honest—the time and effort required for a flawless finish can be massive. If your project looks anything like the scenarios below, bringing in an expert is probably your best move.

  • Large-Scale Cabinet Projects: Your kitchen is a high-value area, and cabinet finishes need to be perfect and durable. A professional crew uses specialized spray equipment to apply a rock-hard, factory-smooth coating you simply can't get by hand.

  • Commercial Renovations: For any business owner or facilities manager, downtime is money. A professional team like Wheeler Painting can tackle a large office space renovation or retail build-out with a tight, predictable schedule, getting your doors back open with minimal disruption. We also provide facility construction services for larger projects.

  • Intricate or Extensive Trim Work: Think about tackling every door, window casing, and baseboard in your entire home or office. We're talking hundreds of hours of painstaking sanding, priming, and painting. A pro team has the manpower and the systems to knock this out efficiently, delivering a consistent, beautiful finish from one room to the next.

Hiring a professional isn't just about saving yourself time. It's an investment in a high-quality, long-lasting result. A reputable local contractor has the experience to navigate the tricky chemistry of old stains and new paints, and they’ll stand behind their work with a warranty.

Ultimately, you have to weigh your own time, patience, and skill against the finish you're hoping for. For a single bookshelf, by all means, have at it! But for those big, high-stakes jobs where the results have to be perfect, calling in a pro is the surest path to getting it done right the first time.

If you're looking for "commercial painting services near me" or a "residential contractor near me," finding a trusted local company guarantees a stress-free process and a truly professional-grade transformation.

Your Top Questions About Painting Stained Wood

Over the years, we've heard just about every question there is when it comes to painting over stained wood. Here are the answers to a few of the most common ones we get from both residential and commercial clients before we start a project.

Can I Just Paint Over Stain Without Sanding?

We get this one all the time, and we know it’s tempting to look for a shortcut. The short answer is no, you really shouldn't. At the very least, the surface needs a thorough cleaning and a good scuff-sand to knock down the existing gloss.

If you skip this step, the primer simply has nothing to bite into. You’ll end up with a finish that chips and peels easily, and all your hard work will be wasted in a matter of months.

How Many Coats of Primer Will I Need?

This really depends on the original stain color. If you're tackling a very dark stain, like a deep mahogany or espresso finish, plan on using two coats of a high-quality stain-blocking primer.

The first coat is your sealer—it locks in the old stain and any wood tannins that might try to bleed through. The second coat is what gives you a perfectly clean, neutral canvas for your new color. Always let each coat dry completely based on what the can says.

We’ve seen it happen on countless projects: someone tries to get by with a single coat of primer over a dark stain, only to see faint discoloration show through the topcoat. Doing it right with two coats from the start actually saves you time and paint in the end.

What's the Best Paint Finish for Kitchen Cabinets?

For kitchen cabinets or any other surface that gets a lot of daily use, a satin or semi-gloss finish is the way to go. These sheens have excellent durability and are so much easier to wipe clean compared to a flat or eggshell finish—a must-have in a busy kitchen or commercial space.

For the absolute best results, look for a modern acrylic-alkyd hybrid paint. These give you the hard-as-nails durability of traditional oil-based paint but with the easy, low-odor cleanup of a water-based product.


Whether you’re updating your home or managing a large-scale commercial renovation, a perfect paint job comes from experience. If your project feels like more than you want to handle, the team at Wheeler Painting is here to deliver a professional finish that lasts. Schedule your free estimate today and let our local experts take care of the details.

12 Types of Cabinet Options for Your Home & Business in 2026

Choosing the right cabinets can feel overwhelming, whether you're renovating your home kitchen in Bellevue or planning a commercial build-out in Seattle. Cabinets are more than just storage; they define the functionality and style of a space, impacting everything from daily workflow to long-term property value. With so many types of cabinet available, from stock and semi-custom to fully custom designs, it is crucial to understand the options before making an investment. This guide breaks down the essential categories, materials, and styles to help homeowners and business owners across the Puget Sound area navigate their choices with confidence.

We'll explore the pros and cons of different cabinet construction methods, such as face-frame versus frameless, and what they mean for durability and aesthetics. Beyond the visual appeal, understanding the various structural components, such as the different types of cabinet door hinges, will help in selecting cabinets that offer both your desired style and lasting functionality. We'll also highlight key considerations for our unique Western Washington climate, where moisture resistance and material stability are paramount for longevity.

This comprehensive guide provides the clarity you need to select cabinets that are functional, beautiful, and built to last. Whether you're a facilities manager sourcing durable solutions for a new office space renovation, an architect planning a retail build-out, or a homeowner ready for a residential remodel, this article will equip you with the knowledge to make an informed decision. Learn how a trusted local partner like Wheeler Painting can guide your project from concept to completion, ensuring your new cabinetry perfectly suits your needs.

1. Kitchen Cabinets

Kitchen cabinets are the foundation of any kitchen’s design and functionality, serving as purpose-built storage for everything from cookware and dishes to pantry staples. These fixtures are a dominant visual element and play a critical role in the room's workflow. As one of the most essential types of cabinet, they are a primary focus in both residential remodels and commercial build-outs, such as in office breakrooms or restaurant kitchens.

The sheer variety available allows for precise customization. For instance, a modern farmhouse kitchen in Bellevue might feature classic white Shaker-style cabinets, while a traditional Mercer Island home could showcase the deep, rich tones of custom stained cherry wood. Two-tone designs, combining different colors for upper and wall cabinets, are also a popular choice for contemporary spaces.

Key Considerations for Kitchen Cabinets

  • Plan Your Layout: Design the cabinet configuration early to ensure an efficient "kitchen triangle" between the sink, stove, and refrigerator.
  • Invest in Hardware: High-quality hinges and soft-close drawer slides are small details that greatly improve daily use and longevity.
  • Professional Finishing: A flawless finish is key to a high-end look. A professional service like Wheeler Painting ensures a durable, even coat without brush marks, whether you're painting new cabinets or refinishing old ones. For a deeper dive into color selection, explore these kitchen cabinet paint color ideas.
  • Proper Installation: Schedule installation for a time when the kitchen can be out of commission for one to two weeks to allow for a smooth, uninterrupted process.

2. Bathroom Vanities & Storage Cabinets

Bathroom vanities and storage cabinets are specialized furniture pieces designed for the unique demands of the bathroom environment. These units combine a sink, countertop, and storage into one functional fixture, serving as a central point for daily routines. As one of the most important types of cabinet for organization, they are essential for stowing toiletries, linens, and cleaning supplies, helping to maintain a clutter-free space in both residential homes and commercial facilities like office restrooms or hotel suites.

The range of available styles allows for a perfect match to any aesthetic. A minimalist bathroom remodel in a Seattle condo might feature a sleek, wall-mounted floating vanity to create a sense of space. In contrast, a master bathroom in a more traditional Sammamish home could benefit from a large, freestanding double-sink vanity with ornate details. For smaller powder rooms or commercial restrooms, pedestal sinks paired with separate wall-mounted storage cabinets offer a practical solution.

Key Considerations for Bathroom Vanities & Storage Cabinets

  • Plan for Moisture: Ensure the bathroom has adequate ventilation to combat humidity. Choose cabinets made from moisture-resistant materials like solid wood, plywood with a high-quality veneer, or thermofoil to prevent warping and damage.
  • Check Plumbing & Electrical: Before ordering your vanity, measure the exact locations of existing plumbing rough-ins. Plan for any new electrical needs, such as outlets for personal care devices or integrated vanity lighting, at the same time.
  • Prioritize a Professional Finish: A durable, waterproof finish is critical for longevity in a high-moisture area. A professional painting service ensures the finish is perfectly applied, sealed, and capable of withstanding daily use and humidity without peeling or bubbling.
  • Select Based on Needs: Before falling in love with a style, assess your storage requirements. Consider if you need deep drawers for towels, shallow organizers for cosmetics, or a combination. For more ideas on how to update your space, you can get inspired by these affordable bathroom remodel strategies.

3. Built-In Wall Cabinets & Shelving

Built-in wall cabinets and shelving are custom-integrated storage solutions built directly into a room's structure, offering a seamless and sophisticated look. These permanent installations are designed to fit specific wall dimensions precisely, maximizing space efficiency in both residential homes and commercial properties. From floor-to-ceiling bookcases flanking a fireplace in a Sammamish living room to a sleek media center in a new office lobby, built-ins add significant functional and aesthetic value.

A chic living room featuring a fireplace flanked by built-in bookshelves with warm lighting.

These types of cabinet systems turn unused nooks and empty walls into valuable assets, whether for display, storage, or a combination of both. In a home office, they create an elegant library wall; in an entryway, they provide organized cubbies for coats and shoes. For maximizing space and creating a seamless look, consider the benefits of custom built-in cabinetry. The result is a high-end, architectural feature that feels like a natural part of the room's design.

Key Considerations for Built-In Wall Cabinets & Shelving

  • Plan for Electrical: If you want integrated lighting, device charging stations, or outlets for media equipment, these electrical needs must be planned during the initial design phase before construction begins.
  • Work with a Designer: Collaborate with a professional designer or a design-build firm to ensure the final product is both beautiful and highly functional for your specific needs.
  • Choose Durable Materials: Since built-ins are a permanent fixture, investing in high-quality materials like solid wood or premium plywood ensures they last for decades.
  • Prioritize a Flawless Finish: The finish is a major focal point. A professional painting service like Wheeler Painting can provide a spray-applied, factory-grade finish that is both stunning and durable, making your built-ins a true centerpiece.
  • Allow Adequate Time: Custom built-in projects are complex. Plan for a timeline of at least 4-8 weeks to accommodate design, fabrication, and professional installation.

4. Garage Cabinets & Storage Systems

Garage cabinets are heavy-duty storage systems built to withstand the unique conditions of a garage environment, including temperature swings, humidity, and dust. Unlike interior cabinetry, these are designed for storing tools, bulky equipment, seasonal items, and household supplies. As a crucial type of cabinet for any home, they transform a cluttered space into an organized, functional area, improving safety by keeping hazardous materials locked away and trip hazards off the floor.

A clean, organized garage with stainless steel overhead cabinets, a workbench, and tall wooden storage units.

The applications are diverse, from wall-mounted metal cabinets in a Sammamish workshop to durable, epoxy-coated units in commercial auto shops. In Western Washington, where dampness is a concern, selecting the right materials and finishes is critical to prevent warping and rust. Custom systems can be configured to fit any space, offering a combination of shelving, drawers, and lockable cupboards for everything from power tools to gardening supplies.

Key Considerations for Garage Cabinets

  • Assess Wall Structure: Before installing wall-mounted units, confirm your wall studs can handle the intended load. Professional installation is recommended to ensure safety and stability.
  • Choose Durable Finishes: Select cabinets with robust finishes like powder coating, epoxy, or polyurethane. These surfaces resist moisture, chemicals, and scratches, which is essential for longevity in a garage setting.
  • Plan for Climate: In humid Puget Sound garages, proper ventilation or a dehumidifier can prevent moisture damage to both the cabinets and their contents. A well-finished floor also helps control moisture, and you can explore options with our guide to garage floor staining.
  • Prioritize Safety and Accessibility: Install lockable storage for chemicals, sharp tools, and other hazardous materials. Position frequently used items at an accessible height to avoid straining or using a ladder unnecessarily.

5. Mudroom & Entryway Cabinets

Mudroom and entryway cabinets are purpose-built storage solutions designed to create order at a home's primary access points. These fixtures serve the critical function of capturing clutter like coats, shoes, and bags right at the door, preventing it from migrating into main living areas. As a key organizational type of cabinet, they are invaluable in both busy family homes and professional settings like commercial office lobbies.

These cabinets expertly blend different storage forms, often combining closed doors, open cubbies, hooks, and integrated benches to create a highly functional and welcoming space. For instance, a Sammamish family home might feature custom-built lockers, giving each child a designated spot for their belongings. A modern farmhouse in Woodinville could incorporate a long bench with pull-out drawers for shoe storage. In a commercial context, entryway cabinets in a Seattle office building can provide sleek, organized storage for employees and visitors alike.

Key Considerations for Mudroom & Entryway Cabinets

  • Plan for Your Users: Involve all family members in the design process to ensure the layout is practical for everyone, from the youngest child to the tallest adult. For commercial spaces, consider the needs of employees and clients.
  • Maximize Every Inch: Design for maximum storage capacity without overwhelming the space. Vertical storage, like tall cabinets, is excellent for smaller foyers.
  • Prioritize Durability: This is a high-traffic, high-use area. The finish must be exceptionally durable to withstand scuffs, moisture, and daily wear. A professional application from Wheeler Painting ensures the paint or stain is tough enough for the job.
  • Include Seating: If space permits, a built-in bench provides a convenient spot to put on or take off shoes and adds a comfortable, welcoming element to the entryway.

6. Laundry Room Cabinets & Storage

Laundry room cabinets are specialized storage systems that bring order and efficiency to a space often overlooked in design. These purpose-built fixtures organize detergents, cleaning supplies, and linens while concealing plumbing and creating a polished look. Because laundry rooms produce moisture and heat, these types of cabinet must be durable enough to withstand humidity and frequent use, transforming a utilitarian area into an attractive and functional part of the home or commercial facility.

The design possibilities can meet any need, from residential to commercial applications. For example, a compact laundry closet in a Seattle condo might benefit from tall, narrow cabinets to maximize vertical space. A larger laundry room in a Sammamish home could feature a long countertop over base cabinets for folding, complete with a built-in utility sink. In commercial settings like hotels or care facilities, durable, easy-to-clean laminate or metal cabinets provide robust storage for bulk supplies and linens.

Key Considerations for Laundry Room Cabinets & Storage

  • Prioritize Moisture Resistance: Select materials and finishes that can handle high humidity. Finishes like high-quality acrylic-alkyd or polyurethane are essential for protecting cabinetry from moisture damage and chemical spills. Wheeler Painting can apply professional-grade coatings that ensure longevity.
  • Plan for Ventilation: Ensure your cabinet layout does not block dryer vents or impede airflow. Proper ventilation is critical for managing humidity and preventing mold growth in enclosed laundry spaces.
  • Optimize the Layout: Position cabinets to allow easy access to washer and dryer controls, as well as water shut-off valves and electrical outlets. A well-planned configuration prevents future maintenance headaches.
  • Incorporate Smart Features: Consider adding functional elements like pull-out drying racks, built-in ironing boards, or designated hampers. A fold-down work surface is another excellent feature for adding temporary folding space in smaller rooms.

7. Display Cabinets & China Cabinets

Display and china cabinets are elegant glass-front storage solutions designed to showcase collectibles, fine dishware, or other decorative items. This type of cabinet merges functionality with aesthetic appeal, featuring glass doors and often interior lighting to highlight valuable or sentimental collections. They serve as beautiful focal points in dining rooms, living rooms, and even commercial spaces like galleries or high-end retail stores.

A well-lit cream display cabinet showcasing patterned plates and clear wine glasses in a dining room.

From traditional-style china cabinets in a formal Sammamish dining room to modern, minimalist display units in a downtown Seattle condo, their purpose is to draw the eye. A custom-built display cabinet can be tailored to fit a specific niche or design theme, becoming a true statement piece. For commercial settings, such as a boutique in Kirkland, these cabinets can be designed to present merchandise securely and attractively.

Key Considerations for Display Cabinets & China Cabinets

  • Plan for Lighting: Integrate interior lighting during the design phase. LED strips are an energy-efficient option, and you can choose a color temperature that best complements the items on display.
  • Choose a Quality Finish: The finish is just as important as the items inside. A professional, flawless paint job from a service like Wheeler Painting ensures the cabinet itself is a work of art, free of drips or brush marks that can detract from its contents.
  • Prioritize Functionality: Opt for adjustable shelves to accommodate items of various heights. For valuable collections, consider adding locking mechanisms for security.
  • Strategic Placement: Position the cabinet to minimize glare from windows or overhead lights, ensuring the contents are clearly visible without distracting reflections.

8. Medicine Cabinets & Bathroom Wall Storage

Medicine cabinets and other forms of bathroom wall storage are essential fixtures that merge storage and practicality, often in compact spaces. These units, which can be recessed into a wall or mounted on the surface, are designed to hold medications, toiletries, and personal care items. By frequently incorporating mirrors and even lighting, they serve multiple functions, making them a crucial component in residential bathrooms, commercial restrooms, and healthcare facilities.

These specialized types of cabinet are invaluable for keeping small items organized and accessible. For instance, a recessed medicine cabinet in a compact Seattle powder room can create a seamless, built-in look, while a larger, LED-lit model adds a touch of modern luxury to a primary bathroom. In commercial settings, such as a doctor's office in Bellevue, lockable wall cabinets provide secure and necessary storage for medical supplies.

Key Considerations for Medicine Cabinets & Bathroom Wall Storage

  • Plan for Installation: Before purchasing a recessed model, carefully verify the dimensions of the wall cavity to ensure a proper fit. If a wall cavity isn't available due to plumbing or structural elements, a surface-mounted cabinet is a great alternative.
  • Integrate Modern Features: For humid climates common in Western Washington, consider a model with a defogging heating element. If you choose a cabinet with integrated lighting, plan for the necessary electrical wiring early in your remodel.
  • Prioritize Safety and Ventilation: For households with children or in healthcare settings, selecting a cabinet with a lockable mechanism is a critical safety measure. Always ensure the bathroom has adequate ventilation to prevent moisture from damaging the cabinet and its contents.
  • Expert Finishing: While many medicine cabinets come pre-finished, custom bathroom wall storage or older units can be painted to match your vanity or trim. A professional painter can apply a moisture-resistant finish that withstands the humid bathroom environment, ensuring longevity and a polished appearance.

9. Office & Home Office Cabinets

Office and home office cabinets are purpose-built storage solutions designed to organize files, supplies, and equipment in a professional setting. These fixtures are fundamental for creating a productive and uncluttered workspace, whether in a corporate environment or a dedicated room at home. As a key type of cabinet, they range from simple filing systems to sophisticated built-in wall units that combine open and closed storage, projecting a polished, professional image to clients and colleagues.

The applications are varied, adapting to specific professional needs. For example, a home office addition in Sammamish might feature custom built-ins with integrated desks and overhead storage. In a commercial setting, like a Bellevue law firm or accounting office, durable laminate or wood veneer credenzas and filing systems are essential for managing sensitive documents. Creative agencies might opt for open shelving to display portfolios and materials, encouraging a collaborative atmosphere.

Key Considerations for Office & Home Office Cabinets

  • Plan for All Storage Needs: Design your cabinet layout to accommodate both physical paper files and digital equipment. Consider drawers for files, shelves for books, and deeper cabinets for printers or servers.
  • Integrate Wire Management: A clean workspace requires thoughtful cable management. Ensure your cabinet system includes grommets, channels, or hidden compartments to keep technology cables organized and out of sight.
  • Balance Open and Closed Storage: Use a combination of open shelving for frequently accessed items or display pieces and closed cabinets to conceal clutter and sensitive materials. This creates visual interest and improves functionality.
  • Professional Installation and Finishing: For custom office built-ins that create a lasting impression, a flawless finish is essential. A professional service like Wheeler Painting can provide a durable, high-quality paint or stain finish for new installations, ensuring your workspace looks impeccable. As a leading "commercial construction near me" provider, we are the ideal partner for office build-outs in the Puget Sound area.

10. Linen & Closet Cabinets

Linen and closet cabinets are specialized storage solutions designed to bring order to hallways, bedrooms, and dedicated closets. These essential types of cabinet transform cluttered spaces into highly efficient zones for storing towels, bedding, seasonal clothing, and other household items. They are a common feature in residential homes and are also vital in commercial settings, such as for employee lockers or organized storage in hospitality businesses.

The versatility of closet systems allows them to be adapted to any space or need. A hallway closet in a North Seattle home might use simple, sturdy wooden shelving to organize linens, while a master suite in Sammamish could feature a custom closet organization system with integrated drawers, shoe racks, and hanging rods. In commercial applications, durable and easy-to-clean materials are often preferred for their longevity and low maintenance requirements.

Key Considerations for Linen & Closet Cabinets

  • Measure with Precision: Before purchasing or building, take exact measurements of the closet's height, width, and depth to ensure a perfect fit and avoid wasted space.
  • Prioritize Accessibility: Plan the layout based on what you need to store. Place frequently used items at an accessible height and consider pull-out drawers or trays for items stored in the back.
  • Incorporate Adjustable Shelving: Using adjustable shelves provides the flexibility to reconfigure the space as your storage needs change, accommodating everything from bulky comforters to small toiletries.
  • Maximize Every Inch: Don't forget the back of the door. Installing door-mounted racks or organizers is a simple way to add valuable storage for smaller items without taking up shelf space.

11. Commercial & Retail Display Cabinets

Commercial and retail display cabinets are specialized systems designed to showcase products and merchandise in business environments while providing secure, organized storage. Unlike residential cabinetry, these units must withstand high-traffic use and project a professional brand image. They are essential fixtures in retail stores, hospitality venues, medical offices, and other commercial spaces where functionality and aesthetics directly impact business success.

These types of cabinet are purpose-built to balance durability, visibility, and security. For example, a luxury jewelry store in downtown Seattle requires elegant, well-lit display cases with robust locking mechanisms. In contrast, a busy restaurant kitchen needs heavy-duty stainless-steel cabinets for supply storage that are easy to clean and access. The design must support operational needs while reinforcing the company’s brand identity, making them a critical component of any commercial build-out or renovation.

Key Considerations for Commercial & Retail Display Cabinets

  • Strategic Product Placement: Design cabinets to position high-value or featured products at eye level, capturing immediate customer attention.
  • Integrated Lighting: Plan for built-in lighting to create ambiance, highlight merchandise, and guide the customer’s focus. LED strips are a popular, energy-efficient choice.
  • Brand-Consistent Finishes: The materials and finishes should align with your corporate branding. A professional service can apply custom paints or durable coatings that match your company’s color palette and can withstand commercial wear and tear.
  • Security and Durability: Ensure cabinets include necessary security features like locks and shatter-resistant glass for valuable items. Materials must be chosen for longevity and ease of maintenance in a commercial setting.
  • Plan for Flexibility: Design modular or adjustable shelving to accommodate future changes in product size, displays, or inventory needs.

12. Specialty & Niche Cabinets (Wine, Bar, Media, Pet Storage)

Specialty and niche cabinets are custom-designed storage solutions created for a single, specific purpose, moving beyond general storage to address unique lifestyle needs. These types of cabinet include everything from temperature-controlled wine cellars and dedicated home bars to integrated media centers and pet supply stations. They are the ultimate expression of personalized design, solving distinct organizational challenges while adding significant value and character to a space.

These custom fixtures are where creative design meets practical problem-solving. A sleek, modern media cabinet in a downtown Seattle condo can discreetly hide AV equipment, while a rustic-style home bar becomes the centerpiece of a Snohomish entertainment room. In commercial settings, a well-designed coffee bar in an office or a display cabinet in a retail build-out can greatly improve the experience for employees and customers alike.

Key Considerations for Specialty & Niche Cabinets

  • Define the Purpose First: Before starting the design, thoroughly research the specific storage requirements. For a wine collection, this means understanding bottle sizes and cooling needs; for media, it involves planning for ventilation and cable management.
  • Plan for Future Growth: Consider how your needs might change. If you plan to expand your wine collection or upgrade your entertainment system, design the cabinetry with extra space to accommodate future growth.
  • Integrate Proper Lighting: Good lighting is essential for showcasing items like glassware or collectibles and improving usability. Low-voltage LED strips are an excellent choice for creating ambiance without generating excess heat.
  • Ensure a Flawless Finish: Since these cabinets are often focal points, the finish is critical. A professional painter like Wheeler Painting can apply a durable, custom finish that complements your home’s aesthetic and ensures the piece looks stunning for years.

12 Cabinet Types Comparison

Category Implementation complexity Resource requirements Expected outcomes Ideal use cases Key advantages
Kitchen Cabinets Moderate–High (custom layouts & installation) Carpenter/cabinetmaker, hardware, finishes, installation time Optimized kitchen workflow; strong visual focal point; higher resale value Full kitchen remodels; chef-friendly layouts; residential/commercial kitchens Maximizes storage; highly customizable; improves functionality
Bathroom Vanities & Storage Cabinets Moderate (plumbing integration increases complexity) Moisture-resistant materials, plumber, countertop & hardware Consolidated sink/storage; improved organization; enhanced bathroom aesthetics Bathroom renovations; master baths; guest bathrooms Combines sink & storage; moisture-resistant options; space efficient
Built-In Wall Cabinets & Shelving High (custom measurement and finishing) Skilled millwork, custom materials, longer lead times Seamless, permanent storage; high-end aesthetic; significant value add Living rooms, home offices, media walls, entryways Space-maximizing; tailored fit; architectural impact
Garage Cabinets & Storage Systems Moderate–High (structural assessment for loads) Heavy-duty materials (steel/plywood), fasteners, protective finishes Durable, secure tool storage; improved safety and organization Workshops, garages, commercial auto shops Heavy-load capacity; lockable storage; robust finishes
Mudroom & Entryway Cabinets Moderate (layout and user planning required) Custom cabinetry, hooks/benches, durable finishes Clutter-free entry; organized outerwear and footwear; welcoming first impression Family homes, multi-occupant households, apartment entries Captures clutter at entry; customizable to family needs
Laundry Room Cabinets & Storage Moderate (humidity & utility coordination) Moisture-resistant materials, ventilation, integration with appliances Organized cleaning supplies; functional folding/ironing workspace Residential laundry rooms, commercial laundry facilities Moisture-tolerant storage; dedicated work surfaces; safety for chemicals
Display Cabinets & China Cabinets Low–Moderate (focus on finishing and lighting) Glass, interior lighting, tempered shelves, locks Visible, protected displays; decorative focal point Dining rooms, living rooms, retail showcases Showcases collectibles; dust protection; interior lighting
Medicine Cabinets & Bathroom Wall Storage Low–Moderate (recessed work adds complexity) Recessed boxes or surface units, mirror, optional lighting/locks Compact organized storage with mirror/lighting; secure medication storage Small bathrooms, powder rooms, healthcare facilities Space-efficient; combines mirror and storage; secure options
Office & Home Office Cabinets Moderate (wire management & file systems) Filing hardware, cable management, durable finishes Organized documents and equipment; professional appearance Home offices, professional suites, accounting/legal offices Secure filing; improved productivity; professional aesthetic
Linen & Closet Cabinets Low–Moderate (measurement and adjustable systems) Adjustable shelving, pull-outs, rods/drawers Maximized vertical storage; easier item retrieval; decluttered spaces Hallway closets, master closets, linen/storage rooms Efficient vertical use; adaptable organization; accessible storage
Commercial & Retail Display Cabinets High (custom design, branding, security) Commercial-grade materials, lighting, locks, professional install Product-focused displays; protected merchandise; brand presentation Retail stores, hospitality, showrooms, commercial lobbies Enhances sales presentation; durable; secure and branded
Specialty & Niche Cabinets (Wine, Bar, Media, Pet) High (special systems & environmental controls) Specialized components (chillers, racks, AV ventilation), custom finishes Dedicated functional zones for hobbies/collections; tailored performance Wine cellars, home bars, media rooms, pet stations Solves niche storage needs; highly personalized; can include environmental control

From Planning to Perfection: Partner with Wheeler Painting for Your Cabinet Project

Navigating the world of cabinetry can feel like a complex puzzle. From understanding the structural differences between face-frame and frameless construction to choosing between stock, semi-custom, and fully custom options, the decisions are numerous. This guide has armed you with the essential knowledge to distinguish between the various types of cabinet, assess their pros and cons, and align them with your specific needs, whether for a kitchen, bathroom, office, or commercial space.

The real takeaway is that your cabinets are more than just storage; they are a fundamental component of your space’s design, functionality, and overall value. A Shaker door can set a timeless, traditional tone, while a sleek, flat-panel door in a high-gloss finish can define a modern aesthetic. Understanding these distinctions allows you to make informed choices that reflect your personal style or brand identity, ensuring your final selection serves its purpose beautifully for years to come.

Beyond the Basics: Making Your Vision a Reality

Simply selecting the right cabinet type is only the beginning. The success of any project, from a simple cabinet refresh to a full-scale commercial renovation, hinges on expert execution. This is where a professional partner becomes invaluable, translating your plans into a polished, durable reality.

For homeowners in the Puget Sound region, this means considering our unique climate. The persistent dampness of Western Washington can affect wood and finishes, making professional-grade materials and application techniques critical for long-term durability. For businesses, the right cabinetry in a retail build-out or office space renovation directly impacts workflow, customer experience, and brand perception.

Key Insight: The longevity and beauty of your cabinets depend just as much on the quality of the installation, finishing, and painting as on the initial cabinet selection itself. Professional execution protects your investment and prevents costly issues down the road.

Why Professional Partnership Matters

Choosing a professional partner like Wheeler Painting means you're not just hiring a painter or a contractor; you're securing a team dedicated to a seamless and successful outcome. We bridge the gap between planning and perfection.

  • For Residential Projects: Imagine you’ve chosen new custom cabinets but want a specific, durable paint finish. Instead of hiring separate contractors, our integrated team handles it all. We are the "residential contractor near me" that can manage the installation, perform any necessary siding replacement or repairs, and apply a flawless, long-lasting finish.
  • For Commercial Projects: A business planning an office space renovation needs more than just new cabinets. They need a partner who understands commercial timelines, building codes, and the importance of minimal disruption. As a leading "commercial construction near me" provider, we manage every facet, from structural changes to applying specialty coatings and ensuring the final space is functional and professional.

Our deep local experience means we understand the challenges and opportunities of building and renovating in Western Washington. We provide a single point of accountability, ensuring every detail aligns with your vision. Whether you need an expert "commercial painting service near me" for a large facility or a skilled team for a home remodel, we bring over 30 years of trusted craftsmanship to your project.


Ready to move from planning to perfection? Whether you're updating existing cabinets or embarking on a full renovation, the expert team at Wheeler Painting provides both the residential and commercial construction services needed to bring your project to life. Visit Wheeler Painting & Restoration Services to schedule your consultation and discover how our integrated approach makes achieving a flawless result straightforward and stress-free.

Your Guide to an Affordable Bathroom Remodel in Puget Sound

An affordable bathroom remodel isn’t about cutting corners—it’s about making smart, high-impact choices. For homeowners and business owners alike, the key to keeping costs in check is focusing on cosmetic updates and, most importantly, avoiding changes to the existing layout. That’s how you sidestep expensive plumbing and electrical work. A stunning, functional bathroom is absolutely within reach, and this guide will help you understand the process in simple, helpful terms.

What an Affordable Bathroom Remodel Really Costs

When property owners in the Puget Sound area hear "bathroom remodel," their minds often jump to massive, budget-busting projects. But an affordable remodel is a different beast entirely. It’s all about maximizing your return on investment, transforming the space with strategic upgrades that deliver a fresh look without the full-demolition price tag.

Getting a handle on the potential costs is the first step. It helps you plan with confidence. A recent nationwide survey from This Old House gives us a pretty clear picture, finding the average project comes in at a manageable $15,586. Of course, that’s a big range—projects can run from $6,456 for smaller powder rooms to $24,715 for larger primary baths. You can dig into the specifics by checking out their in-depth bathroom cost research.

Breaking Down the Numbers

So, what does an "affordable" project actually look like? It almost always means sticking to a cosmetic refresh. These are the updates that give you the most bang for your buck, whether in a home or a commercial facility:

  • Professional Painting: A fresh coat of quality, moisture-resistant paint can completely change the feel of a room. It’s the fastest way to make things feel new.
  • Fixture Swaps: Simply replacing an old, dated faucet, showerhead, or light fixture can instantly modernize the space.
  • Hardware Updates: Never underestimate the power of new cabinet pulls, drawer handles, and towel bars. These are small details with a huge visual impact.
  • Surface-Level Fixes: Instead of ripping out a perfectly good tub or shower surround, consider reglazing. This process can restore the finish for a fraction of the cost of a full replacement.

The single most significant way to save money on any bathroom project is to preserve the current footprint. As soon as you decide to move a toilet or a shower, you're talking about re-routing plumbing and electrical lines. That one decision can add thousands of dollars to your budget.

To help you visualize where your project might land, we've put together some typical budget ranges for different remodel scopes we see here in the Puget Sound.

Here’s a look at what you can expect for different levels of bathroom remodels in our area. These estimates can help you set realistic expectations, whether you're just sprucing up a powder room or doing a more involved update.

Sample Bathroom Remodel Budgets for 2026

Remodel Type Typical Cost Range Common Inclusions
Cosmetic Refresh $4,000 – $9,000 New paint, hardware, light fixture, faucet, mirror, and minor repairs.
Mid-Range Update $9,000 – $18,000 Includes all cosmetic updates plus a new vanity, toilet, and flooring (like LVT).
Layout-Change Remodel $20,000+ All of the above plus moving plumbing/electrical for a new layout, new shower/tub.

These numbers give you a solid starting point for a conversation with a local contractor, helping you align your vision with your budget right from the get-go.

How to Plan a Remodel for Maximum Value

A beautiful, affordable bathroom remodel doesn’t just happen. It all starts with a smart plan, long before the first tile comes off the wall. The real secret is figuring out the difference between what your bathroom needs and what you want. This is your best tool for fighting off "budget creep"—that sneaky tendency for costs to spiral once a project gets going.

Grab a notepad and draw a line down the middle. On one side, list your needs. These are the essentials, the things you can't ignore. Think of that constantly dripping faucet, the cracked floor tile that’s a water-damage risk waiting to happen, or an ancient toilet that wastes gallons with every flush. These are the non-negotiables.

On the other side, list your wants. This is the fun stuff: heated floors for those chilly Puget Sound mornings, a luxurious rain shower head, or custom-built cabinetry. They're great to have, but they're also the first things you can scale back or postpone to keep your budget in check.

By clearly separating needs from wants, you take back control. It’s a simple but powerful exercise that lets you put your money where it matters most, ensuring every dollar you spend delivers real, tangible value.

Focus on High-Impact Surfaces and Fixtures

With your priorities sorted, you can now focus on the changes that give you the most bang for your buck. You don’t always need to tear everything down to the studs to get that "wow" factor. In fact, some of the most dramatic transformations are purely cosmetic.

Here are a few high-impact areas we always recommend focusing on:

  • A Professional Paint Job: Seriously, never underestimate what a fresh coat of paint can do. Using a high-quality, moisture-resistant formula instantly makes a space feel brighter and cleaner, hiding years of minor wear and tear.
  • Strategic Fixture Swaps: Swapping out an old, clunky vanity, a dated mirror, and a tired light fixture can single-handedly modernize a bathroom. These three items work as a team to define the room’s style, and upgrading them offers a massive visual return.
  • Tub and Tile Reglazing: If your tub or tile looks a bit sad but is still in good shape structurally, reglazing is a fantastic alternative to a full tear-out. The process restores the surface to a glossy, like-new finish for a fraction of the cost and mess of replacement.

The following graphic shows how budgets tend to scale with the scope of work, from a simple cosmetic update to a more involved renovation.

As you can see, a "Refresh" keeps costs manageable by focusing on surface-level updates instead of major construction. That’s the heart of an affordable remodel strategy. This is exactly where we come in. At Wheeler Painting, we've helped countless homeowners and property managers across the Puget Sound area make smart choices that bring their vision to life without breaking the bank.

Choosing Budget-Friendly Materials That Last

Various bathroom renovation samples including wood-look tiles, light floor tiles, and a color palette.

When you're trying to keep a bathroom remodel affordable, your material choices are where the real savings happen. This is especially true here in the Puget Sound, where constant dampness means you can’t just pick the cheapest option—you need finishes that will last.

The great news? You don't have to sacrifice a high-end look to stick to your budget.

It’s all about finding smart alternatives that give you the look of expensive materials without the hefty price tag. For example, instead of shelling out for natural stone, consider luxury vinyl tile (LVT). Modern LVT looks incredibly convincing, mimicking real wood or stone, but it’s far more water-resistant and much easier on the wallet. It’s a perfect fit for our Pacific Northwest homes and commercial spaces.

High-Impact, Low-Cost Material Swaps

Getting the most bang for your buck comes down to knowing where to look and what to prioritize. A few strategic swaps can save you thousands without anyone knowing the difference.

  • Flooring and Walls: Porcelain tile is a fantastic workhorse. It’s tougher and less prone to chipping than some ceramic options, and if you choose larger format tiles, you’ll have fewer grout lines to scrub.
  • Showers and Tubs: Instead of a complex and costly custom-tiled shower, look into a high-quality prefabricated shower enclosure. These one-piece units give you a sleek, modern look for a fraction of the cost and labor. Plus, no grout means easier cleaning.
  • Vanities and Countertops: One of our favorite pro tips is to ask your contractor about using stone remnants for your vanity top. These smaller leftover pieces of beautiful granite or quartz are often deeply discounted but deliver the same luxurious feel as a full slab.

Here’s one of the biggest budget-savers we recommend: restoration. Reglazing an existing bathtub or tile surround can make it look brand new, saving you up to 70% compared to a full replacement. It’s a game-changer for making a dramatic visual impact without breaking the bank.

Experts are seeing a big trend for 2026: basic refreshes costing between $4,000 to $9,000, especially in smaller bathrooms where the existing layout is kept to avoid expensive plumbing work. While labor can be 40-60% of the total bill, hiring a pro prevents costly mistakes down the road. Overall, you might see costs from $6,600 to $18,000, but don't discount sub-$5,000 updates. Simple changes like a new vanity or reglazing the tub can completely transform a space.

The Transformative Power of Paint and Tile

Never, ever underestimate what new surfaces can do. A fresh, professional paint job with high-quality, moisture-resistant paint is more than just cosmetic—it’s your first line of defense against mildew and damage in a humid environment. This is absolutely critical in any bathroom, where proper waterproofing is non-negotiable. Our guide on effective waterproofing for wet rooms dives deeper into why this step is so important for longevity.

For more inspiration, check out the latest bathroom tile trends to see how you can adapt stylish designs to fit your budget. As local contractors, the Wheeler Painting team knows exactly which materials deliver the best blend of cost, style, and durability for our climate, and we’re here to help you make the right choices.

Deciding Between DIY and Hiring a Local Pro

So, you’ve got your vision. Now comes the big question: should you roll up your sleeves and tackle this yourself, or is it time to call in a professional residential or commercial contractor?

There's no doubt that going the DIY route can save you some serious cash. If you're comfortable with a paintbrush and basic tools, tasks like demolition, painting, or installing a simple vanity and faucet are well within reach. It’s satisfying work, and it can definitely make a dent in your costs—after all, labor often accounts for 40% to 60% of a total remodeling bill.

Where DIY Can Go Wrong

But here’s where you need to be brutally honest with yourself about your skills. In our years of experience, we've seen the line between a successful DIY project and a full-blown disaster drawn at two specific trades: plumbing and electrical.

A tiny, seemingly insignificant mistake with a plumbing fitting behind your new shower wall can lead to a slow, silent leak. You won't notice it for months, but it will be there, causing catastrophic water damage, rot, and mold. Likewise, a wiring error isn't just a minor issue; it's a major fire and safety hazard.

Trying to save a few hundred dollars on these trades can easily lead to thousands in repairs, completely torpedoing your "affordable" remodel and turning it into a financial headache.

An experienced residential or commercial contractor isn't just another line item on your budget—they're an investment in peace of mind. Their real value is in their efficiency, their network of skilled trades, and their deep knowledge of Puget Sound building codes.

The Value of a Professional Contractor

This is where bringing in a trusted local provider like Wheeler Painting really pays off. We manage the hundred little details that can overwhelm a homeowner or facilities manager.

  • We Sweat the Small Stuff (and the Big Stuff): We ensure every single piece of the project, especially the critical plumbing and electrical work, is done correctly and up to the latest local codes. This protects your property and its long-term value.
  • We Know the Right People: Forget spending weeks vetting and chasing down reliable plumbers, electricians, and tile setters. We have a trusted network of local experts we work with every day.
  • We Keep Things Moving: A professional crew operates on a clear, established timeline. This is the difference between a project that’s finished in a couple of weeks and a DIY remodel that drags on for months, leaving your home or business in chaos.

If you’re planning a more involved project like a full tub-to-shower conversion, leaning on a general contractor's expertise is almost essential. You can see what that process involves in our guide to tub-to-shower conversions in the Puget Sound area.

Ultimately, a partnership with a pro ensures your bathroom remodel is done right the first time, giving you a beautiful, durable space without the hidden risks and sleepless nights.

Finding a Partner to Bring Your Vision to Life

This is the point where all your planning starts to pay off. But it's also where things can go wrong. A bathroom remodel is notorious for budget creep, scheduling nightmares, and those "uh-oh" moments that pop up after demolition. Bringing in an experienced local partner isn't just a good idea—it’s how you sidestep the headaches.

It’s no surprise that bathroom remodels have become one of the most popular property updates. A recent industry report found that 38% of homeowners tackled a bathroom renovation, making it a top project nationwide. Here in the Puget Sound, we see it all the time. Sometimes it's a planned upgrade for a home or office space, but often it’s a necessary repair after a flood or leak, where getting it done right and on budget is critical.

That’s where a team like Wheeler Painting & Restoration comes in. We’ve been navigating these projects for homeowners and businesses since 1991, and we know that clear, transparent proposals are the key to keeping everything on track.

How We Keep Your Project On Track

When you hear that labor can account for 40-65% of a bathroom remodel's cost, it underscores the importance of efficiency. Mistakes, delays, and rework—especially with tricky tile or plumbing—are what blow up a budget. Our entire process is built to prevent that.

With over three decades of experience in Western Washington, we’ve refined our approach to make your remodel as straightforward as possible.

  • It Starts With a Conversation: We meet you on-site to see the space, listen to your goals, and get a feel for your budget and style.
  • A Clear, Itemized Plan: You'll get a detailed proposal that breaks down every cost and task. No vague estimates, no hidden fees.
  • We Handle the Headaches: Our project managers coordinate all the moving parts—from scheduling the plumber and electrician to ordering materials—so you don't have to.
  • The Final Stamp of Approval: We aren’t finished until we’ve done a final walkthrough with you to ensure every last detail is perfect and you're completely happy with the result.

This same commitment to quality, communication, and craftsmanship is what we bring to our commercial construction services, too. The principles are the same whether we're upgrading a single residential bathroom, renovating an entire office, or installing new siding and fixtures on a retail space. For those who want a high-end look with even less fuss, some people are even exploring options like a demolition-free bathroom renovation to minimize mess and downtime.

Partnering with an experienced general contractor means you have a single, accountable partner dedicated to quality outcomes. It’s the most effective way to protect your investment and ensure a stress-free experience from start to finish.

Ultimately, picking the right partner is the single most important decision you'll make for your project. To help you navigate that choice with confidence, we created a practical guide on how to choose a general contractor.

Common Questions About Affordable Bathroom Remodels

Every property owner we talk to has questions, and that's a good thing. Getting clear answers is the first step toward a successful remodel. To get you started, we’ve put together some straightforward answers to the questions we hear most often from homeowners and property managers right here in the Puget Sound area.

What Is the Cheapest Way to Remodel a Bathroom?

Without a doubt, the most budget-friendly option is a cosmetic refresh. This approach is all about high-impact, low-cost changes that make the room feel brand new without getting into heavy-duty construction.

A cosmetic refresh usually involves a few key things:

  • A professional paint job: Nothing transforms a dated bathroom faster than fresh paint. It instantly brightens the space and hides minor flaws.
  • New hardware: You’d be surprised what a difference swapping out old drawer pulls, faucets, and towel bars can make.
  • Updated light fixtures: A modern fixture can completely change the mood and feel of the room.
  • Reglazing surfaces: Instead of a full replacement, giving your existing tub and tile a new, durable finish can save you thousands.

If there’s one piece of advice we give every client on a tight budget, it’s this: avoid changing the bathroom's layout. Keeping the toilet, sink, and shower right where they are lets you sidestep the expensive plumbing and electrical work that can quickly blow up an affordable project.

How Much Should I Budget for a Small Bathroom Remodel?

Here in the Puget Sound region, the numbers can vary, but we can give you a solid baseline. For a basic cosmetic update on a small bathroom (around 40-50 sq. ft.), homeowners are typically looking at a cost between $4,000 and $9,000 in 2026. This range covers those surface-level improvements and fixture swaps.

Want to take it a step further? If you're planning to replace the vanity, toilet, and flooring with quality, standard-grade options but keep the layout the same, your budget will likely land somewhere between $6,500 to $15,000. Whatever your scope, we always recommend setting aside a contingency fund of 15-20%. It’s just smart planning for any surprises that might be hiding behind the walls.

Can I Remodel a Bathroom for Under $5000?

Yes, you absolutely can remodel a bathroom for under $5,000. It just requires some smart planning and discipline in your material choices.

At this price point, you can realistically afford a new vanity and faucet, a new toilet, an updated light fixture, fresh paint, and affordable flooring like Luxury Vinyl Tile (LVT). To make that $5,000 budget work, you'll probably need to handle some of the labor yourself—like painting or demolition—and plan on keeping your existing shower or tub.

How Long Does an Affordable Bathroom Remodel Take?

The timeline really comes down to the scope of your project. A simple cosmetic refresh with just painting and new hardware can often be wrapped up in a few days to a week, meaning very little disruption to your routine.

For a more involved project where you're replacing major fixtures but not changing the layout, you should set aside about 2 to 4 weeks. Working with an experienced residential or commercial contractor is the best way to get a reliable schedule from the start and make sure your project stays on track without any frustrating delays.


A beautiful, high-quality bathroom remodel is well within your reach. With a solid plan and a partner you can trust, you can transform your space without the headaches.

Wheeler Painting & Restoration Services has been that reliable general contractor for homeowners and commercial clients across Western Washington since 1991. We simplify the entire process, from the first design ideas to the final, flawless walkthrough. Ready to see what’s possible? Contact us today for a straightforward consultation and a transparent proposal.

Learn more about our services at https://wheelerpainting.com.

Can You Paint Metal? A Pro Guide for Lasting Results

Absolutely, you can paint metal. The real question is, can you paint it so it lasts? For homeowners and business owners in our local community, a quick paint job is a recipe for failure. A quality coating is the single most important barrier between your property’s metalwork and the damp air that’s always looking to start rust.

Why a Proper Paint Job is Non-Negotiable for Metal

As a local painting and construction contractor, I’ve seen it countless times: a commercial steel door or a beautiful aluminum railing that starts peeling and blistering within a year. Why? Because someone skipped a step. Painting metal isn't just about changing the color; it's a technical process designed to protect an expensive asset from corroding into dust.

Cutting corners—like painting over dirt or skipping primer—guarantees you'll be redoing the work sooner rather than later, and it will cost you more the second time around.

For anyone managing a business, facility, or home, understanding the right way to do this is crucial. It gives you the confidence to tackle a project yourself or to know exactly what to look for when you're hiring a commercial painting contractor.

The Real-World Payoff of Doing It Right

A meticulously painted metal surface does more than just look good. It delivers tangible benefits that protect your investment, whether it’s for a commercial facility, retail space, or your own home.

  • Stops Corrosion in Its Tracks: This is the big one. A complete coating system seals the metal off from moisture and oxygen. For a business with steel support beams or a homeowner with a wrought iron gate, preventing rust isn't just a good idea—it's essential maintenance.

  • Extends the Life of Your Assets: Metal doors, window frames, siding, and railings aren't cheap. A proper paint job can add years to their lifespan, pushing back expensive replacement costs and saving facilities managers and homeowners significant money in the long run.

  • Boosts Curb Appeal and Value: There’s no denying the visual impact. A crisp, uniform finish on metal elements makes a property look sharp and well-maintained. On a commercial building, it signals professionalism. On a house, it directly contributes to its market value.

  • Improves Safety and Functionality: Rust isn't just ugly; it's destructive. Corrosion actively weakens metal. By keeping rust at bay, a quality paint job maintains the structural integrity of critical components like handrails, fire escapes, and support posts.

The secret to a durable finish that stands up to our local weather is sticking to a proven method. It's all about the prep work—cleaning, sanding, and priming—before a drop of paint is even applied. Get that right, and you'll have a coating that adheres properly and protects your property for years.

Preparing Metal Surfaces for a Flawless Finish

A great paint job on metal is all about what you do before you even crack open a can of paint. If you’ve ever wondered, "Can you paint metal?" the answer is yes, but it’s the prep work that makes or breaks the project. Slapping a new coat over grease, rust, or flaking old paint is a surefire recipe for peeling and blistering in just a few months.

Every metal painting job, whether it’s a simple handrail or a large commercial steel building, starts with a good, hard look at the surface. Get up close and inspect it for rust spots, paying special attention to welds and crevices where moisture loves to hide. You'll also want to check for peeling paint, chalky residue from old coatings, and any oily films. These are the enemies of adhesion.

Cleaning and Etching for Lasting Adhesion

Once you know what you’re up against, it’s time to clean. And we don’t mean a quick wipe-down. Each type of metal needs a specific approach to get it ready for primer and paint to grab hold and stay there.

  • Steel and Iron: These ferrous metals are all about rust. Your first move is to get aggressive with a wire brush or scraper to knock off all the loose rust and failing paint. For bigger jobs, a power washer can do a lot of the heavy lifting. Once the loose stuff is gone, wipe the entire surface down with a good degreaser to get rid of any grime or oil.
  • Aluminum: Aluminum is tricky. It doesn’t rust like steel, but it quickly forms an invisible layer of oxidation that paint simply won't stick to. After cleaning it with a degreaser, you need to scuff the entire surface. This process, called etching, can be done with fine-grit sandpaper or an abrasive pad to create a microscopic texture for the primer to grip.
  • Galvanized Metal: New galvanized metal is notorious for shedding paint because of its slick, oily zinc coating. You have to start by cleaning it with a solvent to cut through that oily residue. After that, a mild acid wash—something as simple as white vinegar works great—will gently etch the surface, giving it the tooth it needs for a lasting finish.

For business owners and homeowners in the area dealing with years of built-up grime, looking into professional power washing services near me can be a game-changer. It saves a ton of time and ensures you’re starting with a truly clean slate.

Our rule of thumb is simple: If the surface isn’t perfectly clean and properly profiled, the paint will fail. This is non-negotiable in our local climate, where relentless dampness will find and exploit any weakness in your paint job. A little extra time spent on prep will save you a world of headaches down the road.

This diagram really boils the process down to its three essential parts.

A diagram illustrating the three-step metal painting process: clean, prime, and paint.

Think of it this way: painting is just the final step. The real work that guarantees a beautiful, durable finish happens long before you pick up a brush.

Choosing the Right Primer and Paint for Your Project

Three metal plates display rust-inhibiting primer, self-etching primer, and a glossy topcoat with paint can and brush.

You’ve put in the hard work to get your metal surface perfectly clean and prepped. Honestly, that’s half the battle right there. But the choices you make now—the primer and paint—will determine whether that beautiful finish lasts for years or starts failing in a few seasons.

Think of primer as the ultimate peacemaker between the metal and the paint. Without the right one, your topcoat simply has nothing to grab onto, and it's only a matter of time before it starts to peel and flake away. This is one step you absolutely cannot skip.

I’ve seen it countless times: a beautiful paint job fails because the wrong primer was used—or worse, none at all. The primer’s job is to create an unbreakable bond for the paint while also providing the first line of defense against the elements. It’s the foundation for a lasting finish.

Matching Primer to the Metal

Your primer choice comes down to one thing: the type of metal you're painting. Grabbing a generic can off the shelf is a recipe for disaster. Each formula is designed to solve a specific problem.

  • For Steel and Iron: In our damp local climate, rust is your number one enemy. You need a rust-inhibiting primer, plain and simple. These are typically loaded with zinc, which actively fights corrosion by creating a barrier that locks out moisture. It’s non-negotiable for iron railings, steel gates, or any ferrous metal exposed to our weather.
  • For Aluminum: Aluminum is slick and non-porous, making it notoriously difficult for paint to stick. The solution is a self-etching primer. This stuff is brilliant—it contains a mild acid that microscopically "bites" into the surface, creating a textured profile for the paint to grip onto for a tenacious bond.
  • For Galvanized Metal: That shiny zinc coating on galvanized steel is designed to prevent rust, but it also repels paint. You need a dedicated galvanized metal primer that’s formulated to adhere to that slick surface without damaging the protective zinc layer underneath.

Selecting a Durable Topcoat

With the primer properly applied and cured, you’re ready for the topcoat. This is what provides the color, the sheen, and the final shield against UV rays, rain, and physical abuse. What you choose depends entirely on where and how the metal will be used.

For highly specialized applications, like marine environments, the product choice is even more critical. You can find excellent resources on topics like choosing antifouling paint for aluminum boats that show just how specific you need to get.

For most residential and commercial projects, these are our go-to options:

  • Oil-Based Enamel: A true workhorse. We use it on high-touch surfaces like handrails, doors, and machinery because it dries to an incredibly hard, durable finish that stands up to a ton of wear and tear.
  • Acrylic Latex Paint: Modern acrylics are fantastic for exterior metal that expands and contracts, like siding or architectural features. Their built-in flexibility prevents the cracking and chipping that can happen with more rigid paints.
  • Epoxy Coatings: When you need maximum durability, this is the answer. Two-part epoxies create a finish that’s practically bulletproof, offering unmatched resistance to chemicals, moisture, and abrasion. We rely on them for demanding commercial spaces like warehouse floors and professional kitchens.

Choosing Your Tools: How to Apply Paint for a Professional Finish

A paint brush, paint roller, and spray gun displayed on a brushed metal sheet.

You've done the prep work and picked the perfect paint. Now comes the moment of truth: the application. The tool you choose is what separates an amateur job from a durable, professional-grade finish. Your choice really depends on the size, shape, and texture of the metal surface you're working on.

Brushing: For Control and Detail Work

When it comes to intricate jobs, nothing gives you more control than a good brush. This is perfect for projects like wrought-iron railings, metal window frames, or cutting in the edges of a metal door.

A high-quality, synthetic-bristle angled sash brush is your best friend here. It’s designed for creating those razor-sharp lines. The trick is to dip only the first third of the bristles into the paint and then use long, steady strokes with light pressure. This helps you avoid overloading the surface and leaving behind those telltale brush marks.

Rolling: The Go-To for Large, Flat Areas

If you’re facing a big, flat surface like a commercial roll-up door, a large metal gate, or siding panels, a roller will be your most efficient option. But not just any roller will do—the roller cover (or nap) is everything.

  • Smooth Metal: For a perfectly smooth surface, grab a short-nap roller, something in the 1/4" to 3/8" range. This gives you great coverage without laying the paint on too thick, which is key to avoiding drips and getting a clean, uniform look.
  • Textured or Corrugated Metal: If your surface has some texture, like corrugated siding, you’ll want a slightly thicker nap of around 1/2". This ensures the paint gets into every groove and valley for complete protection.

Spraying: For the Ultimate Flawless Finish

For that pristine, straight-from-the-factory look, you simply can't beat spraying. This is the method we use for most of our commercial painting services near me, especially on large-scale projects. High-Volume, Low-Pressure (HVLP) or airless sprayers atomize the paint into a fine mist, which lays down in a perfectly even layer without a single brush or roller mark.

Of course, professional spray equipment requires maintenance to perform at its best. If you're managing your own gear, knowing about topics like choosing the right pump repair kit for your airless sprayer is essential for keeping your projects on track.

Even aerosol spray cans can give you a great finish on smaller jobs. The secret is to keep the can moving in smooth, overlapping passes about 8-12 inches from the. Always apply several thin coats rather than one thick one to prevent runs.

No matter which tool you use, the golden rule is this: thin, even coats are always better. It might feel slower, but two or three thin coats will cure harder, look smoother, and last significantly longer than one thick, heavy coat that's prone to sagging and drips.

When to Call a Professional for Your Painting Project

Let's be honest, not every metal painting job is a good fit for a DIY weekend. While tackling a small fence or some outdoor furniture can be rewarding, knowing when to call in a professional is the real key to a great result that protects your investment.

Sometimes, the scale, complexity, or materials involved just demand a professional touch. For both homeowners and facilities managers, making that call can be the difference between a finish that lasts for years and one that fails before the next season. It's less about whether you can do it and more about whether you can do it safely, efficiently, and to a standard that protects your property.

Large-Scale and Complex Projects

The most obvious sign it's time to look for professional painting and construction services is the sheer size of the job. Are you thinking about painting the entire metal siding of a commercial building, a huge warehouse, or an extensive metal roof? This is where a DIY approach quickly becomes impractical and, frankly, unsafe.

Professional crews have this down to a science. They arrive with commercial-grade sprayers for a perfectly uniform coat, along with the proper scaffolding and aerial lifts to safely reach every corner. A coordinated team can get a massive project done in a fraction of the time, minimizing disruption to your business. This is especially critical for projects involving large-scale facility construction services.

Specialized Coatings and Finishes

Some projects require coatings that you just can't find at the local hardware store. When you step into the world of industrial-grade finishes, it’s time to bring in someone who handles them every day.

We see this all the time with:

  • Two-Part Epoxies: These are fantastic for high-traffic floors or commercial kitchens, but they require precise mixing and have a very short window for application. Get it wrong, and the product won't cure.
  • Specialty Urethanes: Perfect for providing UV resistance on exterior architectural metal, but they can be tricky to apply without streaks or bubbles.
  • Complex Commercial Renovations: Jobs like retail build-outs or an office space renovation often have strict specifications for durability and performance that only professional-grade products can meet.

A seasoned professional has the muscle memory that comes from working with these demanding products. They know exactly how to prep the surface, the right application technique for a flawless finish, and how to manage curing times to ensure the coating performs exactly as it's designed to.

The Value of Local Expertise

Here in our community, the perpetually damp climate is the ultimate test for any paint job. This is where a local professional's experience becomes invaluable. They’ve spent years seeing what works—and what doesn't—in our soggy environment.

A local contractor who truly understands the weather knows which primers are essential for fighting off relentless moisture and how to time an application so it cures properly, even on a cool, overcast day.

Partnering with an experienced local team like Wheeler Painting isn't just about hiring painters; it's an investment in a guaranteed, long-lasting result. You’re getting peace of mind and protecting your property from the costly cycle of paint failure and repairs.

Frequently Asked Questions About Painting Metal

After years of serving homeowners and businesses in our area, we’ve found that the same few questions come up on almost every job. Everyone wants to know how to get a paint job that lasts. So, let's clear up some of the most common concerns.

Can I Just Paint Over Rust?

It’s tempting, we get it. You see a little rust and think a quick coat of paint will hide it. But this is probably the single biggest mistake you can make.

Painting over rust is like putting a small bandage on a serious wound. The rust won't stop growing just because it's covered. It will continue to eat away at the metal underneath, causing your brand-new paint to bubble, crack, and flake off in no time. You'll be right back where you started, but with a bigger mess.

The only way to get a lasting finish is to deal with the rust head-on. You have to remove every bit of loose, flaky rust with a wire brush, scraper, or sander. For really stubborn areas, a rust converter can be a lifesaver—it chemically changes the rust into a stable, paintable surface. Only then, once the surface is clean and sound, can you even think about priming.

What’s the Best Paint for Outdoor Metal?

In our damp climate, choosing the right paint is all about fighting off moisture. There’s no single "best" paint—the right choice depends entirely on what kind of metal you're working with.

  • For Steel or Wrought Iron: We almost always lean toward a direct-to-metal (DTM) oil-based enamel. These create a tough, rock-hard shell that’s fantastic at blocking moisture and preventing rust from starting.
  • For Aluminum: You'll want to go with a high-quality acrylic latex paint. Aluminum expands and contracts a lot with our temperature swings, and acrylics are flexible enough to move with it without cracking.

No matter which paint you choose, the real secret to success is the prep work. A thorough cleaning followed by the right primer—a rust-inhibiting one for steel and a self-etching one for aluminum—is what makes the topcoat stick and gives you that long-term protection.

Do I Always Need to Use a Primer on Metal?

Yes. Pretty much always. Skipping the primer is the most common shortcut we see, and it’s almost always the reason a metal paint job fails. Primer does two critical jobs: adhesion and protection.

Metals like aluminum and galvanized steel are notoriously slick, and paint has a hard time grabbing on. A self-etching primer actually bites into the metal, creating a perfect surface for your paint to adhere to. For iron and steel, a rust-inhibiting primer acts as your frontline defense against corrosion, which is a constant battle in our local climate.

We get asked about "paint-and-primer-in-one" products all the time. While they have their place for certain indoor projects, they simply don't offer the same level of grip or long-term protection as a dedicated primer coat, especially for anything that lives outside.

How Long Does Professionally Painted Metal Last?

This depends on a few things: the quality of the prep work, the specific coatings used, and how much abuse the metal takes from weather and use.

For a professionally painted exterior metal surface in our region, you can realistically expect the finish to last anywhere from 5 to 15 years. For example, a commercial steel door we coat with a high-performance two-part epoxy might look great for over a decade. A decorative wrought iron railing painted with a standard enamel, on the other hand, will probably need a refresh in about 5-7 years.

A little maintenance, like annual cleaning, can go a long way in getting the most life out of any paint job.


For residential or commercial construction projects big or small, having a professional handle the job ensures the prep is done right and the finish is built to last. If you're considering a painting or renovation project for your property, the team at Wheeler Painting is here to help our community.

Get Your Free Estimate from Wheeler Painting